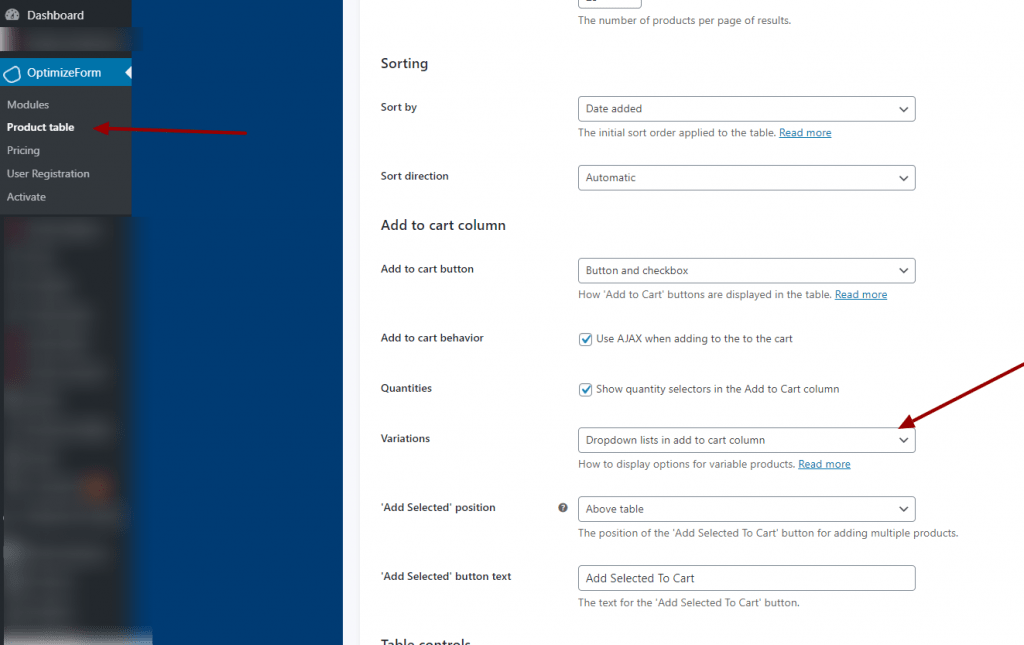
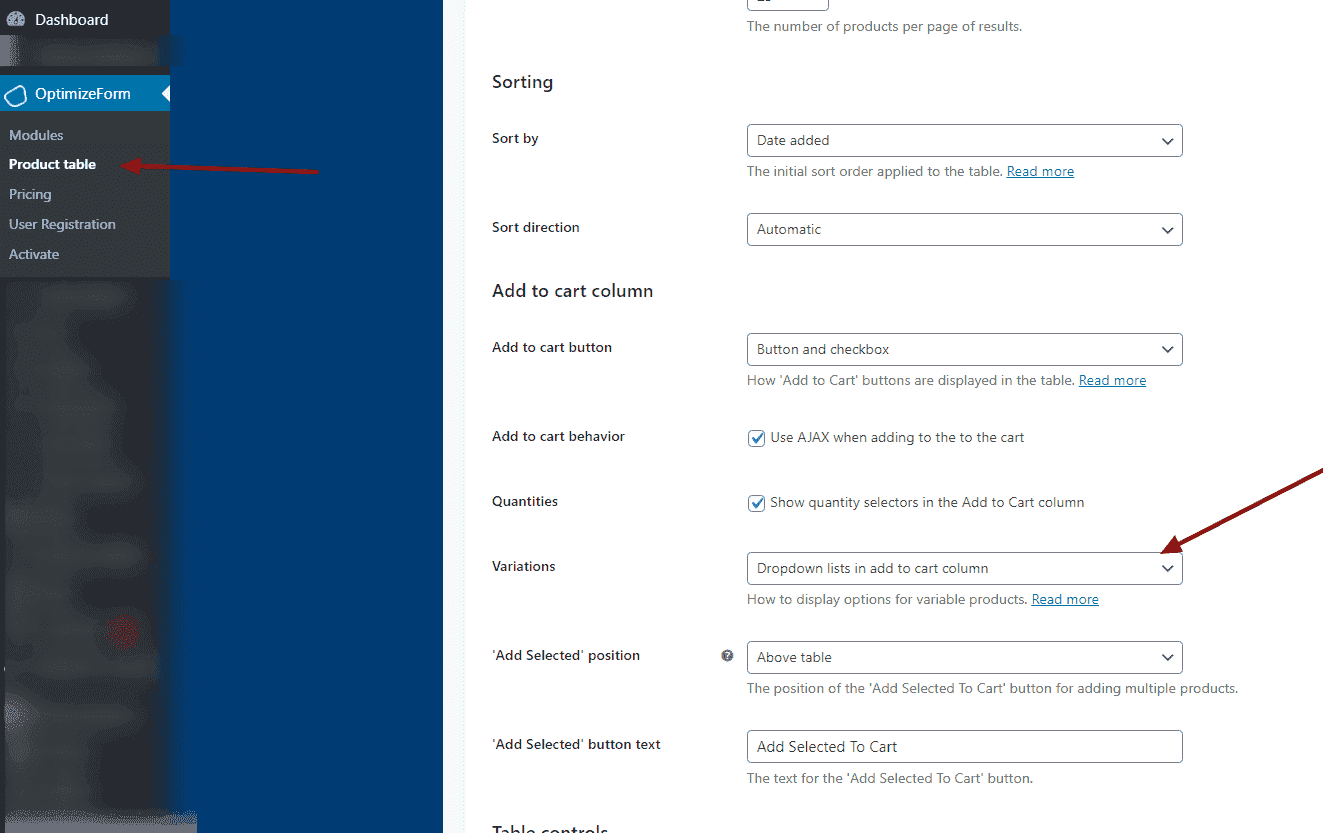
Here is a full list of what you can do with OptimizeForm Product Table, which can you can use these to configure the [product_table] shortcode in many different ways.
Note: where you see the * it indicates that specific option can be set as defaults on the plugin settings page. Other options can only be controlled directly in the product table shortcode.
On This Page
- 1 Columns
- 2 Add to cart
- 3 How to filter which products appear in the table
- 4 Custom taxonomy columns
- 5 Dates
- 6 Table size
- 7 Sorting
- 8 Filtering / searching
- 9 Elements above & below the table
- 10 Images
- 11 Content
- 12 Mobile visibility & responsive options
- 13 Performance
- 14 Miscellaneous
- 15 Product table shortcode examples
Columns
columns=""* – sets the columns in the table. The available columns are:sku,id,name,description,short-description,date,categories,tags,image,reviews,stock,weight,dimensions,price,add-to-cart, andbutton- To change the name of a column you can do this by adding a : (colon) after the column name.
Add to cart
cart_button* – sets the style of the add to cart buttons
Currently there are 3 options to choose from:
button – this is the defualt option
checkbox – this displays a checkbox on the table where the add to cart button would normally be displayed.
button_checkbox – with this option you get the best of both worlds a checkbox and also a button.
For example:
[product_table columns="name,price,add-to-cart" cart_button="button"][product_table columns="name,price,add-to-cart" cart_button="button_checkbox"][product_table columns="name,price,add-to-cart" cart_button="checkbox"]
show_quantity* – shows or hides the quantity selector next to the add to cart button
By default, the quantity selector is set to hidden. You can change this via your options settings or set show_quantity to true or false.
For example: [product_table show_quantity="true"]
variations* – controls how variable products appear in the table
There are 3 ways in which you can allow your customers to choose their product variations.
Option 1 dropdown lists
You can select this as a default setting in the main OptimizeForm product table settings page or add variations="dropdown" to the product table shortcode.

Option 2 – List each variation on its own row
You can select this as a default setting in the main OptimizeForm product table settings page or add variations="separate" to the product table shortcode.
Example: [product_table columns="name,price,add-to-cart" variations="separate"]
Option 3 – Select variations on the single product page
This is the default option and therefore don’t need to do anything else if you have not selected either option 1 or 2 on the main OptimizeForm product table settings page
ajax_cart* – disables or activates ajax add to cart behaviour
You have the option to enable or disable the ajax add to cart function. If the set the ajax_cart=”false” the will cause the page to refresh each time a user add something to their cart.
For eample: [product_table ajax_cart="false"]
add_selected_button* – controls the location of the ‘Add Selected to Cart’ button
If you choose to use the checkbox or button_checkbox add to cart button style then an “Add Selected to Cart” button will automatically display above and/or below the product table.
You have the option to select whether the “Add Selected to Cart” appears above/below the table or in both location.
For example:
[product_table cart_button="checkbox" add_selected_button="bottom"]button_text– changes the button text if you are using the button column to show a link to the single product page
To change the button text from the default “Show details” text you can do so from the main OptimizeForm product table settings page or add button_text="Your New Button text here" to the product table shortcode.
How to filter which products appear in the table
You can segment the products on your table in numerous ways which are documented below. Please note this type of control can only be added directly to the shortcode.
Categories / tags / terms / custom fields
You can specify whether to display multiple categories in the table – either separated by commas or by a plus sign (+). Using commas means “products in this category OR that category”. Using a plus means “products in this category AND that category”. You can’t mix and match commas and pluses – you have to use one or the other.
category="enter category slug or id here"– lists products from a specific categorytag="enter tag slug or id here"– lists products with a specific tagterm="enter term here"– lists products with a specific custom taxonomy termcf="field name– lists products with a specific custom field value. For example::field value " [product_table cf="color:blue,color:red"]That would only show products that are either blue or red.
Custom taxonomy columns
To add taxonomies to your table use the format tax:<insert taxonomy slug> in the columns option. This will display a custom taxonomy in a column of your product table.
So, for example, to display for a custom taxonomy with the slug portfolio_type, you would use:[product_table columns="name,description,tax:portfolio_type"].
Exclude / include
exclude="enter ID of the product you want to exclude here"– excludes specific products from the table based on IDinclude="enter ID of the product you want to include here"– lists specific products in the table based on IDexclude_category="enter ID of the category you want to exclude here"– excludes entire categories of products from the table
Product status
status=" enter product status here"– lists products with a specific post status for example: [product_table columns=”name,price,add-to-cart” status=”publish,draft”]
Dates
You can specify whether to display products in the table based on the date they were published in the table – either separated by commas or by a plus sign (+). Using commas means “products in this year OR that year”. Using a plus means “products in this year AND that year”. You can’t mix and match commas and pluses – you have to use one or the other.
year="insert year here"– lists products published in a specific yearmonth="insert month here"– lists products published in a specific month in numerical format.day="insert day here"– lists products published on a specific day of the month in numerical format.date_format="insert day here"– sets the date format for any date columns. For example:[product_table columns="name,date,price" date_format="F j, Y"]See the WordPress Codex for more information.date_columns="insert day here"– specifies which columns contain dates, so that the column can be sorted by date correctly
Table size
rows_per_page* – sets the number of products on each page of the tableproduct_limit* – sets the maximum number of products that can appear in the table
Sorting
sort_by* – controls how the products are sorted when the table first loads. You can select this as a default setting in the main OptimizeForm product table settings page or addsort_by="insert what you wnat to sort by here"to the product table shortcode.
You can sort by the following options:
- name
- menu_order
- id – sort by product id
- sku – sort by product sku code
- price – low to highest
- popularity – the number of sales
- reviews – the average customer review
- date – the date the product was first added to the store
- modified – the date the product was last updated
- rand – random sorting
sort_order* – sorts the table in ascending(asc) or descending(desc) order. For example[product_table columns="name,price,add-to-cart" sort_by="price" sort_order="asc"]
Filtering / searching
filters* – You can set the filter that displays above the table via a filter dropdown list from the main OptimizeForm product table settings pagesearch_term="insert search term here"– You can filter the products on the table by search term when it loads. for example: [product_table search_term=”dresses”] would show all dresses on the table.search_on_click="true or false here"– controls whether clicking on a category, tag or custom taxonomy will filter the table or link to the relevant archive page
Elements above & below the table
search_box* – shows, hides or positions the keyword search boxreset_button* – shows, hides or positions the reset linkpage_length="Enter location here i.e top"* – This allows users to specify the amount of product to display per page. You can control the location on the table in which this is shown. Choose from top, bottom, both or false to hide it.totals* – This allows you can to control the location on the table in which this is shown. Choose from top, bottom, both or false to hide it. For example “Showing 1 to 10 of 50 products”)pagination="Enter location here i.e top"* – shows, hides or positions the pagination buttons, for example previous, next etc… Choose from top, bottom, both or false to hide it.paging_type="Enter location here i.e top"* – sets the pagination style
Aviliable options:
numbers – page numbers only
simple – ‘Previous’ and ‘Next’ only
simple_numbers – ‘Previous’ and ‘Next’ buttons, plus page numbers (the default)
full – ‘First’, ‘Previous’, ‘Next’ and ‘Last’ buttons
full_numbers – ‘First’, ‘Previous’, ‘Next’ and ‘Last’ buttons, plus page numbers
no_products_message– controls the text that appears if no products are found when the table first loadsno_products_filtered_message– controls the text that appears if no results are found when a user searches or filters the table
Images
image_size=""* – sets the size of product images in the table. You can use any standard image size (e.g. thumbnail, medium, large, etc), or one or two numbers to denote the width and height for the image.
For example: [product_table columns=”image,name,description” image_size=”medium”]
For an image 160 pixels wide by 200 pixels high:[product_table columns=”image,name,description” image_size=”160×200″]
lightbox="insert true or false here"* – control whether your images open in a lightbox when users click an image. This can be set in the plugin default settings or via the product_table shortcode.
Content
description_length="insert the number of words to limit description by here"* – sets the length of the description columnshortcodes="insert true or false here"* – With this option, you can display shortcode and embeds such as videos, mp3 files and more in the product table. Set on in global settings.links="insert element to make clickable or set to none"* – allows you to make a certain element on your table clickable for example yoursku,name,categories,tags,attributes, anycustom taxonomy, andimage.
Mobile visibility & responsive options
Learn more here: https://aovup.com/kb/table-responsive-options/(opens in a new tab)
priorities– controls which columns are hidden on screen sizes when there are too many to fit on the pagecolumn_breakpoints– choose which columns are shown/hidden on different screen sizes and devicesresponsive_control– controls the + icon which shows hidden rowsresponsive_display– sets whether hidden rows are visible or hidden, or open in a modal window
Performance
lazy_load* – improves performance by loading the overall page before the product table, and loading 1 page of products at a timecache– whether to use caching to speed up table load time
Miscellaneous
widths– sets the width of each columnwrap="insert true or false here"– controls whether or not content is wrapped onto multiple linesshow_footer* – shows or hides the footer row of the table set at the global level or by editing the product shortcode define true or false to enable or disable footer label.scroll_offset="insert a numeric number here"* – changes the height that the page scrolls to when you move between pages in the product tablenumeric_terms– fixes any issues if you’re using numeric slugs for your categories or taxonomies
Product table shortcode examples
To get you started, here are some popular examples of different ways to use WooCommerce Product Table.
Basic usage displaying all products (see below for full list of columns):[product_table columns="name,short-description,tags,price,add-to-cart"]
Display products from a single category (use the category slug or ID):[product_table columns="sku,name,description,tags,price,add-to-cart" category="ebooks"]
Display products from several categories. This example shows products in the “ebooks” category or the “audiobooks” category:[product_table columns="id,name,categories,price,add-to-cart" category="ebooks,audiobooks"]
Display products that belong to several categories. This example shows products that are in the “featured”, “course”, and “health” categories:[product_table columns="name,short-description,tags,price,add-to-cart" category="featured+course+health"]
Exclude products from a category. This example excludes products in the “clients” category:[product_table exclude_category="clients"]
Display product image. Defaults to 50 by 50 pixels, but you can specify a custom image size if you wish:[product_table columns="image,name,price,add-to-cart" image_size="80x80"]
Choosing custom column headings:[product_table columns="name:Product Name,reviews:Rated,date:Added On,price:Unit Price"]


