WooCommerce is a dynamic platform but to accept donations and give your donors an excellent experience, you need to use a third-party plugin like AovUp Product Add-Ons & Extra Options plugin.
In this guide, I’ll provide step-by-step instructions for setting up a seamless donation collection system on your website and share some helpful tips for accepting donations.
Without any further ado, let’s jump into it.
On This Page
- 1 Tips to Accept WooCommerce Payments
- 2 How to Accept WooCommerce Donations Easily?
- 2.1 1. Create a Donation Product
- 2.2 2. Create an Option Set
- 2.3 3. Add Predefined Donation Amounts
- 2.4 4. Configure the Option Display & Style
- 2.5 5. Allow Customers to Add Custom Donation Amount
- 2.6 6. Enable Direct Checkout
- 2.7 7. Add Custom Checkout Fields
- 2.8 8. Enable the Checkout
- 2.9 9. Final Results
- 3 Conclusion
Tips to Accept WooCommerce Payments
Here are a few valuable tips for accepting donations in WooCommerce:
1. Choose the Right Payment Gateway: Select a reliable payment gateway that supports donations and integrates seamlessly with WooCommerce. Popular options include PayPal, Stripe, and Square. Ensure the payment gateway you choose is trusted and offers a user-friendly experience for donors.
2. Create a Compelling Donation Page: Design a dedicated donation page on your website that clearly explains your cause, why donations are needed, and how they will be used. Use compelling visuals, such as images or videos, to evoke emotions and encourage donations.
3. Offer Multiple Donation Options: Provide donors with flexibility by offering multiple donation options, including predefined amounts and the ability to enter a custom donation amount. This allows donors to contribute according to their means and preferences.
4. Enable Recurring Donations: Allow donors to set up recurring donations to support your cause regularly. This can help you maintain a consistent flow of donations and provide donors with a convenient way to support your organization over time.
5. Express Gratitude and Transparency: Show appreciation to your donors by sending thank-you messages or emails. Be transparent about how donations are used and provide regular updates on your progress to build trust with your donors.
Following these tips can help you create a successful donation strategy in WooCommerce that engages donors and maximizes contributions to your cause.
Now, let’s dive in to accept the WooCommerce donations.
How to Accept WooCommerce Donations Easily?
To accept donations in WooCommerce, I’ll use the AovUp Product Add-Ons & Extra Options plugin. It will allow you to create predefined donation amounts and add a field to allow customers to donate any amount they want.
I’ll use the AIO Checkout plugin to improve the donor’s experience and get some additional information at the checkout.
Note: Make sure to download and install the AovUp Product Add-Ons & Extra Options plugin to follow along with this tutorial.
The following is the step-by-step process to achieve the final goal.
1. Create a Donation Product
The first thing you need to do is to add a new product to your store to get donations. Ensure the product you have added to your store is simple, and you do not create variations. This is because we’ll use the plugin to add options and variations.
I’ll add a new product to my store.
To do so, navigate to Products > Add New from the WordPress dashboard.
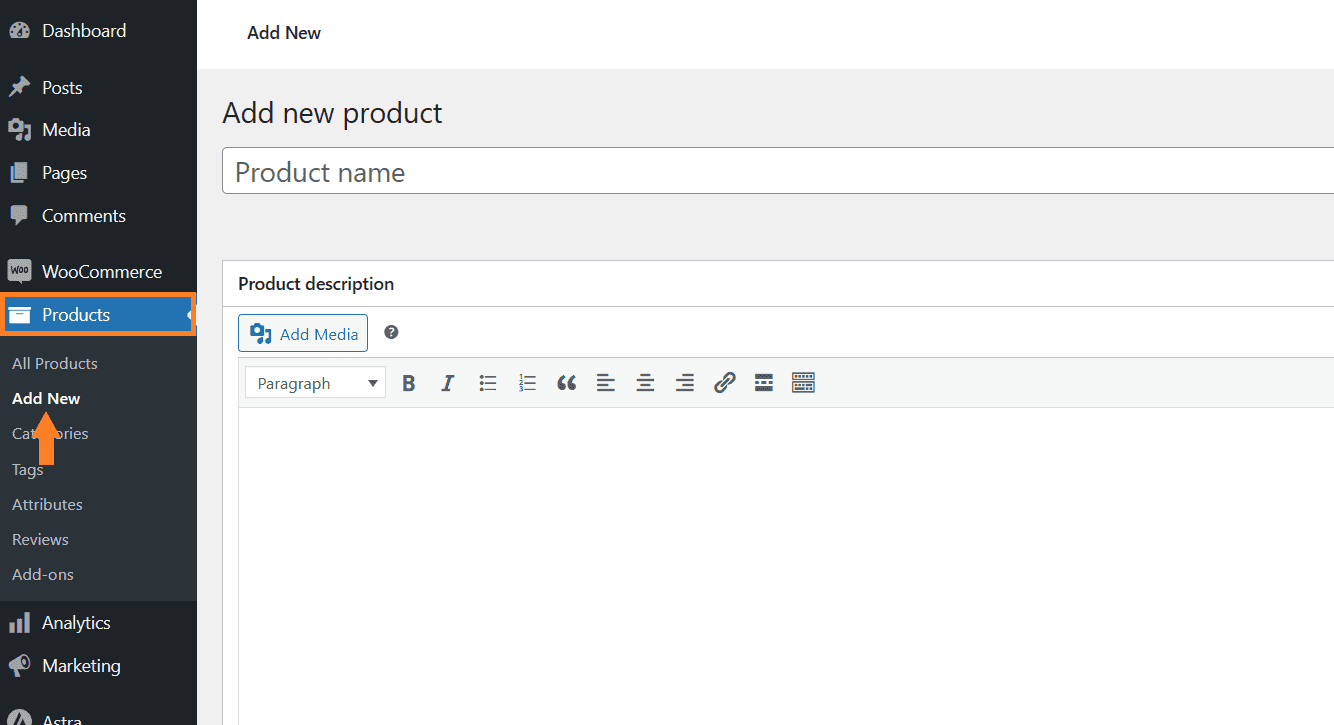
1.1. Add the Product Details
Once you click it, you’ll be redirected to the page where you can add the details and publish the product.
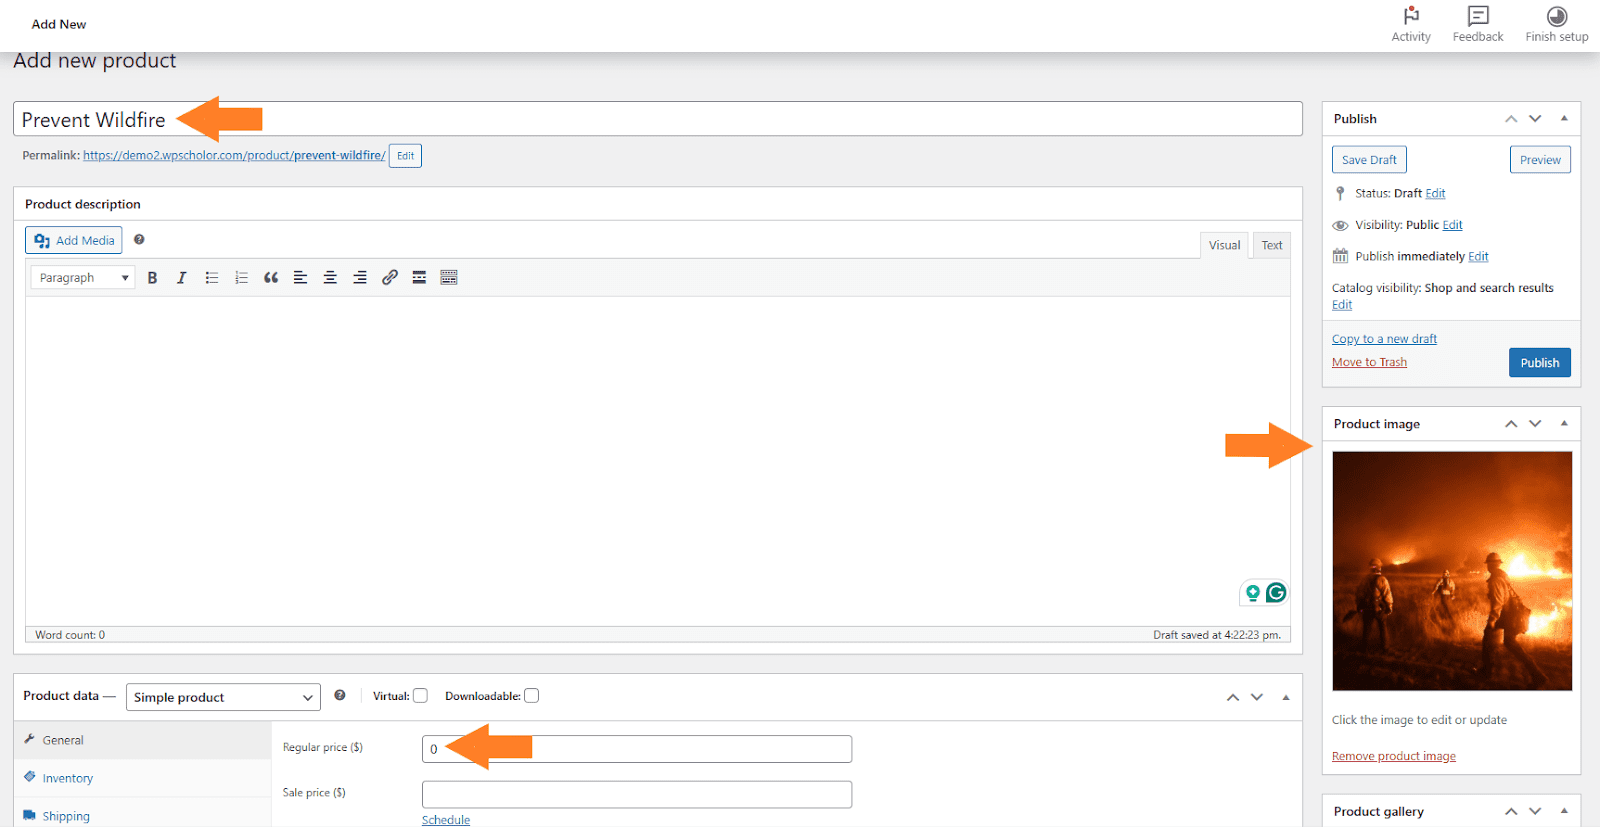
Create a simple product and add the product title, image, and price. You can also add a description if you want. There are several other options that you can configure from there.
Note: The price you’ll enter here will be the base price, and the options that we’ll create later in this article will have separate prices.
I have added the 0 as the base price as I’ll create predefined donation amounts.
Note: You can use the AovUp Subscriptions plugin to create a subscription donation product and allow customers to donate after every specific period.
1.2. Publish the Product
Once you have added the necessary details, click the blue ‘Publish’ button at the top right corner of your screen to publish the product.

2. Create an Option Set
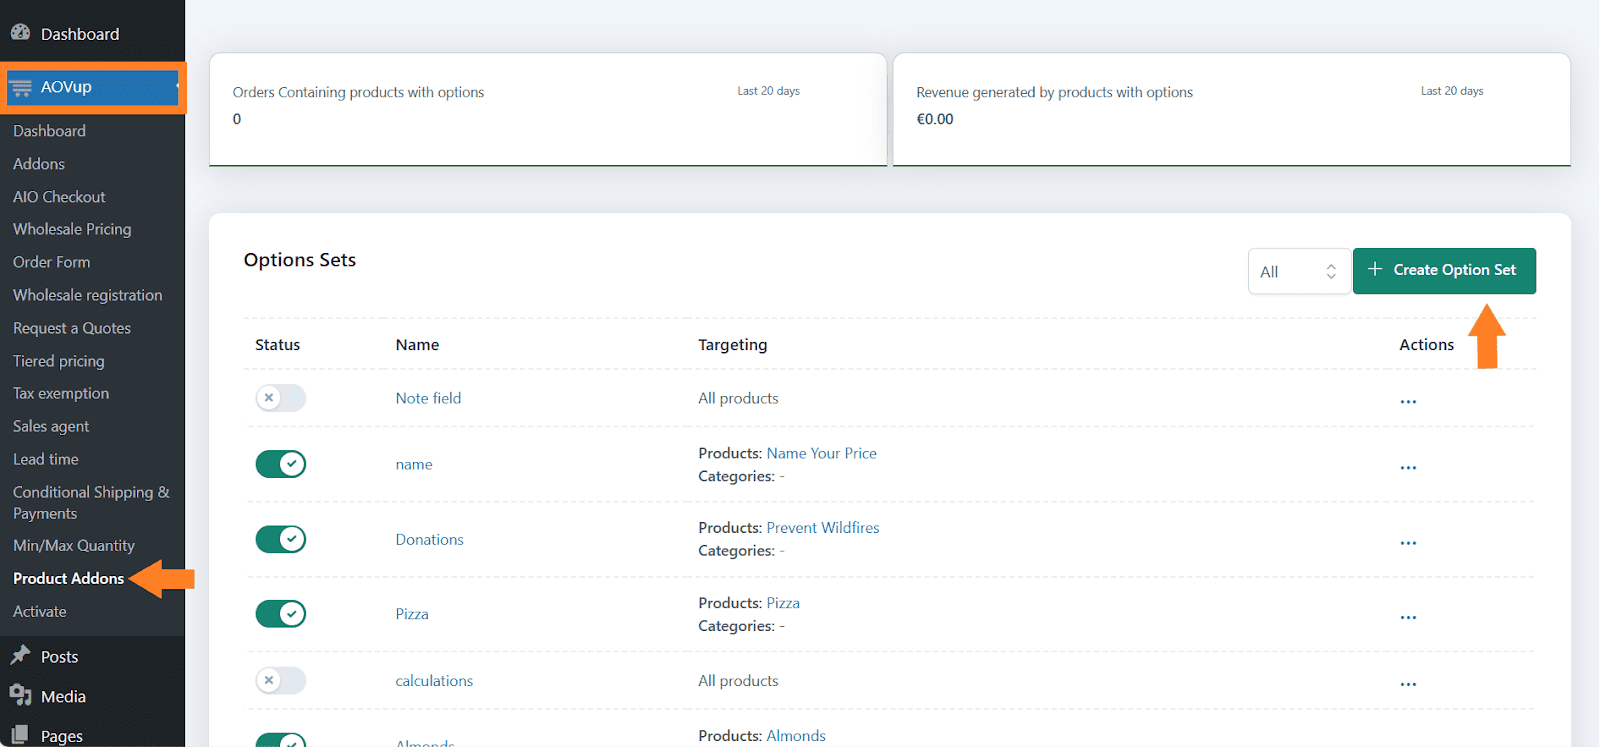
Now to accept donations, we need to add a few custom fields to the product we created. To do so, navigate to AovUp > Product add-ons from your WordPress dashboard and click the ‘Create Option Set’ button.
3.1. Add the Option Set Name
After clicking it, you will see a new interface with different settings. In the ‘Option set name’ field, add the name. It could be anything you want, but you may want to keep it as descriptive as possible.
It’ll help you if you are working with different option sets.
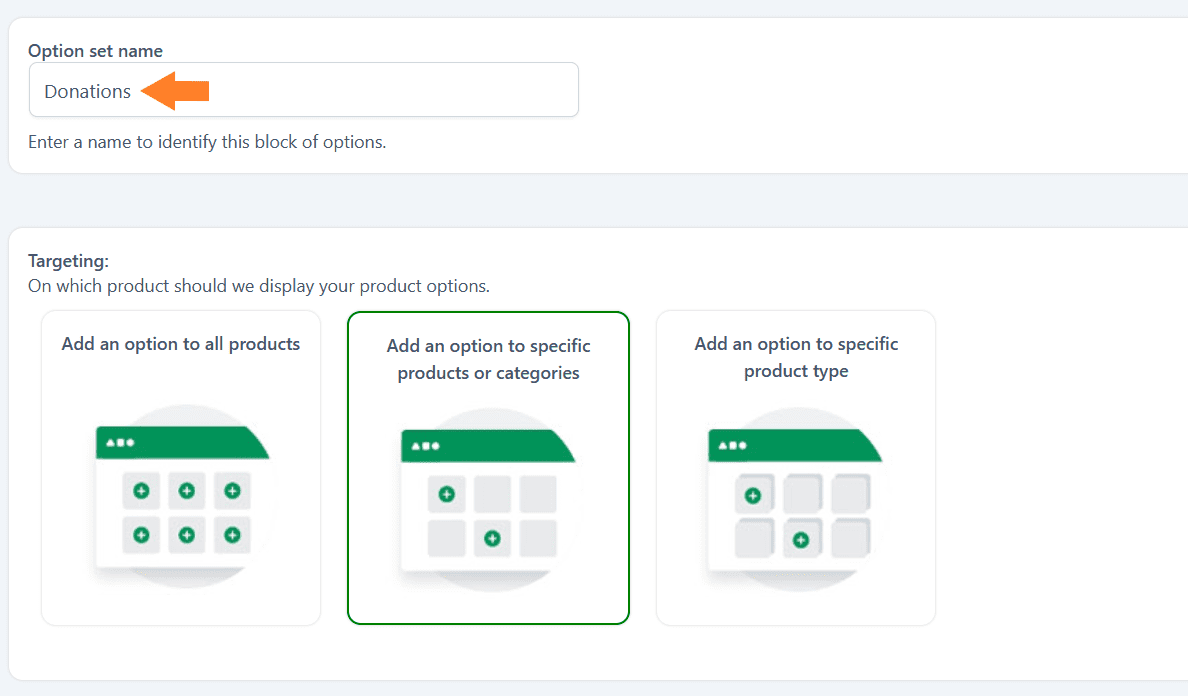
3.2. Select the Product
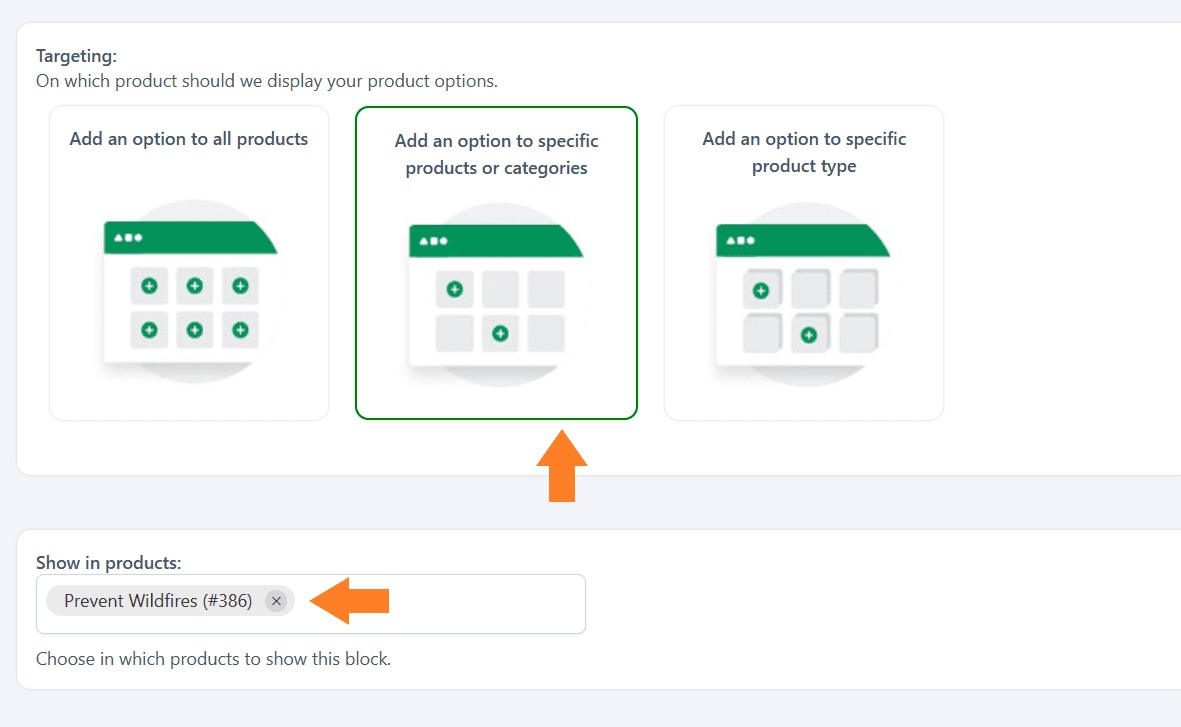
The next thing you need to do is select the products to which you want to display this option set. You have three different options:
- Add an option to all products.
- Add an option to specific products or categories.
- Add an option to a specific product type.
I only want to add this option to the donation product we created above.
- I’ll select the ‘Add an option/custom field to specific products or categories’ option by clicking its image.
- Once you select it, two new fields will appear below it, from which you can choose the products and categories. I have selected a product from the ‘Show in Products’ dropdown.
3. Add Predefined Donation Amounts
You can create predefined donation amounts and allow customers to select one of them and quickly donate the amount.
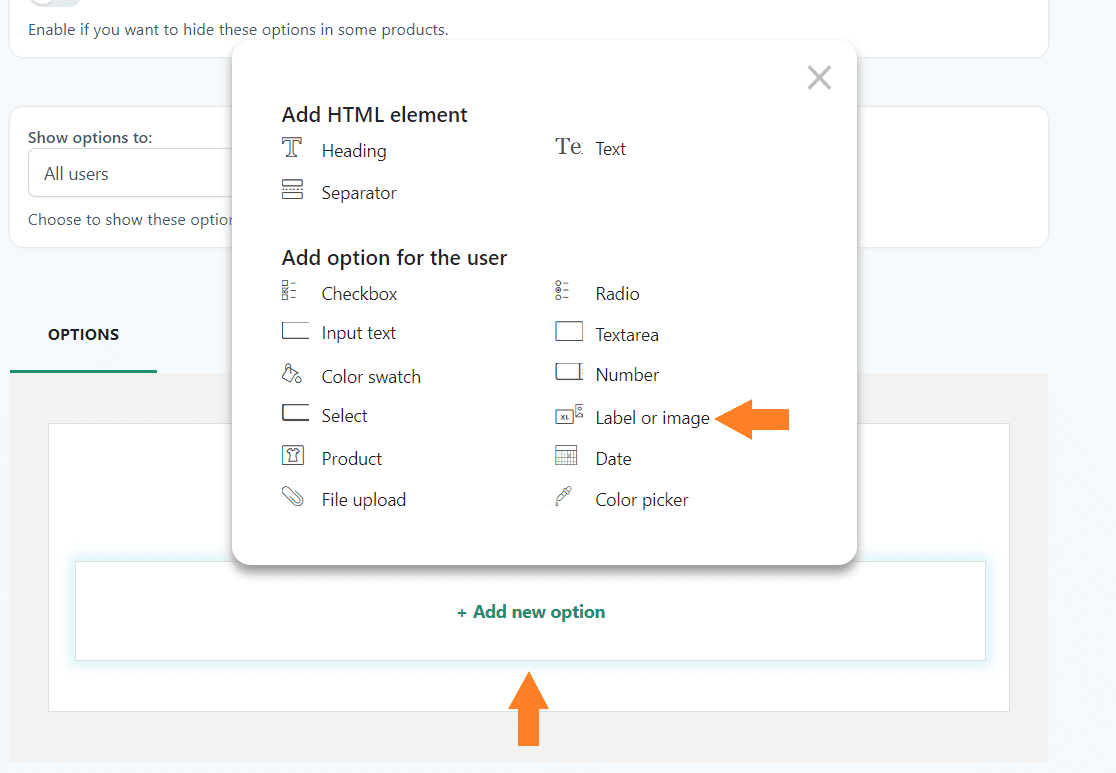
This plugin offers various options to fulfill your requirements and allows customers to personalize their products. The following is a list of fields or options you can add using this plugin.
- Heading
- Text
- Separator
- Checkbox
- Radio buttons
- Input text
- Textarea
- Color Swatch
- Number
- Select
- Label or image
- Product
- Date
- File Upload
- Color picker
- Formula
You can use different fields to create the predefined donation amounts. To add a field to this set, click the ‘Add New Option’ button at the bottom of the page and select the field you want to add.
I’ll add a Label or Image field to create predefined donation amounts.
3.1. Add the Field Title
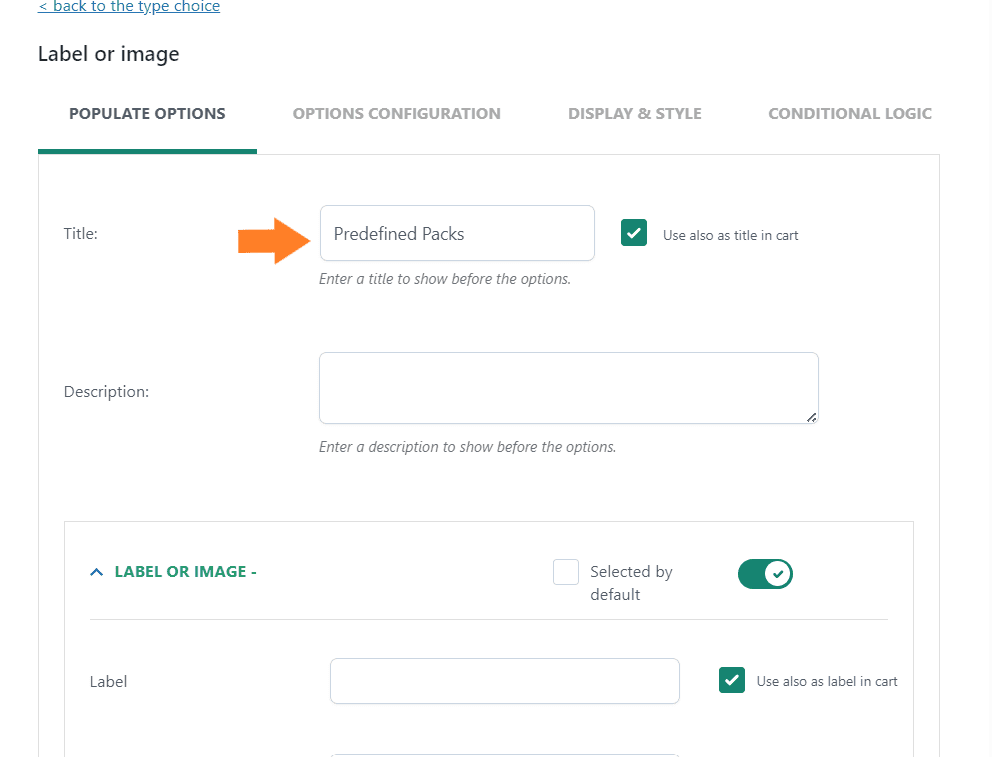
Once you select the field, a new popup will appear on the right side of your screen. From that popup, you can configure the field’s styling and other options.
These will be the same for most fields; following this tutorial, you can add any field.
First, add the field title in the ‘Title’ field. It will be displayed on the front end. You can also add the field description.
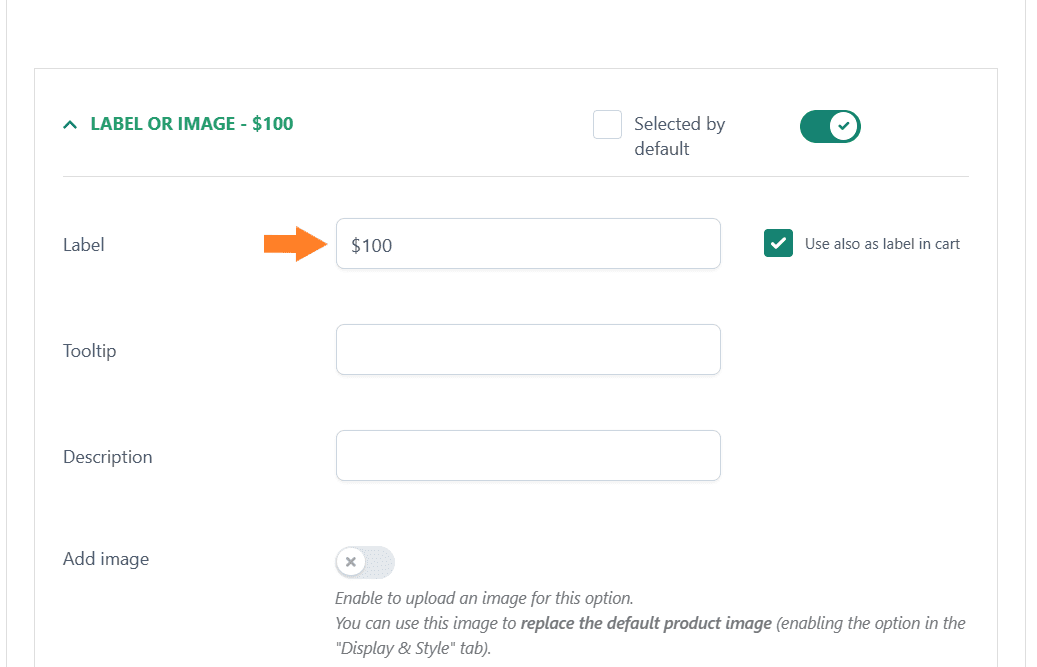
3.2. Add the Field Label
Next, add the label in the ‘Label’ field. I’ll add the predefined donation amount ($100) to it. This is the amount that users can quickly select and donate.
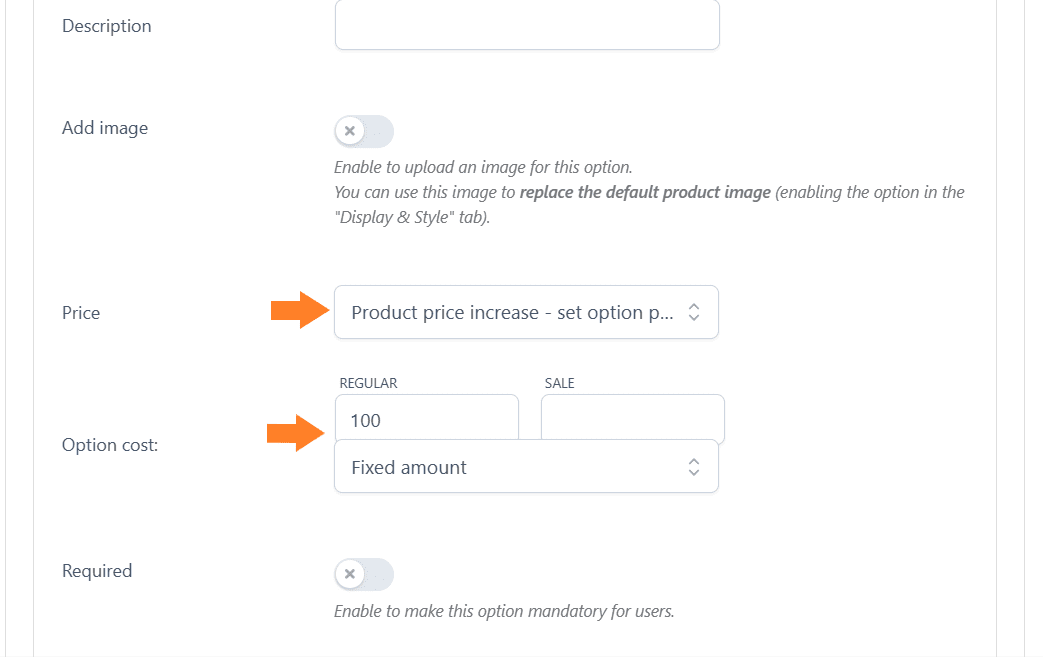
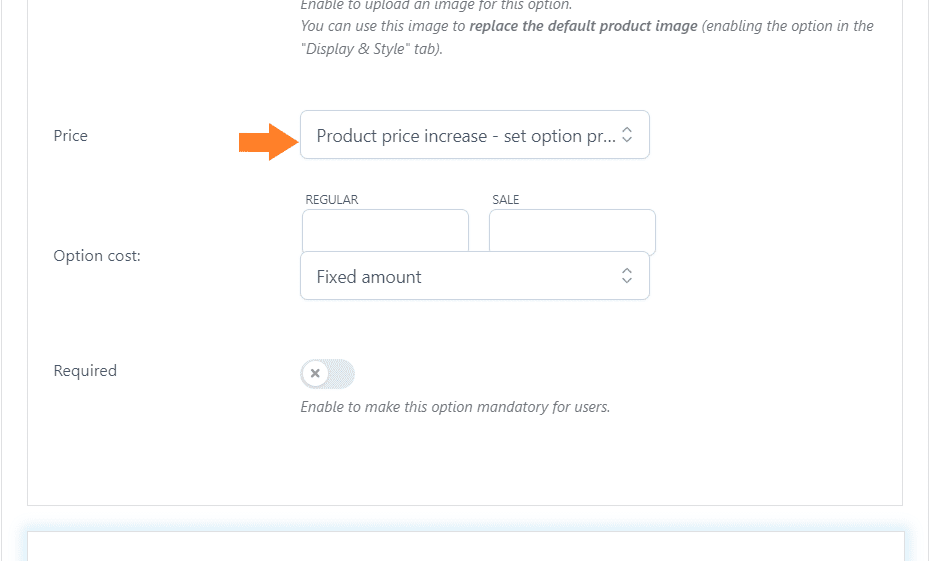
3.3. Set the Donation Price
To set the donation price or the price of the custom field, you will get three options:
- Product price doesn’t change – set option as free
- Product price increase – set option price
- Product price decrease – set discount
To create predefined donation amounts, I have selected the ‘Product price increase – set option price’ option from the price dropdown and added the price in the ‘Regular’ field.
3.4. Add More Predefined Donation Amounts
You can add multiple label or image fields in this option set. To add more predefined donation amounts, scroll to the bottom and click the ‘Add a new image or label’ button.
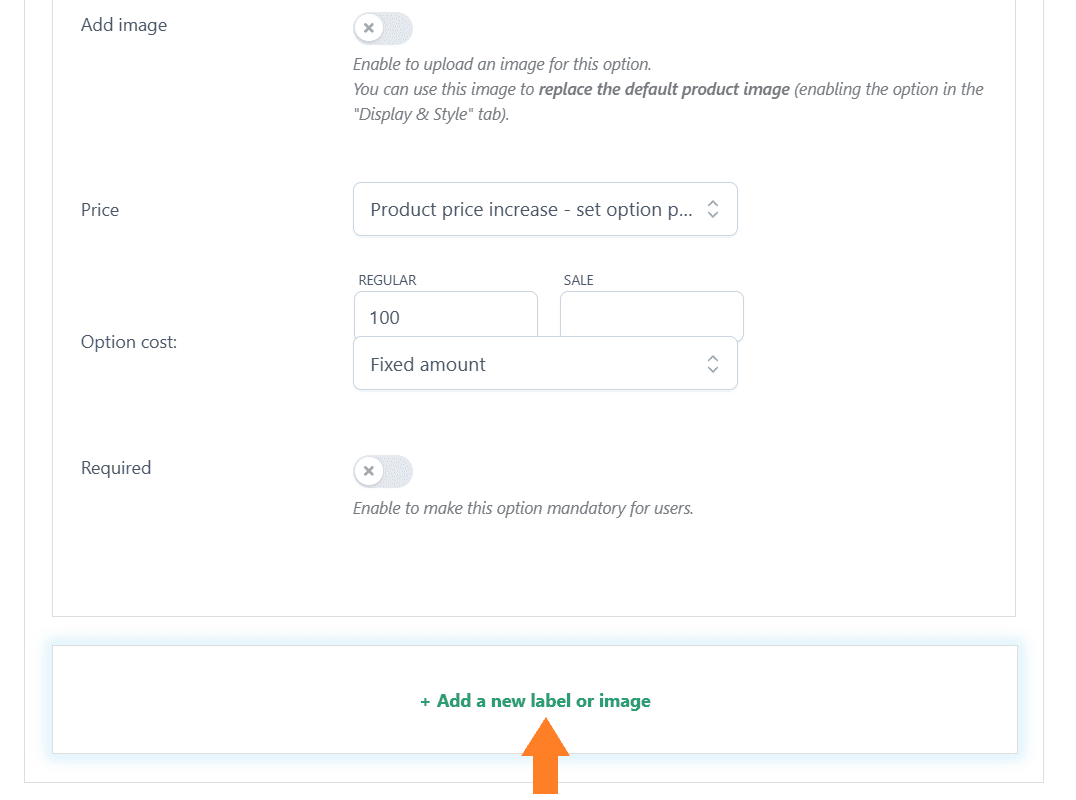
To configure it, you can follow the same steps as mentioned above. I have added two more predefined packs and set their pricing accordingly.
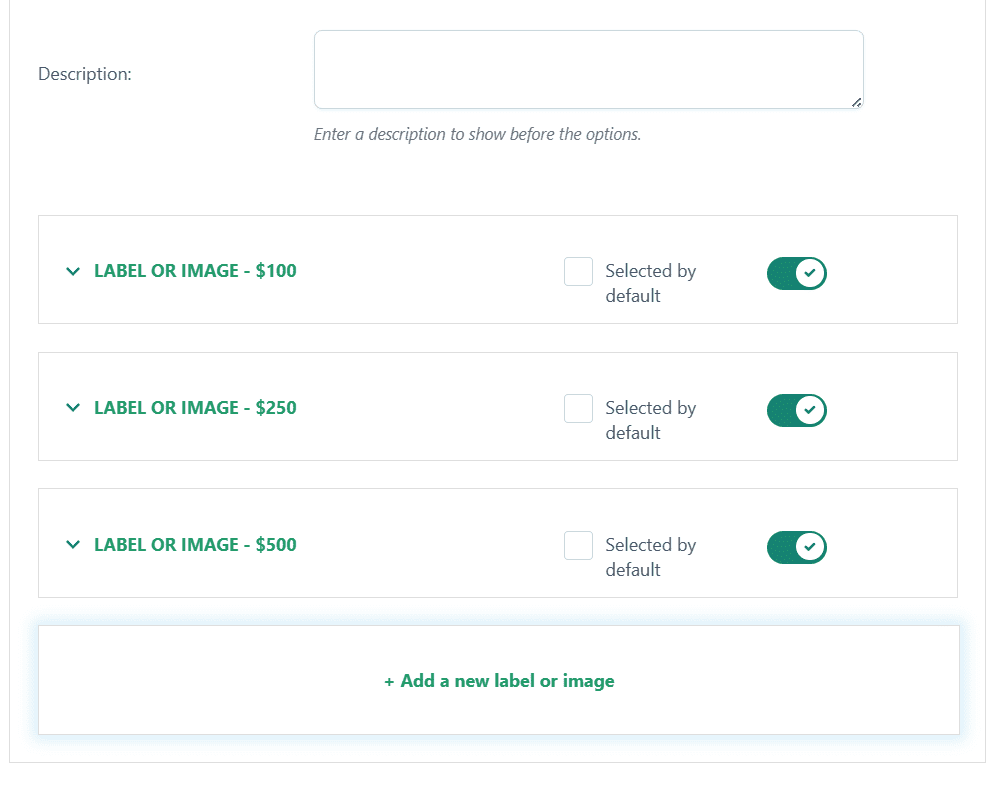
4. Configure the Option Display & Style
The above donation amounts we added using the label field, will display the label and its price in a rectangle. There will be two prices showing in it which might confuse the customers.
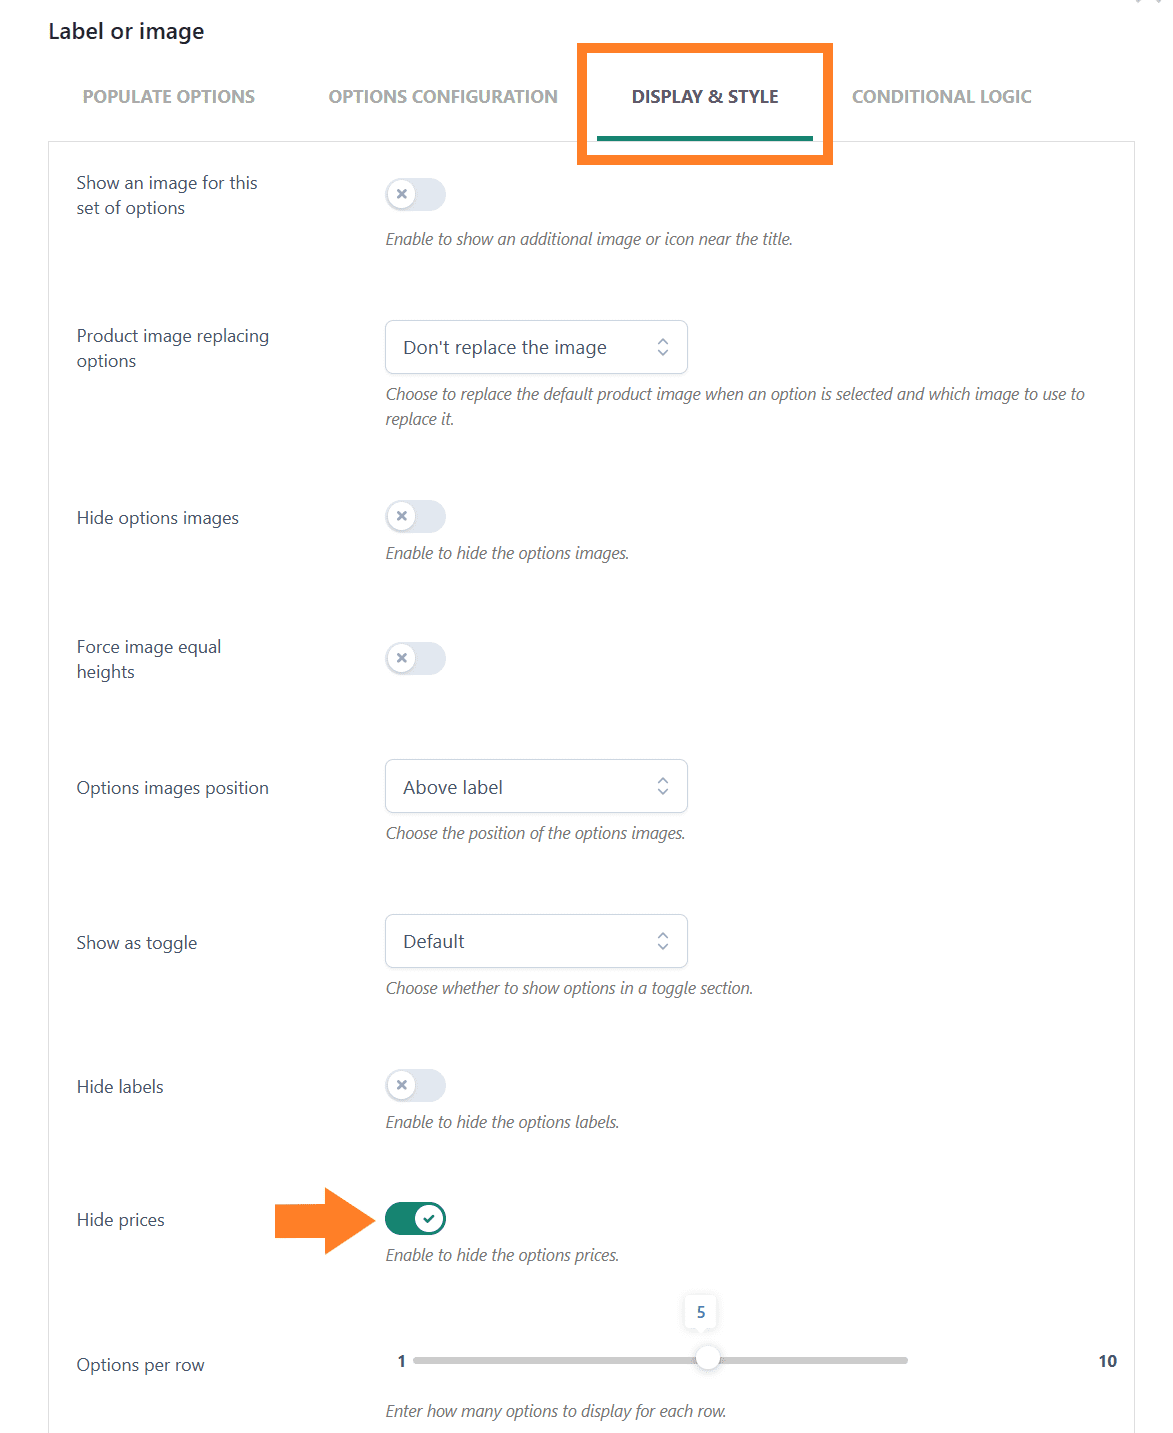
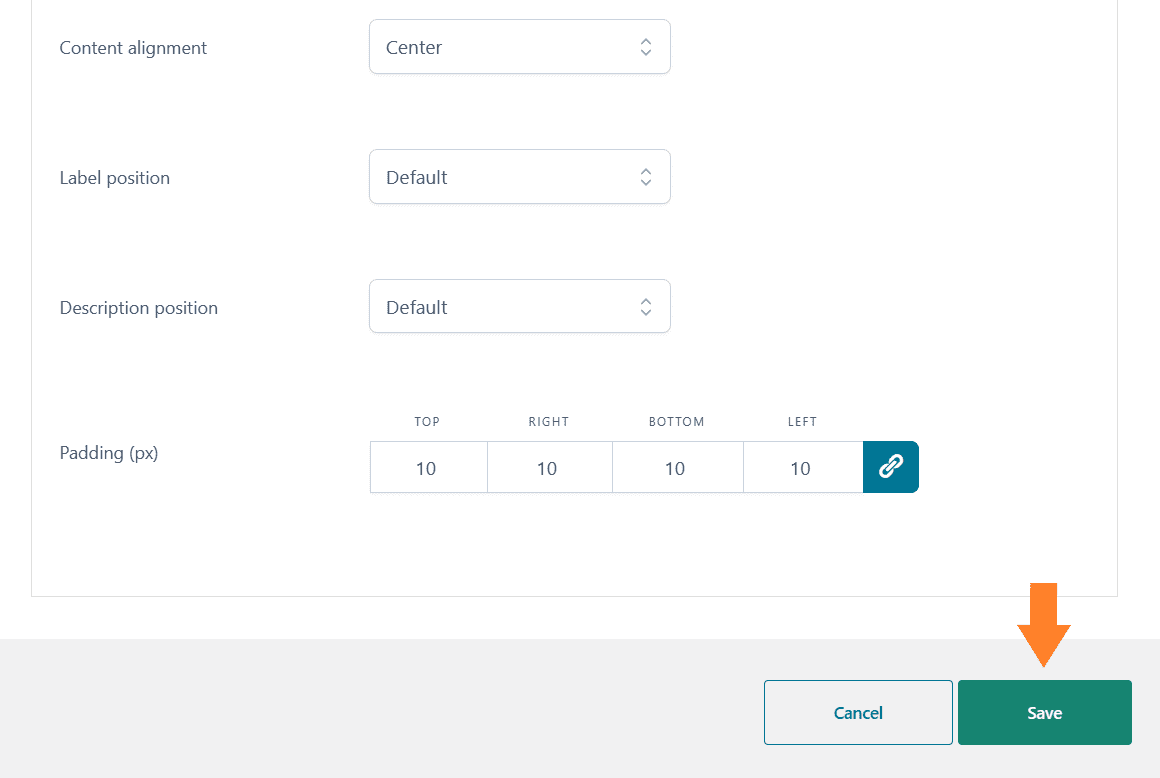
By customizing the field settings, you can hide the price and only display the label. Click the ‘Display & Style’ tab within the popup to do so. You’ll get several different styling options.
I’ll not go into the details of all the settings, you can explore them yourself. However, to hide the prices, toggle the ‘Hide Prices’ button to hide the option prices.
After making the required adjustments, don’t forget to click the ‘Save’ button within the popup to save the settings.
5. Allow Customers to Add Custom Donation Amount
Now, if you want to allow customers to donate a custom amount, you can easily do that with the help of this plugin. You can add a number field and multiply the user-added amount by 1.
This way, customers can donate the custom amount as well.
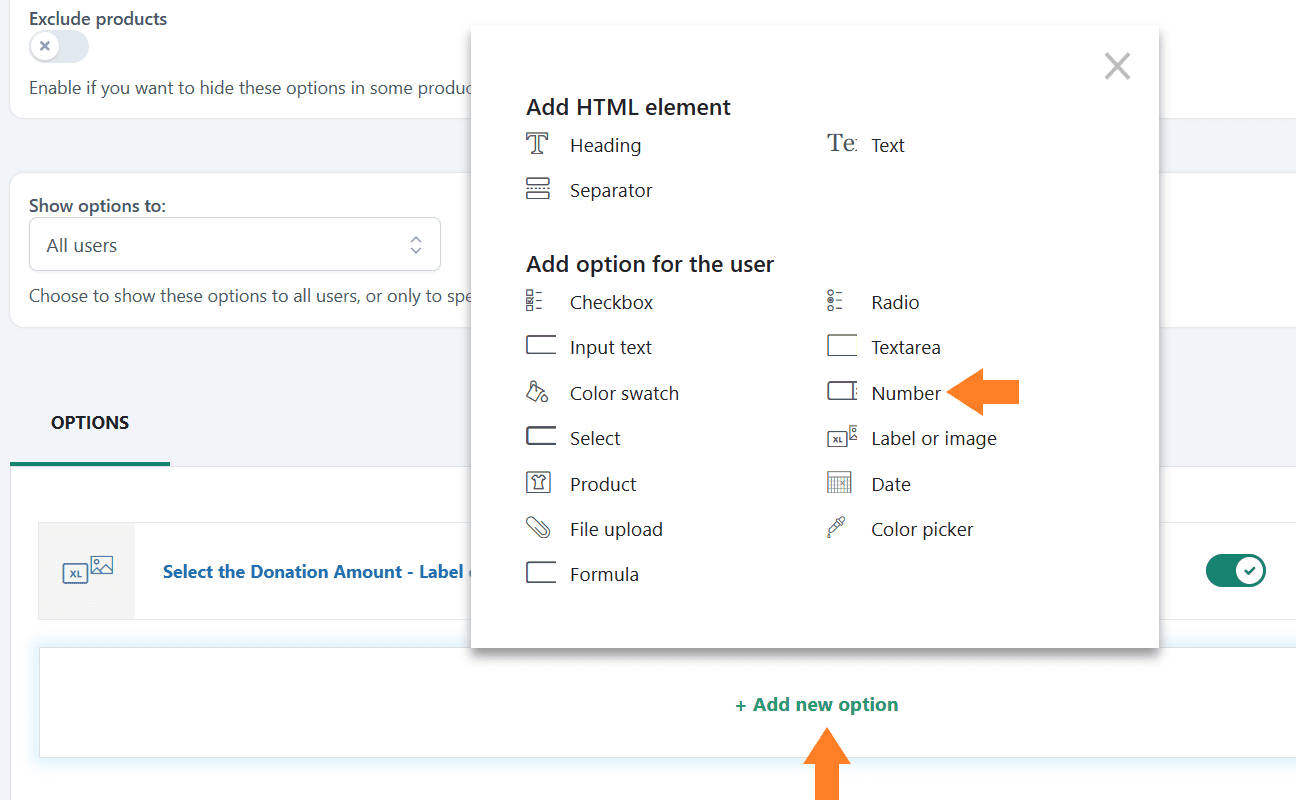
Once you save the field, you’ll be redirected back to the option set settings page. From there, click the ‘Add New Option’ and select the ‘Number’ field.
5.1. Add the Field Label
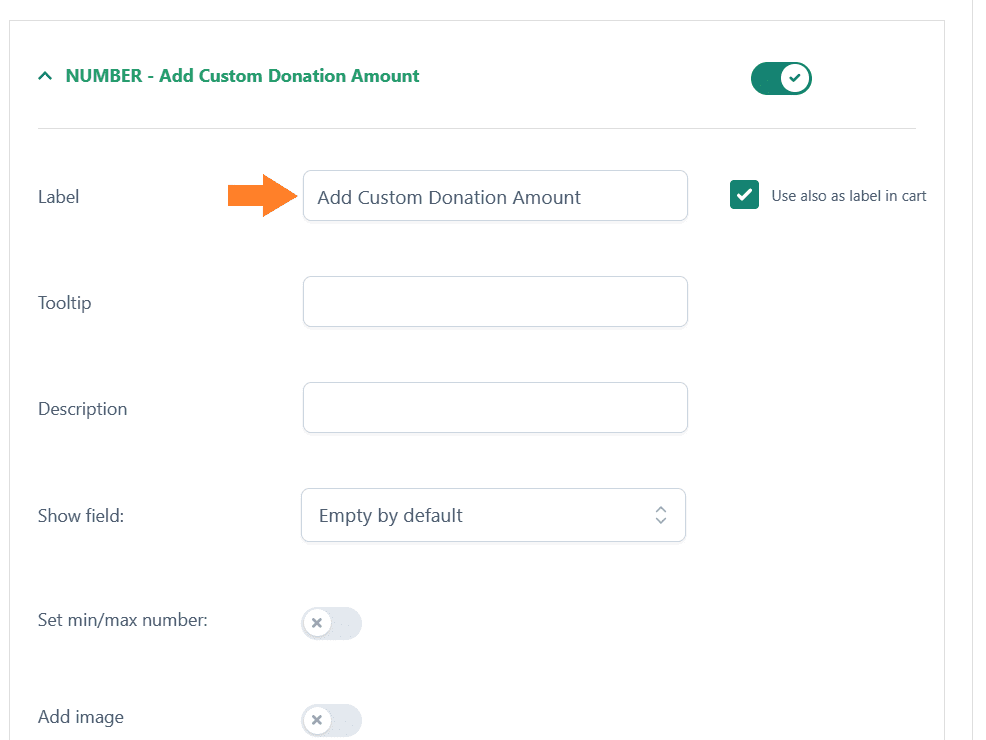
A new popup will appear on the right side of your screen. From that popup, you can configure the field’s styling and other options.
You can add the title of this set, but I’ll move to adding the field label in the ‘Label’ field. You can also add the tooltip and description.
5.2. Set Minimum and Maximum Allowed Price
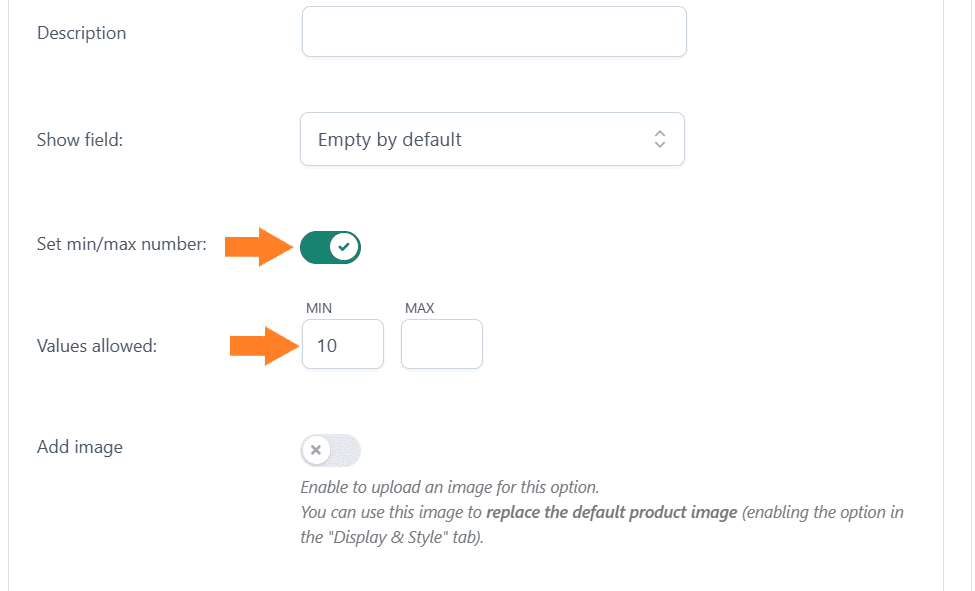
You may also want to set the minimum and maximum amount customers can donate. Fortunately, this plugin allows you to do that easily within a few clicks.
Toggle the ‘Set min/max numbers’ button and add the donation range in the designated fields. Customers will not be able to donate outside the specified range.
I have only added a minimum donation amount, meaning customers won’t be able to donate less.
5.3. Add Custom Donation Amounts
Next, to allow customers to donate any amount they want, you need to multiply the user’s added amount by 1 so the total will be the amount the user wants to donate.
To set the price for the number field, you will get four options:
- Product price doesn’t change – set option as free
- Product price increase – set option price
- Product price decrease – set discount
- Value multiplied by product price
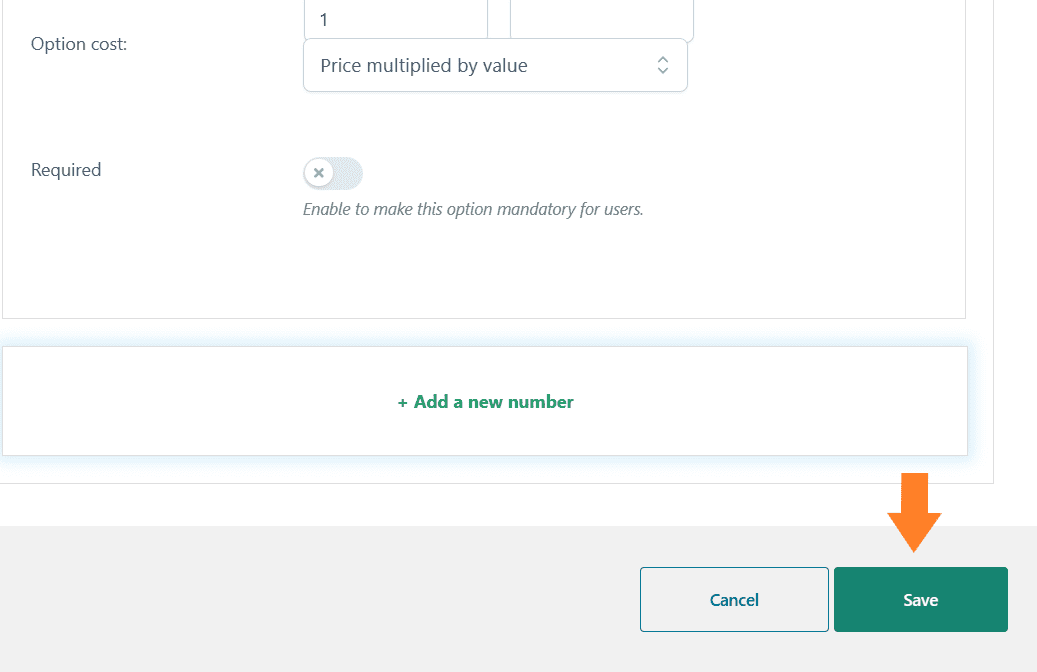
As we want users to donate any amount, select the ‘Product price increase – set option price’ option from the ‘Price’ dropdown.
Once selected, you can add the regular price in the designated field. From the option cost dropdown, you must also choose the ‘Price multiplied by the value’ option.
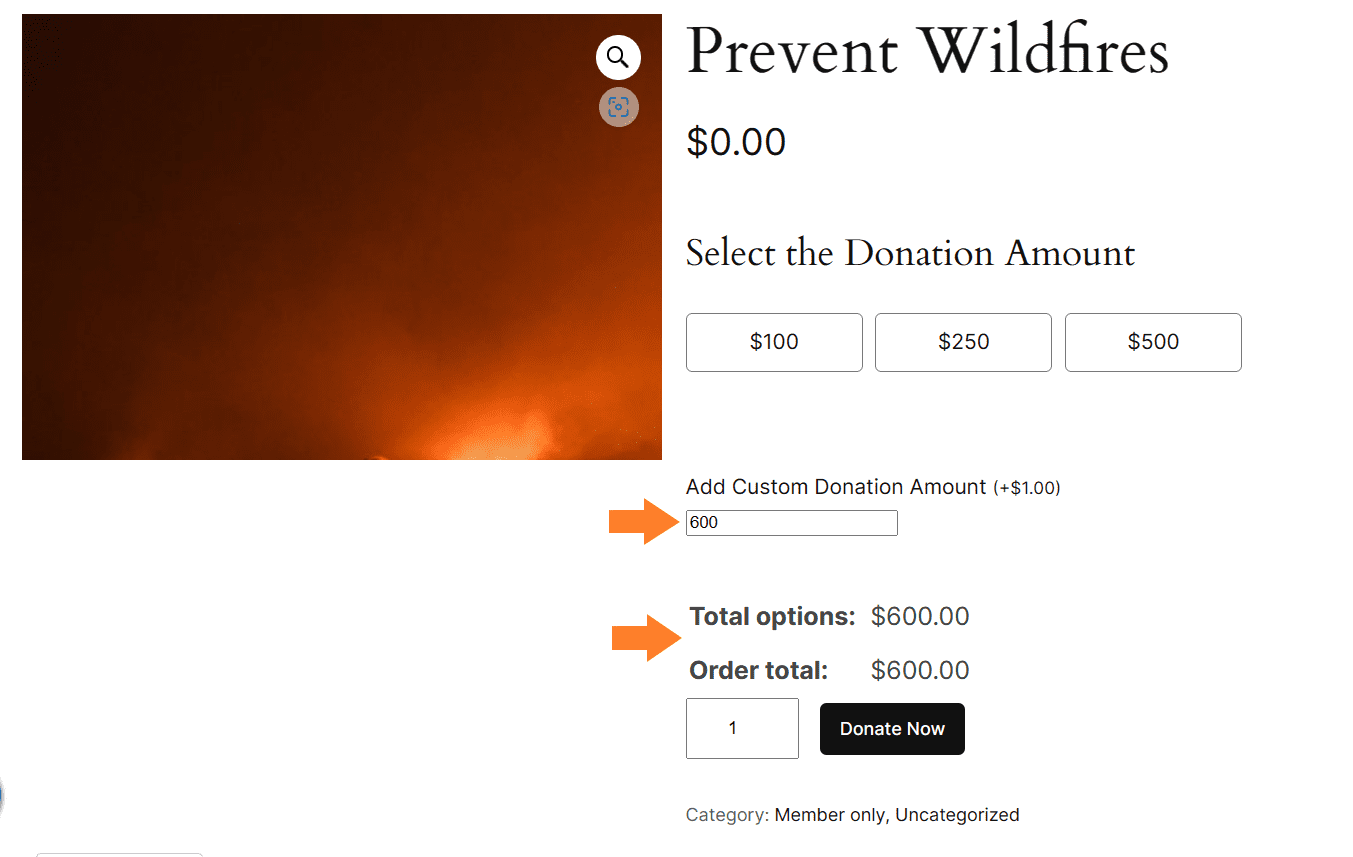
Selecting this option will multiply the value by the option’s cost. For example, I have added ‘1 ’ in the regular price field, so if a customer wants to donate $600 and adds this value, the total donation amount will become $600×1=600.
Finally, don’t forget to click the save button at the bottom right corner of the popup to save the settings.
6. Enable Direct Checkout
After that, I’ll also optimize the checkout process and redirect donors directly to the checkout page skipping the cart page. To do so, I’ll use the AIO Checkout plugin.
Note: I have already installed and activated the AIO Checkout plugin. Make sure you also activate it to follow along with the tutorial.
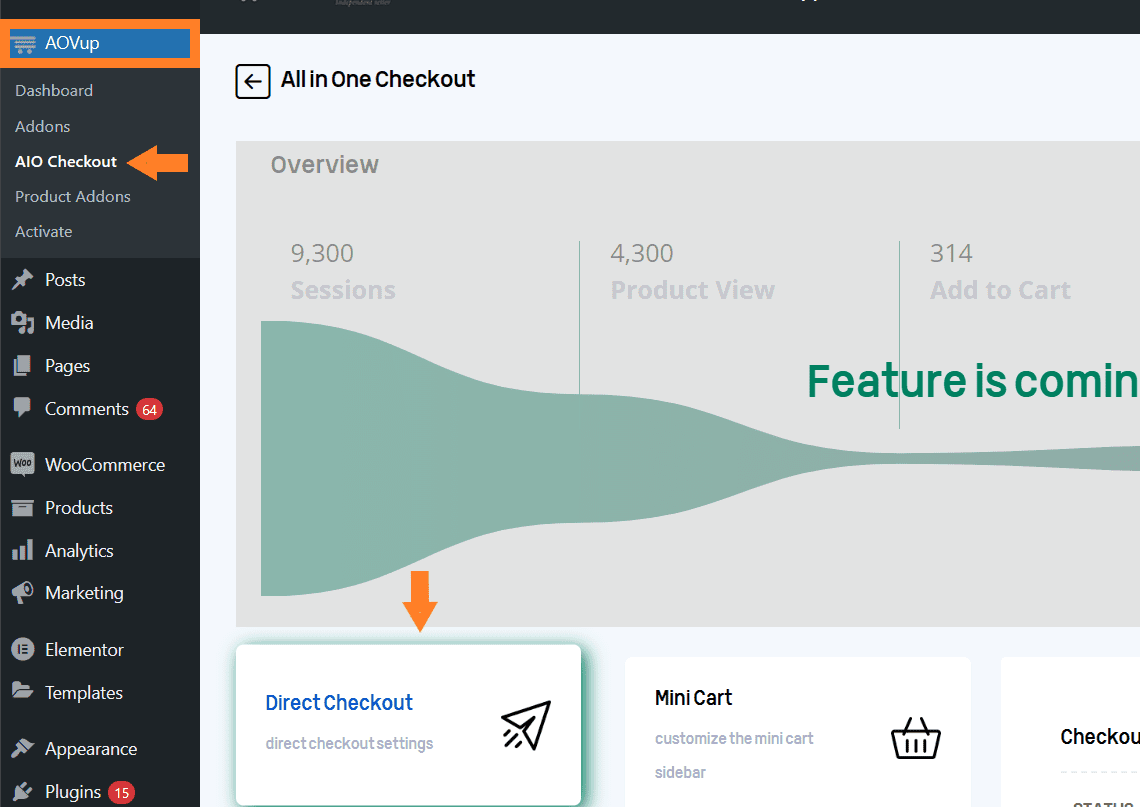
Navigate to AovUp > AIO Checkout from your WordPress dashboard, hover your mouse over the ‘Direct Checkout’ block, and click it.
6.1. Enable the Direct Checkout
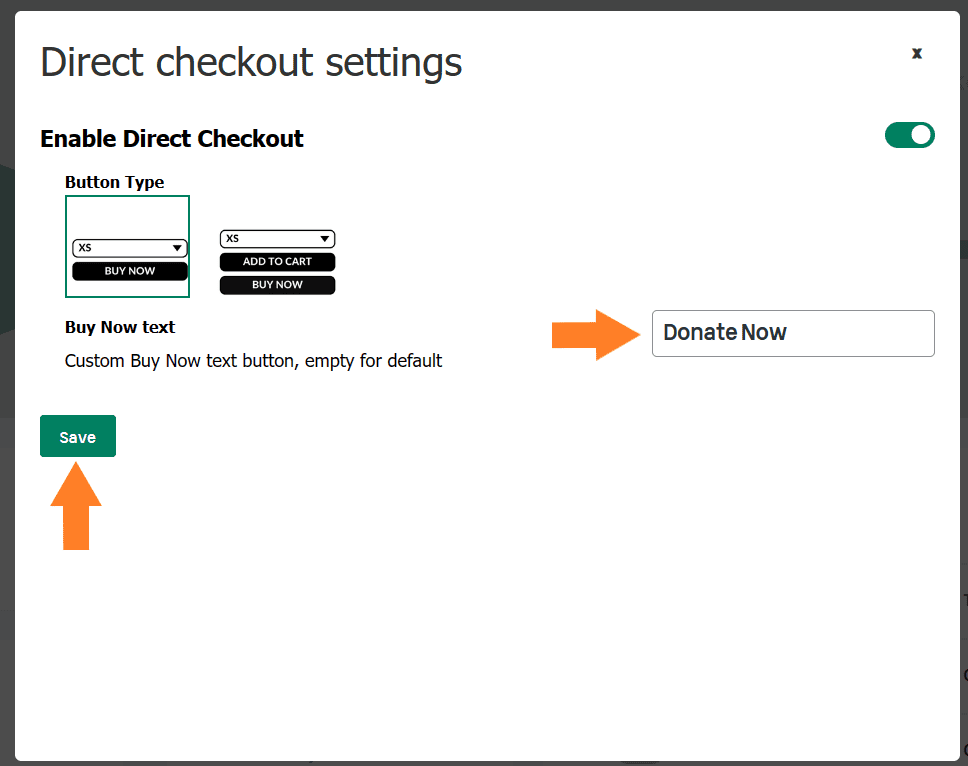
A popup will appear from which you need to toggle the ‘Enable Direct Checkout’ button and select whether you want to display both the cart and the checkout buttons or just the checkout button.
I only want to display the checkout button so I have selected it as the button type.
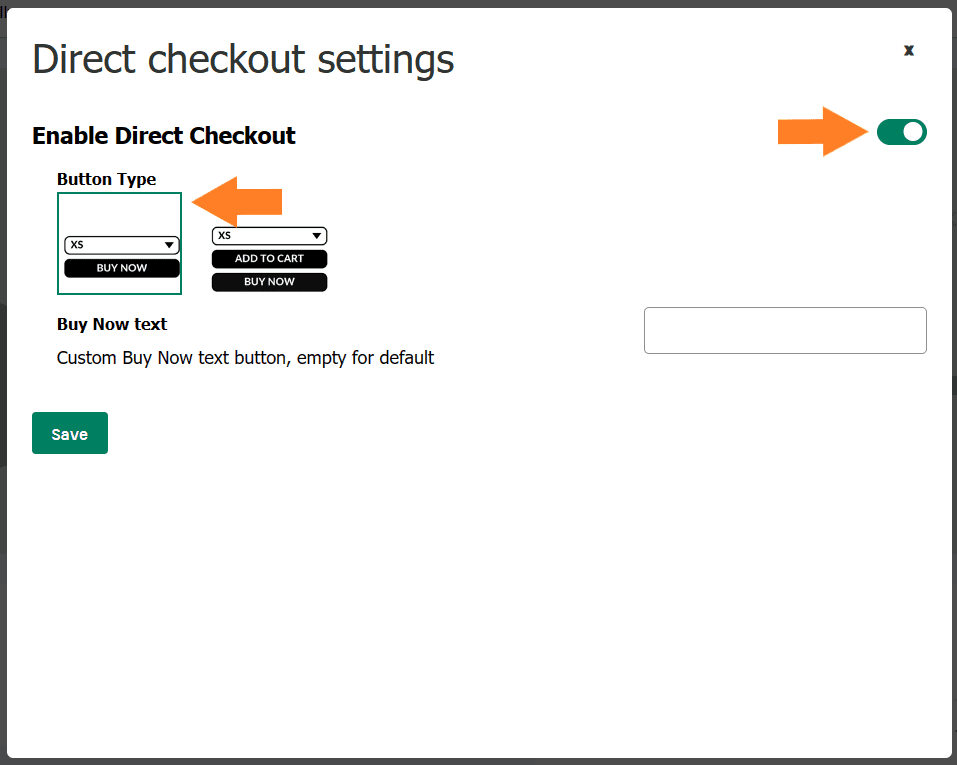
6.2. Add Custom Text
Next, you can also add custom text for the checkout button in the ‘Buy Now Text’ field. I have added ‘Donate Now’ as the button text.
Once done, click the ‘Save’ button to save it.
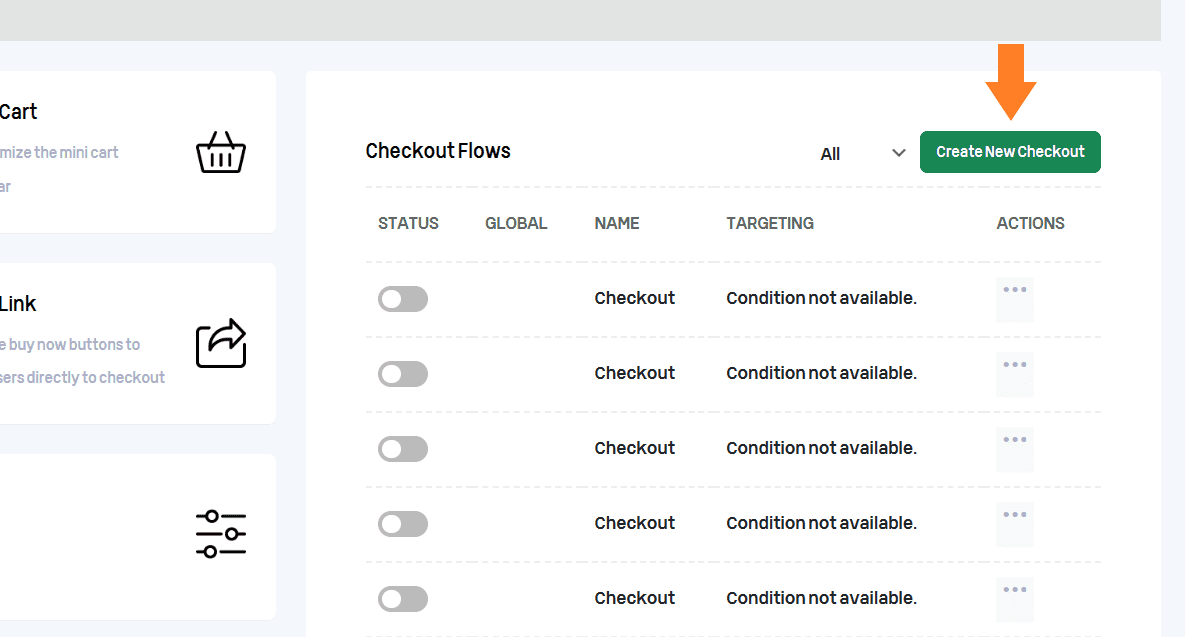
7. Add Custom Checkout Fields
Next, you may also want to get additional information from your donors, such as occupation and employer. We need to create a new checkout form and add the required fields to it.
To do so, click the ‘Create New Checkout’ button.
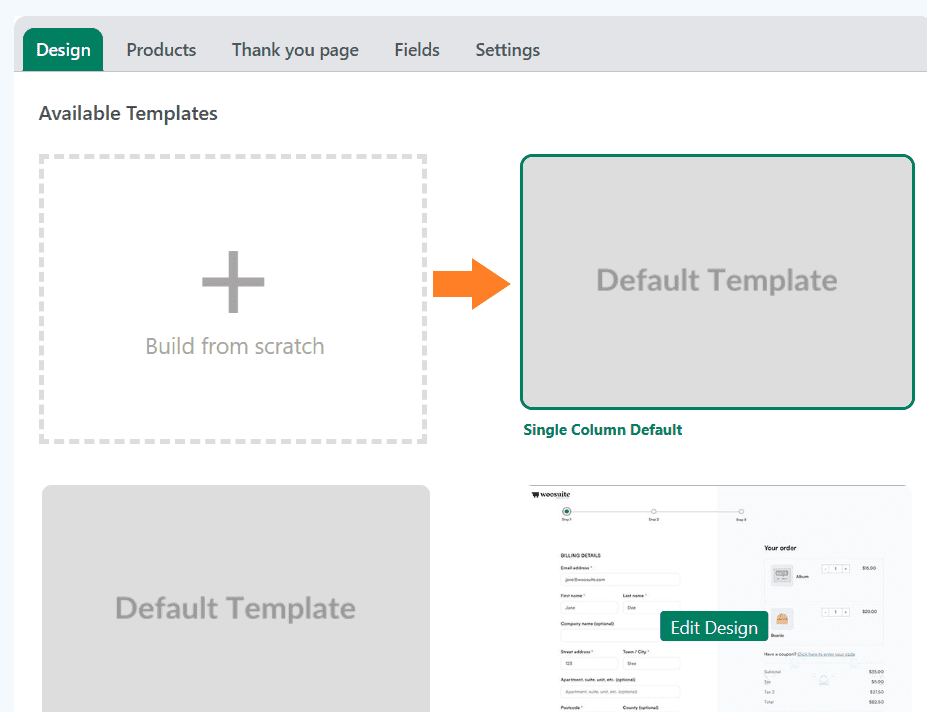
7.1. Select the Checkout Design
After that, first, you need to select the design of the checkout. This plugin gives you different templates and you can also build a template from scratch.
You can also edit the pre-made templates and change their colors. I have selected the ‘Single Column Default’ template.
7.2. Add Custom Fields to Checkout
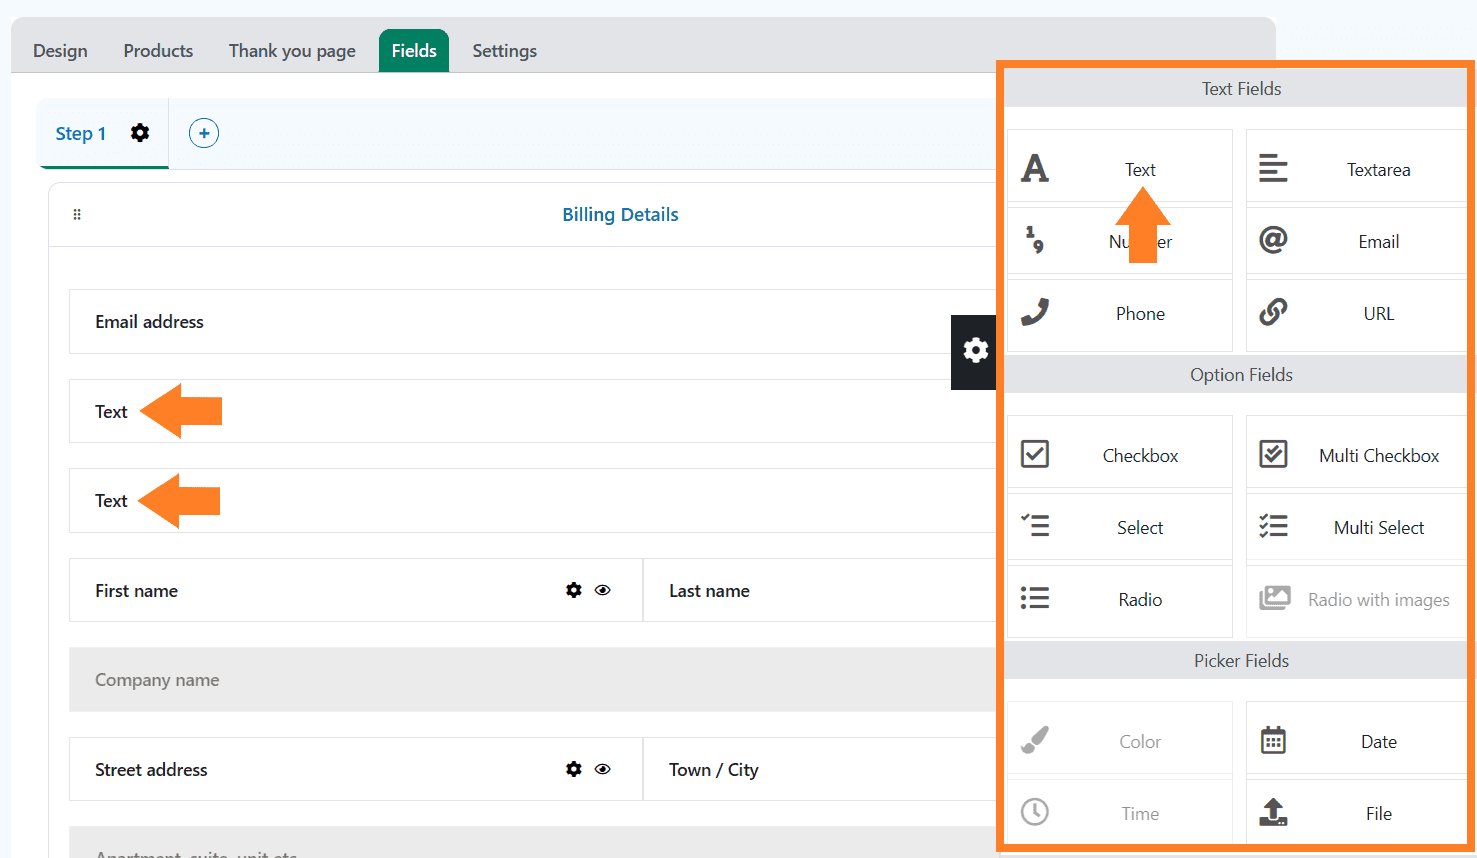
Once selected, click the ‘Fields’ tab and you’ll see different checkout fields. These will be divided into columns based on the design you selected in the previous selection.
I selected a single-column layout so all the checkout fields are divided into a single column. Now, to add custom fields to checkout, click the black gear icon at the right side of your screen.
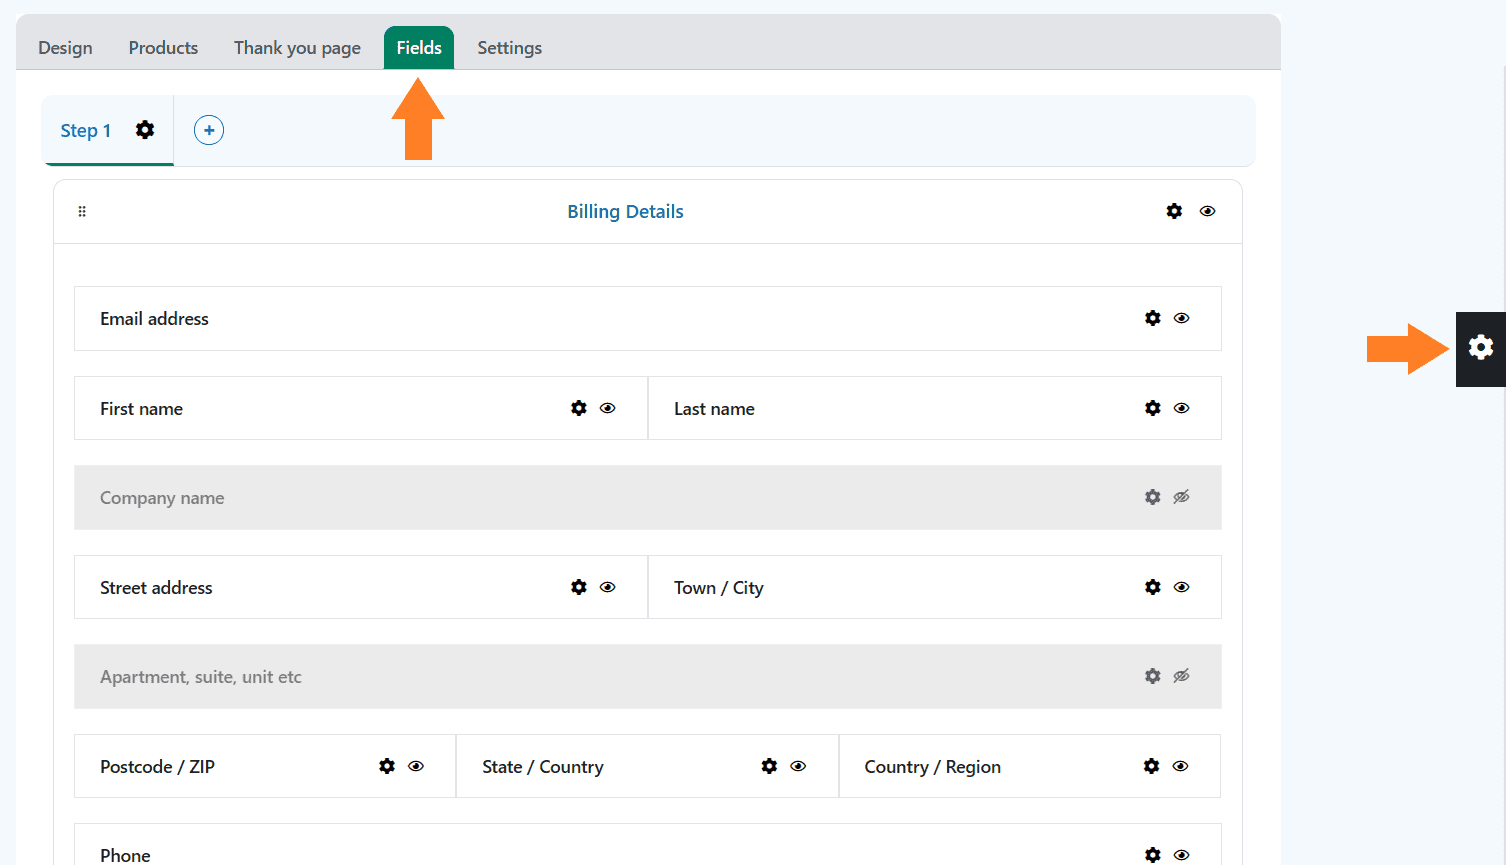
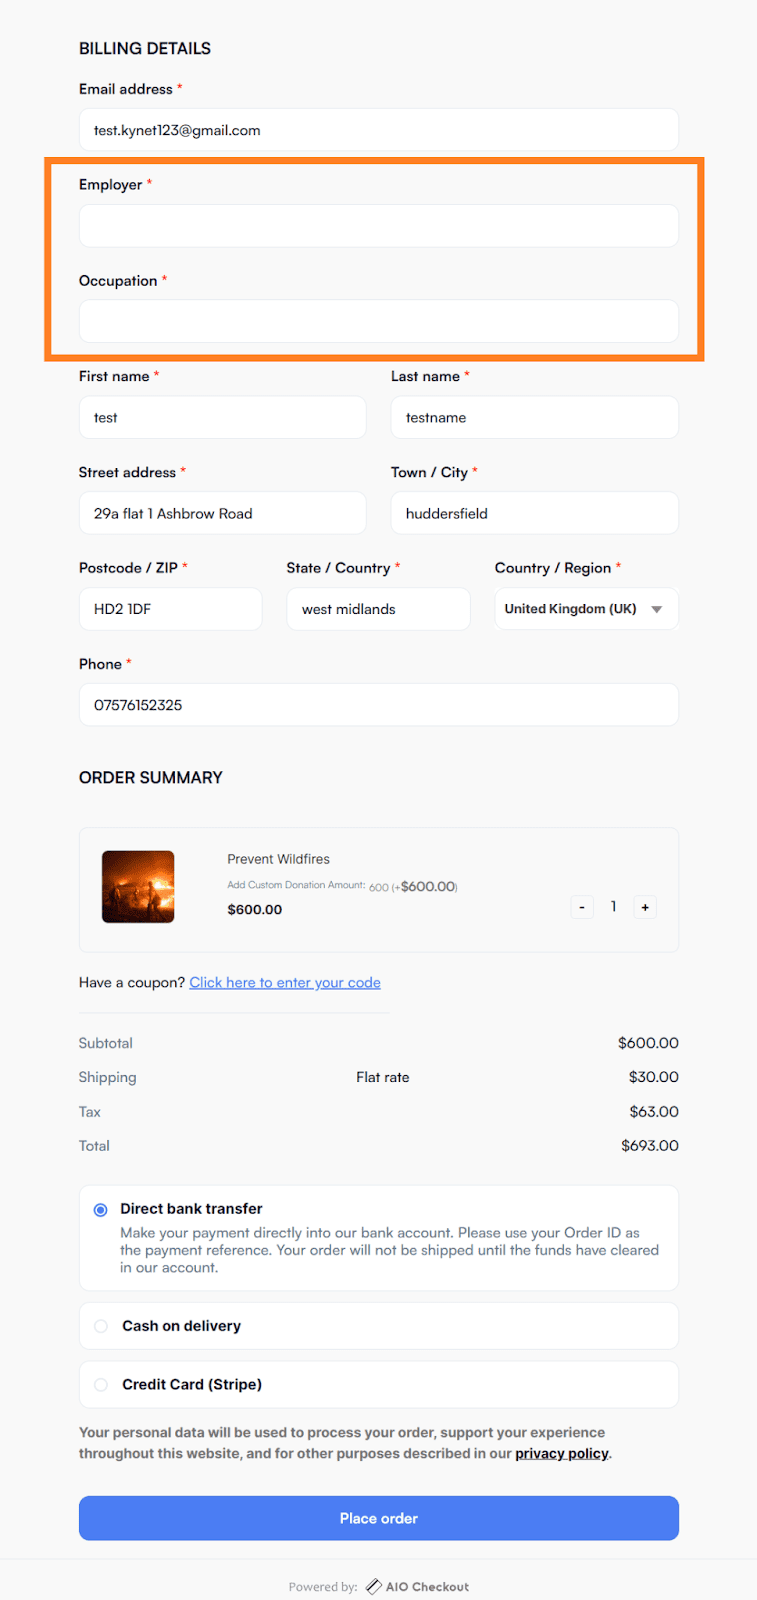
Clicking it will open a popup with different fields. You can drag any field you want and drop it in the checkout form. I have added two text fields as I want to allow customers to add their employer and occupation.
7.3. Change the Text Field Labels
You can also change the text field labels you just added. To do so, click the black gear icon next to the field you just added.
After clicking it, a popup will slide in from the right side of your screen.
You can add the label in the ‘Label’ field. You can also check the required field checkbox to make it a required field.
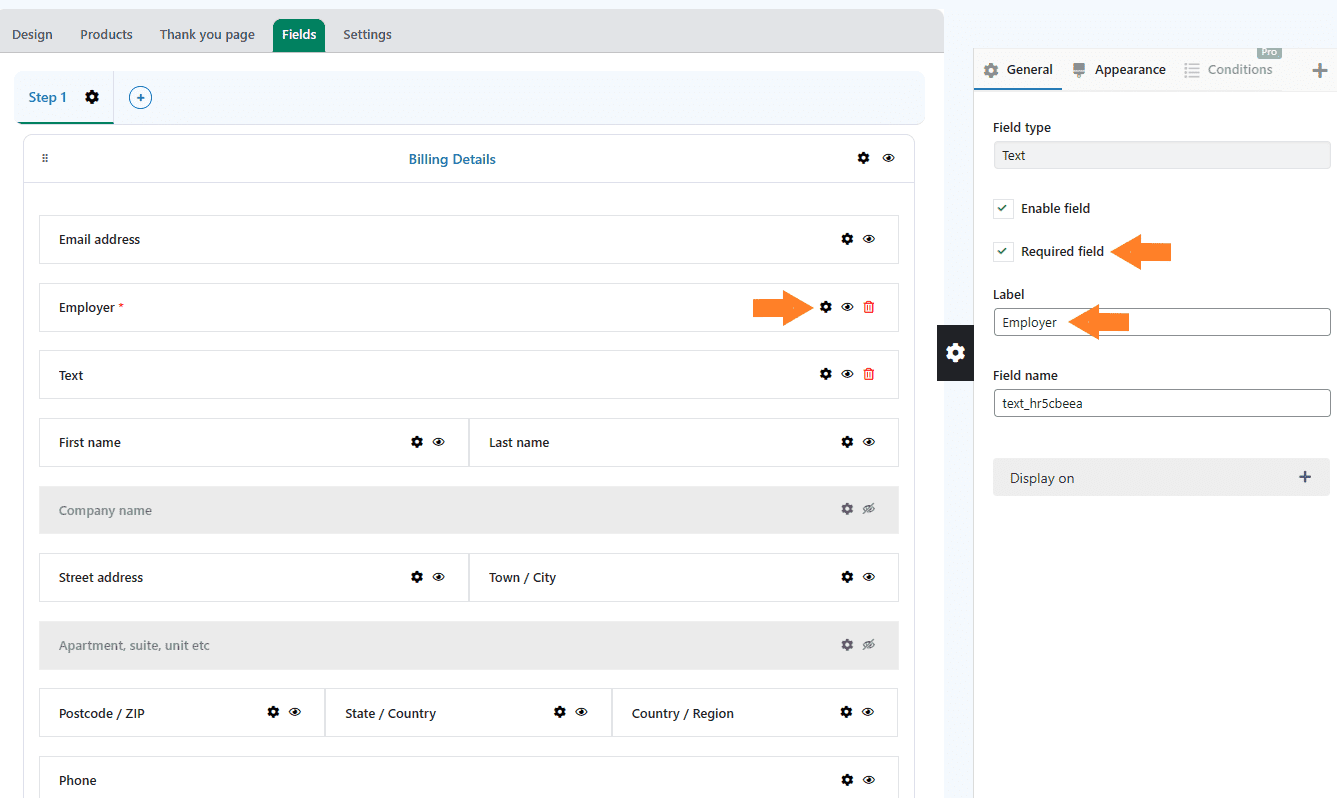
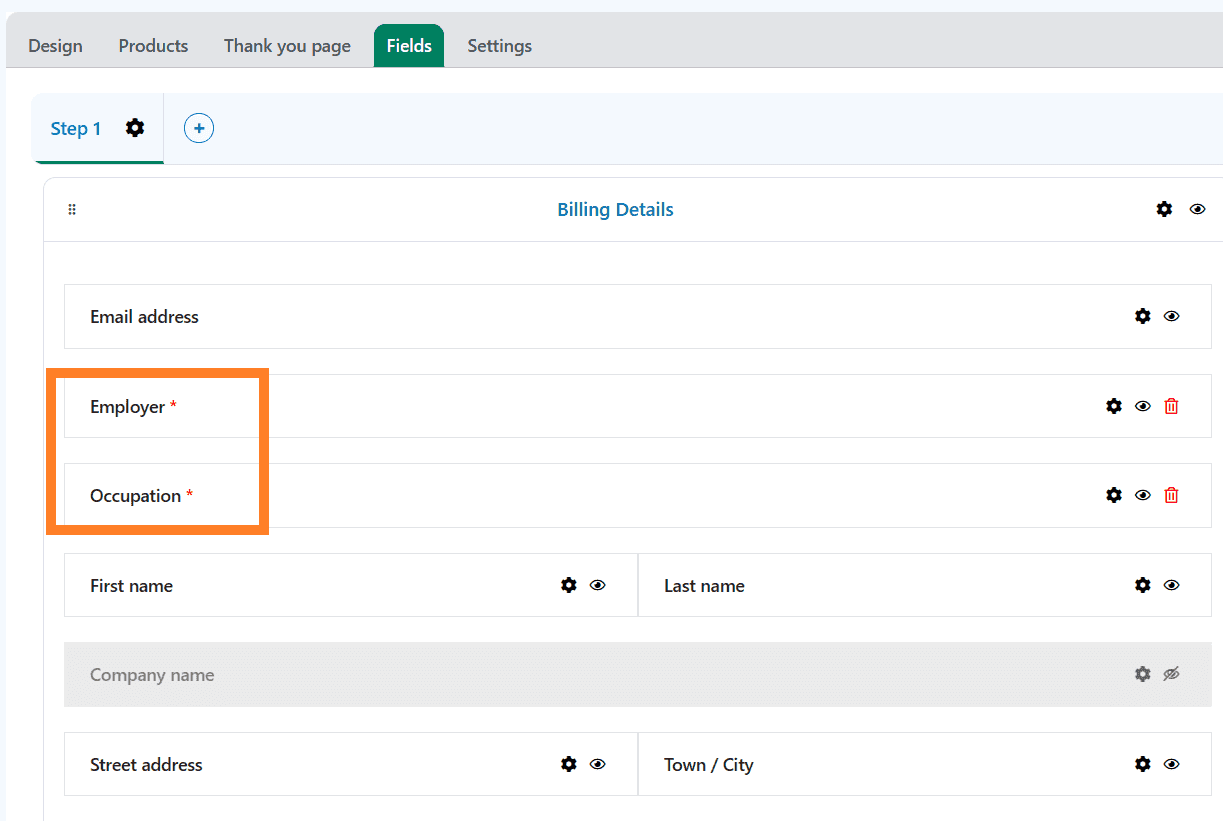
I have changed the label for both fields.
Note: I have hidden the shipping details section.
8. Enable the Checkout
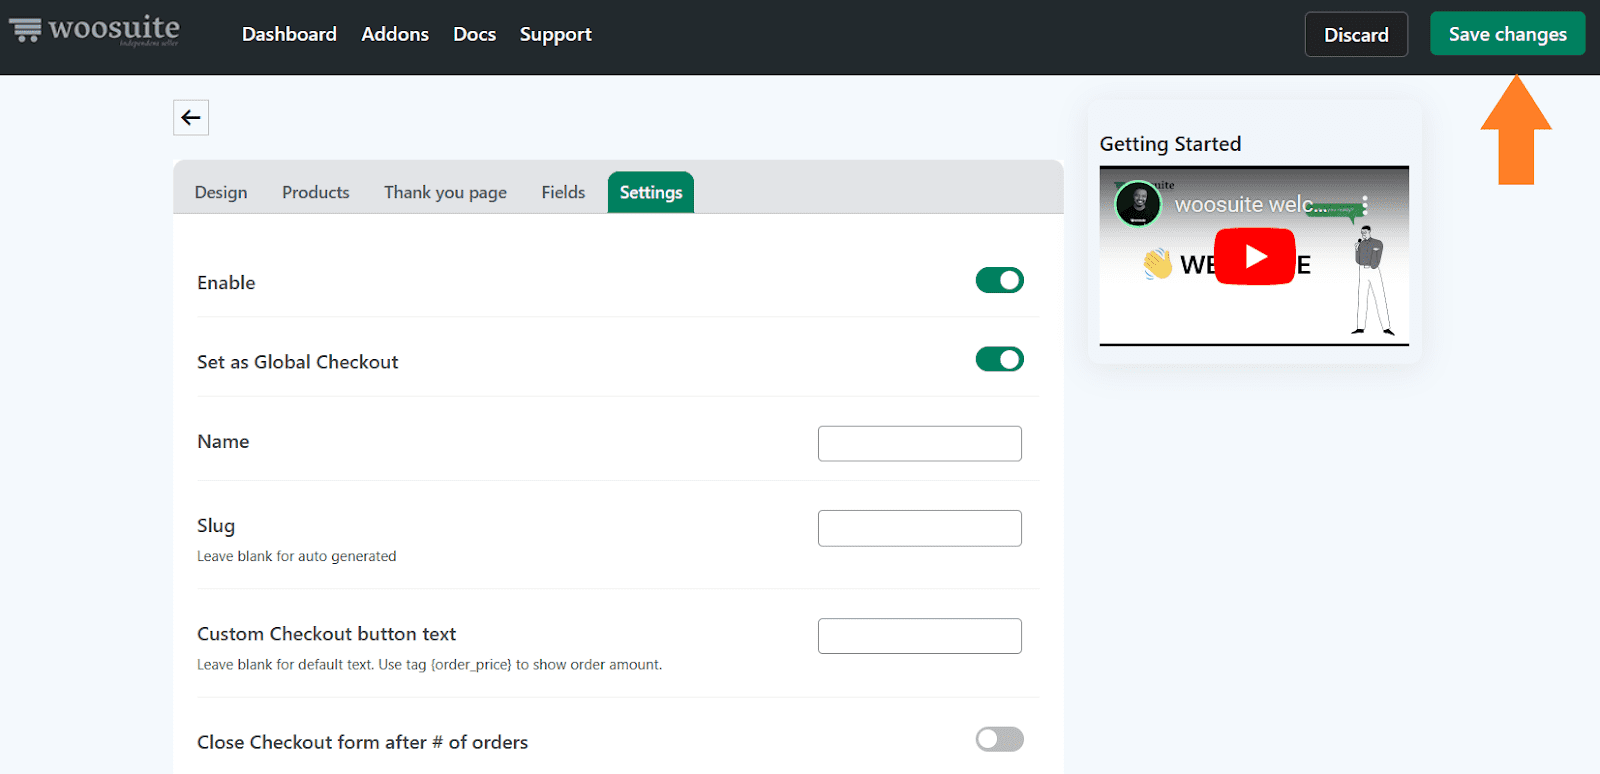
Once you have adjusted the fields per your requirements, click the ‘Settings’ tab and enable the checkout by toggling the ‘Enable’ button.
You can also toggle the ‘Set as Global Checkout’ button to enable it globally.

8.1. Save Changes
Finally, click the green ‘Save Changes’ button at the top right corner of your screen to save the form and the settings.
9. Final Results
Let’s test the final results.
I visited the product page and I could see the predefined donation amounts. I could also see a field where I can add a custom donation amount.
And instead of the add to cart button, I could see the ‘Donate Now’ button which will take users directly to the checkout page.
On the checkout page, I could see the fields we added and that its design was completely changed.
Conclusion
That’s it for today’s article.
I hope it was helpful to you and you were able to accept donations in your WooCommerce store easily. This plugin allows you to add different fields to all or specific products in your store.
You can create products like composite, personalized, and more. It gives you and your users a user-friendly shopping experience and improves the average order value.
Ready to get started? Download the AovUp Product Add-Ons & Extra Options plugin now!


