In this article, I’ll show you two different methods to create a one page checkout on your WooCommerce store.
Which method you choose will depend on your requirements for example you might just want to combine the cart and checkout page and bypass the cart page. If that is the case method 1 is for you.
However, if you want to display your shop and the checkout on the same page then method two is for you.
So keep reading and figure out how to enable WooCommerce One Page Checkout Shop with the Product Table plugin.
On This Page
- 1 Why do you need the One Page Checkout Shop?
- 2 How to Enable WooCommerce One Page Checkout?
- 2.1 1. Install and Activate the AIO Checkout Plugin
- 2.2 2. Navigate to the AIO Checkout
- 2.3 3. Create a One-Page Checkout Form
- 2.4 4. Hide the Shipping Details Section
- 2.5 5. Select the Design of the One-Page Checkout Form
- 2.6 6. Select the Thank You Page Design
- 2.7 7. Enable the Checkout
- 2.8 8. Enable Direct Checkout
- 2.9 9. Enable the Checkout Edit
- 2.10 10. Final Results
- 3 Method 2: Shop page with checkout
- 3.1 Step 1: Install and Activate Woosuite Core Plugin
- 3.2 Step 2: Install and Activate the Product Table Plugin
- 3.3 Step 3: Select the Page to Display the Product Table
- 3.4 Step 4: Add a New Page to Display Product Table
- 3.5 Step 5: Additional Settings for Product Table
- 3.6 Step 6: Customize the Product Table Design(Optional)
- 4 Final Results
- 5 Frequently Asked Questions
- 6 Conclusion
Why do you need the One Page Checkout Shop?
There are several benefits of adding the one page checkout shop to your WooCommerce store. One of the major benefits is that it makes the checkout process faster and more straightforward for the customers. The research says that 1 in 10 people abandon their cart is because of the long process of checkout. If the customer has to navigate through multiple pages to complete a purchase, then he/she might get fed up with spending time clicking on different pages. As a result, they are less likely to make a purchase. That’s where you will need the Product Table plugin to create the one page checkout shop.
How to Enable WooCommerce One Page Checkout?
Let’s get started and set up the one page checkout shop using the Product Table plugin. Please follow all the steps carefully and verify the settings with the given screenshots.
1. Install and Activate the AIO Checkout Plugin
First, we need to install and activate the AIO Checkout plugin to improve the customer’s shopping experience.
Download the AIO Checkout plugin from the AovUp store. It also has a free version, but to follow along with this tutorial, you’ll need to purchase its Pro version.

Once you have downloaded it, navigate to the Plugins » Add New from your WordPress admin dashboard, and click the Upload button to upload the downloaded file to install and activate the plugin.
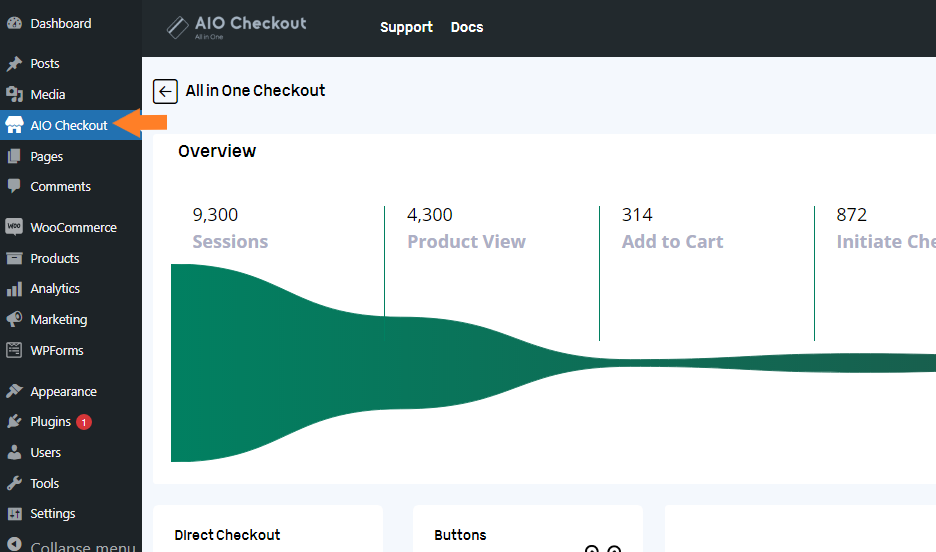
Once you have installed and activated the plugin, navigate to AIO Checkout from your WordPress dashboard.
3. Create a One-Page Checkout Form
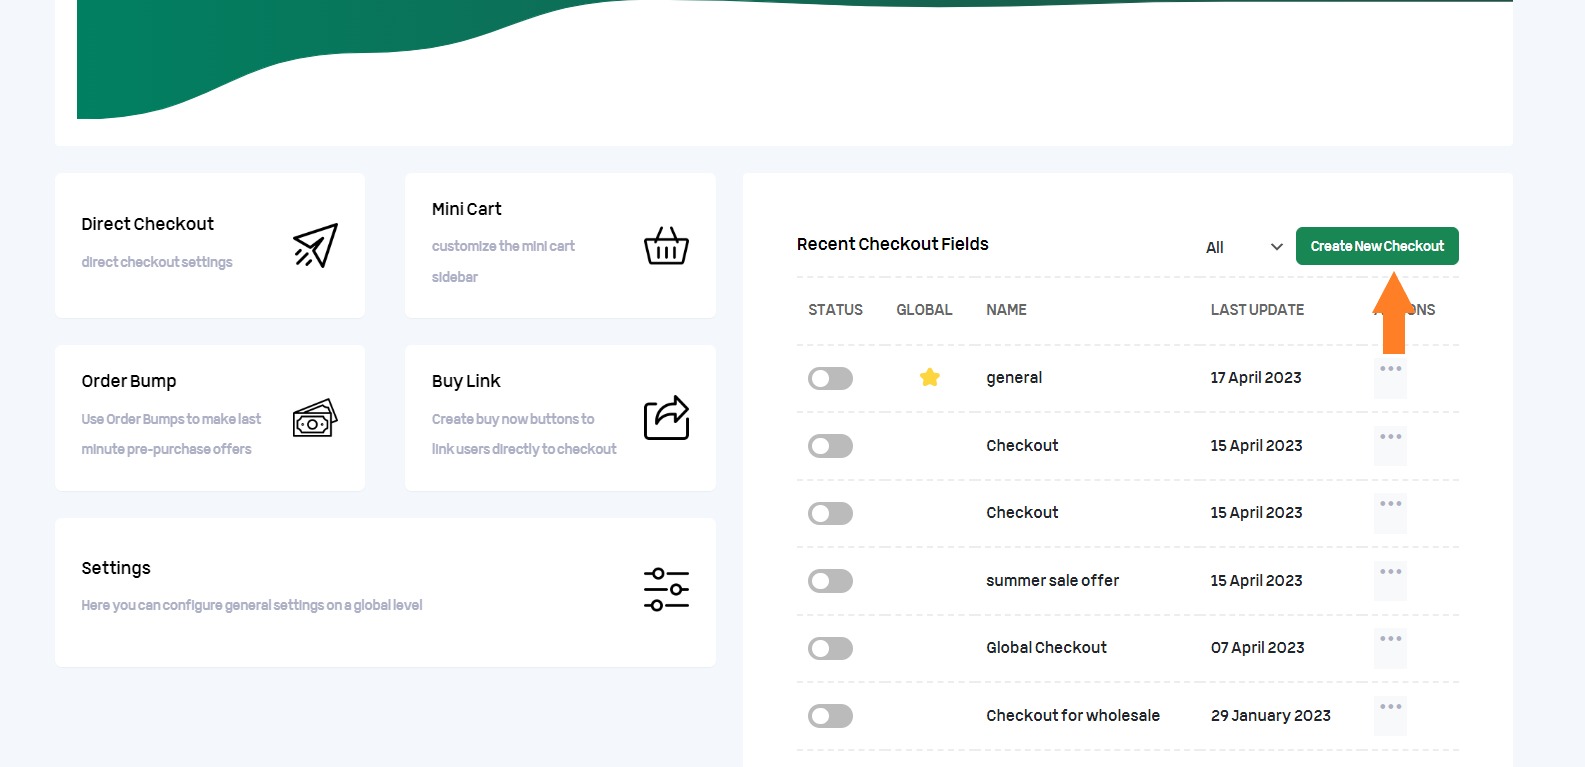
With this plugin, you can create different types of checkout forms. I have already created a few checkout forms, but I’ll make a new one-page checkout for this tutorial to show you the complete process.
Click the “Create New Checkout” button to create a new one-page checkout form.
Once you click the button, a new checkout form will be created. It’ll be the default WooCommerce checkout field, but you can customize it according to your business needs to improve the customer experience.
You can also add custom fields like birthday fields, VAT number fields, etc.
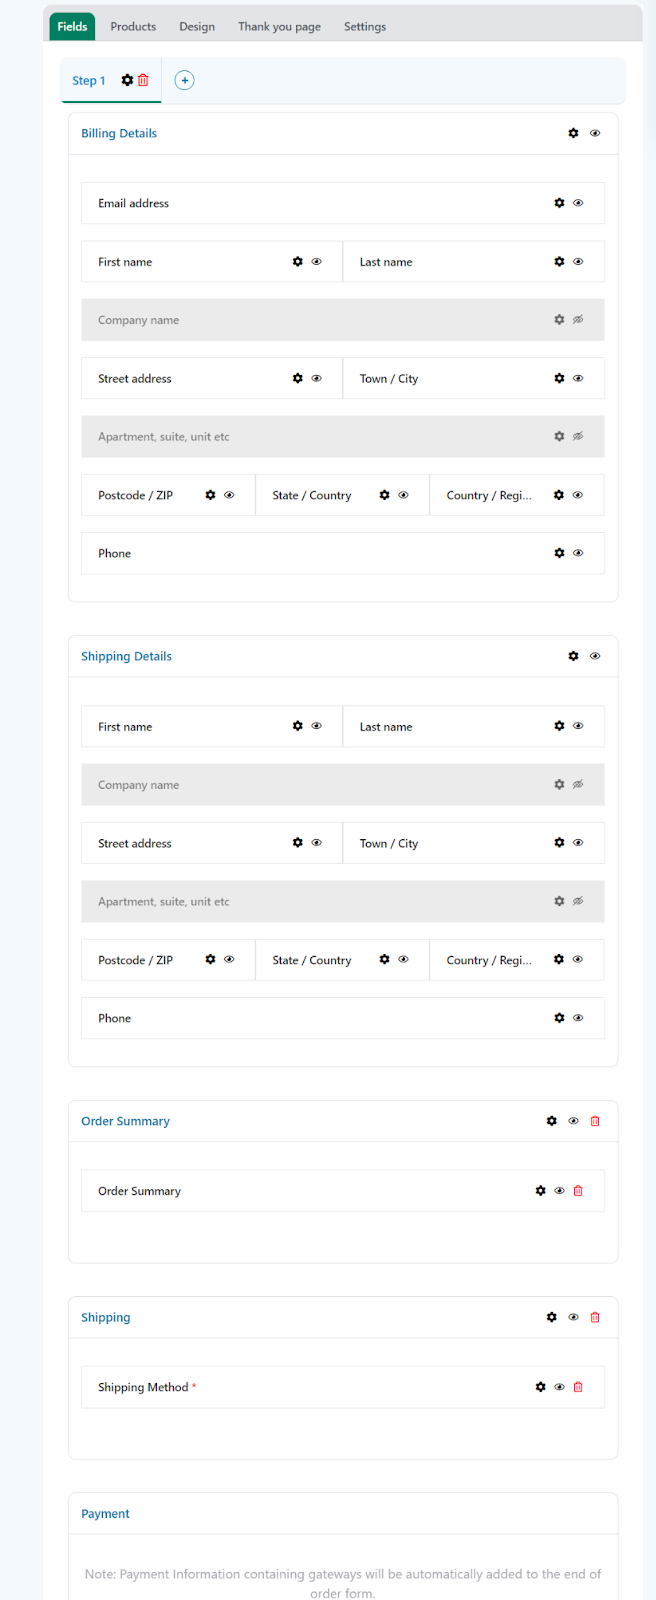
4. Hide the Shipping Details Section
A one-page checkout should have the least number of fields, so users can quickly fill it and complete the checkout process. The default WooCommerce checkout page has ‘Billing and Shipping’ sections and they might need to fill the form twice, which makes it a bit time-consuming process.
We can hide one of those sections and force the shipping to one of both sections. For example, if we hide the ‘Shipping Details’ sections, the shipping will be forced to the billing details or vice versa. We can change the label of the section to make it clear to customers.
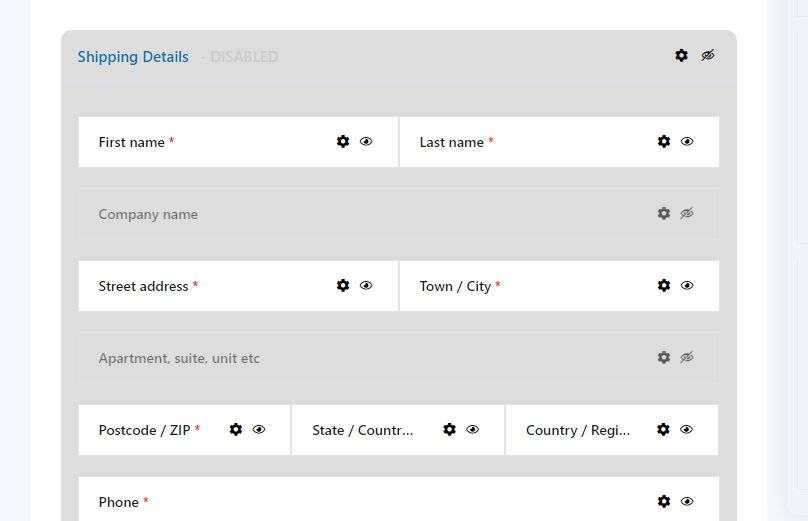
I’ll hide the shipping section, and force shipping to the customer’s billing address. To hide the shipping details section, so to hide it, click the black eye icon on the section.
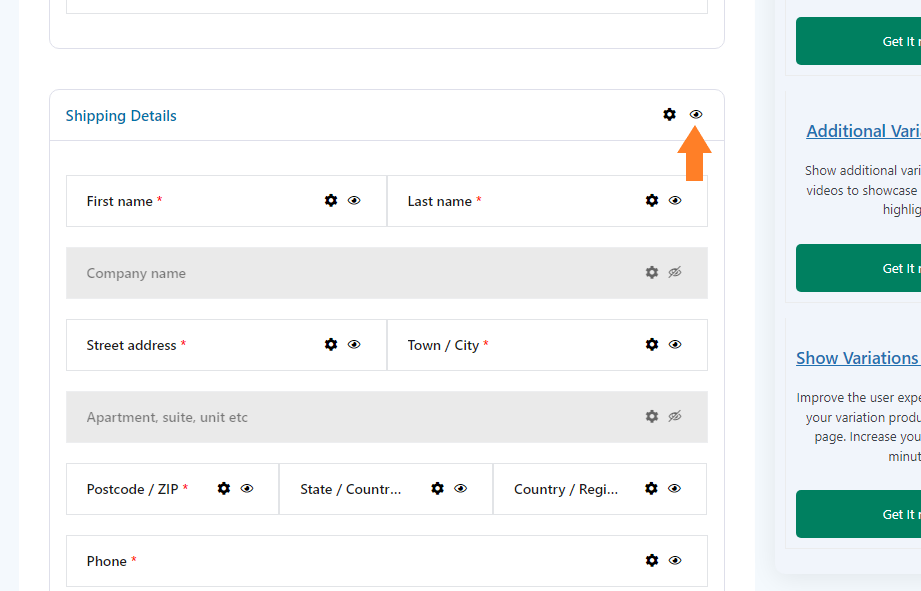
Once the section is hidden, it will look something like this:
You can also add additional required fields or remove the unnecessary fields from the form to make it more optimized for users. I’ll share a few guides at the end of this tutorial to help you edit the checkout form.
5. Select the Design of the One-Page Checkout Form
Once you have adjusted the one-page checkout form, the next thing you need to do is select the design of the checkout form/page.
Click the ‘Design’ tab at the top.
There are multiple templates available, you can choose any template you want. I have selected the ‘Multiple Columns Modern’ template.
You can also create a template from scratch.

6. Select the Thank You Page Design
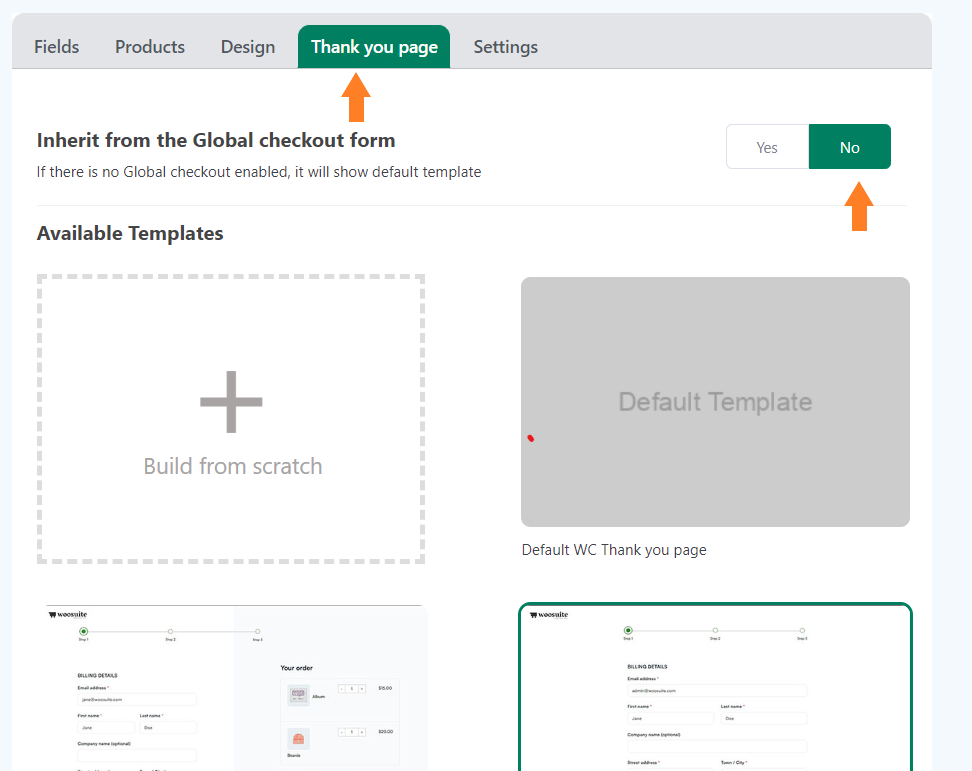
Next, click the ‘Thank You Page’ tab at the top, and select the template for the thank you page. If you want, you can also create a custom thank you page.
If you want to inherit the thank you page design from the global checkout, you can leave everything to default. But if you want to customize the thank you page or create one from scratch, ensure to select ‘No’ for the ‘Inherit from the Global checkout form’ option.
Note: You won’t see the thank you page templates if you have set the ‘Inherit from the Global checkout form’ option to ‘Yes.’
7. Enable the Checkout
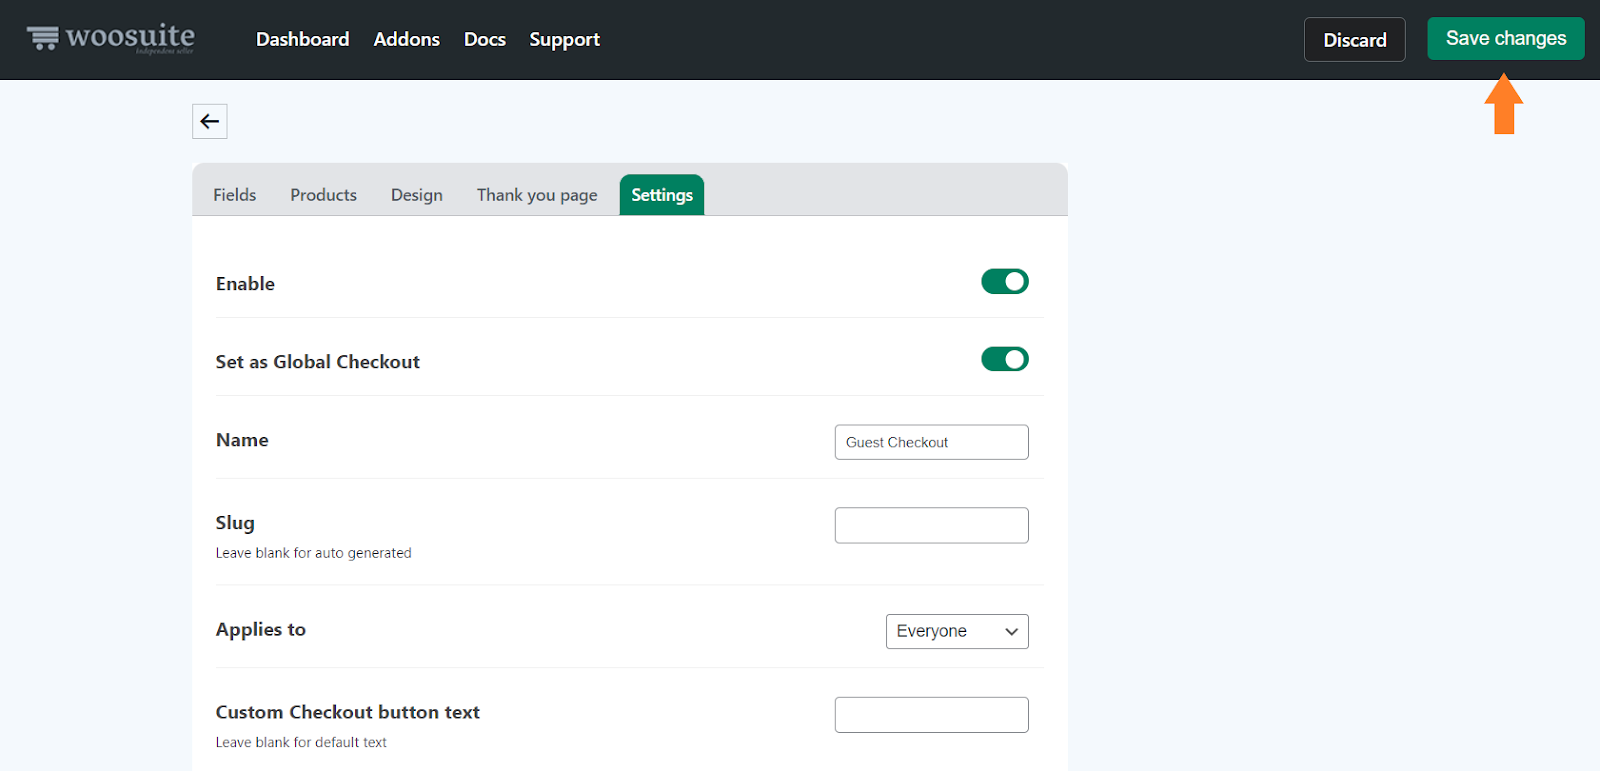
After selecting the thank you page design, we need to enable this checkout form. Click the ‘Settings’ tab.

7.1. Enable the Checkout Form
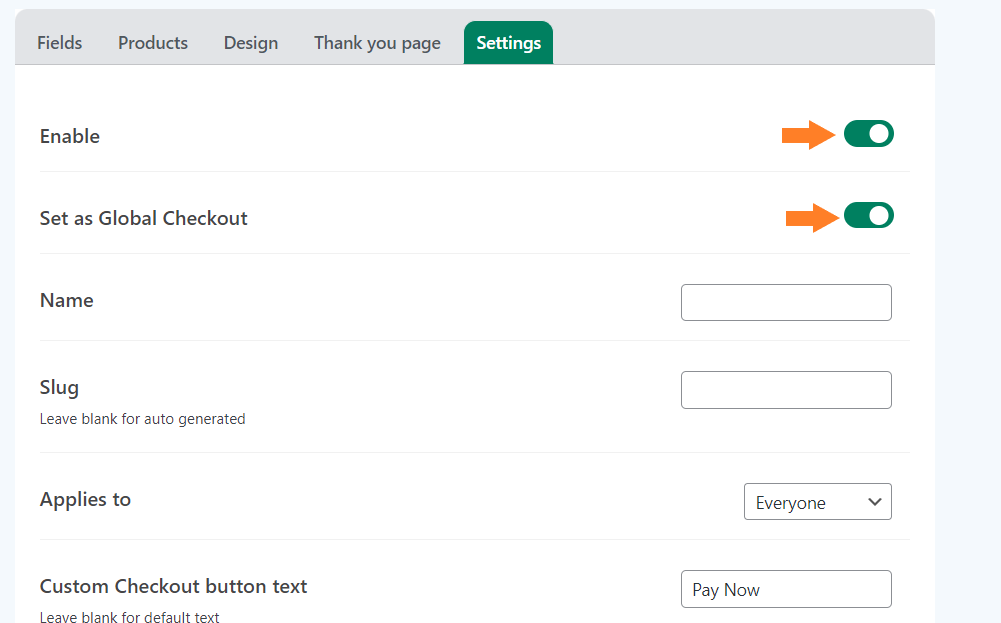
To enable the checkout form, toggle the ‘Enable’ button. Also, ensure you have enabled the ‘Set as Global Checkout’ option to make this form the global checkout.
You can leave it disabled if you want to set this checkout form for specific user roles. I am enabling it as a global checkout as I don’t want to set a user restriction.
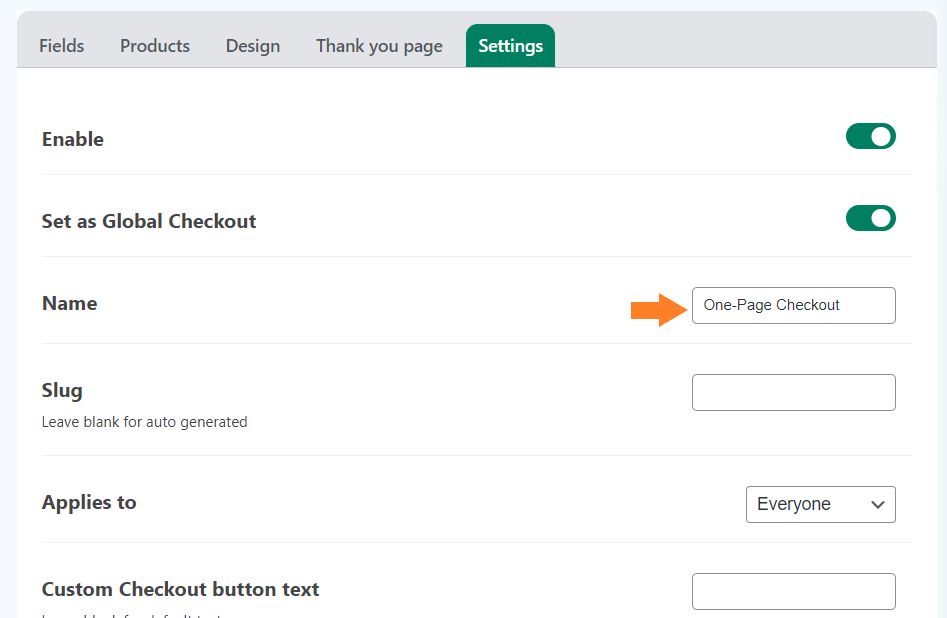
7.2. Give a Name to the Form
Now, we need to give a name to this form. It will only be displayed to the admin. It is helpful if you have created different checkout layouts for different user roles.
Note: You can also explore the other available settings and set a custom checkout button text. But I’ll move to the next step to keep this tutorial short and to the point.
7.3. Save Changes
Once you have made the required adjustments to the checkout form and enabled it, click the green ‘Save Changes’ button at the top right corner of your screen to save the settings.
8. Enable Direct Checkout
Once you have created the order form page, next, we need to enable the direct checkout so users can complete the checkout process in a single step.
Enabling the direct checkout will redirect users to the one-page checkout form page by clicking the ‘Buy Now’ button. It will replace the default ‘Add to Cart’ button and allow users to skip the cart page.
To enable the direct checkout, you need to go back to the plugin’s general settings and enable it. I have created a guide to help you enable direct checkout to your store which you can follow to do the same.
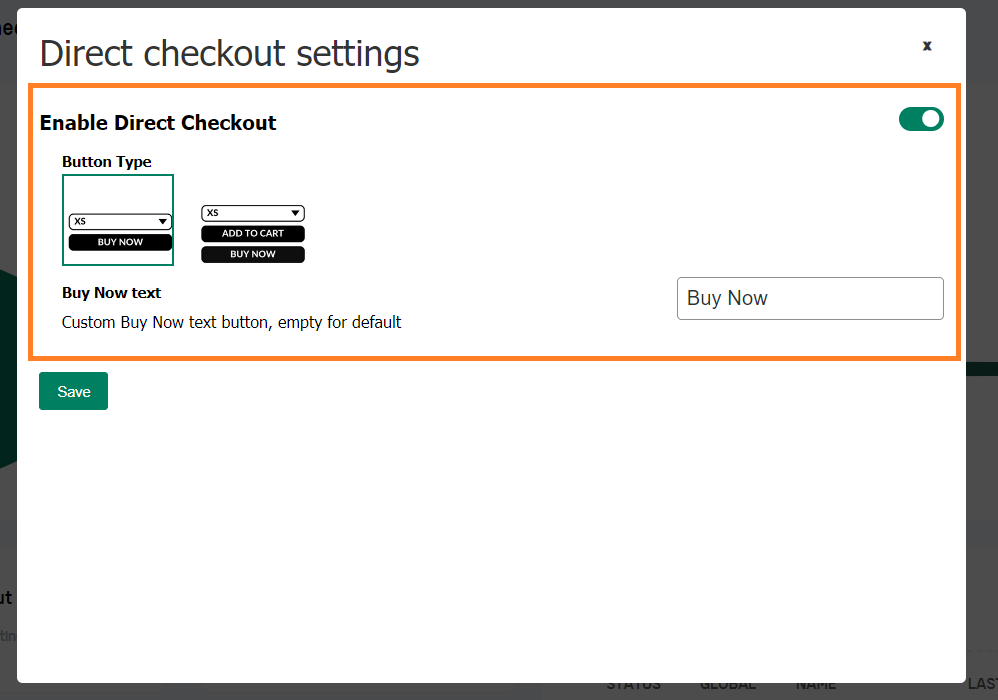
Don’t forget to click the ‘Save’ button at the bottom left corner of the pop-up to save the settings.
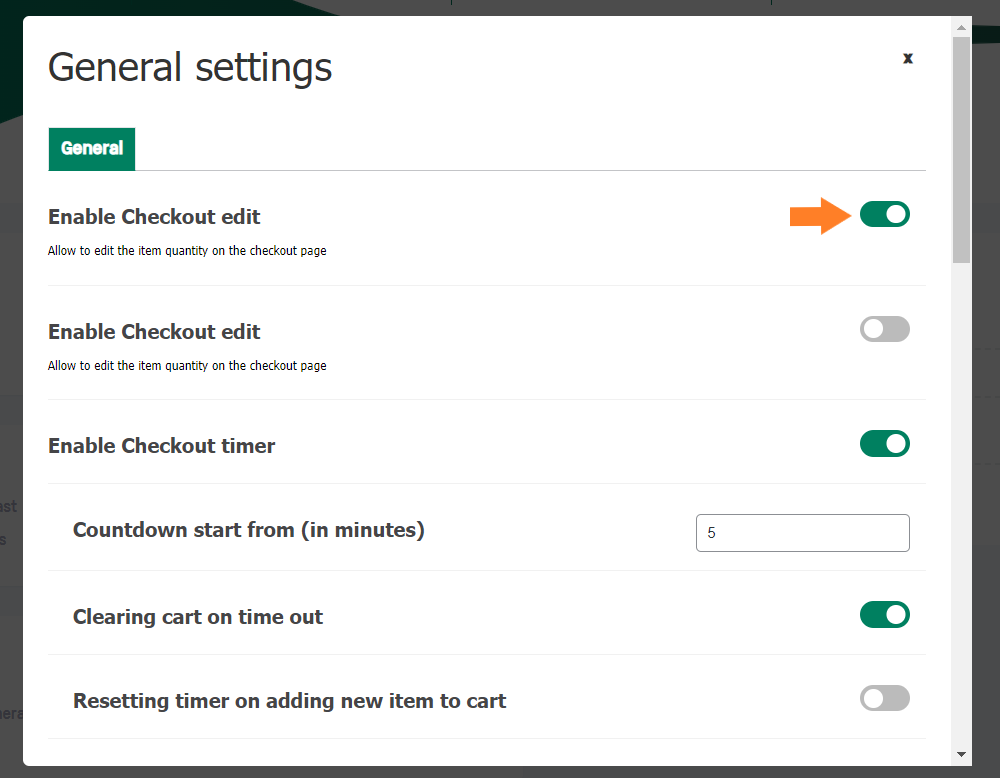
9. Enable the Checkout Edit
After enabling direct checkout on your store, the next step to create an optimized and user-friendly one-page checkout is to allow customers to edit their cart on the checkout page.
As we are eliminating the cart page from the default WooCommerce process to create a one-page checkout, it is essential to allow customers to edit the cart directly on the checkout page.
To do so hover your mouse on the ‘Settings’ section from the plugin’s general settings page and click it. From there you can enable the ‘Checkout Edit’ feature.
Here’s the guide to combining the cart and checkout pages to help you.
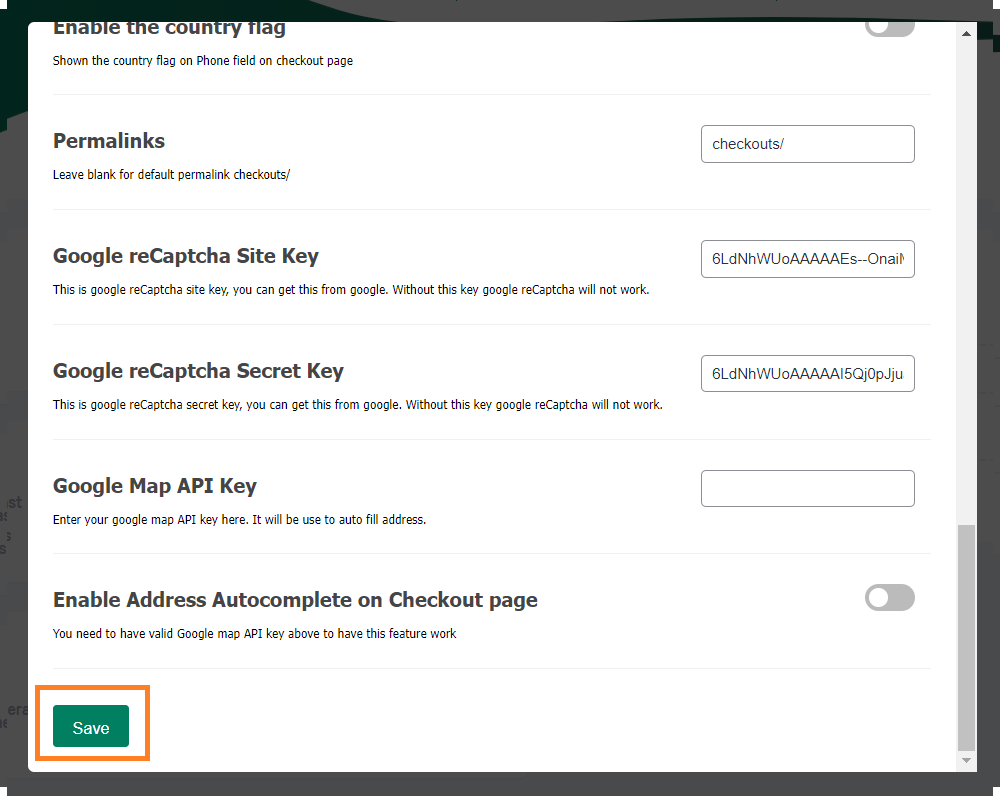
9.1. Save Changes
After enabling the checkout edit feature to combine the cart and checkout page, don’t forget to click the ‘Save’ button at the bottom left corner of the pop-up to save the settings.
10. Final Results
Once you have made all the necessary updates and changes to create a one-page checkout form, now is the time to test it.
To test it, I visited my store’s shop page, and as you can see in the screenshot below the ‘Add to cart’ button has been replaced with a ‘Buy Now’ button. You or your customers can click it to directly go to the one-page checkout form.

When I clicked one of the buy now buttons to purchase the product, I was redirected to the checkout page instead of the cart page.
On the one-page checkout, I could see the less number of fields as compared to the default WooCommerce checkout form. It is because we have hidden the shipping details sections to force the shipping to the customer’s billing address.
Also, your customers can increase or decrease the product quantity or remove a product from the cart directly on the checkout page, which makes it a complete one-page checkout to optimize the customer’s experience.

Method 2: Shop page with checkout
Step 1: Install and Activate Woosuite Core Plugin
First, you have to download the Woosuite core plugin file to your device. After that, you need to upload and install the plugin to your WooCommerce site.
Go to Plugins and click Add New. Then click on ‘Upload Plugin’ and choose the plugin file. After uploading the plugin, click Install Now.
Plugins > Add New > Upload Plugin > Choose File > Install Now
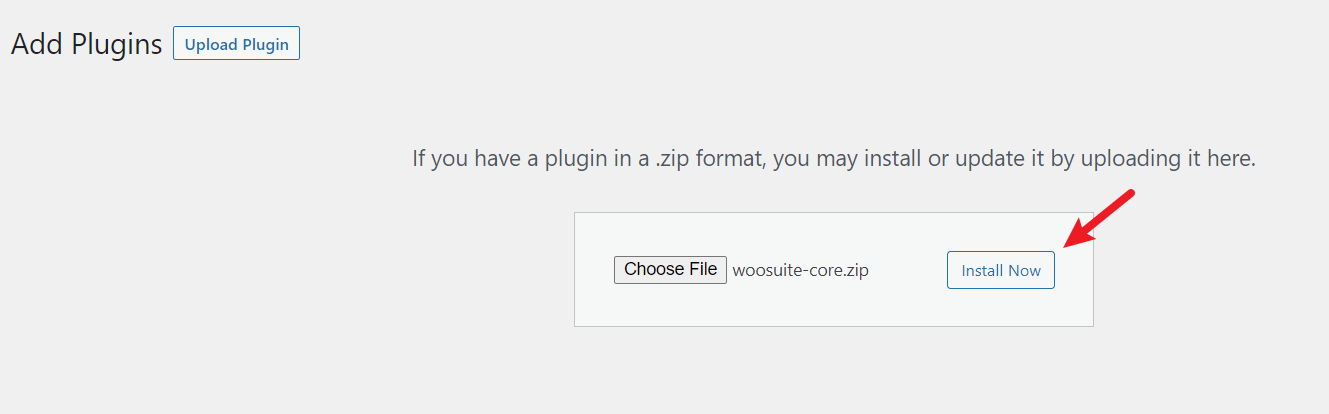
After the plugin is installed, do not forget to activate the plugin.
Step 2: Install and Activate the Product Table Plugin
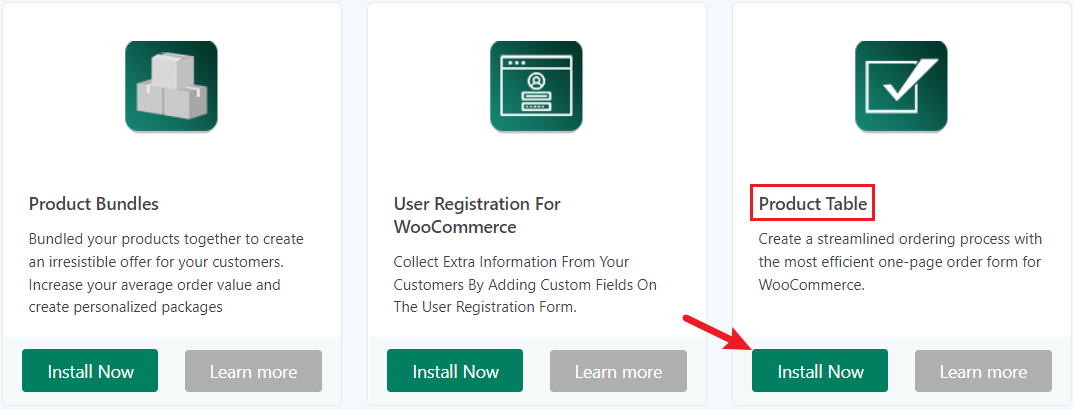
After activating the Woosuite Core plugin, you will see a new option “Woosuite” in the WordPress toolbar. Now, we will install the Product Table plugin.
Click on Woosuite and go to the Addons option. Then find the Product Table plugin and click Install Now to install it.
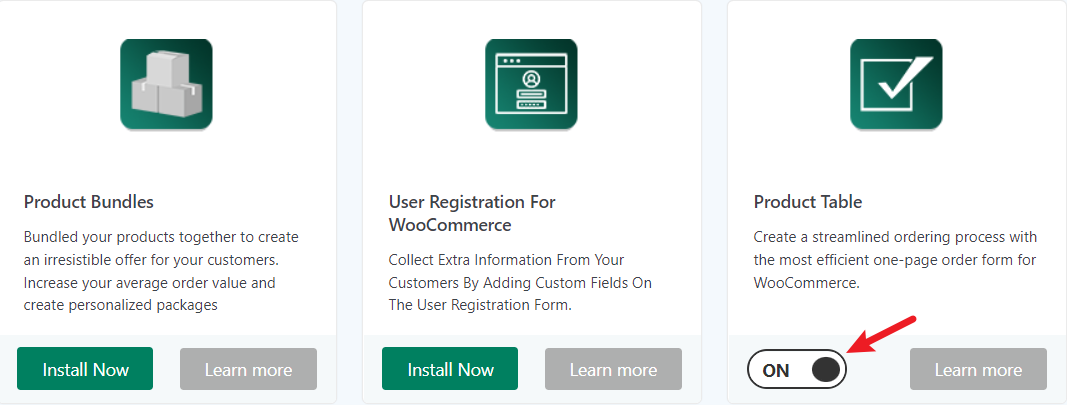
After installing the plugin, you need to activate the plugin by clicking on the toggle button.
Step 3: Select the Page to Display the Product Table
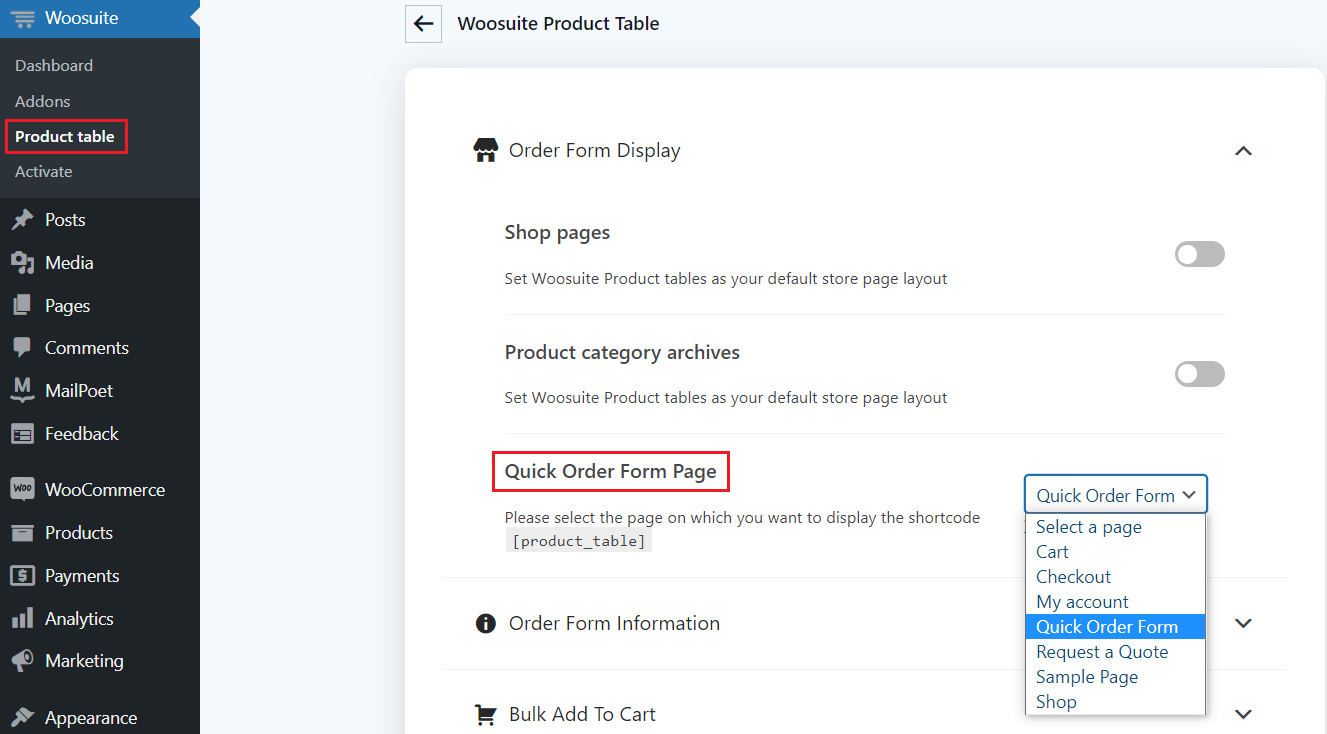
After you activate the plugin, by default, it should create a Quick Order Form page to display the product table. You can change the page to display the product table from the Product Table setting.
Go to Woosuite and click the Product table. There you will find different options and settings to customize the quick order form or product table.
Shop pages: If you toggle on the Shop pages button, the product tables will be displayed on your default store page. Do not turn this on unless you want to display the product table on your shop page.
Product category archives: This option states whether you want to display the product table on the category pages or not. You can toggle this on if you want to show the product table on all categories published on your site.
Quick Order Form Page: You can select the page on which you want to display the product table or quick order form. This is the quick option for adding the product table to any existing page.
You can visit the Quick Order Form page on your website to view how the product table is displayed on the page.
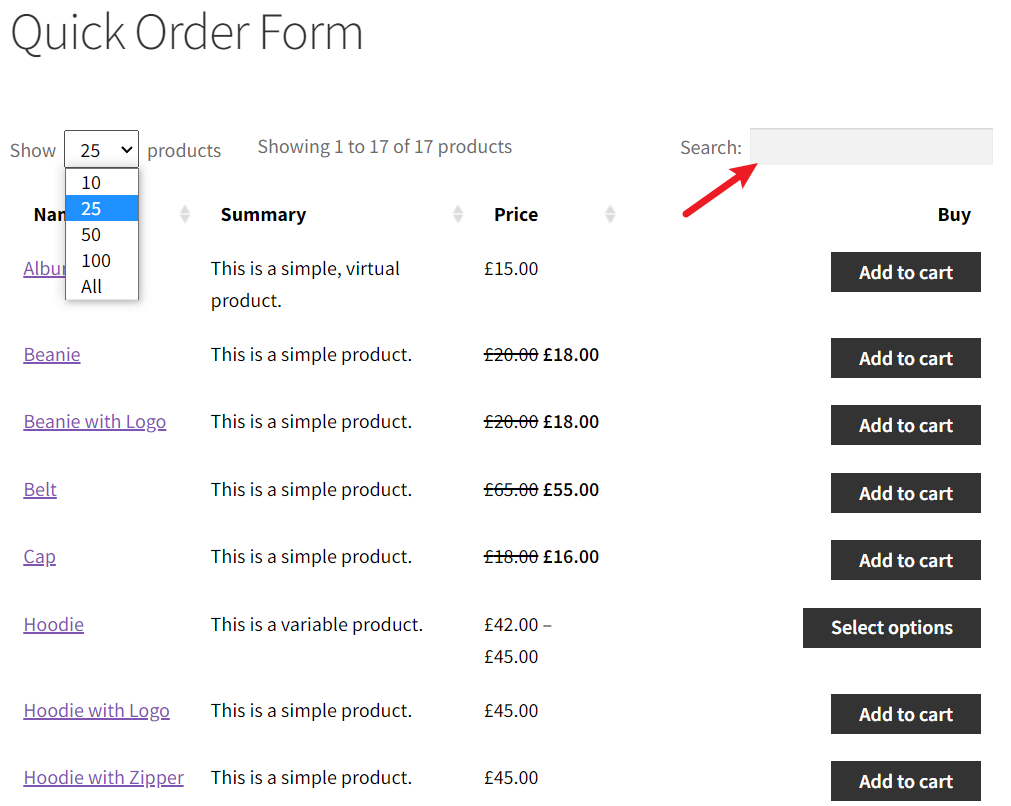
All the products are displayed on the table with columns Name, Summary, Price, and Buy option. Above the column, you can select the number of products to be displayed at once from the Show products dropdown. It also shows the number of products displayed on the table. From the Search option, you can easily find the products you are looking for. There are lots of other features that you can customize from the Product table setting.
Step 4: Add a New Page to Display Product Table
In this step, we will create a new page to display the product table and enable one page checkout on that page.
Go to Pages and click Add New. Then set a name for the page. For e.g., One Page Checkout.
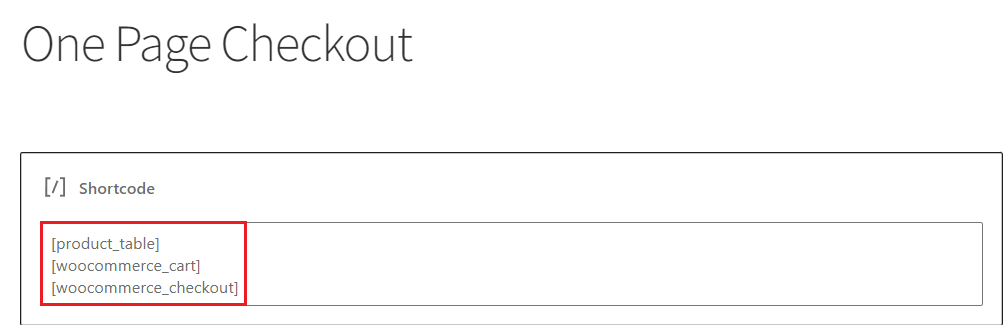
You can add a shortcode [product_table] on any page and display the product table on that page.
For displaying the cart and checkout on the same page, you can use:
[woocommerce_cart]
[woocommerce_checkout]
We will use the same method to display the product table, cart, and checkout option on our One Page Checkout page.
Then publish and view the page to see how the one page checkout page looks.
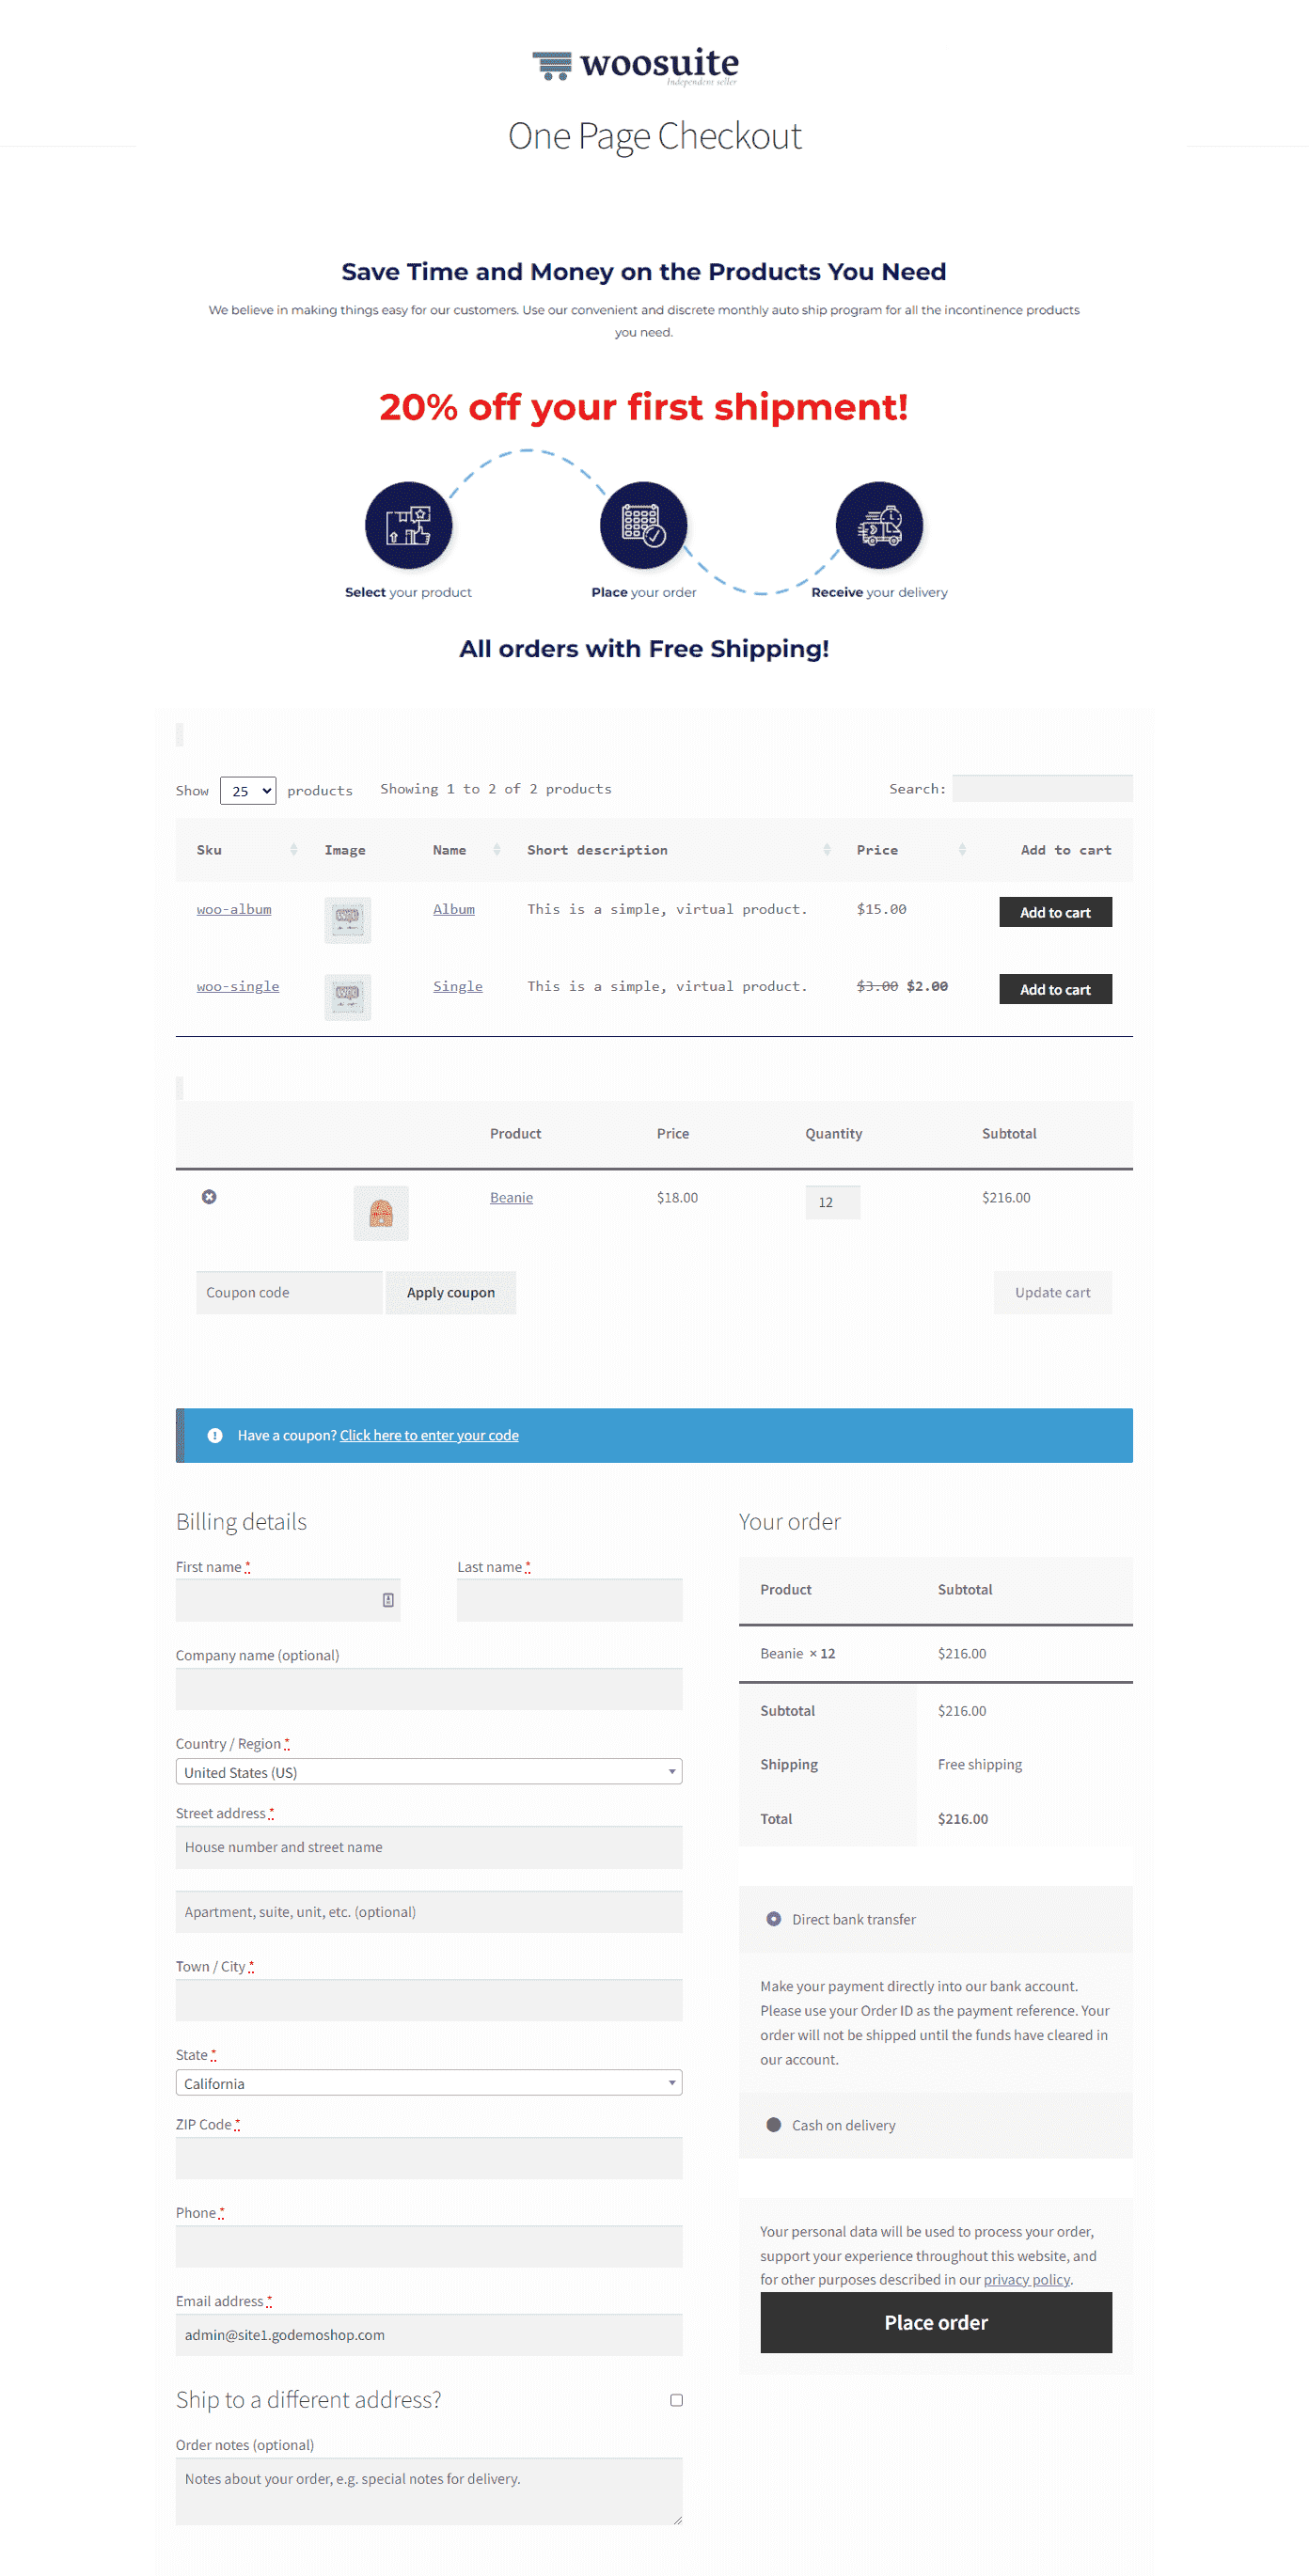
As you can see, you can browse products, add to cart, and checkout them on a single page. You can modify the Product table setting to show the additional features and information on the product table..
So, jump to the next section and figure out additional settings to configure in the product table.
Step 5: Additional Settings for Product Table
In this step, we will make some changes in the setting to display additional information.
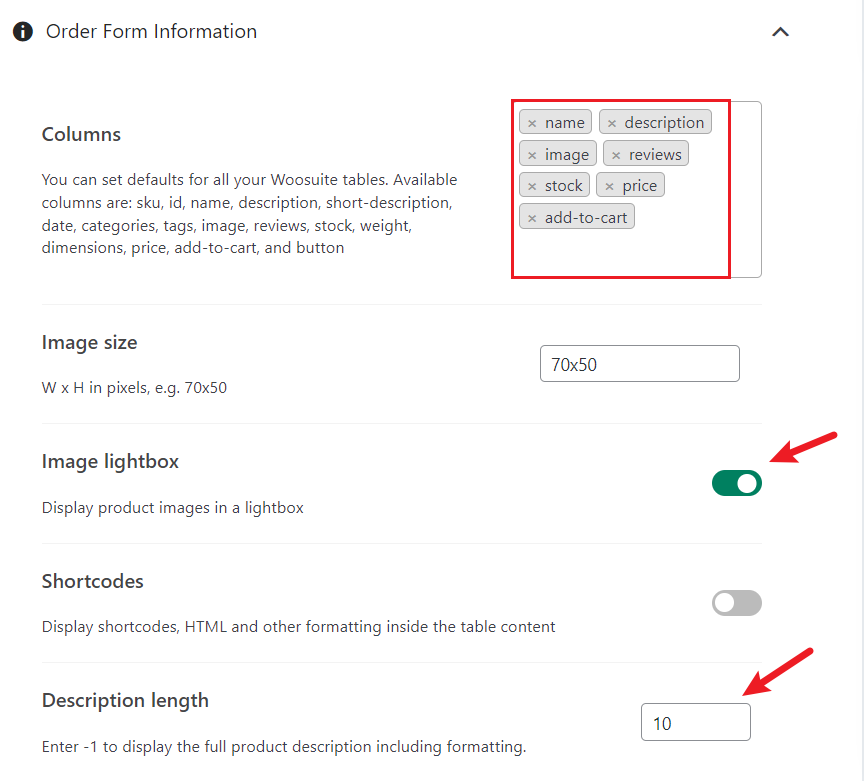
Go to Woosuite and click on the Product table from the submenu. On the Product table page, expand the Order Form Information setting. There you will find the following settings.
Columns: On this field, you can select different columns to add to the product table. The available columns are: sku, id, name, description, short-description, date, categories, tags, image, reviews, stock, weight, dimensions, price, add-to-cart, and button.
Image size: You can change the image size according to your preferences. By default, it is 70×50 which fits well in the product table.
Image Lightbox: This option allows the customers to view images in the lightbox. For example, when a user clicks on the image, the image will be displayed in a large popup. You can enable this option if you want. It will help customers to see products in detail.
Shortcodes: Only enable this option if you want to display shortcodes, HTML and other formatting inside the table.
Description length: You can control the description length of products in the table. It allows you to set the description limit if you have added a description column. For example, setting 10 will only show the first 10 words of the description in the table. You can enter -1 to display the full description.
Product links: This option helps to create a hyperlink on tags such as category, tag, or attribute.
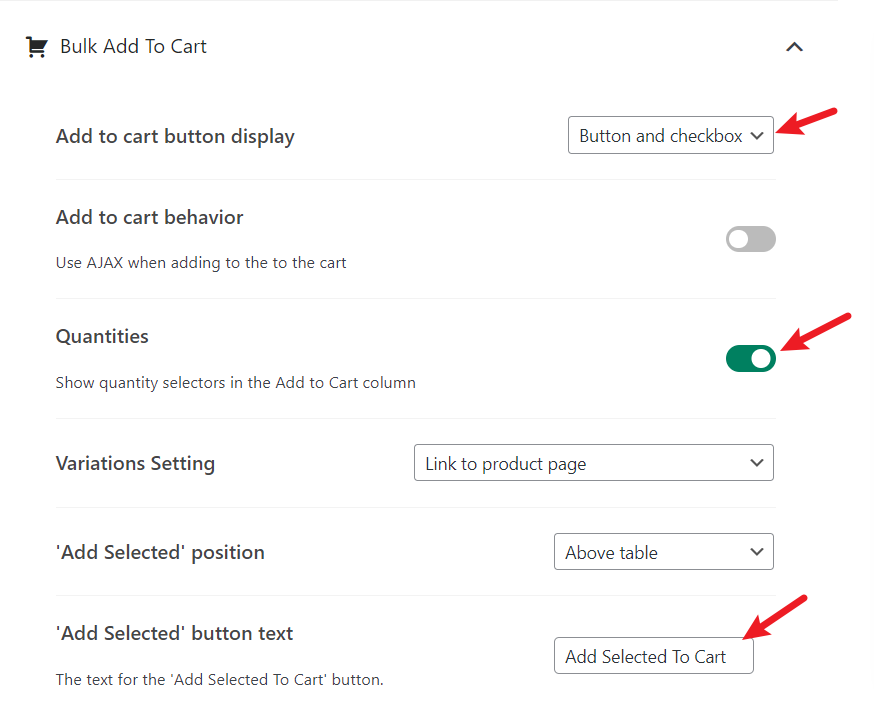
Bulk Add to Cart Settings:
In this section, you can customize the settings for the Add to Cart button.
Add to Cart Button Display: It allows you to change the option for adding the products to cart. By default, it is Button only but you can select to display “Checkbox only” or “Button and checkbox”. It helps to show the checkbox alongside all products in the product table so the customers can select multiple products and add them to cart with a single click.
Add to cart behavior: Do NOT enable this option, otherwise, the page will not reload when the customers add products to the cart. As a result, the users will not see the correct products in the cart and checkout section.
Quantities: By default, the product table does not show the quantity selectors in the Add to Cart column. After you enable this option, the users will be able to select the product quantity before adding the products to the shopping cart.
‘Add Selected’ button text: If you enable the checkbox in add to cart, you can use this option to change the text for the ‘Add Selected To Cart’ button. The ‘Add Selected To Cart’ button is used to add all products to cart by selecting multiple products using the checkbox.
Step 6: Customize the Product Table Design(Optional)
The Product Table plugin offers the design options for customizing the product table and making it look more attractive. So, in the Product table setting, expand the Order Form design. The design option is set to default, you can get additional settings for design by changing it to custom.
You will see options like Border Outer, Border Header, Border Cell, Header background, Header font, and many more. You can modify them to change the border size, background color, text color, and font size.

Final Results
We have configured all the required settings for the product table, now it’s time to save the settings. So, head over to the top right corner of the Product table setting and click on Save changes. Then visit the One Page Checkout page and verify whether all the settings are visible in the table.
As you can see in the image below, all of them are applied to the product table.

In this way, you can easily enable the one page checkout shop in your WooCommerce store. Here is an example showing that the users can browse products, add them to the cart, and checkout on a single page. As a result, it makes the shopping process easier for your customers.

Frequently Asked Questions
Q. How do I enable WooCommerce single checkout?
Ans. The best way to enable WooCommerce single checkout is by using the plugin. And the Product Table plugin is an excellent choice if you are searching for the best and easy-to-use plugin for the one page checkout.
Q. How do I combine checkout and cart in WooCommerce?
Ans. Yes, you can combine checkout and cart in WooCommerce. In this article, we have shown how you can combine checkout and cart with the product table to create a one page checkout shop.
Q. How do I customize the product table or quick order form?
Ans. The Product Table plugin does not only add the product table but offers extensive features to display the additional information and customize the design of the table.
Conclusion
As you can see, the Product Table plugin is a wonderful choice for creating WooCommerce one page checkout shop. It makes it easier to browse products, select them and perform checkout on a single page. We also learned to display different columns, quantity selectors, and checkboxes on the product table. We hope you understood everything correctly and will be able to create a one page checkout shop for your WooCommerce store.
Ready to enable WooCommerce One Page Checkout Shop? Get the Product Table plugin now.
If you have any queries, please share them with us in the comment section below.


