Do you want to combine the WooCommerce cart and checkout pages?
If yes, then you’ve landed at the right place!
Usually, WooCommerce has two separate pages for cart and checkout. And if you want to merge them into a single page, you need to use custom code.
It can be complicated for users without any technical and coding experience.
But don’t worry. I got you covered here!
In today’s article, I’ll show you the step-by-step process to combine the WooCommerce cart and checkout page with the help of the AIO Checkout plugin.
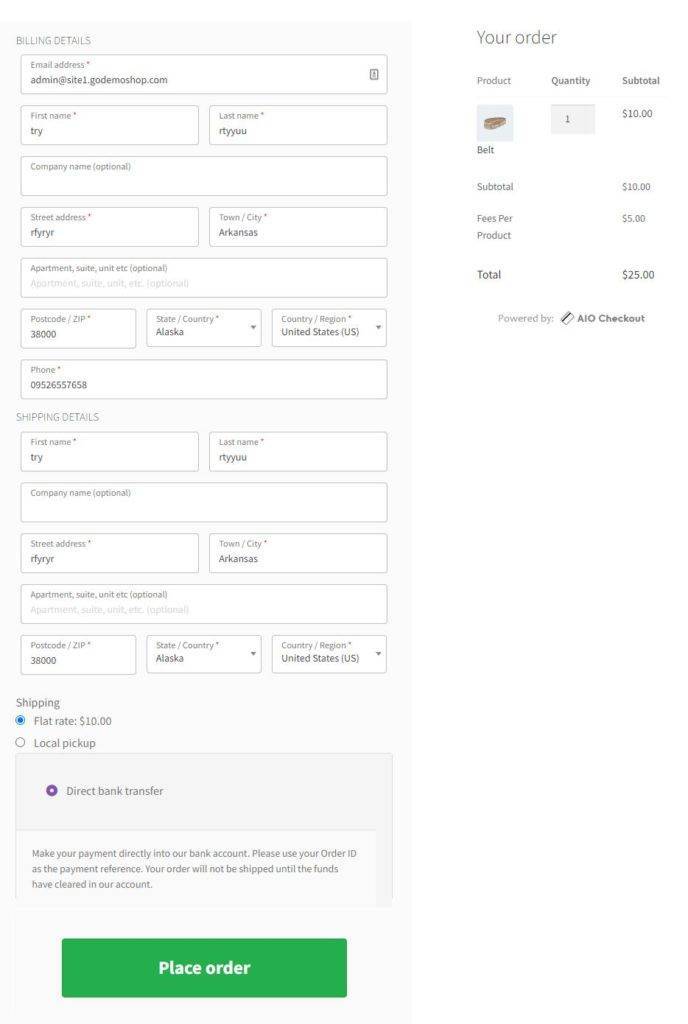
Here’s a quick sneak peek of the final results.
How to Combine WooCommerce Cart and Checkout Page?
First, we need to create a checkout page with the help of the AIO Checkout plugin, and then we’ll combine the cart and checkout page by enabling a few options from the plugin’s settings.
Note: Remember that the settings will only work with the checkout form created with the AIO Checkout plugin. The plugin’s settings won’t work for the default WooCommerce checkout form.
So follow the following steps to combine the WooCommerce cart and checkout page.
1. Install and Activate the AIO Checkout Plugin
First, you need to download the AIO Checkout plugin from the Woosuite store. It is free, and you can get it by submitting the form.
Once you have downloaded it, navigate to the Plugins » Add New from your WordPress admin dashboard, and click the Upload button to upload the downloaded file to install and activate the plugin.
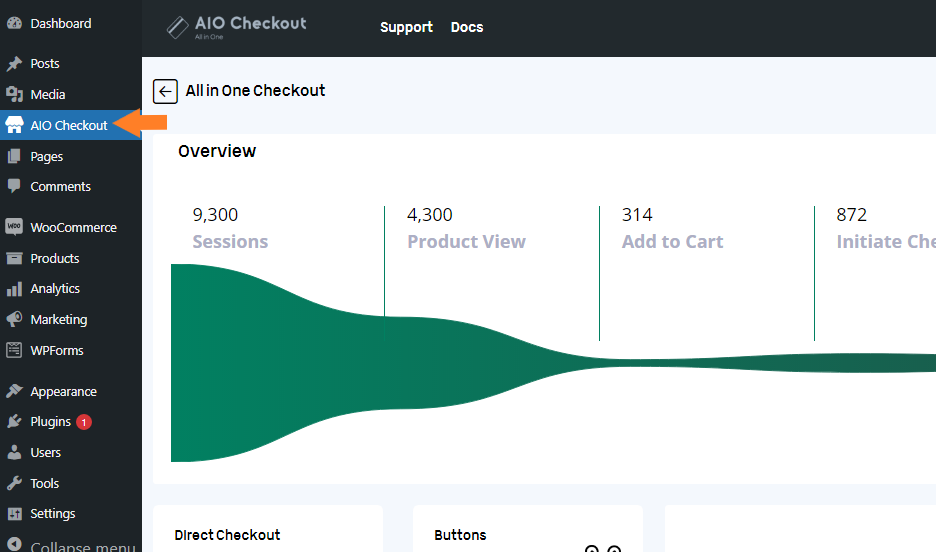
Once you have installed and activated the plugin, navigate to AIO Checkout from your WordPress dashboard.
3. Create a New Checkout Form
Click the “Create New Checkout” button to create a new form.

Once you click the button, you’ll be redirected to a new checkout form edit page. It will be the default checkout form. Now, if you want, you can customize it by hiding a section, adding custom fields, and much more.
But for this tutorial, I’ll keep it to the default because our focus is to combine the cart and checkout page to provide a fast checkout process to users.

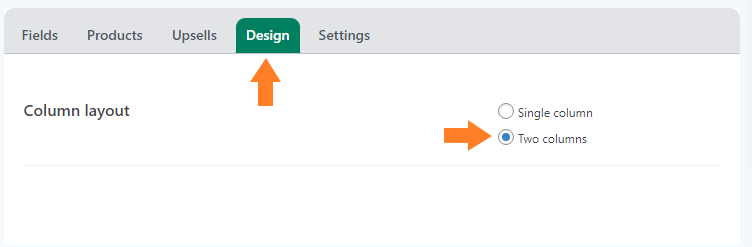
4. Select the Design of the Checkout Form
Once you have created the form, click the “Design” tab to select the form’s design. You can choose the design as
- Single Column
- Two Columns
There will be some templates to select from in future updates, but for now, I have used the “Two Columns” design for this tutorial, but you are free to choose any of them.
To select it, select the “Two Columns” button.
5. Enable the Checkout Form
Once you have selected the design of the checkout form, click the “Settings” tab and enable the form by toggling the “Enable” button.
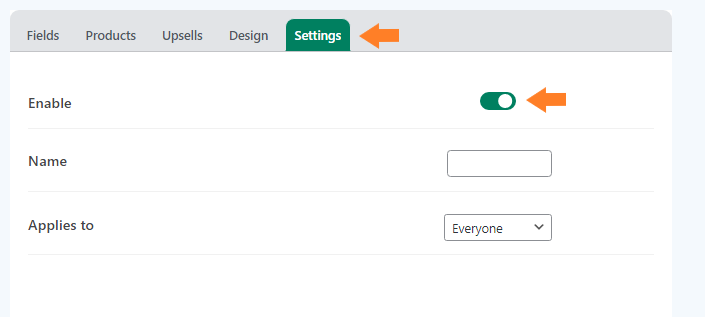
5.1. Give a Name to the Form
Now in the “Name” field, give a name to the form. The form’s name will be helpful if you have created different forms for different user roles.
You can apply this form to specific user roles from the “Applies to” dropdown. For this tutorial, I am keeping it to “Everyone,” but it depends on your needs.

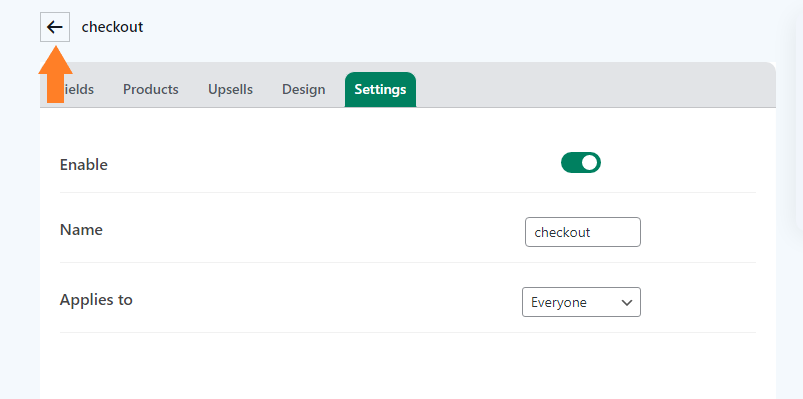
5.2. Save Changes
Now click the green “Save” button at the top right corner of your screen to save the settings.

6. Enable the Checkout Edit
Once the checkout form is saved, we need to “Enable the Checkout Edit” so the users can edit the products and their quantities from the checkout.
As we combine the cart and checkout pages, you must enable it because it will allow the customers to edit the cart item’s quantity and purchase it from a single page.
Click the arrow at the top to go back to the general settings of AIO Checkout.
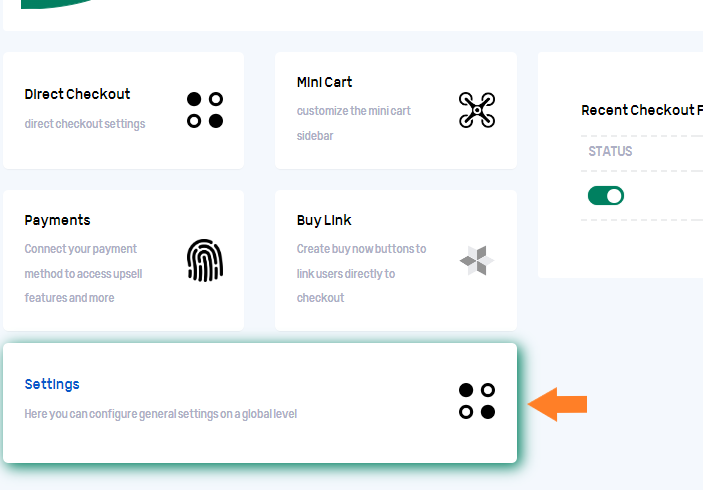
6.1. Click the Settings Section
After that, you’ll reach the general settings page of the plugin. Hover your mouse to the “Settings” section and click it.
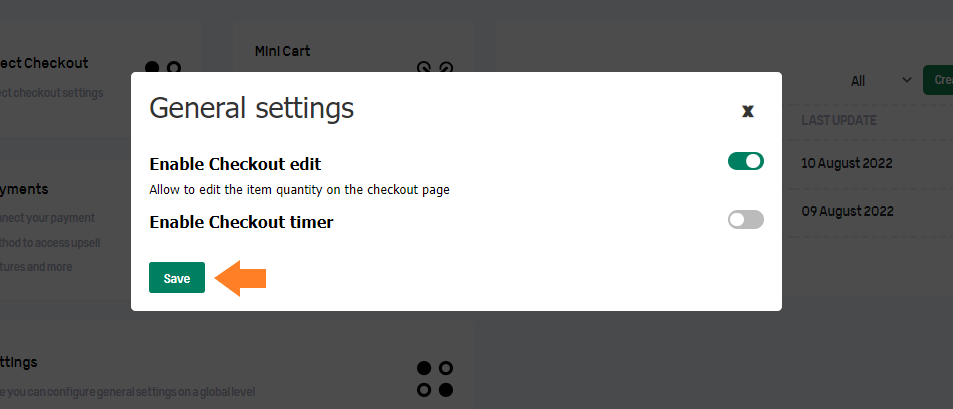
6.2. Enable the Checkout Edit
Once you click the settings, a popup will appear. To allow the customers to edit the items from the checkout page, we need to enable the checkout edit.
So toggle the button next to the “Enable Checkout Edit” to enable it.
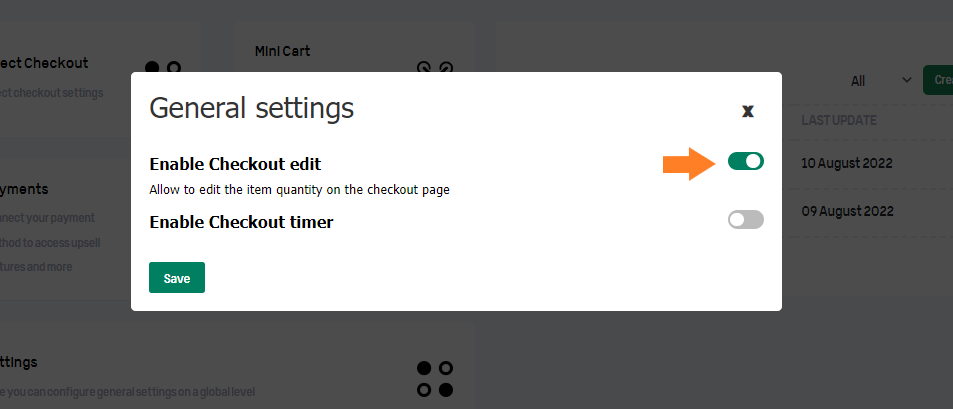
6.3. Save the Changes
Once you have enabled the checkout edit, click the “Save“ button in the popup to save the settings.
7. Enable the Direct Checkout
After that, you need to enable direct checkout. It is a good practice to enable it so the users can directly go to the combined cart and checkout page instead of Woocommerce’s default add-to-cart page.
They can edit the items from the combined cart and checkout page.
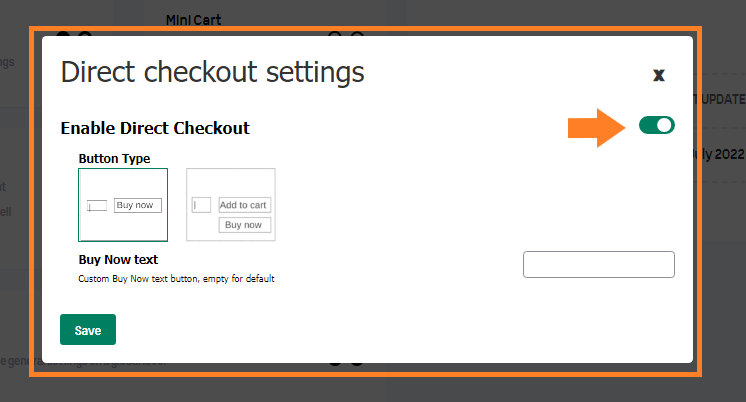
To enable the direct checkout, hover your mouse over the Direct Checkout box and click it.

Once you click it, a popup will appear from where you can enable the direct checkout to display the Buy Now button on the WooCommerce shop and product pages.
7.1. Toggle the Direct Checkout Button
To enable it, toggle the “Enable Direct Checkout” button.
It will replace the add-to-cart button on the shop and the product pages with the “Buy Now” button.
It will take the users to the combined cart and checkout page, skipping WooCommerce’s default add-to-cart page, and the users will be able to purchase and edit the product’s quantity quickly from a single page.
You can simultaneously display the “Add to Cart” and “Buy Now” buttons. Also, you can customize the Buy Now button text if you want.
7.2. Save the Settings
Once you have enabled the direct checkout, click the “Save“ button in the popup to save the settings.

8. Final Results
Once you have made all the settings, it is time to test them.
To test them, visit your store’s shop page, and you’ll notice that the ‘Add to Cart’ button is replaced by the ‘Buy Now’ button.
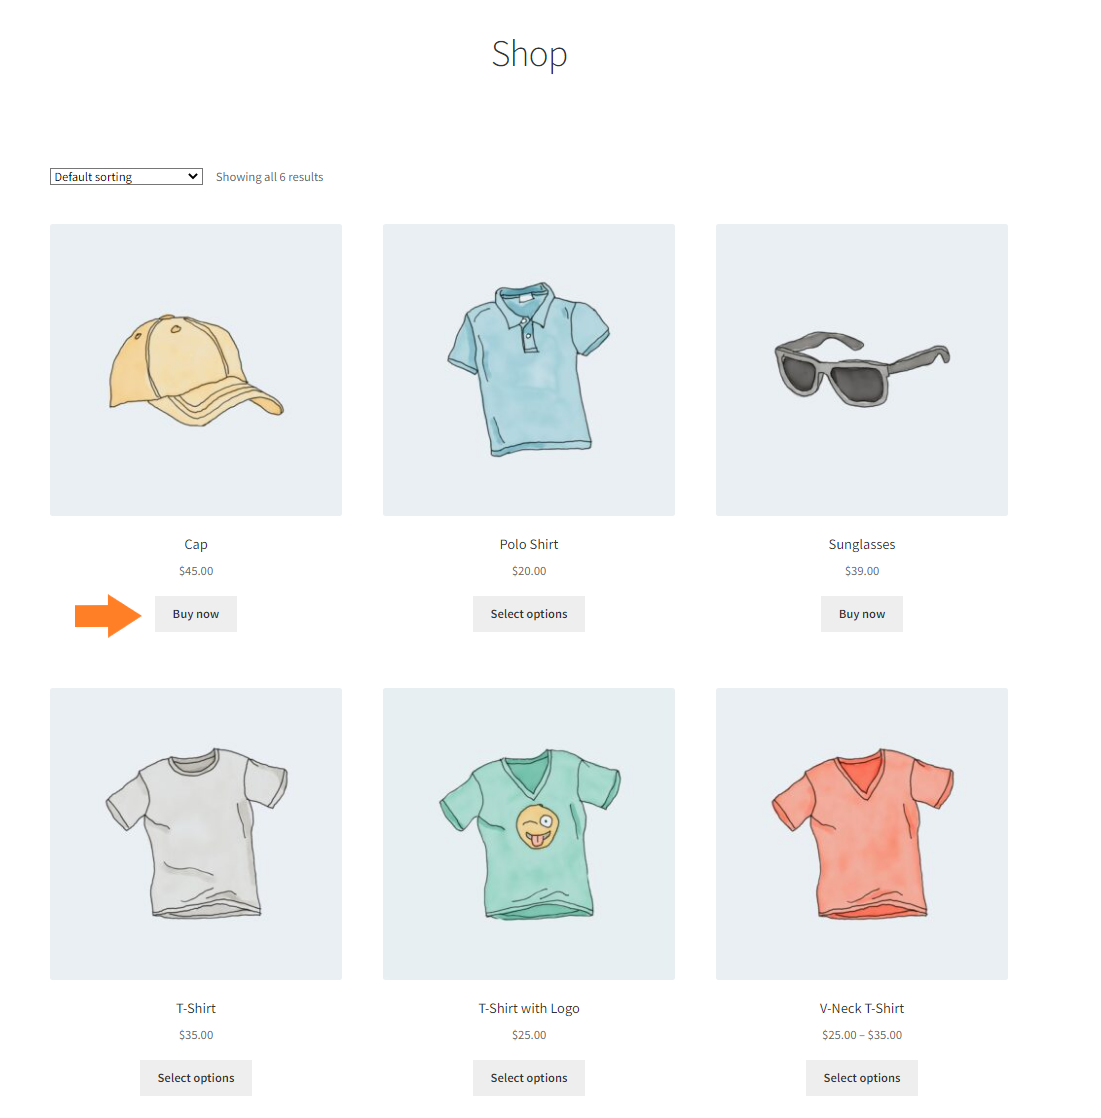
And if you click it, you’ll redirect to the combined cart and checkout page. From that page, you can edit the product quantity, remove the product from the cart, fill up the checkout form, and complete the purchase.
Wrapping Up
That’s it for today’s tutorial.
Now you know how to combine the WooCommerce cart and checkout page in a few easy steps without using any custom code. AIO Checkout plugin is a single solution to all the checkout issues you can face in WooCommerce.
I hope this article helped you learn to combine the WooCommerce cart and checkout page. If you have any questions, you can post them below in the comments or contact our customer support.
The customer support team is quick in answering your questions and helping you. They typically reply within 24 hours or less.
Download the AIO Checkout plugin to improve the customer’s experience and boost sales!


