Are you wanting to set WooCommerce shipping by user roles? You don’t need to worry anymore. I have got you covered.
In this article, I will show you how to add WooCommerce shipping by user role step by step. I will use the Dynamic Shipping and Payments plugin to carry out this tutorial.
WooCommerce allows you to create different shipping methods for your customers. You can even offer free shipping to your eCommerce store customers based on their cart amount or total order value. Everything is fine. Here is a problem.
WooCommerce doesn’t allow us to add WooCommerce shipping by user roles. You can select which users can use this particular shipping method. Yet, this can be done with the help of the Dynamic Shipping and Payments plugin.
So, continue reading ahead and check out how to add WooCommerce shipping by user roles.
On This Page
Why Offer WooCommerce Role-based Shipping?
There could be multiple reasons for offering role-based shipping to your WooCommerce store customers. It depends on what type of WooCommerce store you are running. Some of you might be running a B2C store, while some B2B and B2C stores only. To give you a clear perspective about use cases, here I’m mentioning the use cases.
B2B and B2C Store: You might go with this feature if you are running a B2B and B2C store, you can set different shipping for each customer groups
Member Only Sites: Another use case is running a member-only site or offering a premium subscription to our customers. You can offer free shipping to your premium customers and normally charge from your typical customers.
To Logged In Users: You can offer discounted shipping to your logged-in customers. While the logged users will see shipping charges on the product page.
These are the use cases of WooCommerce role-based shipping. Read the following section to check how to add WooCommerce shipping by user role.
You Might Be Looking For:
- How to Create Shipping Discounts in WooCommerce? (Step-by-Step Guide)
- How to disable payment gateways per user role
How to Add WooCommerce Shipping By User Role?
To add WooCommerce shipping by user role, we will use the Dynamic Shipping and Payments plugin. I will use the Dynamic Shipping and Payments plugin throughout this tutorial to explain each step. In addition, I will attach images to make you understand the process easier.
Step 1. Install and Activate the Dynamic Shipping and Payments plugin
Note: You can skip this step if you have already installed and activated the Dynamic Shipping and Payments plugin.
To install the Dynamic Shipping and Payments plugin, we need to install the Woosuite Core plugin and activate the license. So, we have created a Quick Start Guide for you to figure out how to install and activate the Dynamic Shipping and Payments plugin.
Step 2. Create Shipping Zones
Now, we will need to create Shipping Zones. WooCommerce allows us to create shipping zones from its settings. To create shipping zones, go to the WooCommerce settings. Then, go to the Shipping sections in the WooCommerce settings.
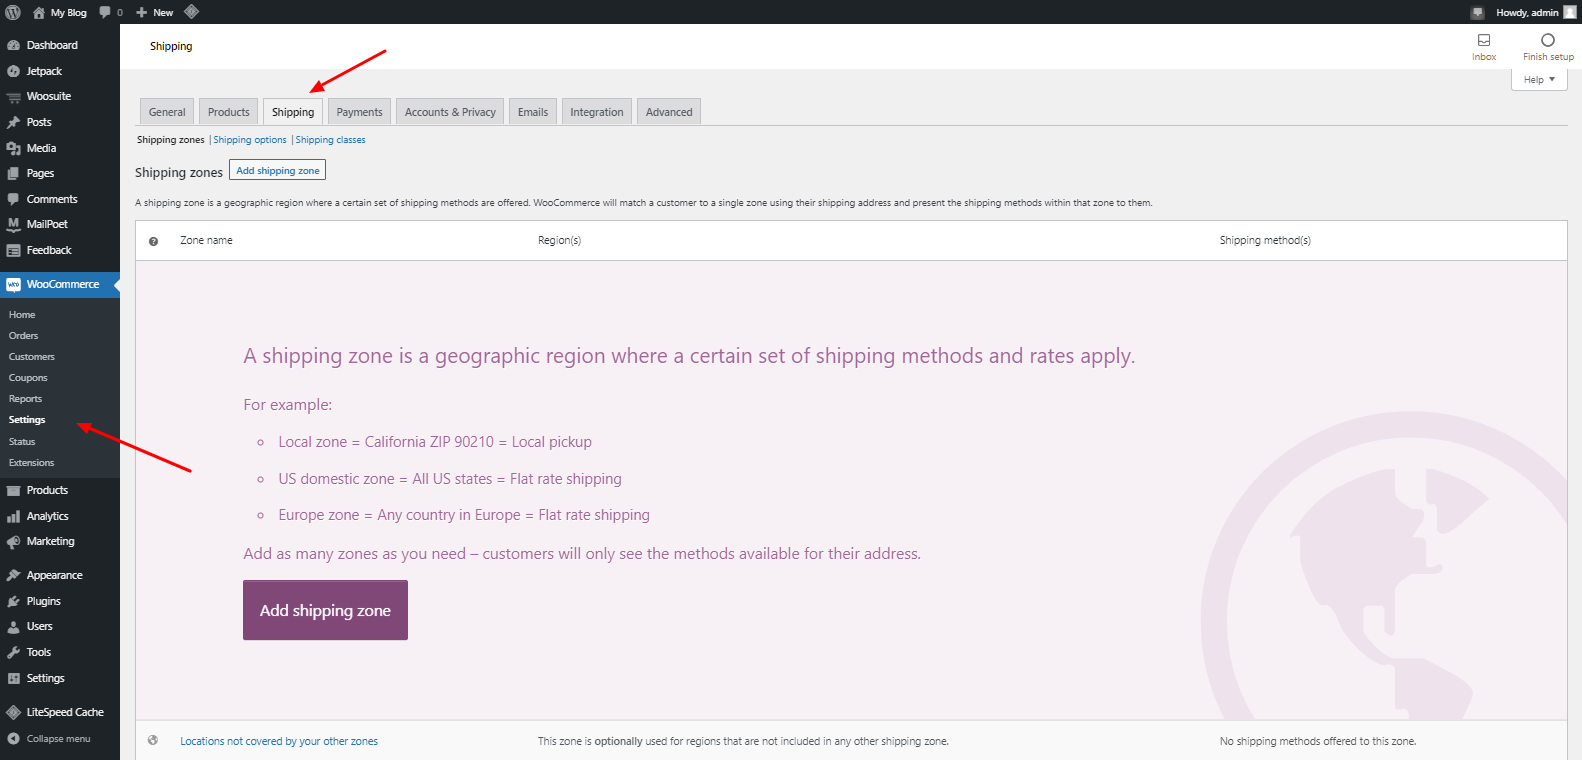
Click on the Add Shipping Zone button to add a new shipping zone. After clicking on it, you will see a new page with some additional settings. You can start configuring them as mentioned below.
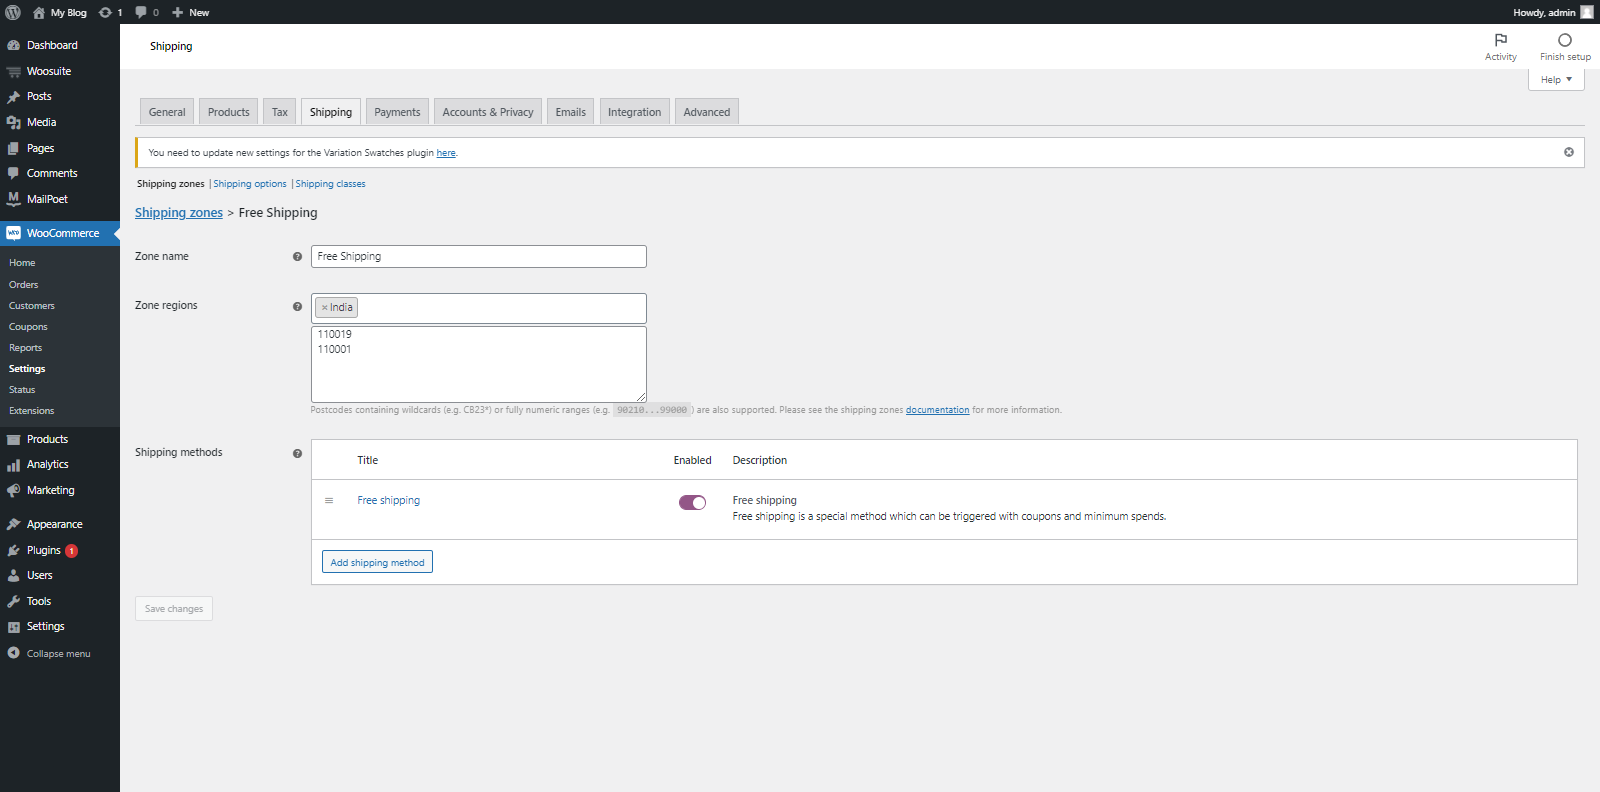
2.1 Zone Name: In this section, give a name to your shipping zone. For instance, you plan to sell in India, so you can name it India.
2.2 Zone Regions: In the Zone Regions, select the region in which you want to offer free shipping. Let’s say you plan to sell in India, so select India from the given countries.
Now, if you want to limit it to specific regions, click on the Limit to Specific Postal/Zip Codes, and enter the Zip Codes in the given box. For example, enter the Zip Code to which you want to offer the particular shipping method.
2.3 Shipping Methods: You will see three options: Free Shipping, Flat Rates, and Local Pickup. From these three given options, you have to select the Shipping Method according to your requirements. I will select Free Shipping.
I will create two shipping zones for this tutorial – Local Shipping Method and Free Shipping Method.
After that, click on the Save Changes button to save all the changes and move forward.
Step 3. Configure the Free Shipping Method Settings
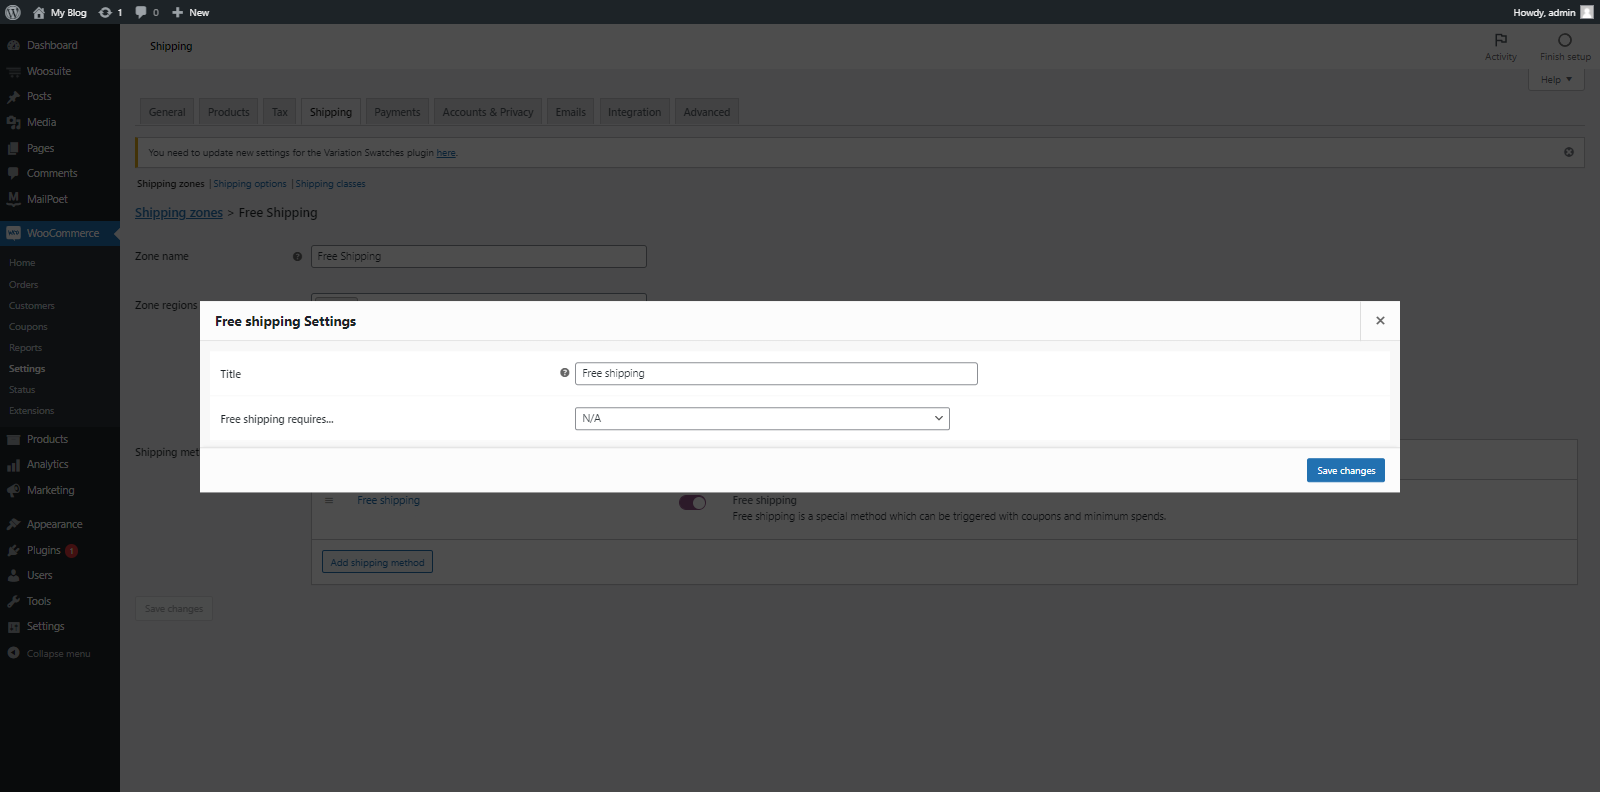
Now, we will need to configure local pickup delivery settings. To do that, click on the Edit button to configure the Free Shipping method settings. You will see the Edit option below the Title. After clicking on Edit, you will see a popup with new options. We will now configure each option individually.
3.1 Enter Title: Use this to give a name to the Local Pickup method. You can name it Free Shipping for Wholesale Users In India.
3.2 Free Shipping Requires: By default, this would be selected as N/A. It means there will be no condition when this rule will be applied. You can select from other options as well according to your requirements.
You Should Read: How to Set Up Free Shipping For Bulk Order [Step-By-Step Guide]
Step 4. Assign User Roles to Shipping Methods
In this step, we will learn to assign user roles to shipping methods. To do this, you will need to install and activate the Dynamic Shipping and Payments plugin.
Navigate to Woosuite in the WordPress tool menu, and click on it. In the Woosuite submenu, search for the Shipping and Payments option and click on it.
You will see three new options on the next page – Payment Gateways, Shipping Methods, and Shipping Countries and States. You have to click on the Shipping Methods. Now, you will see different options on the next page, and we will configure them.
3.1 Short Description: In this field, add a short description of your new shipping rule. I’m naming it Free Shipping In India For Wholesale Users.
3.2 Exclude Methods: Select All ‘Local Pickup’ Method Instances and Flat Rate Shipping methods from these given options.
3.3. Add Condition: Select the Customer Role option from the Add Condition dropdown menu.
3.4 Select Roles: From the Select Roles section, select the role to which you want to apply this rule. I’m selecting the Wholesale Customer user role.
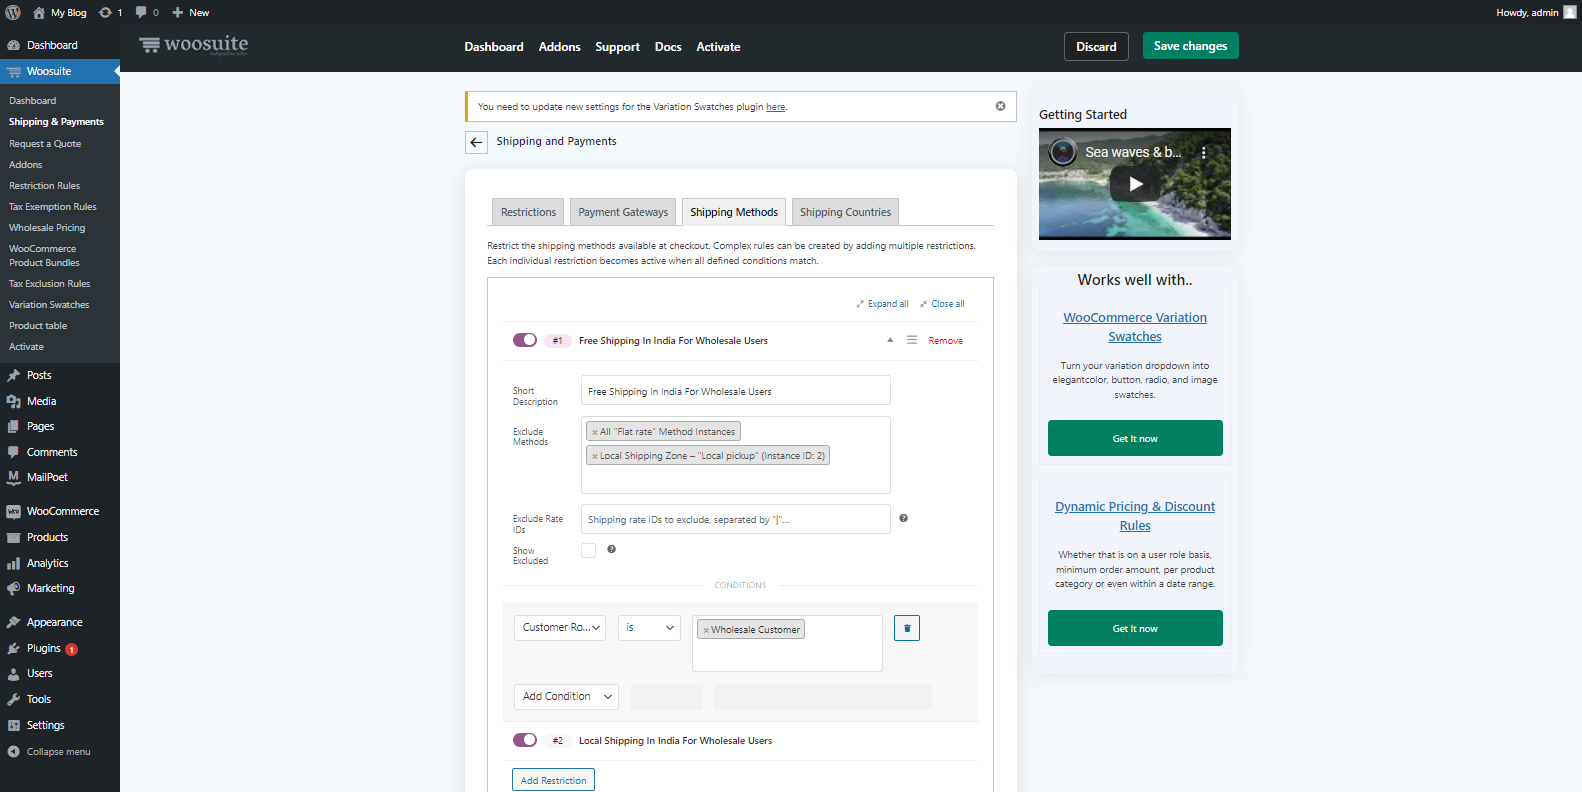
After that, click on the Add Restrictions button to create the shipping method rule.

Click on Publish to enable this new Shipping rule. If you have made changes to the rule, then click on Save Changes. If you want to enable or disable the rule, click on the toggle to do it.
Conclusion
In this article, we figured out how we can add WooCommerce shipping by user role. If you are facing any issues with the steps, do let me know in the comment sections. In addition, if you are facing any issues with the plugin, you can contact our customer support. We would be happy to assist you.


