In today’s article, I’ll walk you through the step-by-step process to set weight-based shipping in WooCommerce to give your customers more precise shipping prices. They will be assured that they are only paying for the exact weight of the products they are purchasing, eliminating unexpected or inflated shipping fees.
As a WooCommerce store owner, offering weight-based shipping will simplify the logistics, reduce potential shipping differences, and can even enhance profitability by ensuring accurate shipping costs.
So without any further ado let’s jump into it. But first, let’s take a look at what exactly is the weight-based shipping.
On This Page
What is Weight-Based Shipping?
Imagine you’re sending a letter and a big box of books through the mail. The letter is light and the box is heavy. It wouldn’t be fair to charge the same postage for both, right? That’s where weight-based shipping comes in!
Weight-based shipping is just like it sounds: your customers will pay for shipping based on how much something weighs. The heavier the package, the more it costs to send.
So, in your online stores, if a customer buys a lightweight item like a t-shirt, they’ll pay less for shipping than a heavy item like a kettlebell. It’s all about making sure the shipping cost is fair for everyone!
How to Set Up WooCommerce Weight-Based Shipping?
Setting weight-based shipping in WooCommerce can be ideal if you sell products that are heavy or if you sell in large quantities. By default, WooCommerce gives you three shipping methods.
- Flat Rate
- Free Shipping
- Local Pickup
If you want to add a custom shipping method, you need to use a code or a third-party plugin. So here, I’ll cover both these different methods to set the weight-based shipping.
The following are the methods you can use to get the desired results.
Method 1: Add Weight Base Shipping Using the Plugin
The first method to set up the weight-based shipping to your store is by using the plugin. I’ll use the WooCommerce Weight Based Shipping plugin to add this feature to my demo store. It is a free plugin and you can download it from the WordPress repository or your WordPress dashboard.
Requirements
Before jumping into the process of adding weight-based shipping to your store, you need to make sure that you meet the following requirements.
- Make sure all the products and variations have a weight greater than 0.
- Make sure you set the correct weight unit by navigating to WooCommerce > Settings > Products from your WordPress dashboard.
Once you meet these requirements, you can follow the following steps to add weight-based shipping to your WooCommerce store using a plugin.
1. Install and Activate the Plugin
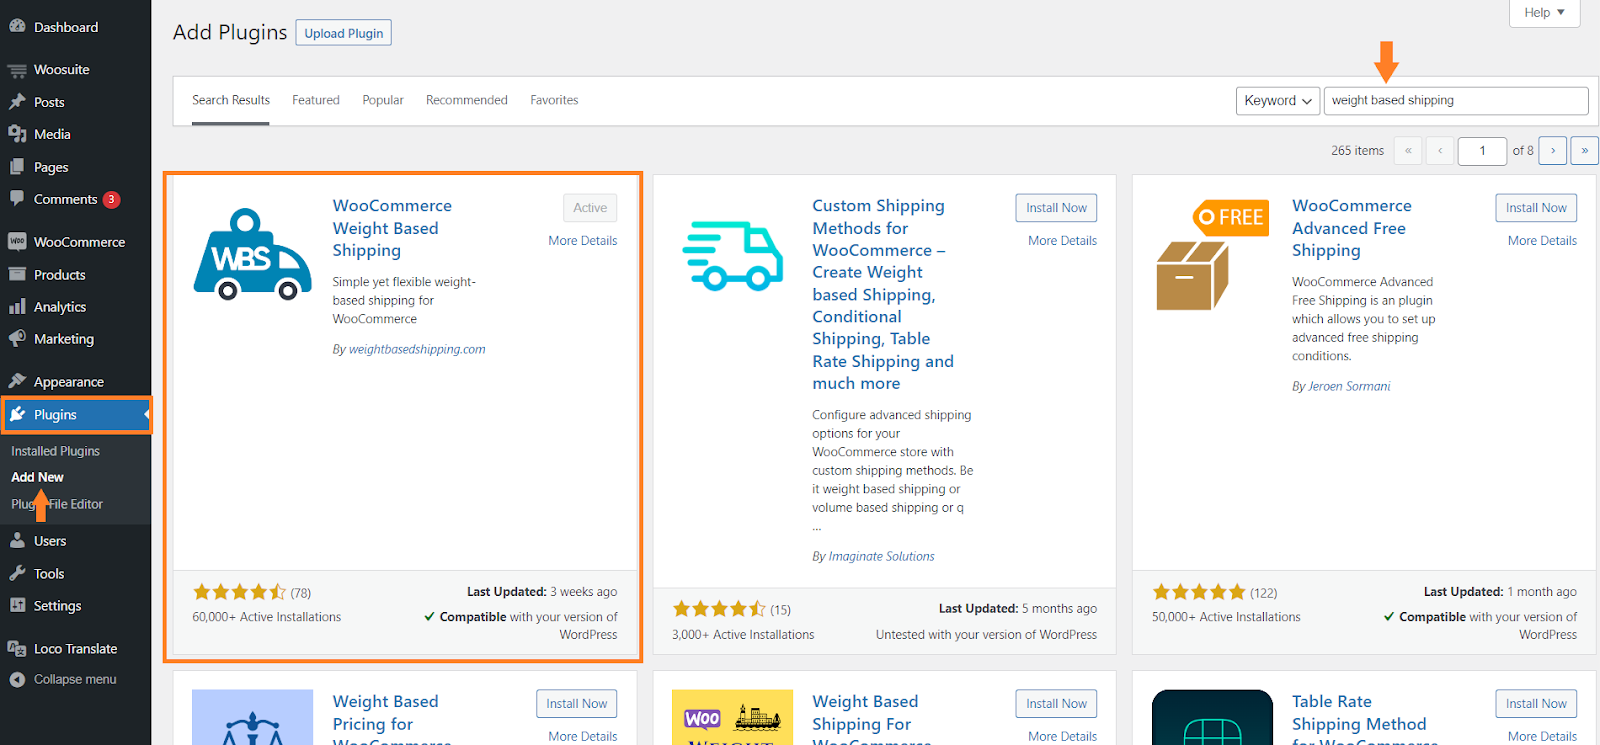
First, we need to install the required plugin that will help us set up the weight-based shipping. To install it, navigate to Plugins > Add New from your WordPress dashboard and search for ‘weight based shipping’ in the search bar.
You will get the plugin at the very top. Just make sure the plugin’s author has the same name as the plugin’s name.
You will see an ‘Install Now’ button right beside the plugin’s name. Click it to install the plugin. Once the plugin is installed, it will be replaced by the ‘Activate’ button.
You need to click it, to activate and use the plugin.
Note: I have already installed and activated the plugin so I could see the ‘Active’ button.
2. Add a Shipping Zone
Once the plugin is activated, we need to create a shipping zone. You can add the weight-based shipping method to existing shipping zones or create a new one.
You can also add this new shipping method to the global shipping zone.
If you have already created a shipping zone for your store, you need to edit it. I have not created any shipping zone to my store so I’ll first create a shipping zone.
You can simply follow the following results to create a shipping zone and add the weight-based shipping method to it.
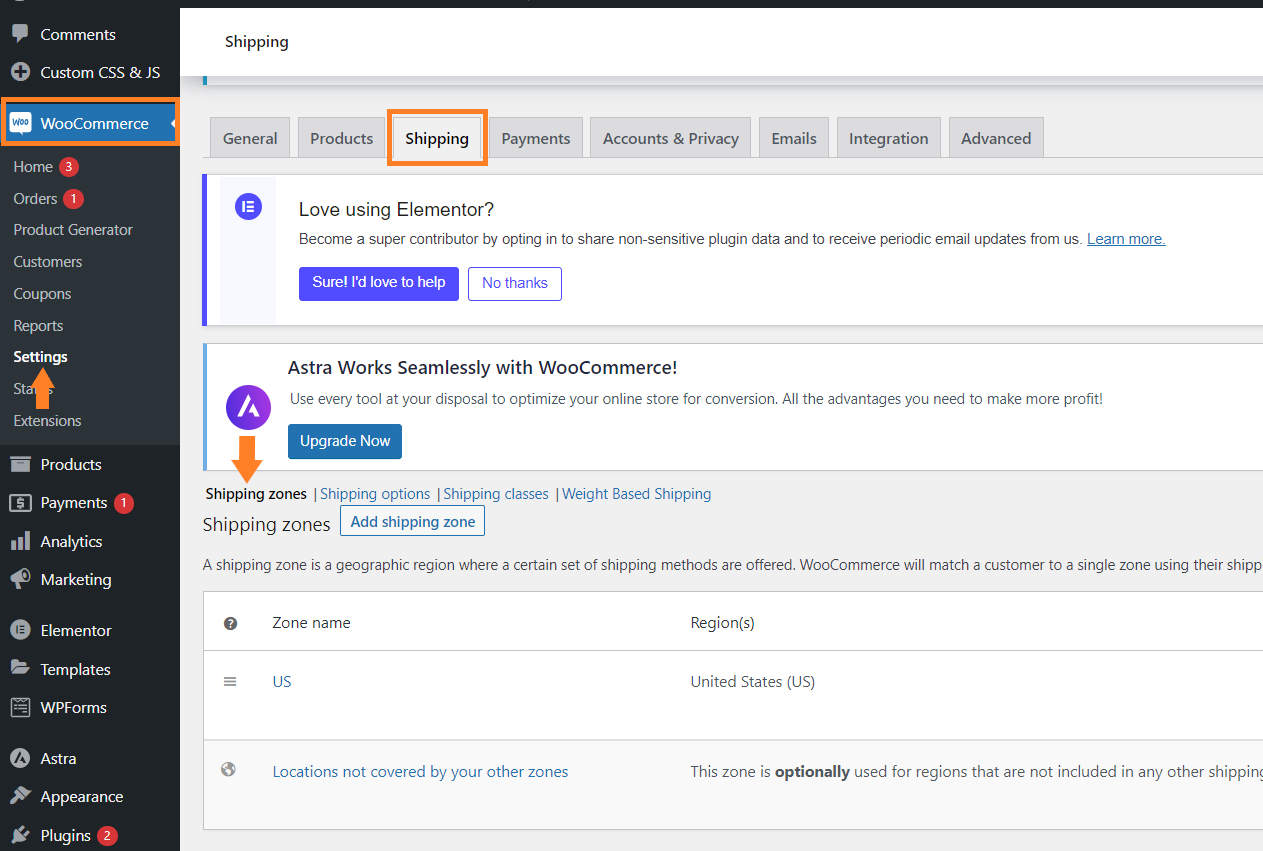
2.1. Navigate to Shipping
To create a shipping zone, navigate to WooCommerce > Shipping from your WordPress dashboard and ensure you are in the ‘Shipping Zones’ section.
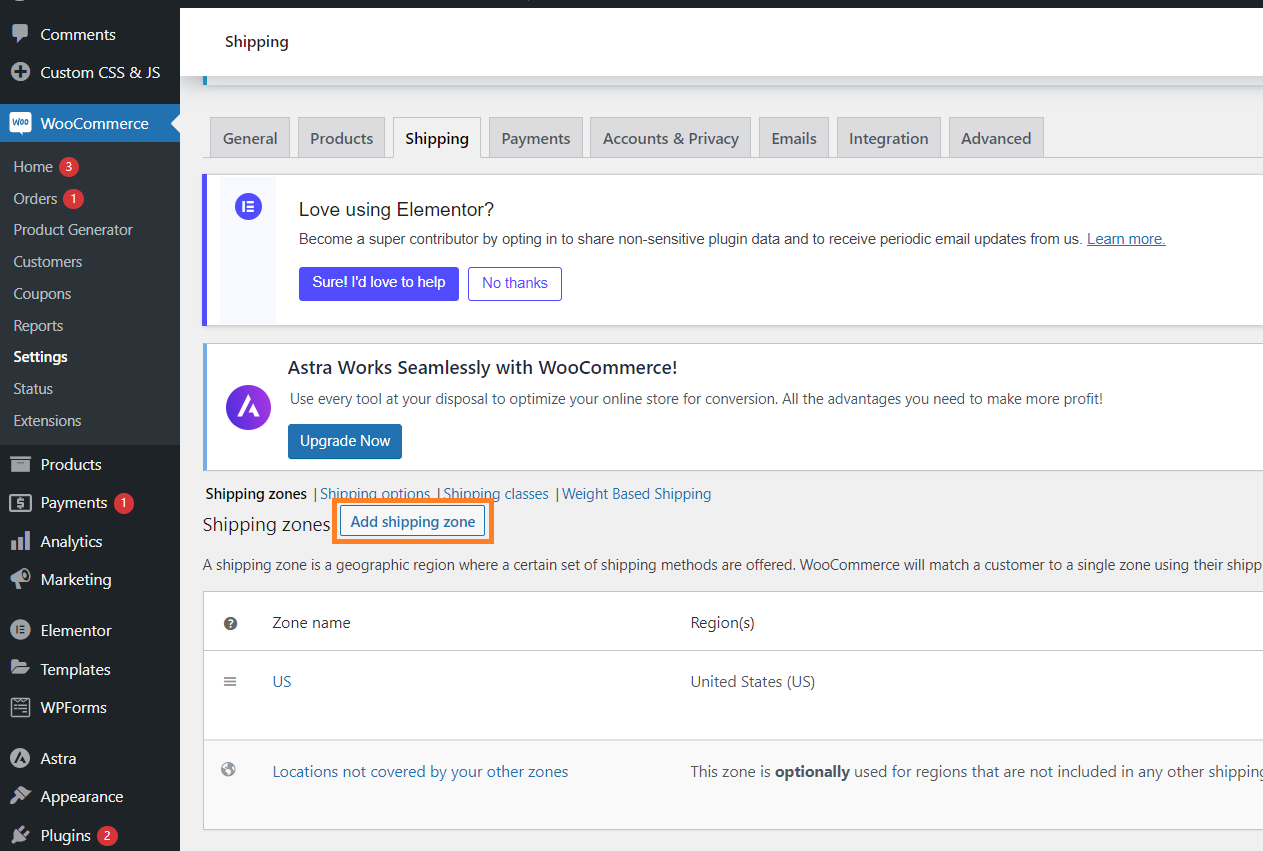
2.2. Add a Shipping Zone
Once in the shipping settings, click the ‘Add Shipping Zone’ button to add a new zone to your store.
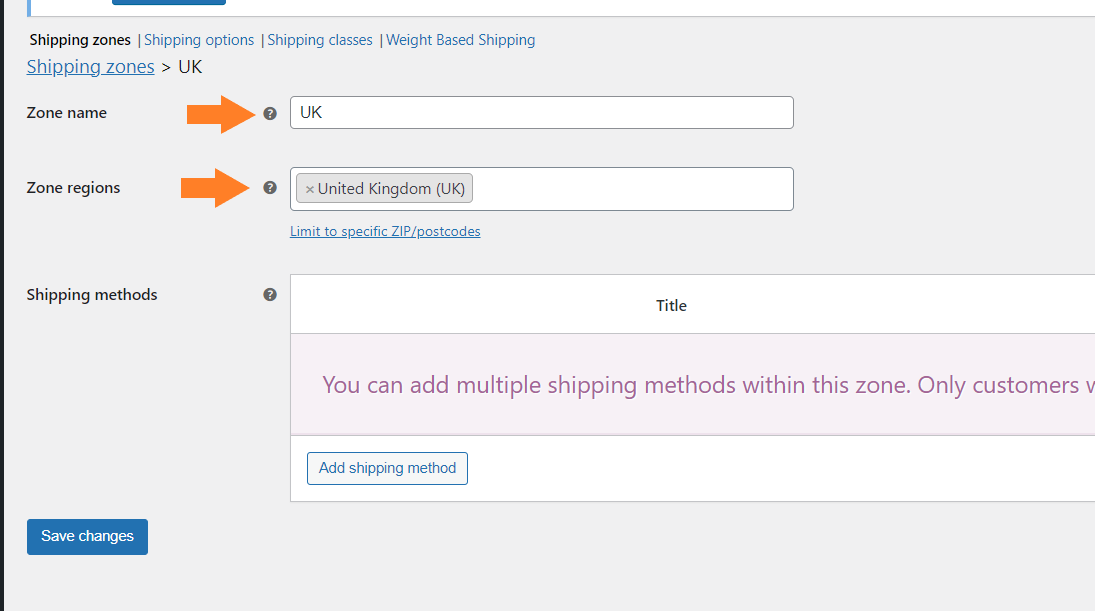
2.3. Configure the Shipping Zone
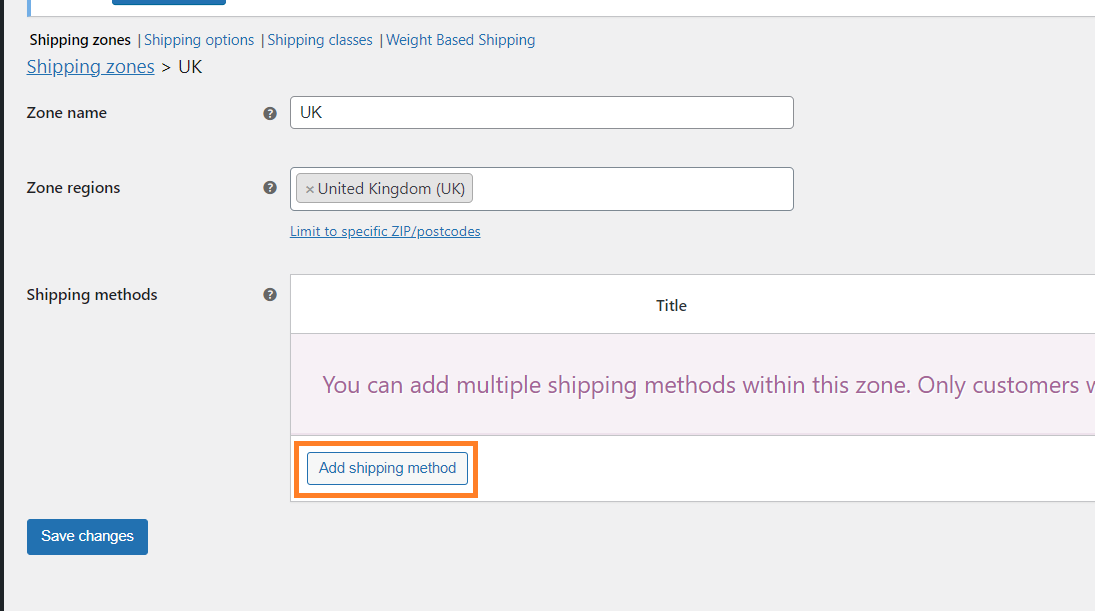
After clicking the button, you’ll be redirected to a new page where you can configure the shipping zone by giving it a name, selecting the countries, and adding shipping methods to it.
- In the ‘Shipping Zone’ field, give a name to this zone. If you are creating this zone for a specific country, then you can name it after the country name. I have named it after the ‘United Kingdom’ as I am creating a shipping zone for the UK. It won’t be displayed anywhere on the front end. It is just for your reference.
- Next, from the ‘Zone Region’ field, you need to select the region(country and state). You can select multiple regions as well. As mentioned before, I am creating a zone for the UK so I have selected the ‘United Kingdom’ from the dropdown.
3. Add WooCommerce Weight-Based Shipping Method
Once you have selected the region, we need to add shipping methods to this zone. You can add multiple shipping methods for this specific shipping zone.
Remember the shipping methods that you’ll add to this shipping zone will only be applied if a user has selected the same country and state that you selected at the backend.
For example, I have selected the ‘United Kingdom’ region from the backend. If a user is from the UK, he/she will only see the shipping methods that I’ll add to this specific zone.
To add the weight-based shipping method or any other method, click the ‘Add Shipping Method’ button in the shipping methods section.
3.1. Select the Weight-Based Shipping Method
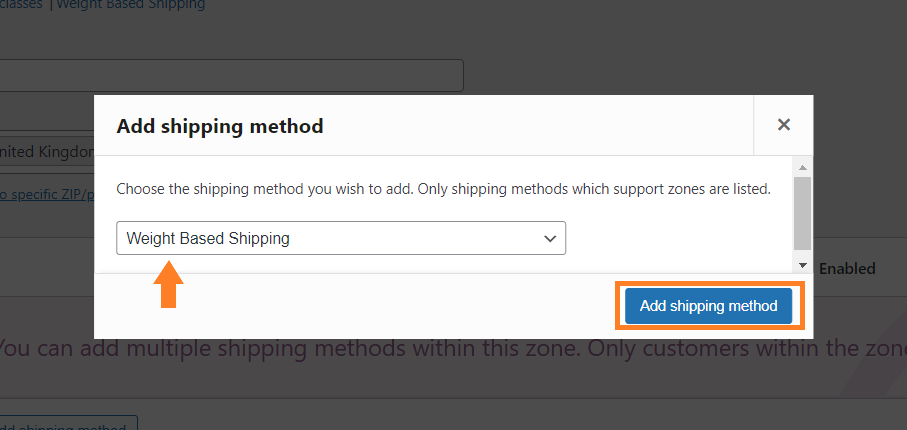
After clicking the button, a pop-up will appear on your screen. You need to select the shipping method you want to add to this specific shipping zone. It will have a dropdown with all the shipping methods(including the default and custom shipping methods that you added using third-party plugins or custom code).
The plugin that we installed at the very first step of this tutorial will add a new shipping method named ‘Weight-Based Shipping’ to the dropdown in this pop-up.
You need to select the ‘Weight-Based Shipping’ option from the dropdown to add this shipping method to your WooCommerce store.
Once selected, click the ‘Add Shipping Method’ button to add it.
3.2. Save Changes
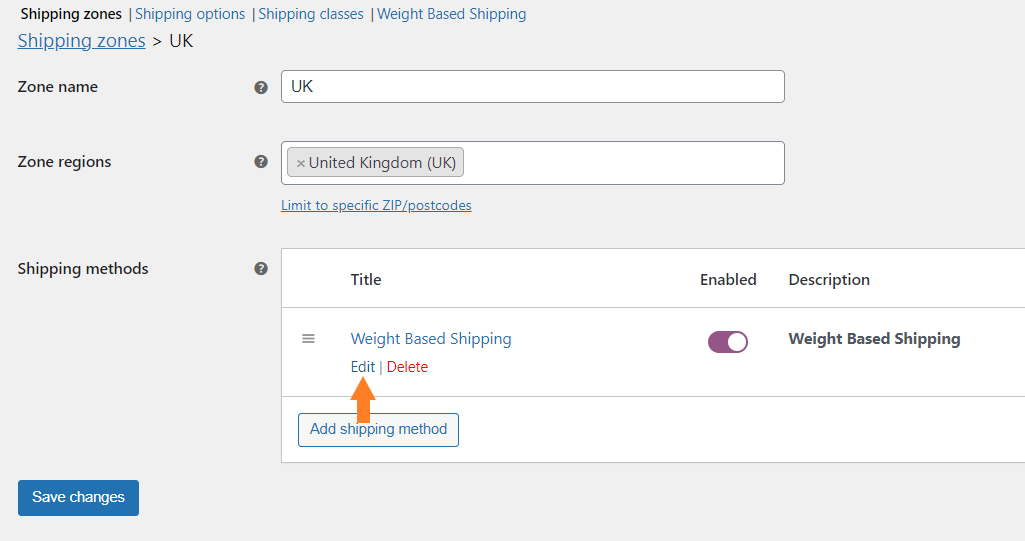
Once the weight-based shipping method has been added, the pop-up will disappear. Before configuring the weight-based shipping method, click the ‘Save Changes’ button to save the settings.
Without saving the settings, you may need to redo the complete process.

4. Add a Weight-Based Shipping Rule
Once the settings are saved, hover your mouse over the weight-based shipping method that you added in the previous step and click the ‘Edit’ button to configure this shipping method.
On the next page, click the ‘Add Shipping Rules’ button to add a weight-based shipping method.
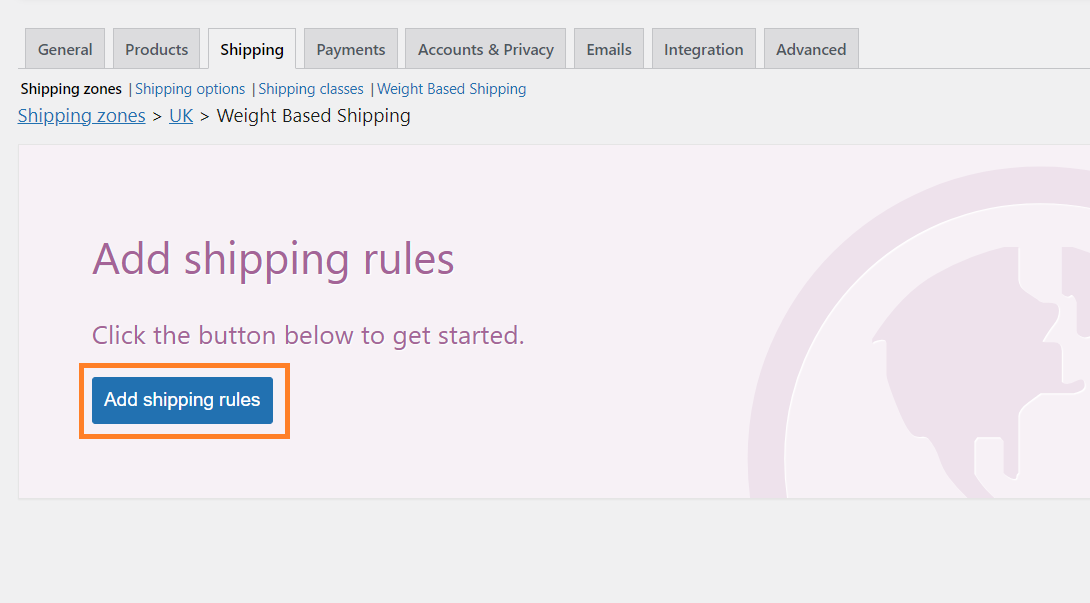
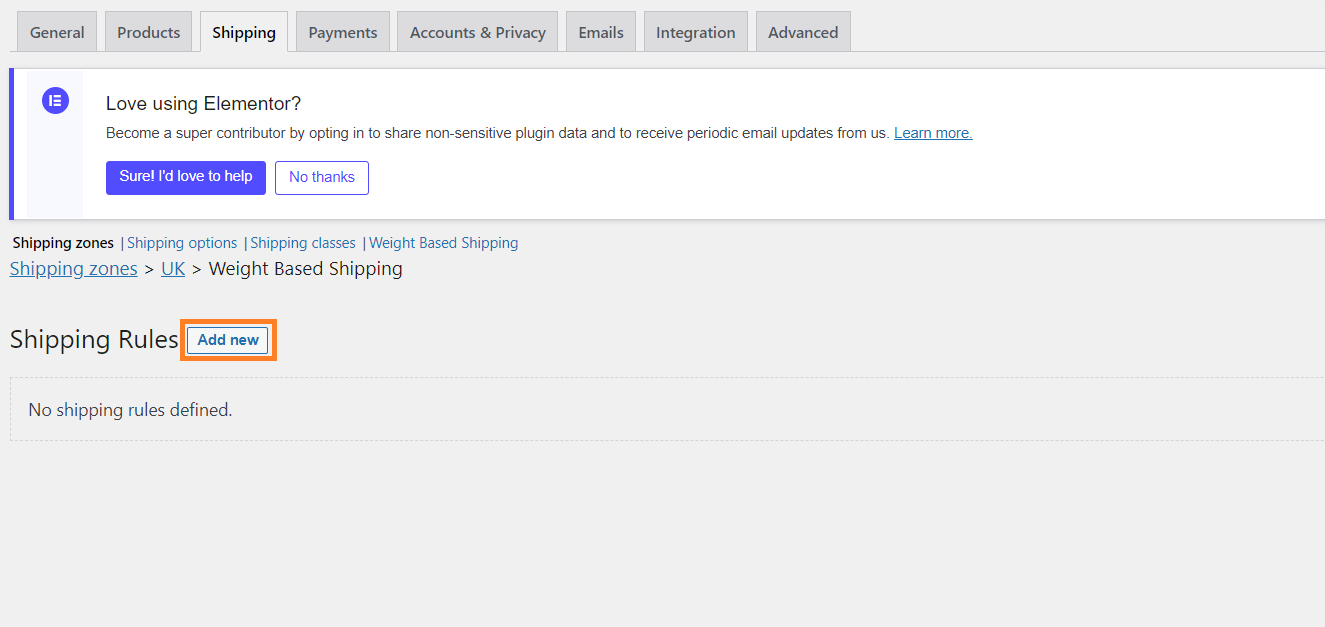
After that, you’ll be redirected to a new screen from where you can add weight-based shipping rules to your store.
To do so, click the ‘Add New’ button.
5. Configure the Weight-Based Shipping Rule
Once you click the add new button, a pop-up will appear from where you can configure the weight-based shipping according to your choice.
I’ll explain the necessary settings that you need to configure to offer weight-based shipping to your customers at the checkout.

5.1. Add the Label and Title
In the ‘Label’ field you can add the label for this rule and in the ‘Title’ field you can add the title that customers will see at the checkout.

5.2. Set the Order Weight Condition
Next, you need to add the weight condition to offer weight-based shipping at checkout. It is a very important step as If you configure it wrongly, you may end up losing money.
In the ‘Conditions’ section, you’ll see three different options. We’ll be focusing on the ‘Destination’ and ‘Order Weight’ options.
- From the Destination dropdown, you can select the location. It will mostly help you if you are setting the weight-based shipping for global shipping zones. But as we are creating a rule that is specific to the ‘UK’ so there’s no need to configure it. Just leave it to default.

- You’ll see two different fields in the ‘Order Weight’ section. In these fields, you can set the weight limits. You can set the minimum weight and maximum weight limit to apply this weight-based shipping rule.
In the ‘above’ field, you need to enter the lowest weight limit and in the ‘below’ field, you need to enter the maximum weight to apply this rule. You can also click the ‘or equal’ checkbox to ensure that the weight should be less than or equal to the added limit.
For example, I have added ‘1’ in the ‘above’ field and ‘10’ in the ‘below’ field. I have also enabled the ‘or equal’ checkbox. So, this rule will only be applied at the checkout if the user’s cart weight is greater than or equal to ‘1’ and less than ‘10’.
If I check the ‘or equal’ checkbox for the ‘below’ field as well, this rule will only be applied if the cart weight is greater than or equal to ‘1’ and less than or equal to ‘10’.

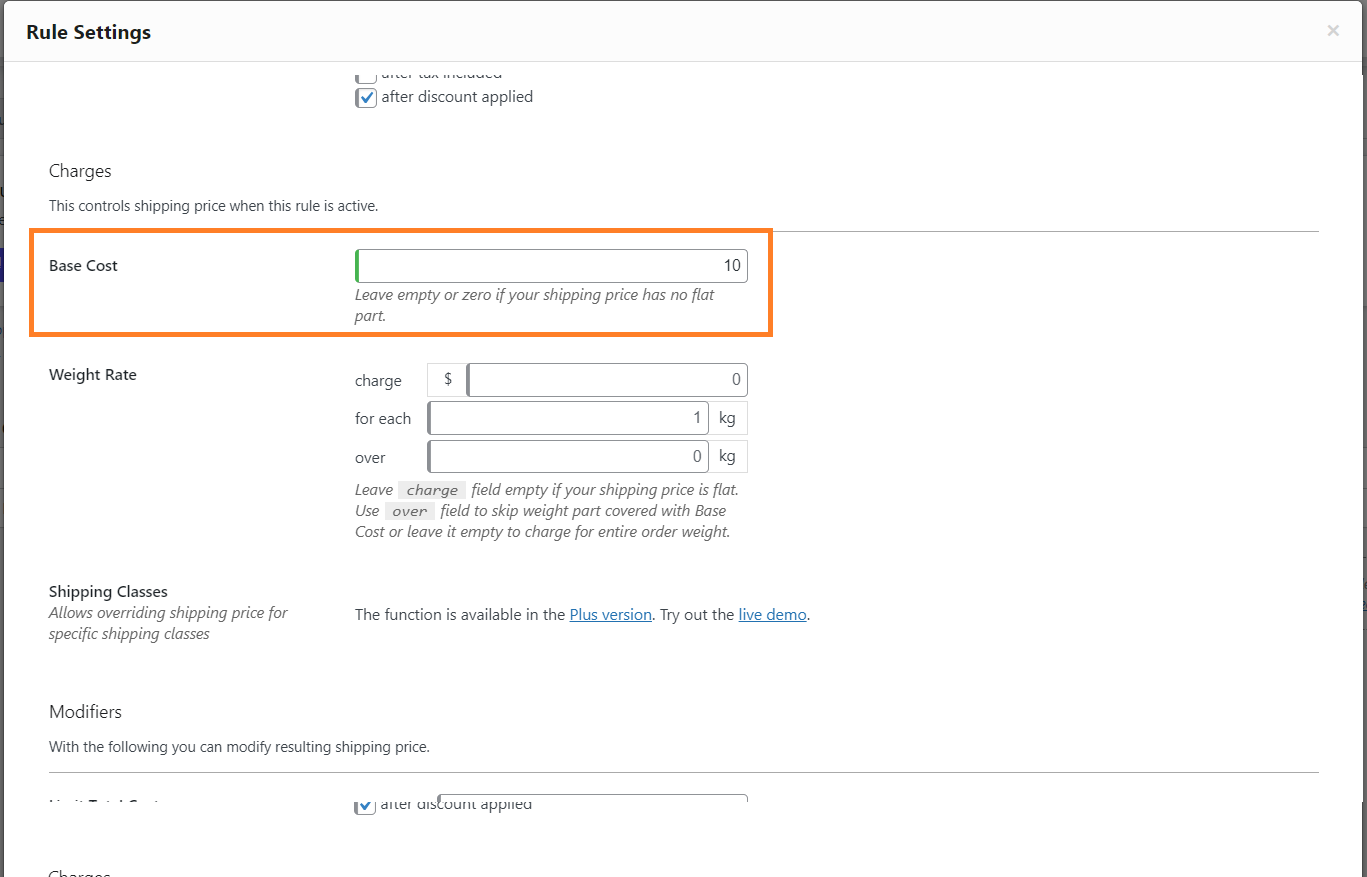
5.3. Set the Base Cost
Once you have set the condition, scroll down to the ‘Charges’ section and set a base price in the ‘Base Cost’ field for this shipping rule. It is the price that users will pay if the weight is in between the limit that we set in the above step.
I have set it as ‘10’ so customers will be charged $10 for this shipping method if their cart weight is between 1 and 10 kg.
5.4. Set the Weight Rate
The next step is also very important and you should configure it very carefully. It is an optional thing but you may need to configure it. Right beside the ‘Weight Rate’ text, you’ll see three fields.
These fields will help you charge extra if the user’s cart weight is above a certain limit.
- In the ‘Charge’ field, you need to enter the amount that you want to charge your customers if the weight is above a certain limit. I have added ‘15’ in this field but it depends on your shipping prices.
- In the ‘over’ field, you can set the weight limit. If the user’s cart weight exceeds this limit, they’ll be charged the price that we set in the ‘Charge’ field. It will be above the base cost. For example, base cost + extra charge. I have added ‘5’ in this field. So, if a user’s cart weight is more than 5kg, they’ll be charged $15 above the base cost($10).
- In the ‘for each’ field, you need to enter the weight for which you want to charge extra. For example, if you add ‘1’ in this field, then for every 1 KG above the weight that we set in the ‘over’ field, users will be charged $15(above the base cost).
I have set it so customers will be charged $15 per 1 KG above the base cost if their cart’s weight exceeds 5 KG. For example, let’s say the customer’s cart weight is 7 KG, so they’ll be charged $10(base cost) + $15 per 1 KG above 5 KG($15×2=$30) = $40.
If a customer’s cart weight is between 1 and 5 KG, they’ll be charged $10 but if it is above 5 KG they’ll be charged $15 extra for each 1 KG above it. You can set this according to your requirements.

5.5. Close the Pop-up
Once you have configured the weight-based shipping rule, scroll to the bottom of the pop-up and click the ‘Close’ button to close the pop-up.

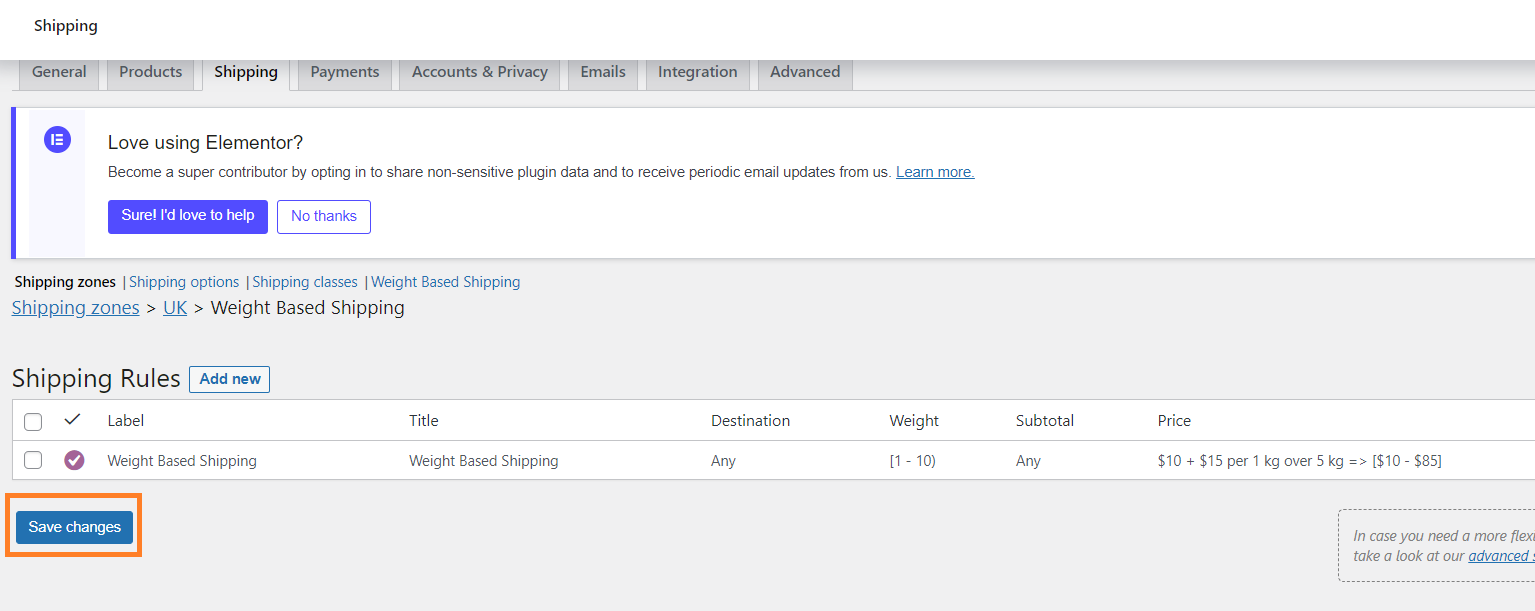
5.6. Save Changes
Once the pop-up is closed, click the ‘Save Changes’ button to save the settings. You can add as many weight-based shipping rules as you want.
I have just added a single rule.
6. Final Results
Once the settings are saved, let’s test the final results.
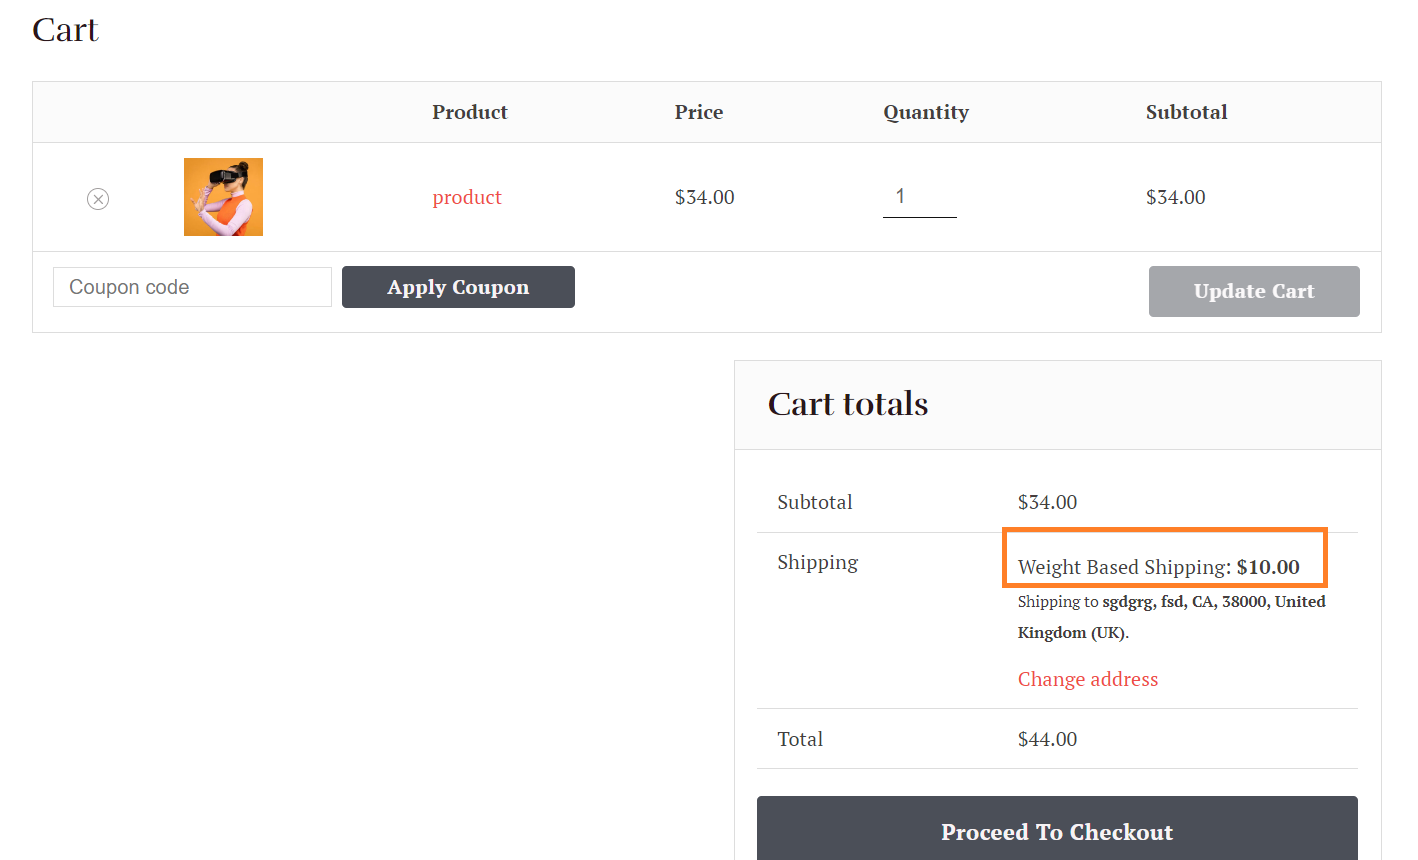
To test it, first, I added a product to my cart that weighed less than 5 kg and then visited the cart page. I changed my address to the United Kingdom and I could only see the ‘Weight Based Shipping’ shipping method along with its price.
I was not able to see this shipping method until I selected the country as the United Kingdom. As you can see in the screenshot below I was being charged $10 for shipping based on the cart’s weight because the cart’s weight is less than 5kg.
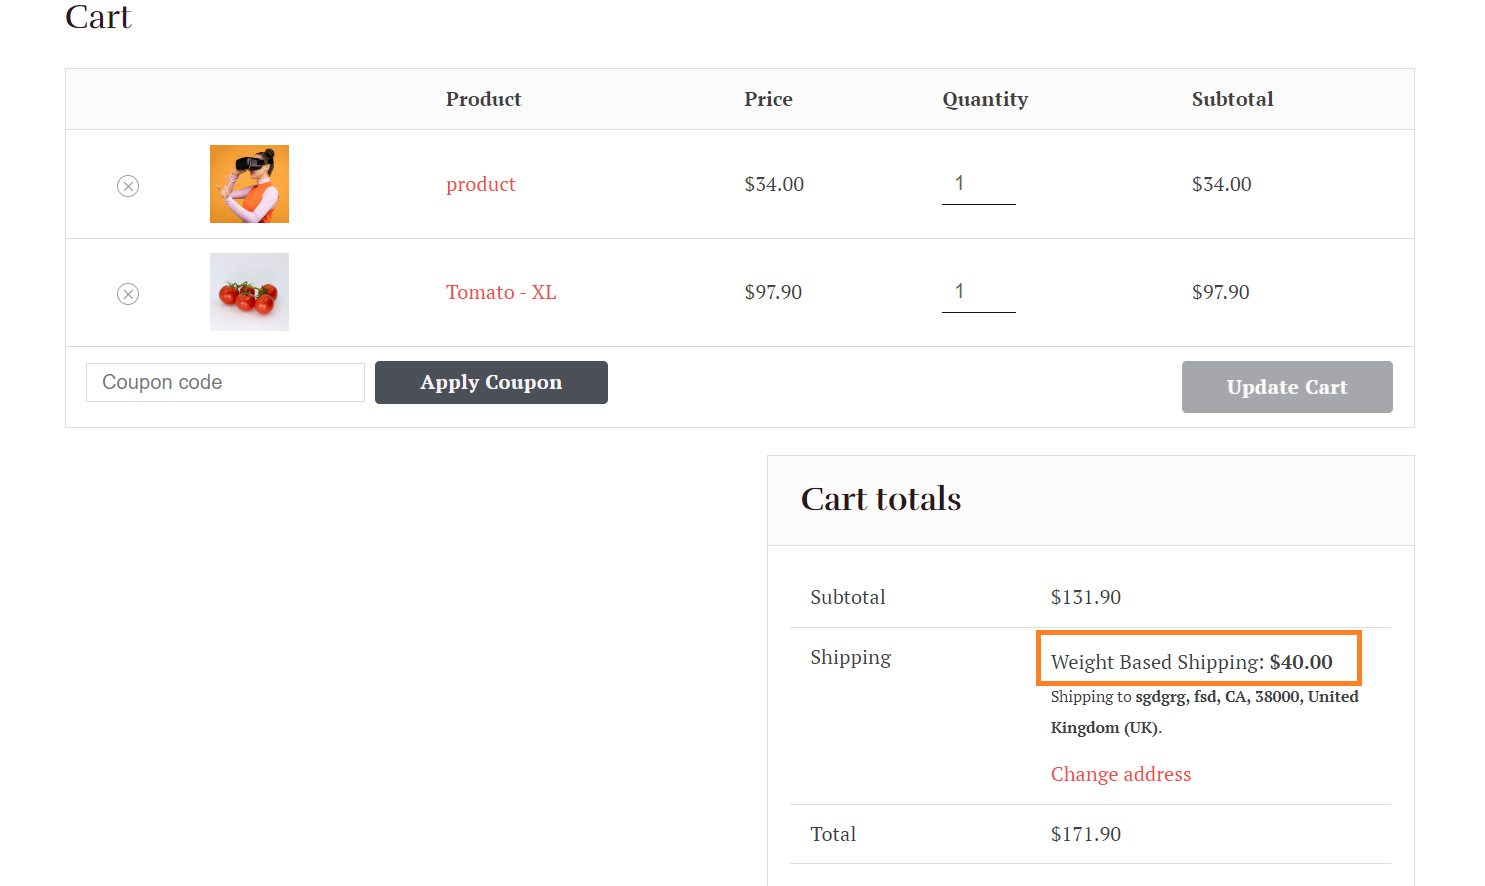
When I added another product to make the cart’s weight more than 5 kg, I was charged $40 for the shipping.
Now, the cart’s total weight is 7 kg. It means that I was being charged $30 for an additional 2 kg above the 5 kg plus $10(base cost of shipping).
Hence, our weight-based shipping rule is working perfectly fine. If you sell products that are quite heavier in weight like furniture or other stuff, then you may want to add additional rules for weights more than 10 kg.
You can follow the same steps as mentioned above. Just make sure to change the values according to your requirements.
Method 2: Add Weight Base Shipping Without a Plugin
The second method to set weight-based shipping in WooCommerce is by using the custom code. It is not a recommended method but still, some users want to go with a custom solution instead of installing a new plugin that may cause their site to become slow.
Note: I have disabled the plugin that we installed above, so it does not conflict with the code that we’ll be using in this step.
As we are not using any third-party plugin to create weight-based shipping, we’ll need to add multiple ‘Flat Rate’ shipping methods to a specific or global shipping zone and change their title according to the weight limit we want to set.
You can also set the shipping methods using a custom code, but I am doing it from right inside WooCommerce.
For example, you can change the ‘Flate Rate’ method title to ‘Order Below 2kg’ to make it clear to customers.
Follow the following steps to get a clearer understanding of this and add a weight-based shipping method to your WooCommerce store using custom code.
1. Add Flat Rates Shipping Method to Your Store
First, make sure you have created a shipping zone. If not, you can follow step 2 of method 1, to create a shipping zone.
For this, I have already created a new shipping zone, I’ll continue with it.
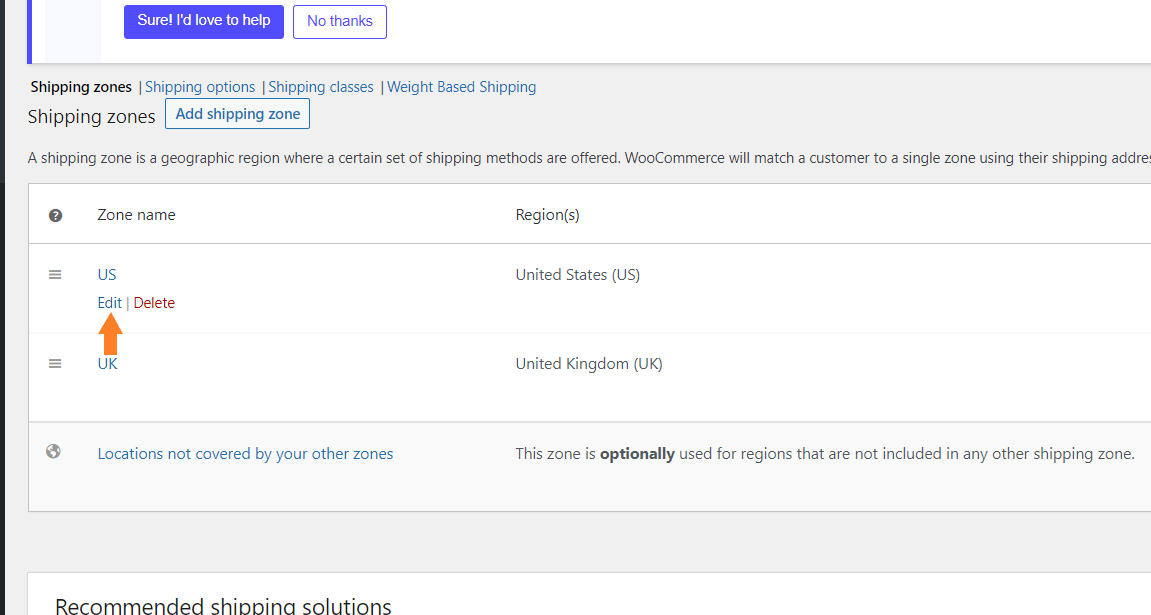
If you have already created a shipping zone, edit the shipping zone for which you want to set weight-based shipping.
Hover your mouse over it and click the ‘Edit’ button to edit it.
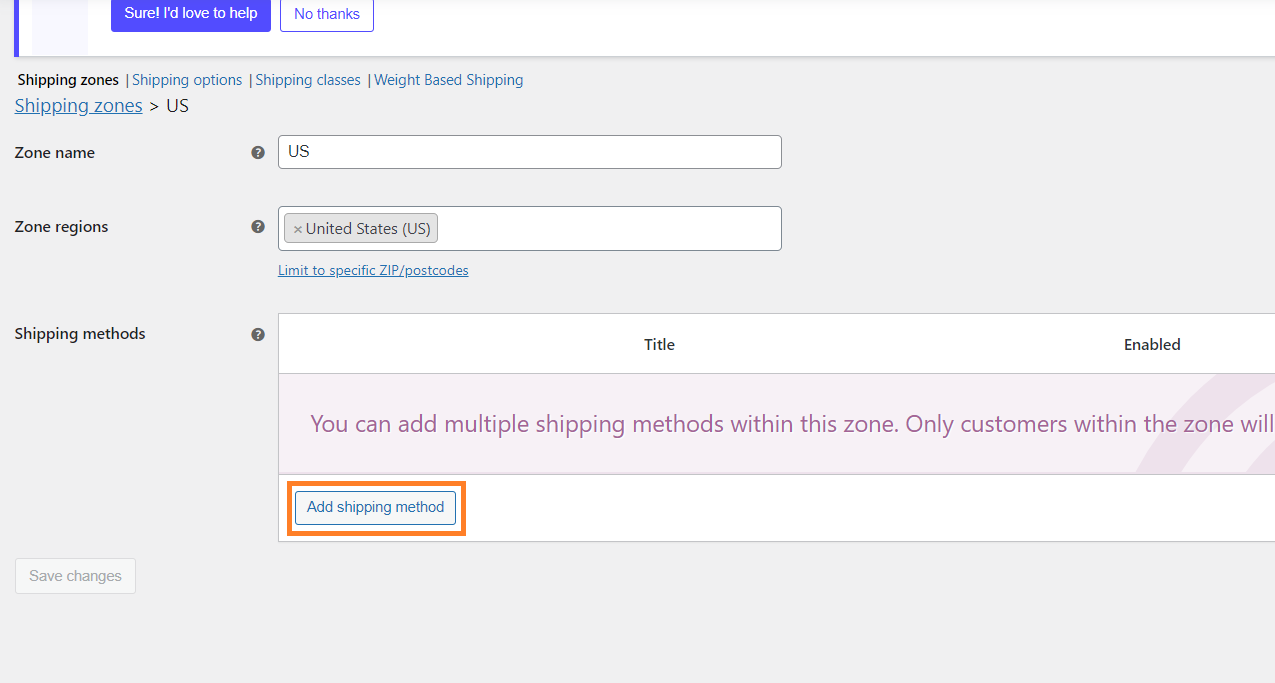
1.1. Add the Flat Rate Shipping Method
On the shipping zone edit page, click the ‘Add Shipping Method’ button to add a new shipping method to your store.
After clicking it, a pop-up will appear, Select ‘Flat Rate’ from the dropdown and click the ‘Add Shipping Method’ button to add it.

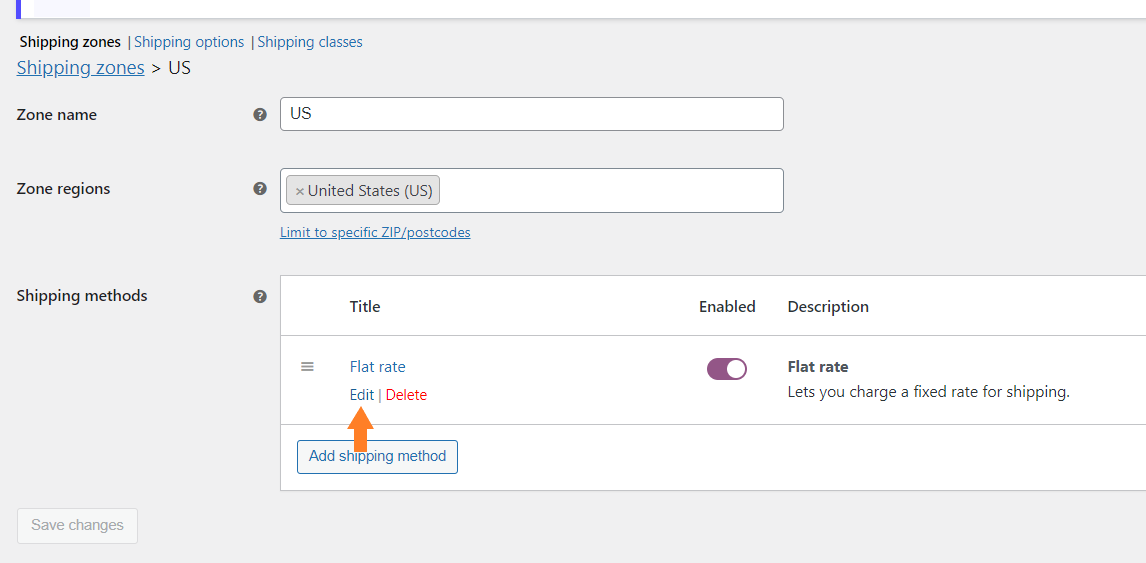
1.2. Edit the Flate Rate Shipping Method
To edit the flat rate method, hover your mouse over it and click ‘Edit’ to edit it.
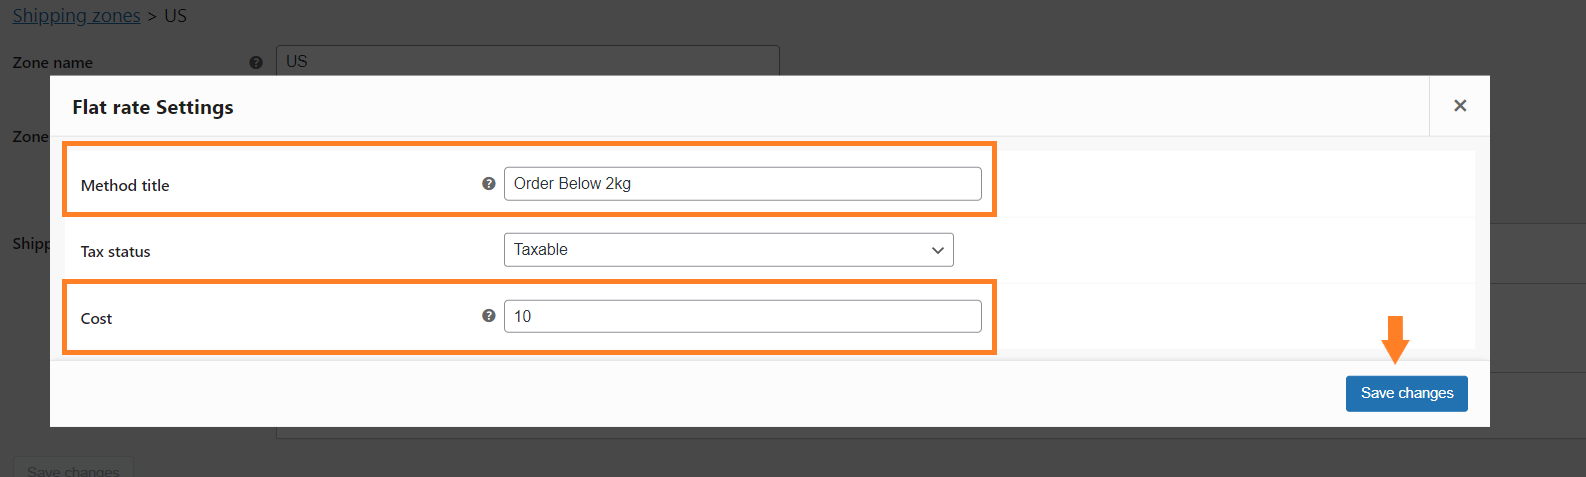
2. Configure the Flat Rate Method
Once you have clicked the edit button, a pop-up will appear on your screen from where you can configure it.
You need to change the ‘Method Title’ and add the ‘Cost’ of this shipping method.
- In the method title field, I have added ‘Order Below 2kg’ as I want this method to be applied if the user’s cart weight is less than or equal to 2 kg.
- In the cost field, make sure to add the price for this shipping method. I have added $10 as an example.
- After that, click the ‘Save Changes’ button to save the settings.
3. Add Multiple Flate Rate Shipping Methods
Once you have added one flat-rate shipping method and configured it to match the weight-based shipping you want to offer, you can add more methods by following the same steps.
Just make sure to change the cost and the title of the method according to the weight limit for which that specific method will be applied.
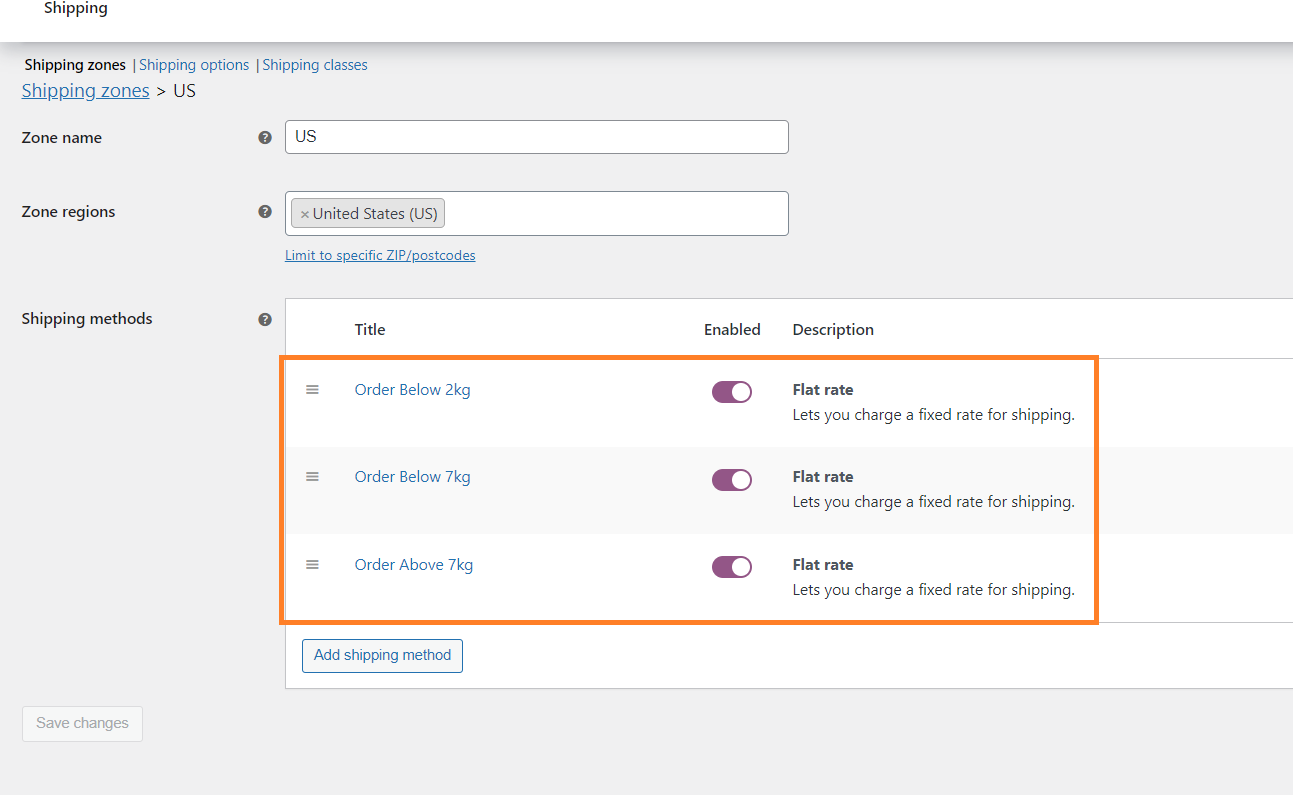
By following the above steps, I have added two more flat-rate shipping methods. There are a total of 3 rules that I created to create tiered shipping pricing based on weight:
- $10 for shipping up to 2kg
- $20 for shipping up to 7kg
- $30 for shipping above 7kg
Note: Remember, these won’t work yet because we haven’t used any custom code. But these are important to configure as the custom code will not work without configuring these methods.
We are only using these methods, to set the prices at the checkout. We’ll create a logic using the code so each method will only be applied if the cart weight is within its limits.
4. Find the Flat Rate Shipping Method IDs
Once we have added the shipping methods, we need to find the shipping IDs for each method. We will need these IDs to target the shipping methods using the code and apply them to the cart if a certain condition is fulfilled.
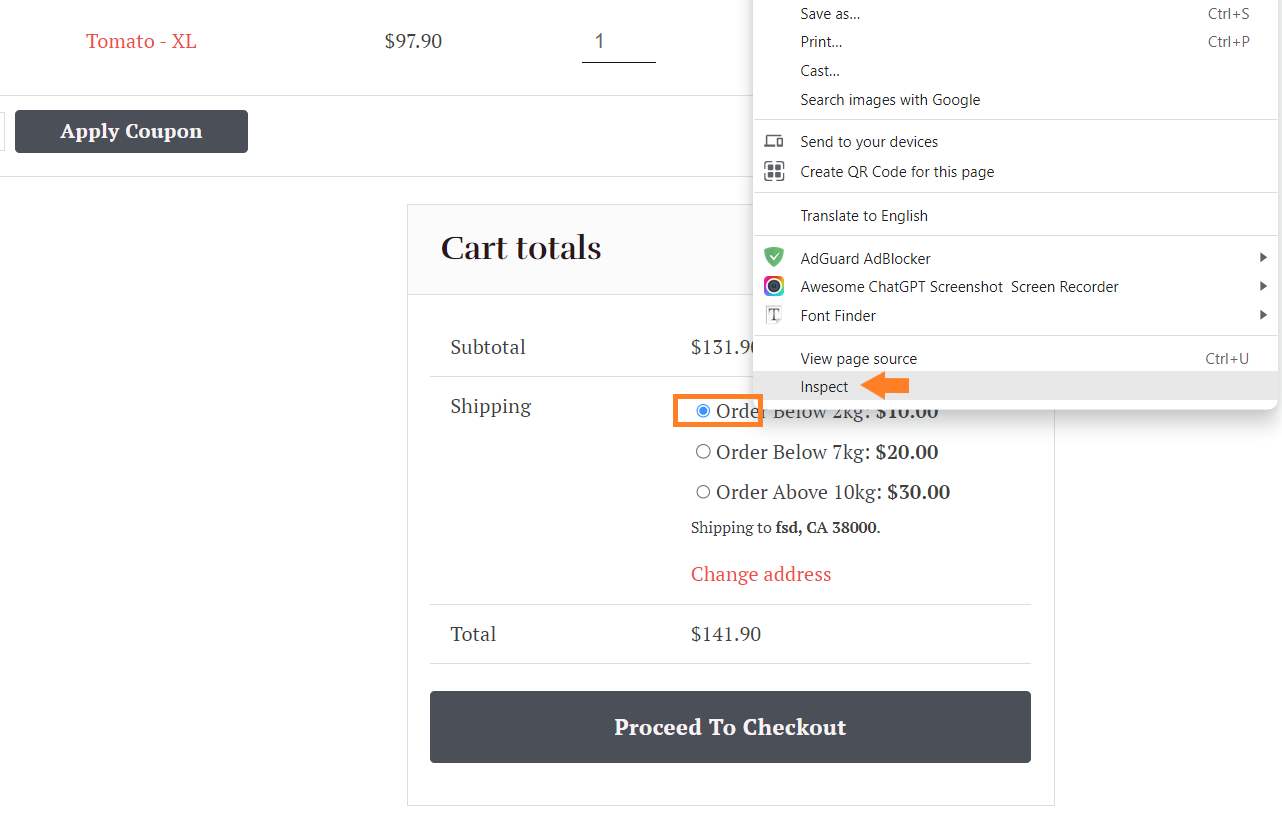
To find the shipping ID, visit your store’s cart page.
Here you should be able to see all the three shipping methods that we added in the above steps. Right-click on the shipping method’s name and click ‘Inspect’ to view the HTML of the element.
Note: Make sure your selected country on the cart pages matches the shipping zone for which you want to offer the weight-based shipping. In my case, it is the US, so I have the country as the US on the cart page.
4.1. Get the Shipping Method ID
After inspecting the element, make sure the ‘input’ tag is highlighted. You will see the ‘value’ attribute. Copy its value that is inside the double quotes.
In my case, it is flat_rate:5 but it may be different in your case.

Similarly, you’ll need to find the IDs for all the flat-rate shipping methods you have added in the previous step.
In my case, the shipping method IDs are:
- Order Below 2kg method has an ID of flat_rate:5
- Order Below 7kg method has an ID of flat_rate:6
- Order Above 7kg method has an ID of flat_rate:7
5. Copy the Code
Once we have added the shipping method pricing and gathered their IDs, now is the time to write some code to tell WooCommerce which flat-rate shipping method to use, depending upon the cart weight.
I’ll also explain the code briefly to give you a better understanding.
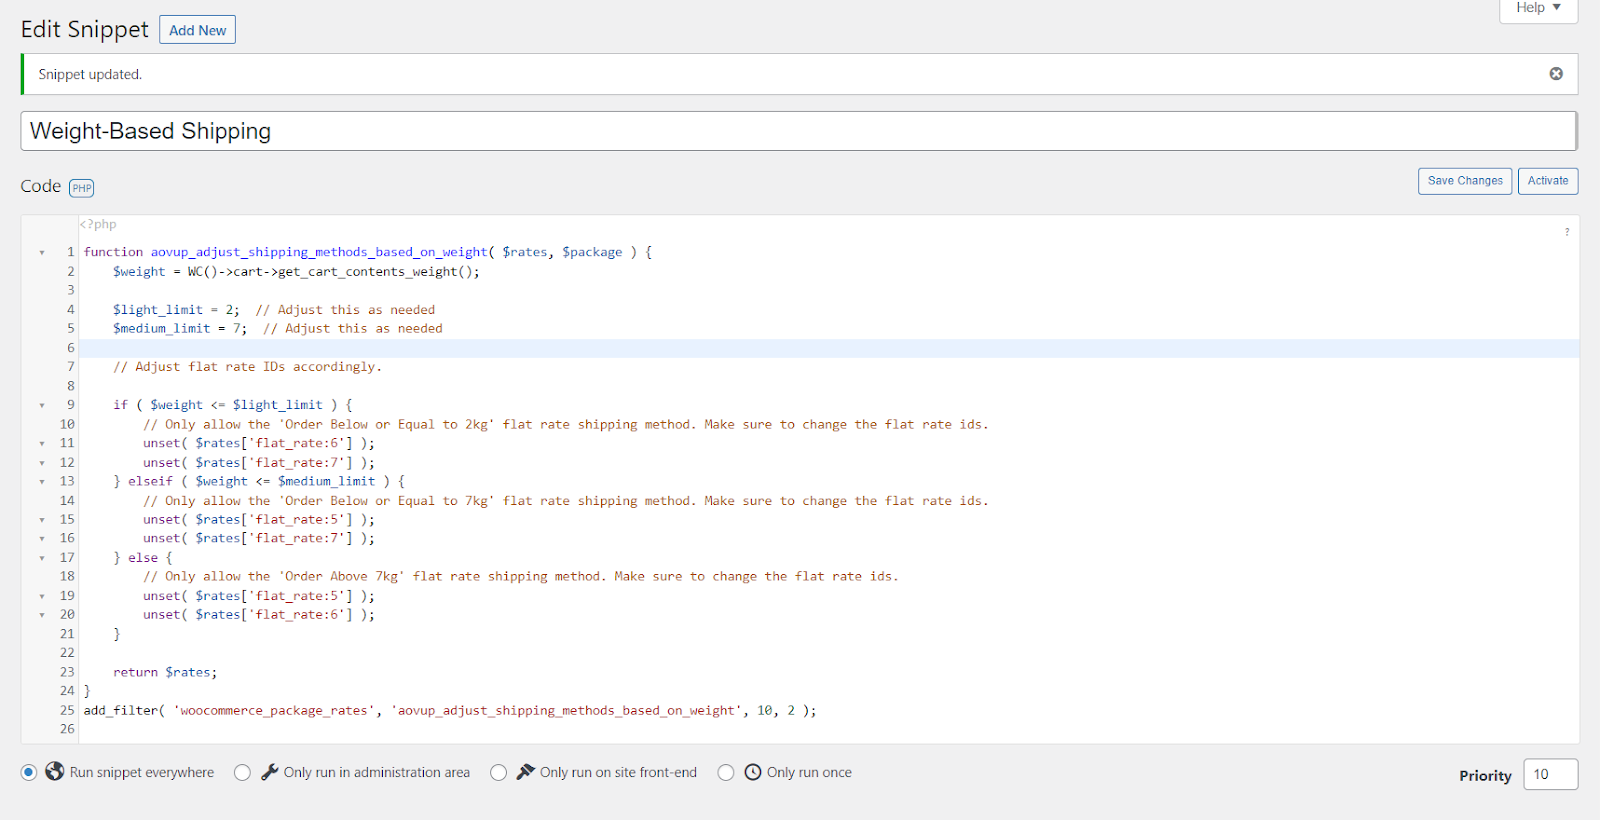
Note: Make sure to change the $light_limit and $medium_limit variable values and use your flat rate shipping IDs.
Here’s the code you need to copy:
function aovup_adjust_shipping_methods_based_on_weight( $rates, $package ) {
    $weight = WC()->cart->get_cart_contents_weight();

    $light_limit = 5;  // Adjust this as needed
    $medium_limit = 10;  // Adjust this as needed

    // Assuming method_id for flat rates are 'flat_rate:1', 'flat_rate:2', 'flat_rate:3'. Adjust accordingly.
    if ( $weight <= $light_limit ) {
        // Only allow 'Flat Rate Light'
        unset( $rates['flat_rate:6'] );
        unset( $rates['flat_rate:7'] );
    } elseif ( $weight <= $medium_limit ) {
        // Only allow 'Flat Rate Medium'
        unset( $rates['flat_rate:5'] );
        unset( $rates['flat_rate:7'] );
    } else {
        // Only allow 'Flat Rate Heavy'
        unset( $rates['flat_rate:5'] );
        unset( $rates['flat_rate:6'] );
    }

    return $rates;
}
add_filter( 'woocommerce_package_rates', 'aovup_adjust_shipping_methods_based_on_weight', 10, 2 );
Code Explanation:
This code is a PHP function that adjusts WooCommerce shipping methods based on the total weight of items in the shopping cart. It uses WordPress and WooCommerce hooks to filter and modify the available shipping rates.
Here’s a breakdown of how it works:
- The aovup_adjust_shipping_methods_based_on_weight function takes two parameters: $rates (an array of available shipping rates) and $package (information about the package being shipped).
- It calculates the total weight of the items in the shopping cart using WC()->cart->get_cart_contents_weight() and stores it in the $weight variable.
- There are two weight limits defined: $light_limit and $medium_limit. These limits are used to categorize the cart’s total weight into different ranges.
- The code then uses conditional statements to determine which shipping methods should be available based on the cart’s total weight:
- If the cart’s total weight is less than or equal to $light_limit, it allows only the ‘Order Below 2kg’ flat rate shipping method by unsetting (removing) the other flat rate shipping methods.
- If the cart’s total weight is greater than $light_limit but less than or equal to $medium_limit, it allows only the ‘Order Below 7kg’ flat rate shipping method.
- If the cart’s total weight exceeds $medium_limit, it allows only the ‘Order Above 7kg’ flat rate shipping method.
- If the cart’s total weight is less than or equal to $light_limit, it allows only the ‘Order Below 2kg’ flat rate shipping method by unsetting (removing) the other flat rate shipping methods.
- Finally, the modified $rates array is returned, which now only includes the allowed shipping methods based on the cart’s total weight.
- The code uses the add_filter function to hook into the ‘woocommerce_package_rates’ filter, which allows it to run the aovup_adjust_shipping_methods_based_on_weight function when WooCommerce calculates shipping rates.
6. Paste the Code to Your Store
Once you have understood the code, now is the time to paste it into your WooCommerce store. There are different methods to add custom code to WordPress.
I have compiled a tutorial explaining all the available methods. You can follow it to learn more about adding custom code to WordPress. Here’s the tutorial.
I have used a plugin to add the code to my demo store.
7. Final Results
Once you have pasted the code to your store, let’s test the final results.
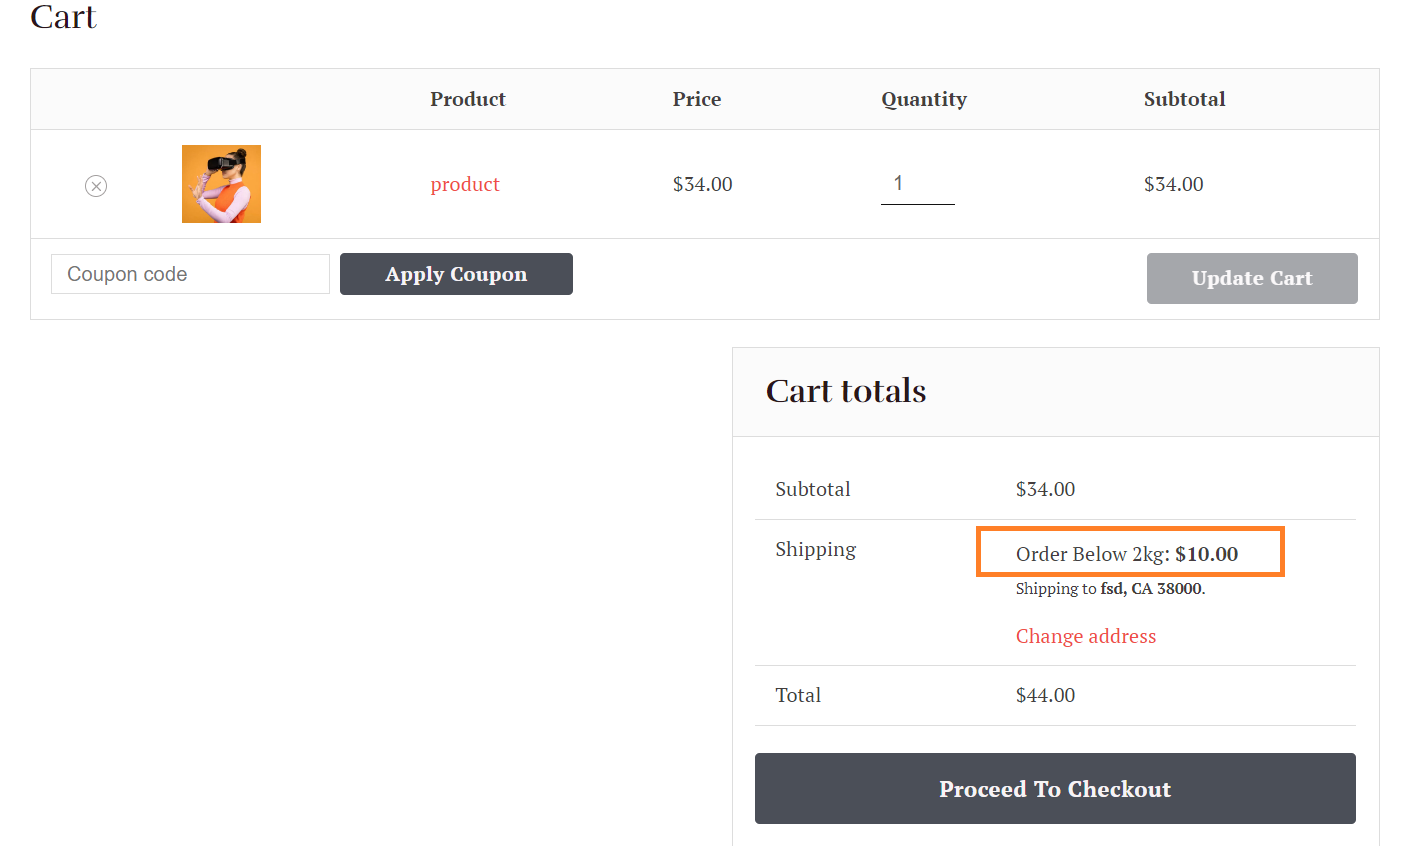
To test it, I added a product to my cart that weighed less than 2 kg, and as you can see in the screenshot I could only see the shipping method for orders below 2kg.
Make sure you have selected the country to match the shipping zone.
Now, when I added another product to my cart to make the total weight more than 7kg, I could see a different shipping method that is specific for the weight of more than 7kg.
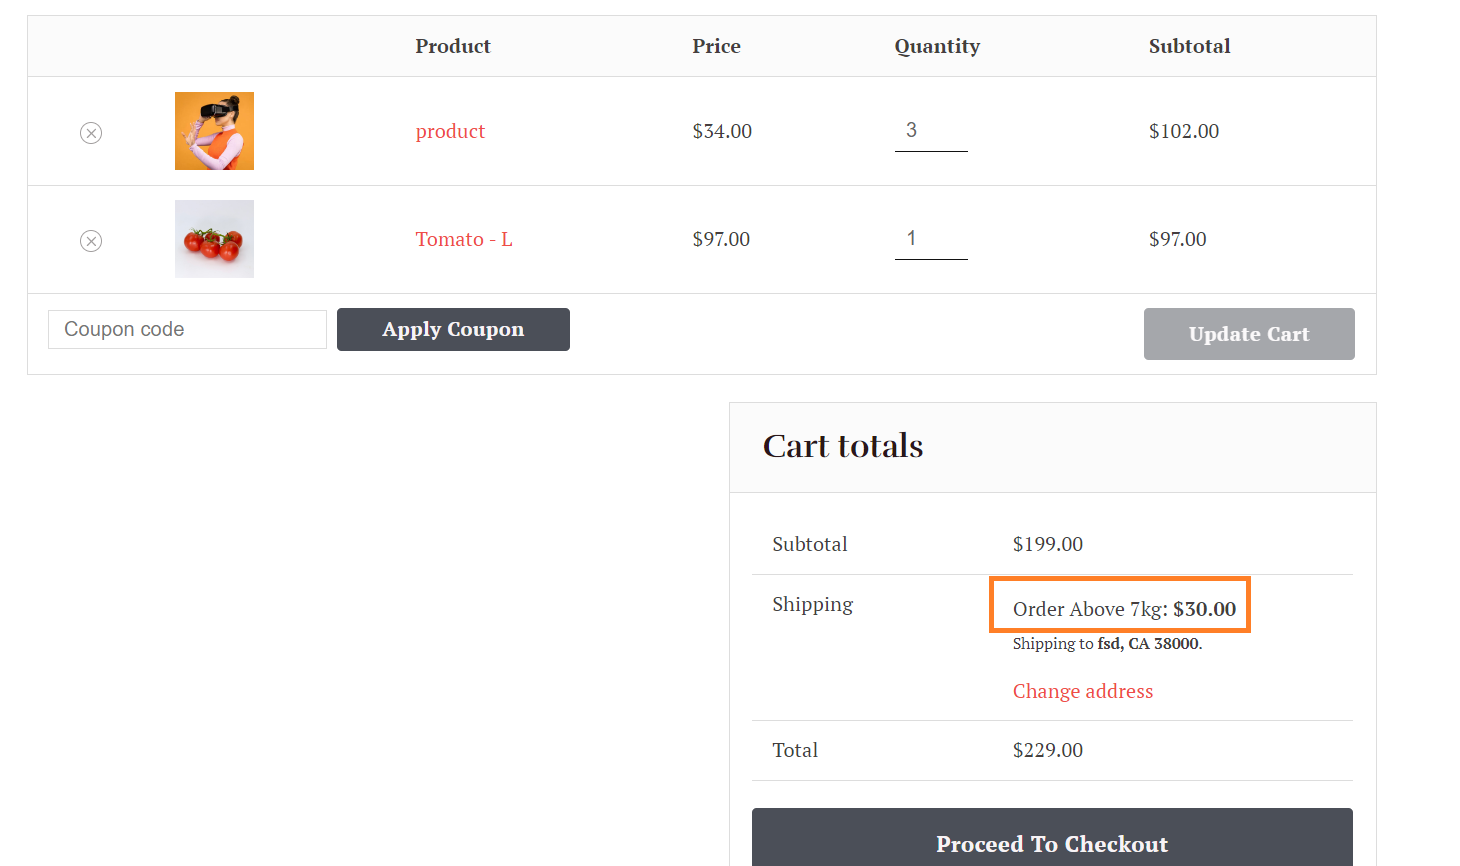
Note: Don’t forget to make necessary adjustments to match your shipping IDs and also adjust the weight limit.
Conclusion
That’s it for today’s article.
I hope this article was helpful to you and you were able to set up the weight-based shipping in your WooCommerce store. I have explained both methods in quite a detail so you can understand them thoroughly.
But I won’t recommend you use the code method to add this feature to your store. Even if you have some coding experience, setting this up may cause you a little bit of difficulty. Also, it is not very flexible.
Using the plugin is an easy way to do so with more customization opportunities. But it is entirely up to you how you want to shape your weight-based shipping method.
Eventually, it will help you to grab customer’s trust and increase your average order value.


