This guide will help you understand all the checkout page hooks by visually representing them. I’ll also explain how you can use them to customize the WooCommerce checkout page.
Whether you are a coder learning about WooCommerce development or a store owner who wants to create custom checkout solutions for your customers, this guide will help you understand every checkout page hook.
Without any further ado, let’s jump straight into it.
On This Page
- 1 WooCommerce Checkout Page Visual Hook Guide
- 2 List of WooCommerce Checkout Page Hooks
- 2.1 1. woocommerce_before_checkout_form
- 2.2 2. woocommerce_checkout_before_customer_details
- 2.3 3. woocommerce_checkout_billing
- 2.4 4. woocommerce_before_checkout_billing_form
- 2.5 5. woocommerce_after_checkout_billing_form
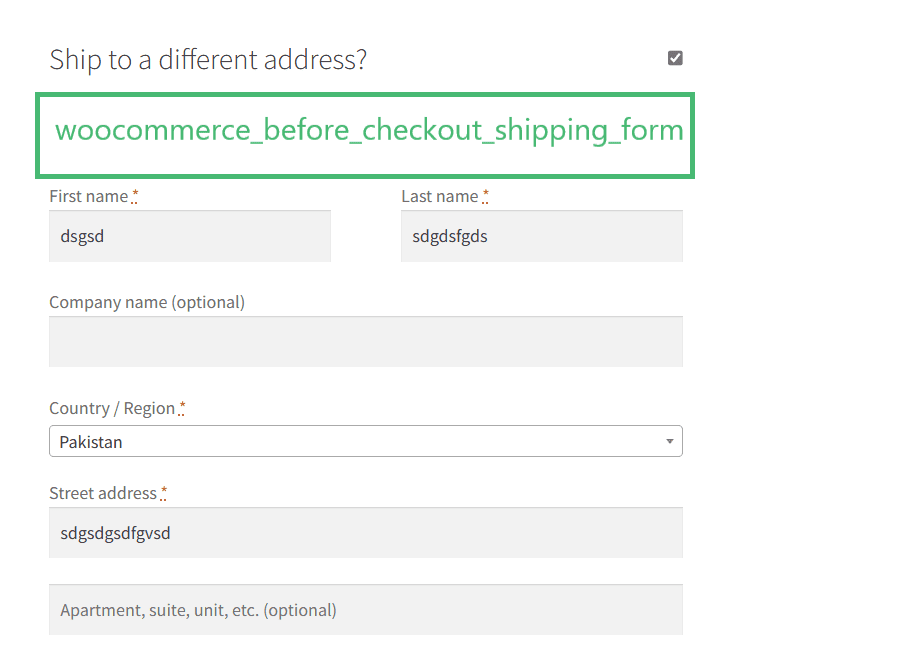
- 2.6 6. woocommerce_checkout_shipping
- 2.7 7. woocommerce_before_checkout_shipping_form
- 2.8 8. woocommerce_after_checkout_shipping_form
- 2.9 9. woocommerce_before_order_notes
- 2.10 10. woocommerce_after_order_notes
- 2.11 11. woocommerce_checkout_after_customer_details
- 2.12 12. woocommerce_checkout_before_order_review
- 2.13 13. woocommerce_review_order_before_cart_contents
- 2.14 14. woocommerce_review_order_after_cart_contents
- 2.15 15. woocommerce_review_order_before_shipping
- 2.16 16. woocommerce_after_shipping_rate
- 2.17 17. woocommerce_review_order_after_shipping
- 2.18 18. woocommerce_review_order_before_order_total
- 2.19 19. woocommerce_review_order_after_order_total
- 2.20 20. woocommerce_review_order_before_payment
- 2.21 21. woocommerce_review_order_before_submit
- 2.22 22. woocommerce_review_order_after_submit
- 2.23 23. woocommerce_review_order_after_payment
- 2.24 24. woocommerce_checkout_after_order_review
- 2.25 25. woocommerce_after_checkout_form
- 3 Final Words
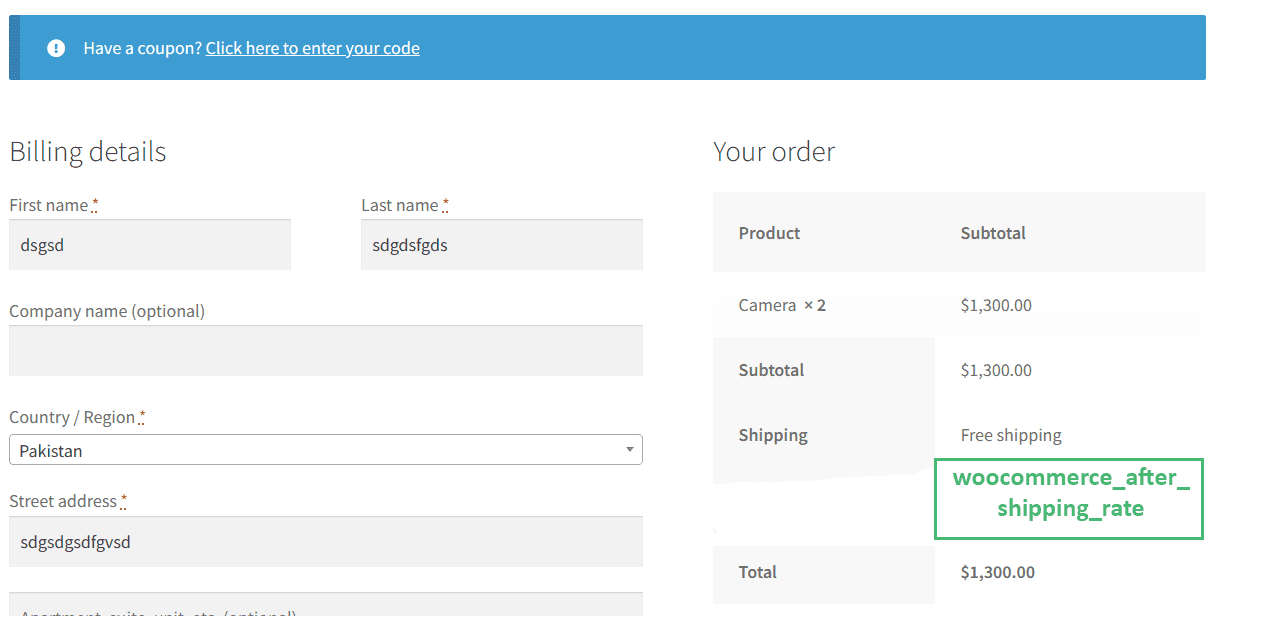
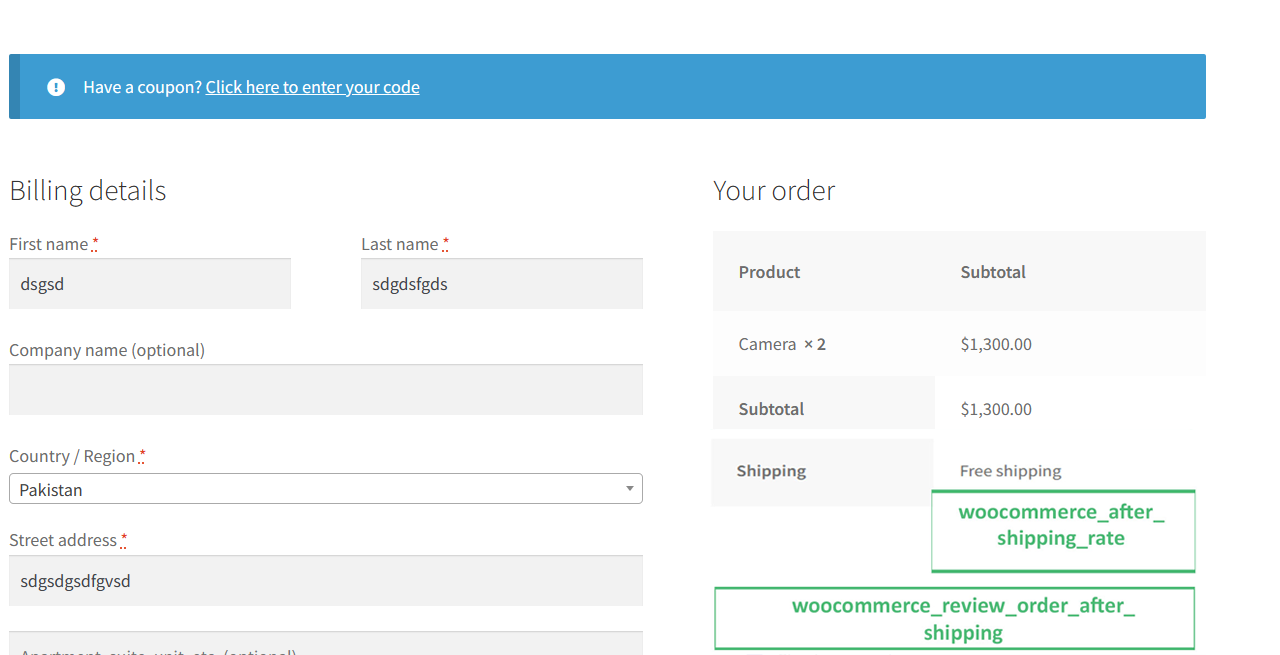
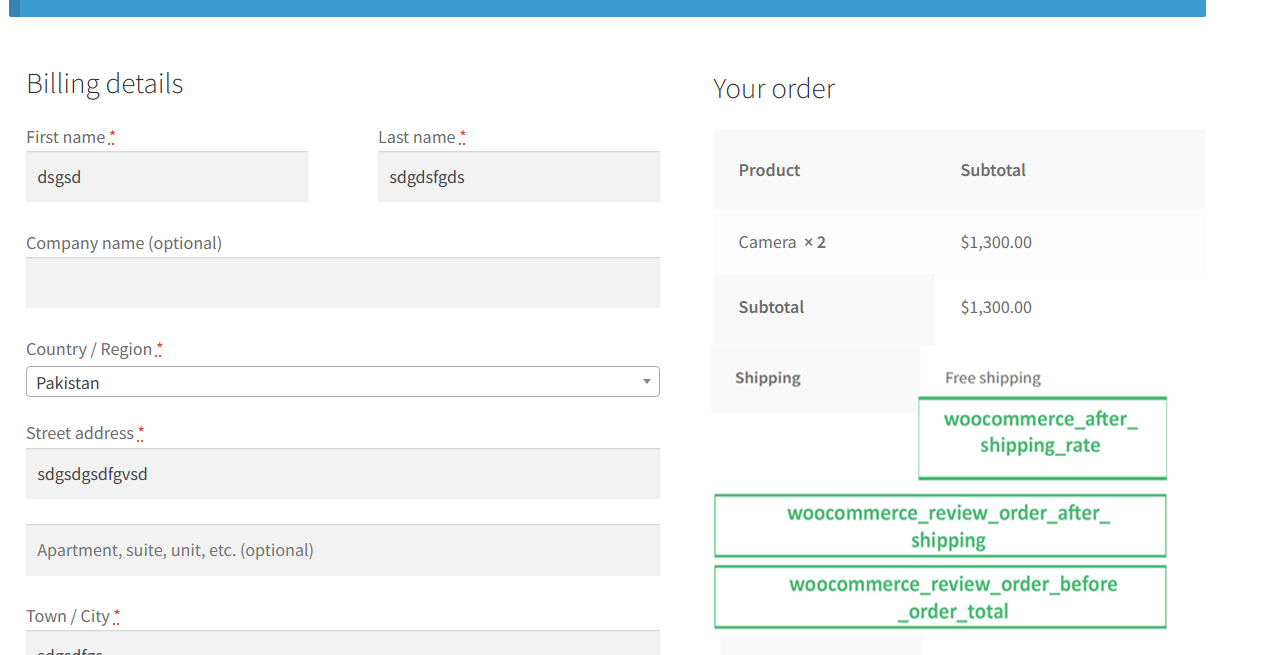
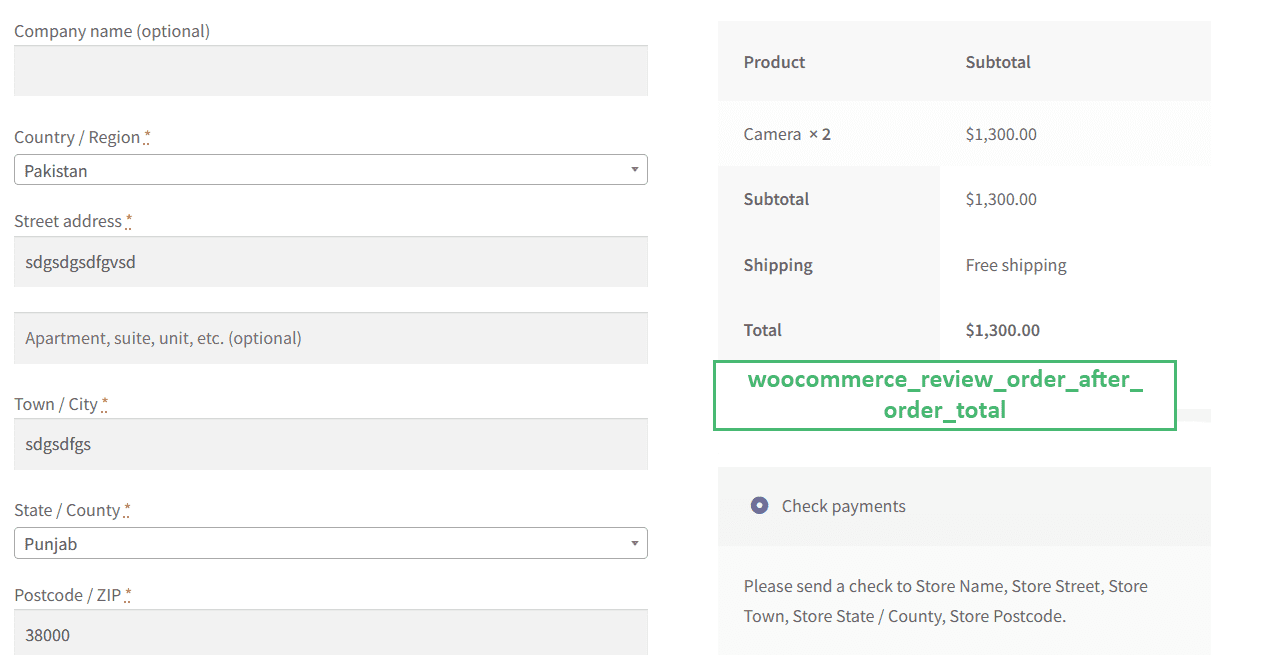
WooCommerce Checkout Page Visual Hook Guide
Here’s the visual representation of WooCommerce checkout page hooks.
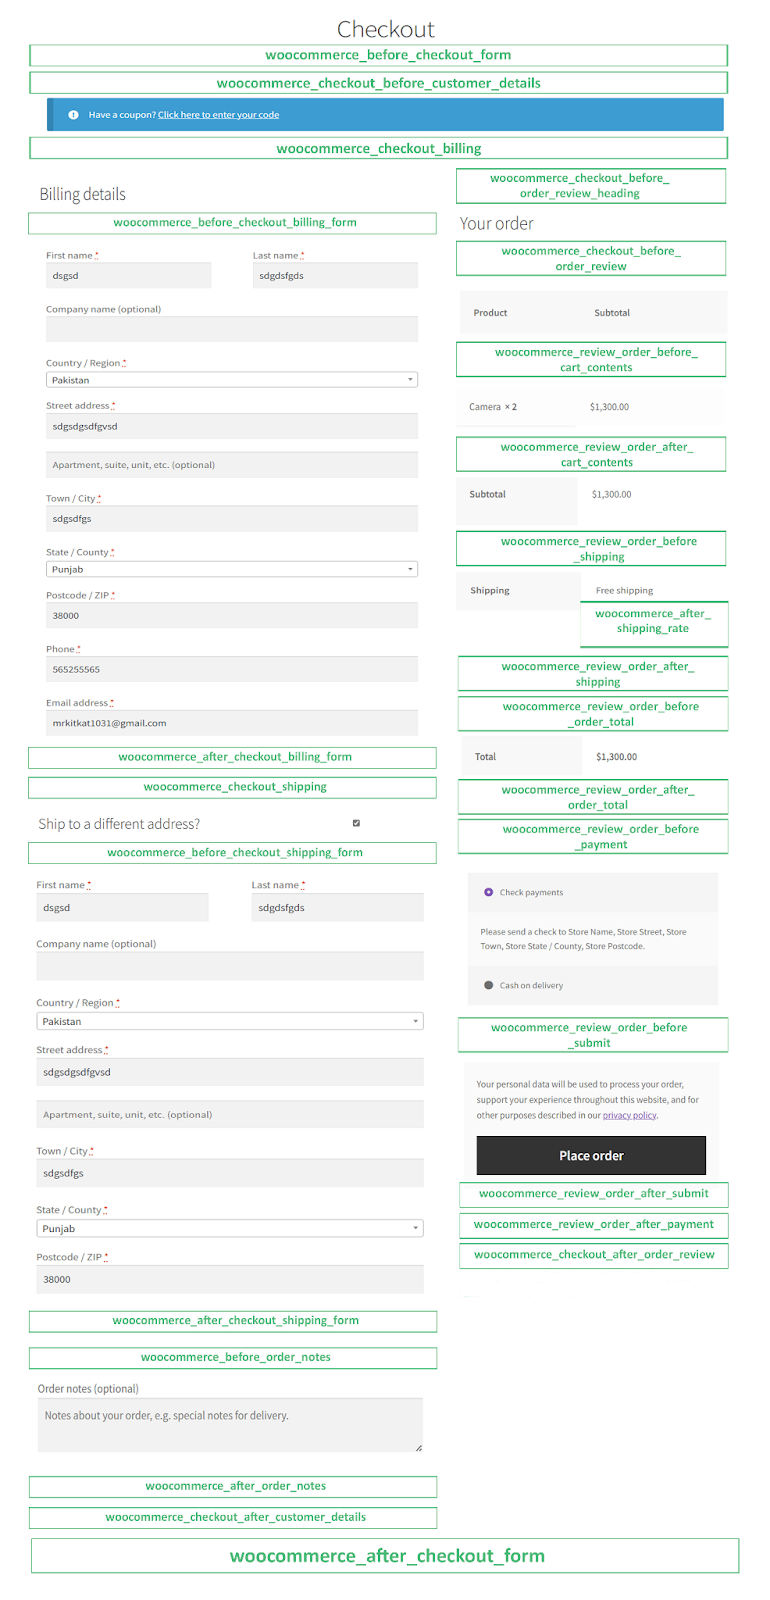
List of WooCommerce Checkout Page Hooks
The availability and the position of checkout page hooks depend on the active theme and the WooCommerce version you use.
WooCommerce itself provides several checkout page hooks. Here is a comprehensive list of commonly used WooCommerce checkout page hooks:
- woocommerce_before_checkout_form
- woocommerce_checkout_before_customer_details
- woocommerce_checkout_billing
- woocommerce_before_checkout_billing_form
- woocommerce_after_checkout_billing_form
- woocommerce_checkout_shipping
- woocommerce_before_checkout_shipping_form
- woocommerce_after_checkout_shipping_form
- woocommerce_before_order_notes
- woocommerce_after_order_notes
- woocommerce_checkout_after_customer_details
- woocommerce_checkout_before_order_review
- woocommerce_review_order_before_cart_contents
- woocommerce_review_order_after_cart_contents
- woocommerce_review_order_before_shipping
- woocommerce_after_shipping_rate
- woocommerce_review_order_after_shipping
- woocommerce_review_order_before_order_total
- woocommerce_review_order_after_order_total
- woocommerce_review_order_before_payment
- woocommerce_review_order_before_submit
- woocommerce_review_order_after_submit
- woocommerce_review_order_after_payment
- woocommerce_checkout_after_order_review
- woocommerce_after_checkout_form
These hooks allow developers to modify and personalize various aspects of the WooCommerce checkout page. Utilizing these hooks effectively will enable you to create a fully customized checkout page that aligns with your brand and enhances customer satisfaction.
Note: For more details and specific use cases, it is recommended to consult the official WooCommerce Hook Reference.
Following are the details and examples of each hook.
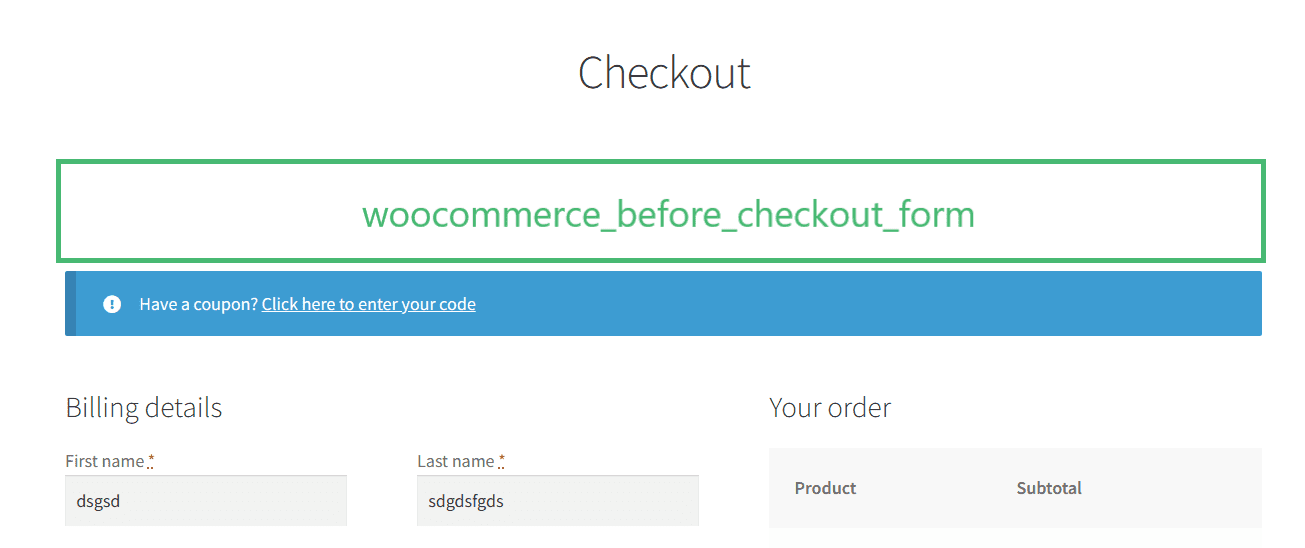
1. woocommerce_before_checkout_form
This hook displays the content or custom elements before the entire WooCommerce checkout form. It can display additional information, notices, or custom HTML elements above the cart items.
1.1. Add Text Using woocommerce_before_checkout_form Hook
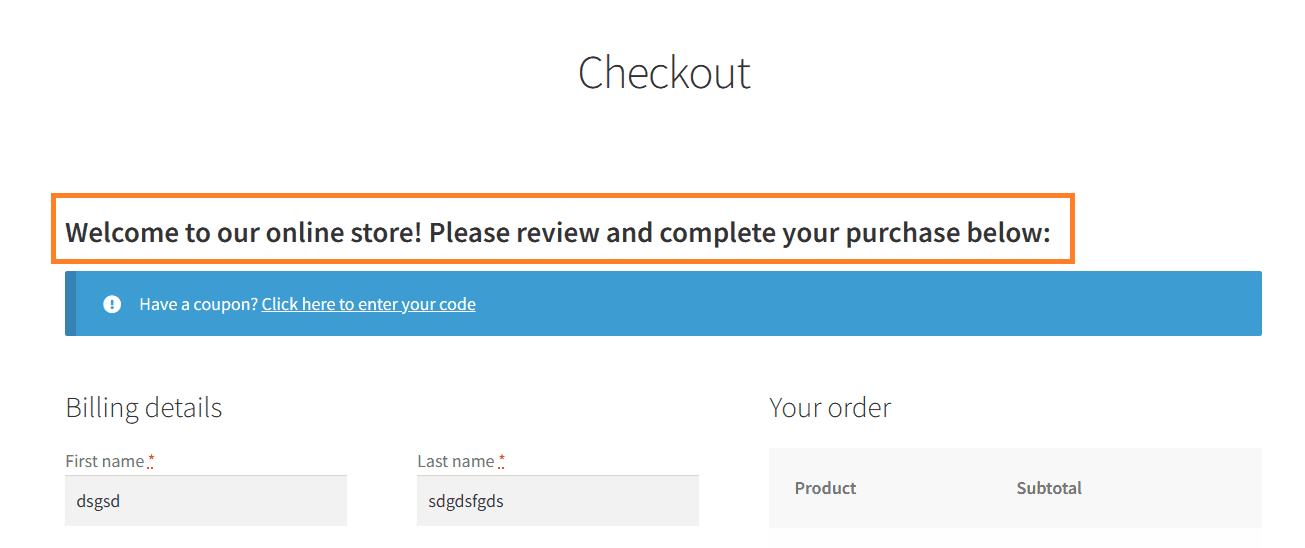
To use the woocommerce_before_checkout_form hook, you need to create a function (aovup_custom_before_checkout_form_message) and hook it to the desired action or filter.
Note: You must also give a priority number (5) within the action or filter to display something at the top of the checkout form (before the coupon message/section). Anything you want to display without the priority number (5) will be displayed below the coupon section.
I have created a function to display a custom welcome message before the checkout form. You can add any element and go as creative as you want. This is just to show you an example of how the woocommerce_before_checkout_form hook works.
The following is the code example that displays a custom message before the WooCommerce checkout form.
function aovup_custom_before_checkout_form_message() {
    echo '<div class="custom-before-checkout-form-message"><h3><strong>Welcome to our online store! Please review and complete your purchase below:</strong></h3></div>';
}
add_action('woocommerce_before_checkout_form', 'aovup_custom_before_checkout_form_message', 5);
add_action(‘woocommerce_before_checkout_form’, ‘aovup_custom_before_checkout_form_message’, 5);
1.2. Final Results
Following is the result after adding the above code to my demo store.
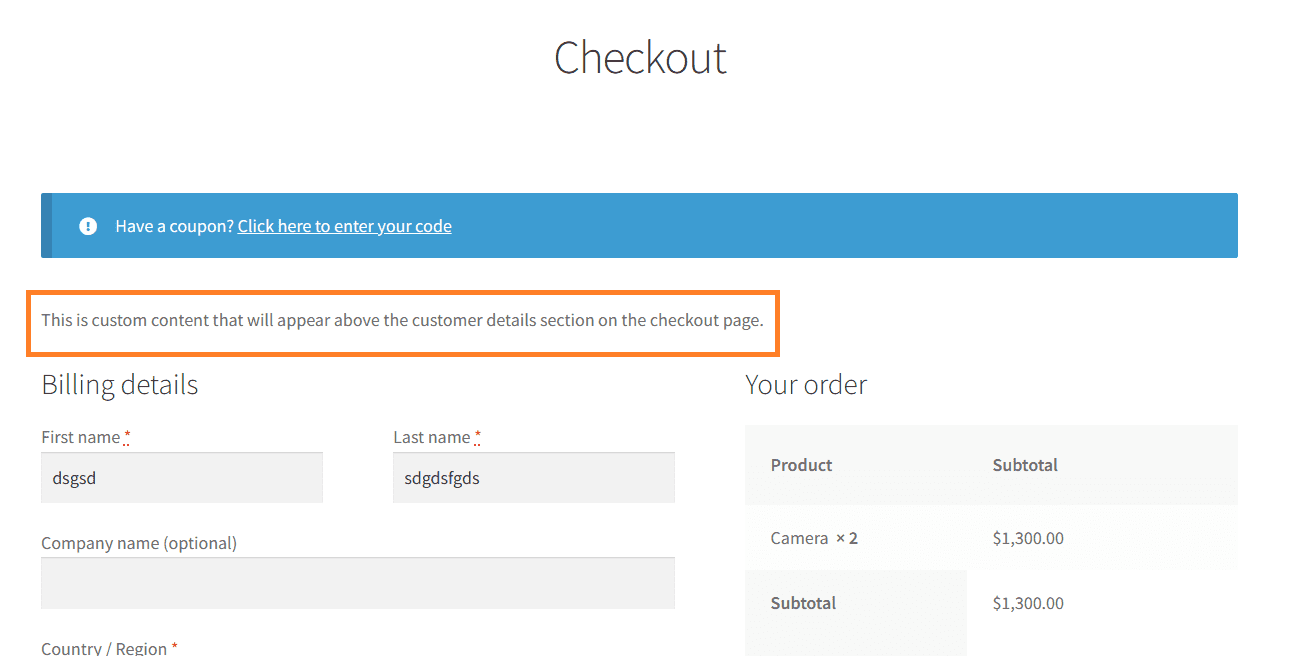
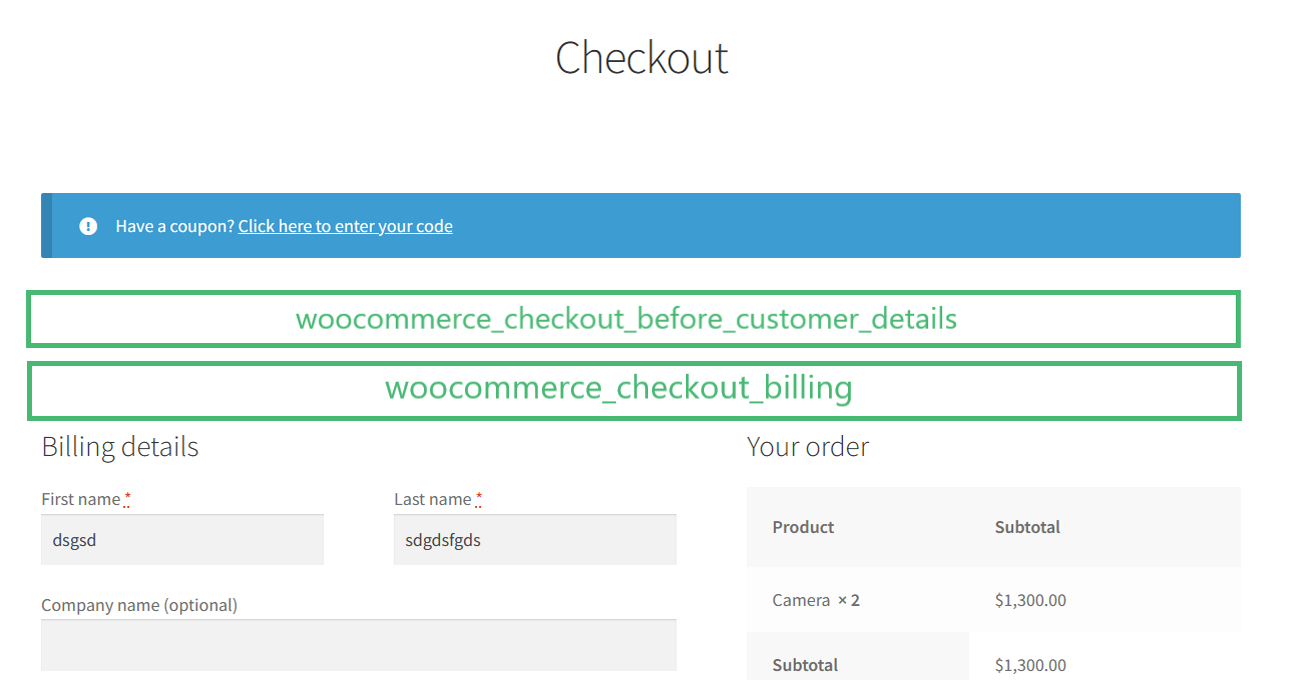
2. woocommerce_checkout_before_customer_details
This action hook is used to add content or code before the customer details section on the WooCommerce checkout page.
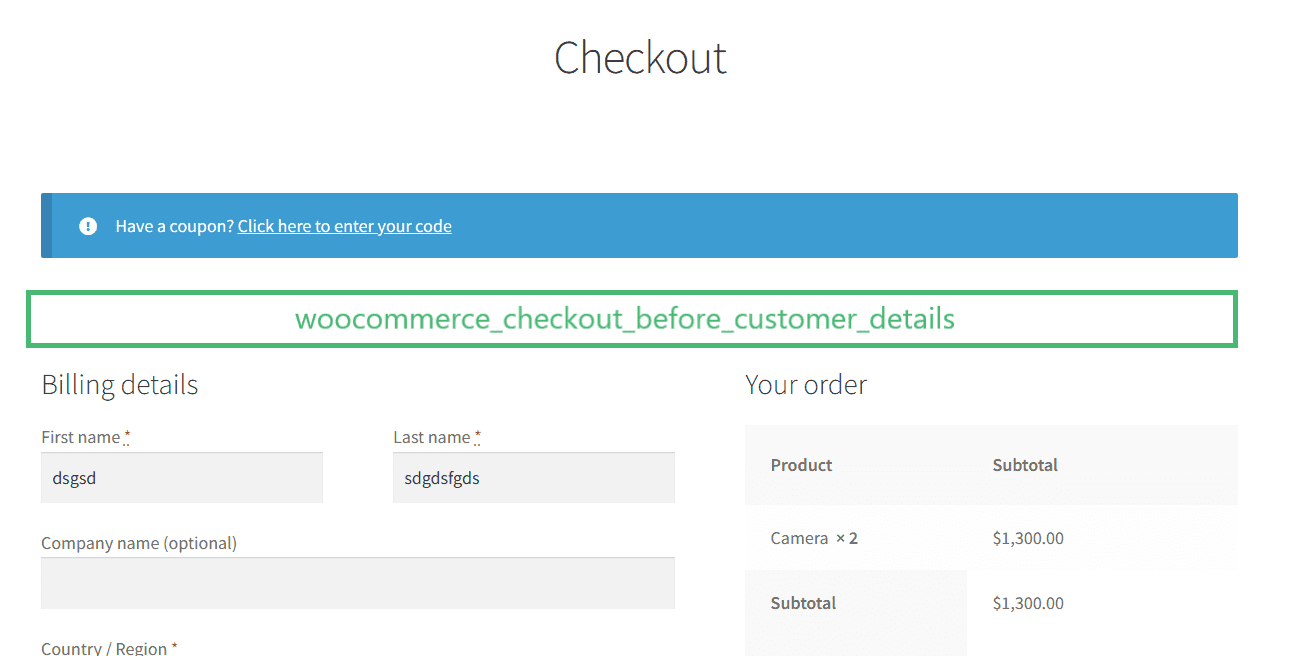
2.1. Add Content Using woocommerce_checkout_before_customer_details Hook
To use the woocommerce_checkout_before_customer_details hook, we need to create a function aovup_custom_content_before_customer_details() to output the desired text before the customer details section. Then, we need to use the add_action() to hook our custom function.
The first parameter of the add_action() function is the hook name (woocommerce_checkout_before_customer_details), and the second parameter is the name of our custom function (aovup_custom_content_before_customer_details).
Following is the code example of using the woocommerce_checkout_before_customer_details.
// Add content before the customer details on the checkout page
function aovup_custom_content_before_customer_details() {
    echo '<div class="custom-content">';
    echo '<p>This is custom content that will appear above the customer details section on the checkout page.</p>';
    echo '</div>';
}
add_action('woocommerce_checkout_before_customer_details', 'aovup_custom_content_before_customer_details');
2.2. Final Results
After placing the above code in my demo store, here are the final results.
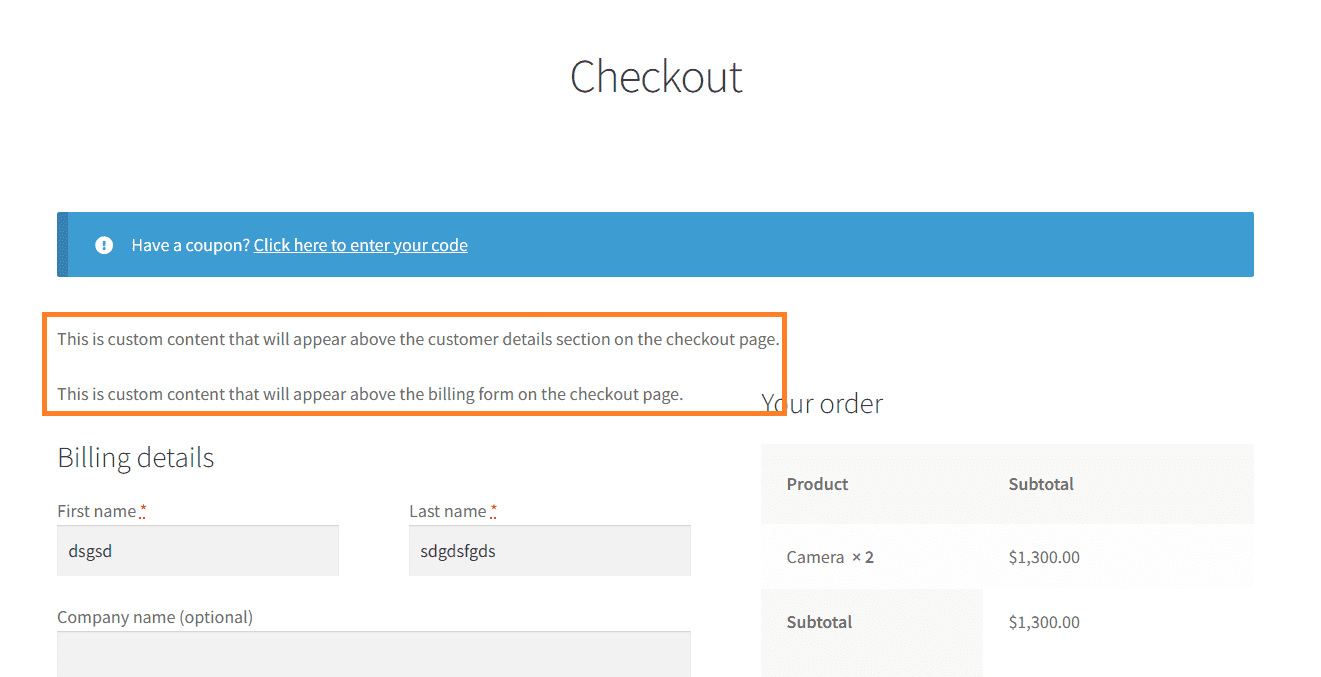
3. woocommerce_checkout_billing
This action hook adds content or code before the billing section on the WooCommerce checkout page.
3.1. Add Content Using woocommerce_checkout_billing Hook
To show you an example, I created a function and added some HTML to display it on the front end. I have also added a CSS class to the div element. Add custom CSS for this class to your theme’s style.css file.
After that, I used the add_action() function. It takes two parameters, the first one is the name of the hook and the second parameter is the function name.
The following is the code snippet.
function aovup_custom_content_before_billing_form() {
    echo '<div class="custom-content">';
    echo '<p>This is custom content that will appear above the billing form on the checkout page.</p>';
    echo '</div>';
}
add_action('woocommerce_checkout_billing', 'aovup_custom_content_before_billing_form');
add_action(‘woocommerce_checkout_billing’, ‘aovup_custom_content_before_billing_form’);
3.2. Final Results
After placing the above code snippet in my demo store, here are the final results. I have displayed the results for woocommerce_checkout_before_customer_details and the woocommerce_checkout_billing hooks to help you understand clearly.
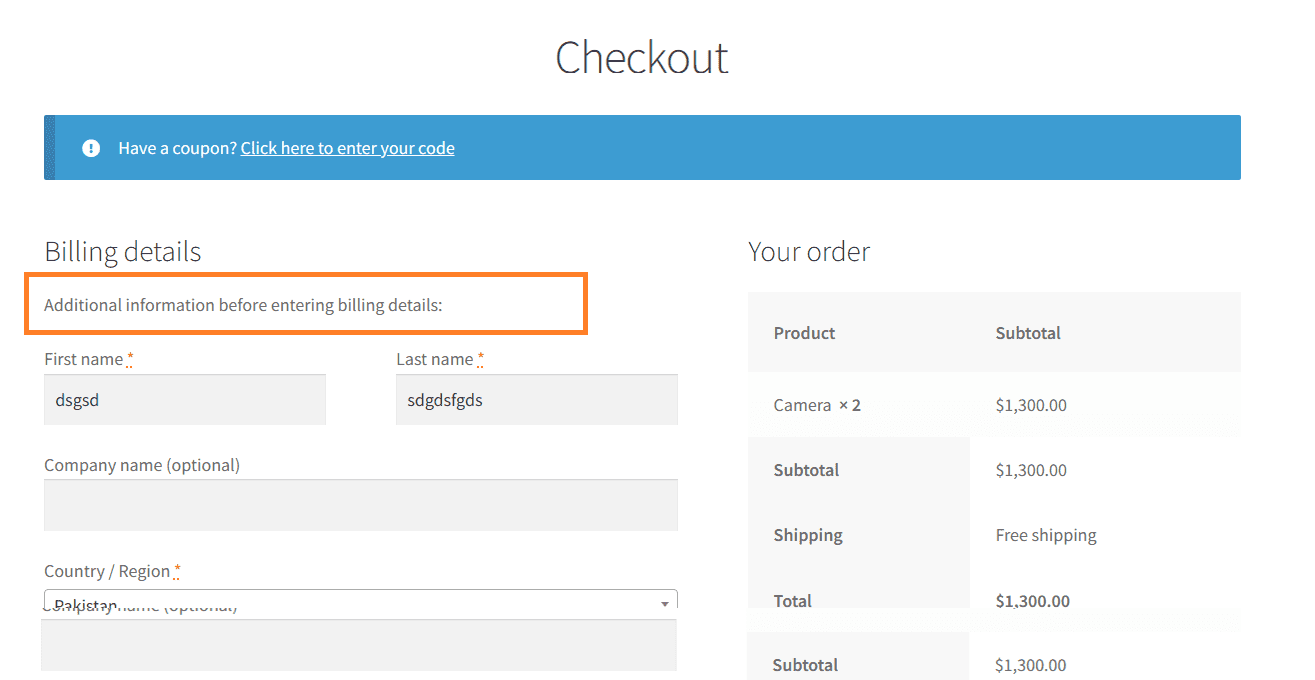
4. woocommerce_before_checkout_billing_form
This hook is used to display additional information before the billing checkout form. It displays the content after the ‘Billing Details’ heading and before the billing form.
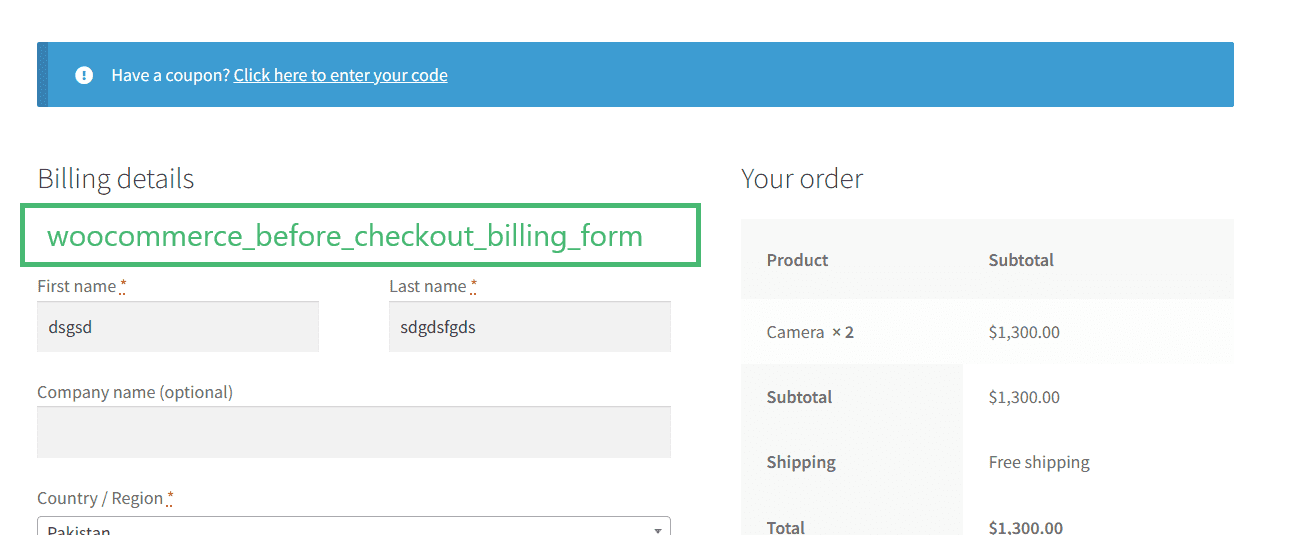
4.1. Add Content Using woocommerce_before_checkout_billing_form Hook
The usage of this hook is quite similar to the ones we saw before. The following is the code snippet:
// Add content before the WooCommerce checkout billing form.
function aovup_custom_before_billing_form_content() {
    echo '<div class="custom-before-billing-form-content">';
    echo '<p>Additional information before entering billing details:</p>';
    echo '</div>';
}

add_action('woocommerce_before_checkout_billing_form', 'aovup_custom_before_billing_form_content');
4.2. Final Results
After placing the above code snippet in one of my demo stores, here are the final results.
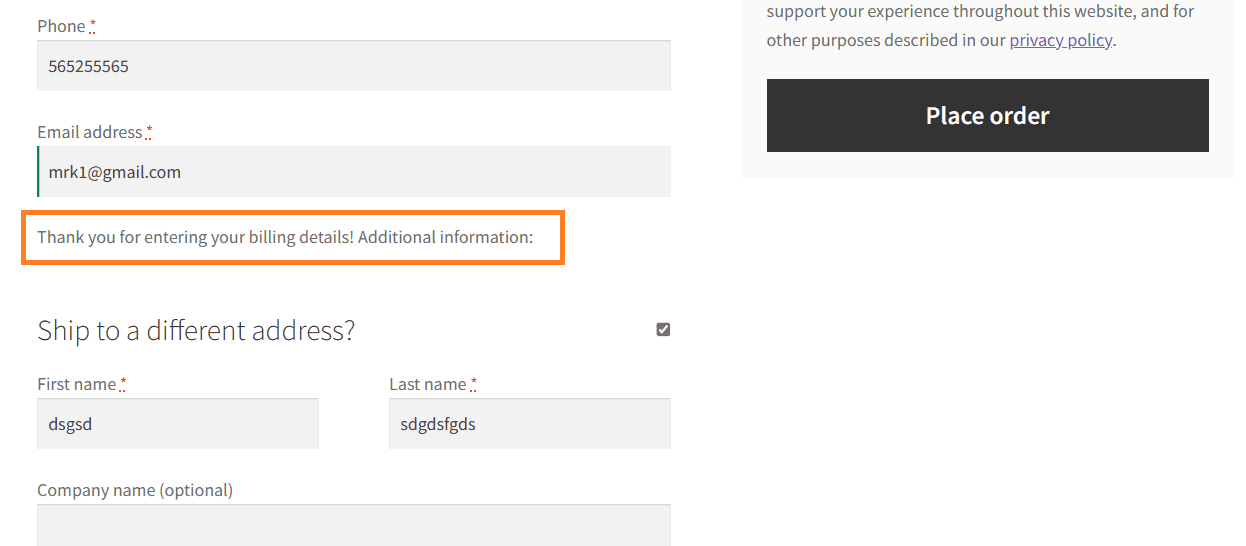
5. woocommerce_after_checkout_billing_form
This hook displays additional information just after the billing checkout form. You can display any information or custom element you want, but to show you an example, I’ll add a simple text after the checkout billing form.
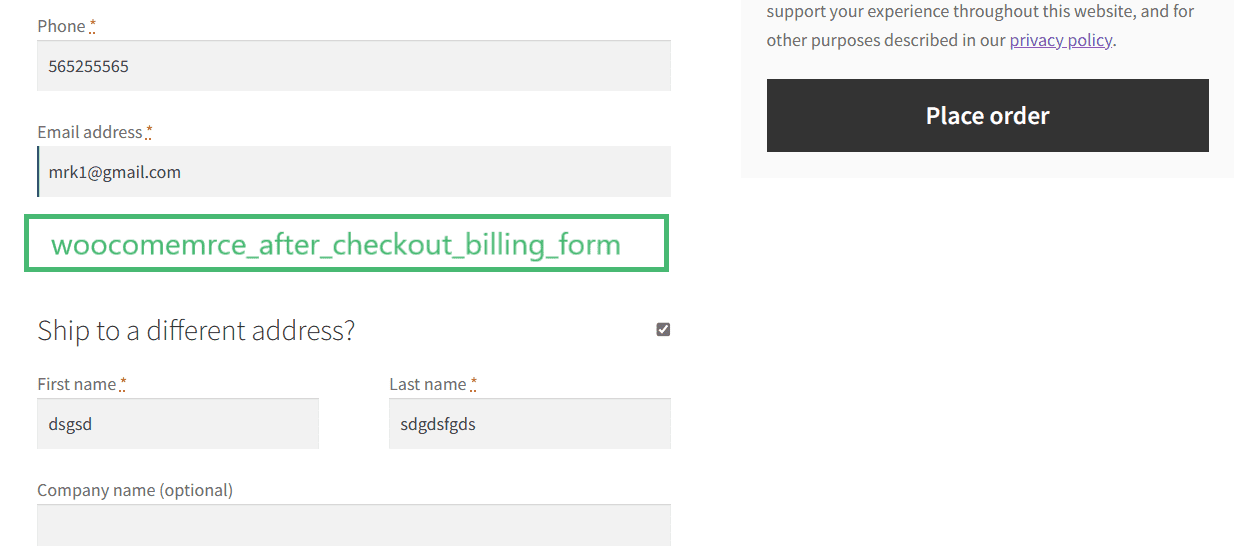
5.1. Add Content Using woocommerce_after_checkout_billing_form Hook
The usage of this hook is quite similar to the ones that we saw before, here is the code snippet:
// Add content after the WooCommerce checkout billing form.
function aovup_custom_after_billing_form_content() {
    echo '<div class="custom-after-billing-form-content"><p>Thank you for entering your billing details! Additional information:</p></div>';
}
add_action('woocommerce_after_checkout_billing_form', 'aovup_custom_after_billing_form_content');
5.2. Final Results
After placing the above code snippet in one of my demo stores, here are the final results.
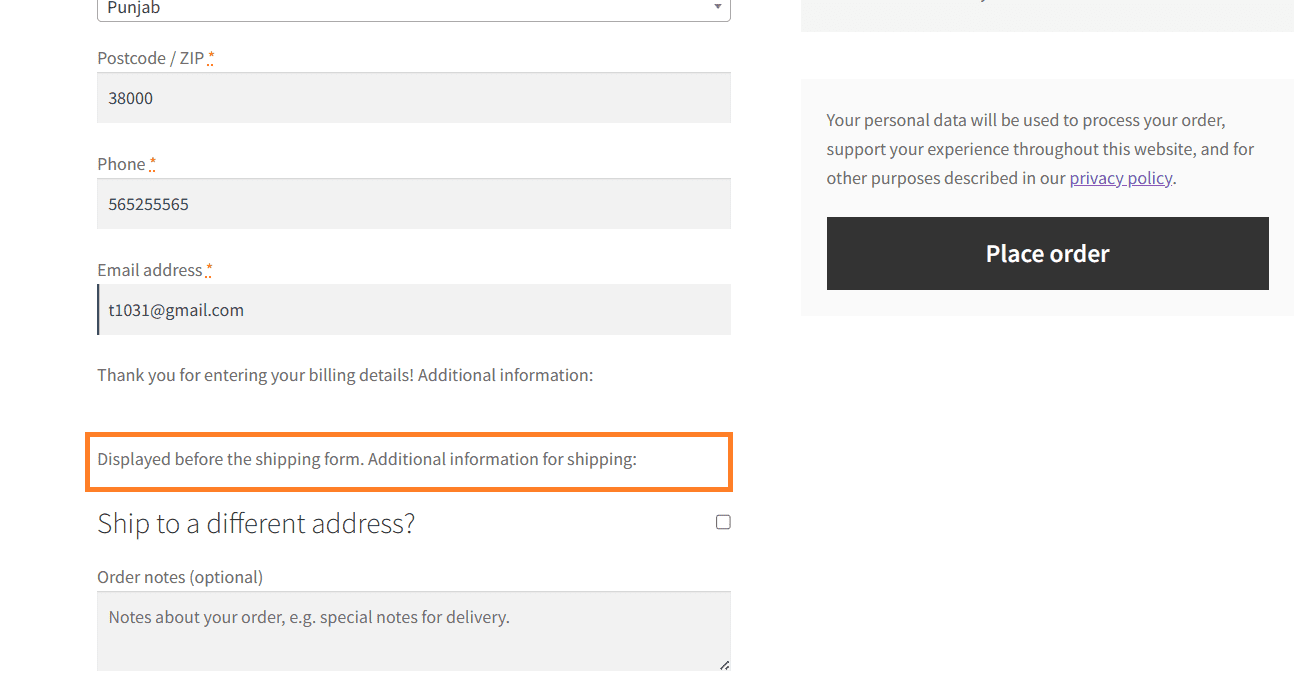
6. woocommerce_checkout_shipping
This hook is used to display any type of information or custom element right after the billing form and above the shipping form.
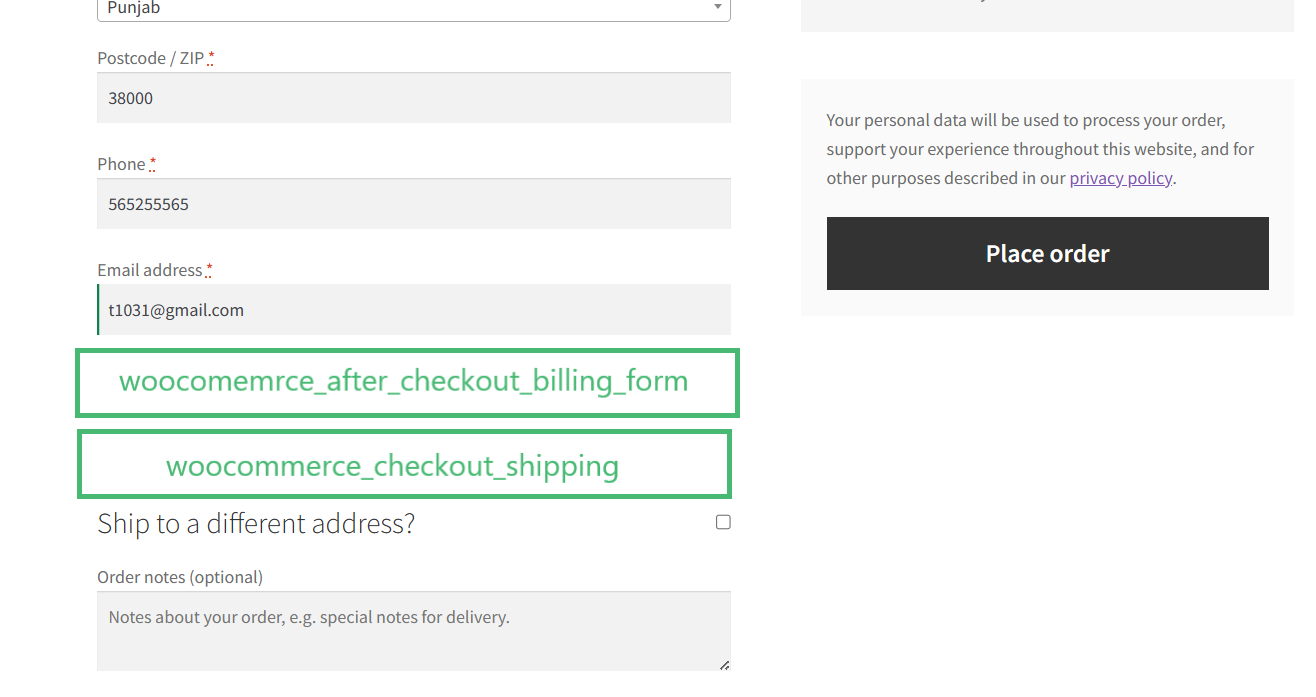
6.1. Add Content or Custom Element Using woocommerce_checkout_shipping Hook
To use this hook, you first need to create a function aovup_custom_checkout_shipping_content and add the contents to it. After that, you need to use the add_action() function to hook the function to the desired place on the checkout page.
It uses two parameters. The first parameter is the hook name (woocommerce_checkout_shipping) while the second parameter is the function name (aovup_custom_checkout_shipping_content).
Note: You can change the function name, but it should be unique. Ensure you do not modify the hook name or the parameter position in the add_action() function.
The following is the code snippet:
// Add content within the WooCommerce checkout shipping section.
function aovup_custom_checkout_shipping_content() {
    echo '<div class="custom-checkout-shipping-content"><p>Displayed before the shipping form. Additional information for shipping:</p></div>';
}
add_action('woocommerce_checkout_shipping', 'aovup_custom_checkout_shipping_content');
6.2. Final Results
After placing the above code snippet in one of my demo stores, here are the final results.
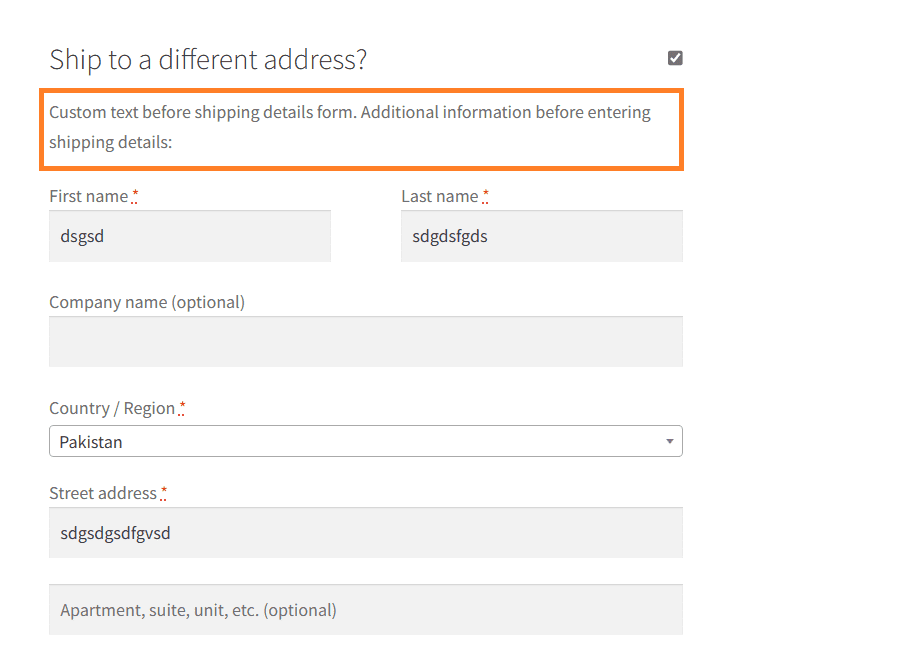
7. woocommerce_before_checkout_shipping_form
7.1. Add Text Using the woocommerce_before_checkout_shipping_form Hook
I have added a simple text before the shipping details form. To add it, I created a function named aovup_custom_before_shipping_form_content and added the content to it.
After that, I hooked the function to the desired location using the add_action() function. The following is the code snippet:
// Add content before the WooCommerce checkout shipping form.
function aovup_custom_before_shipping_form_content() {
    echo '<div><p>Custom text before shipping details form. Additional information before entering shipping details:</p></div>';
}
add_action('woocommerce_before_checkout_shipping_form', 'aovup_custom_before_shipping_form_content');
7.2. Final Results
I added the above code snippet to one of my demo stores, and here are the final results upon visiting the checkout page.
8. woocommerce_after_checkout_shipping_form
The woocommerce_after_checkout_shipping_form hook allows developers to insert additional content or elements after the shipping address form on the WooCommerce checkout page.
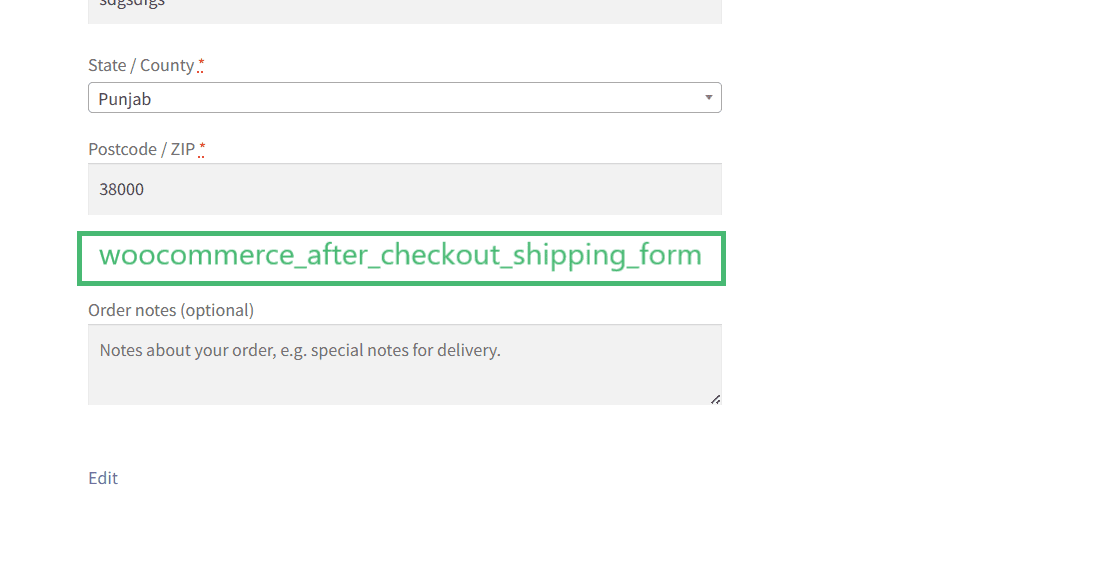
8.1. Add Shipping Guarantee Text Using the woocommerce_after_checkout_shipping_form Hook
If your store offers shipping guarantees or specific shipping-related promotions, this hook could be used to showcase those details.
If you have understood the previous code snippets, this would be a piece of cake for you.
The following is the code snippet:
function aovup_custom_shipping_guarantees() {
    echo '<div class="custom-shipping-guarantees"><h4>Guaranteed delivery or your shipping costs refunded!</h4></div>';
}
add_action('woocommerce_after_checkout_shipping_form', 'aovup_custom_shipping_guarantees');
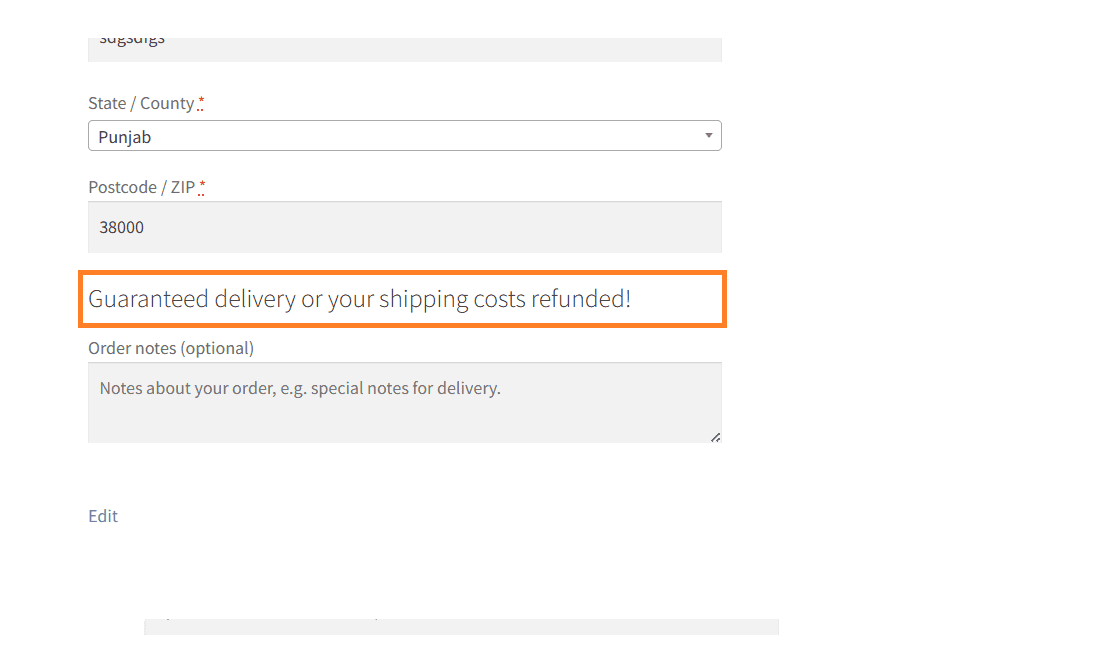
8.2. Final Results
I added the code to my store using a plugin and visited the checkout page. Here are the results:
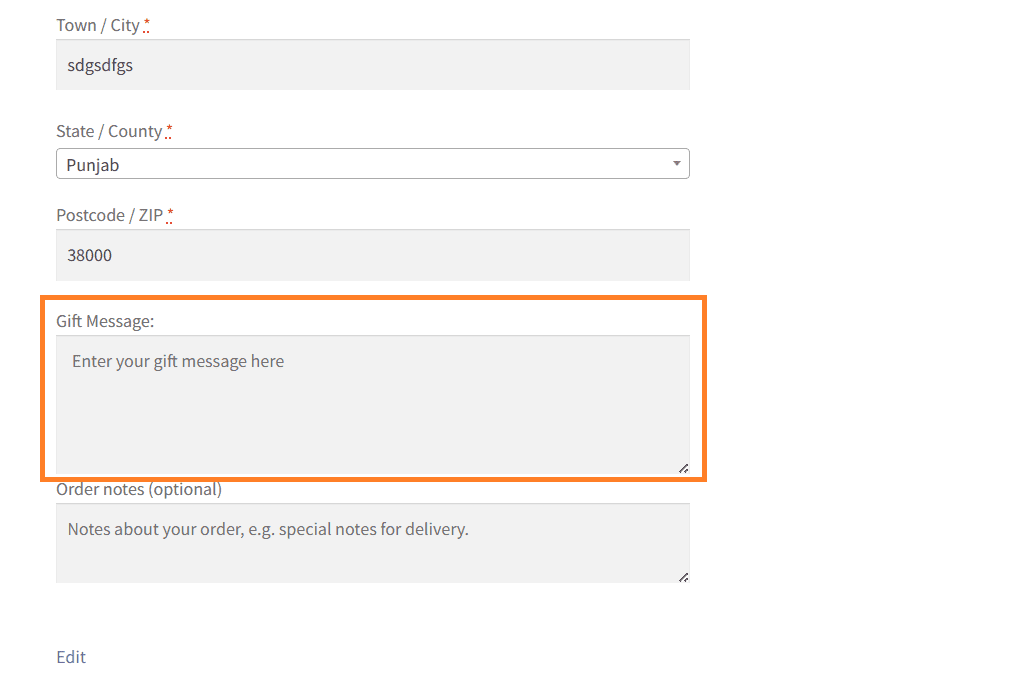
9. woocommerce_before_order_notes
It shows on the checkout page above the order notes section.
9.1. Add a Custom Field Using woocommerce_before_order_notes Hook
The following is the code snippet to add a gift message field above the order notes section on the checkout. You can play with the code and display anything above the order notes section.
// Add a Gift Message section before the order notes on the WooCommerce checkout page.
function aovup_custom_gift_message_field() {
    echo '<div class="custom-gift-message">
            <label for="gift_message">Gift Message:</label>
            <textarea id="gift_message" name="gift_message" rows="4" placeholder="Enter your gift message here"></textarea>
          </div>';
}
add_action('woocommerce_before_order_notes', 'aovup_custom_gift_message_field');
9.2. Final Results
I added the code to my store using a plugin and visited the checkout page. I could see the custom gift message field and its label.
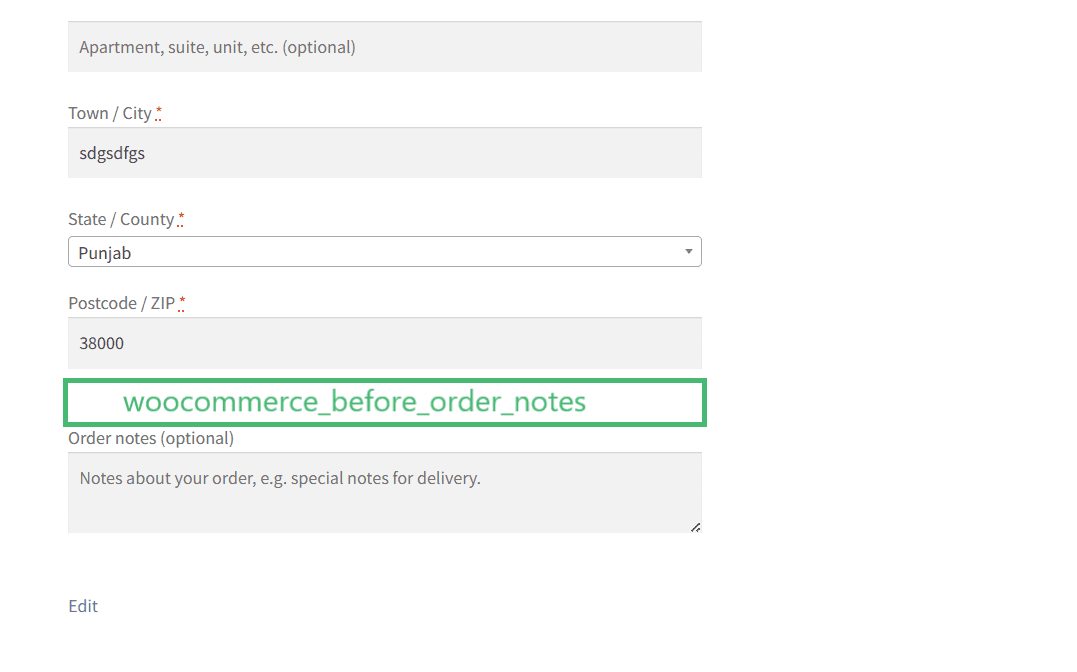
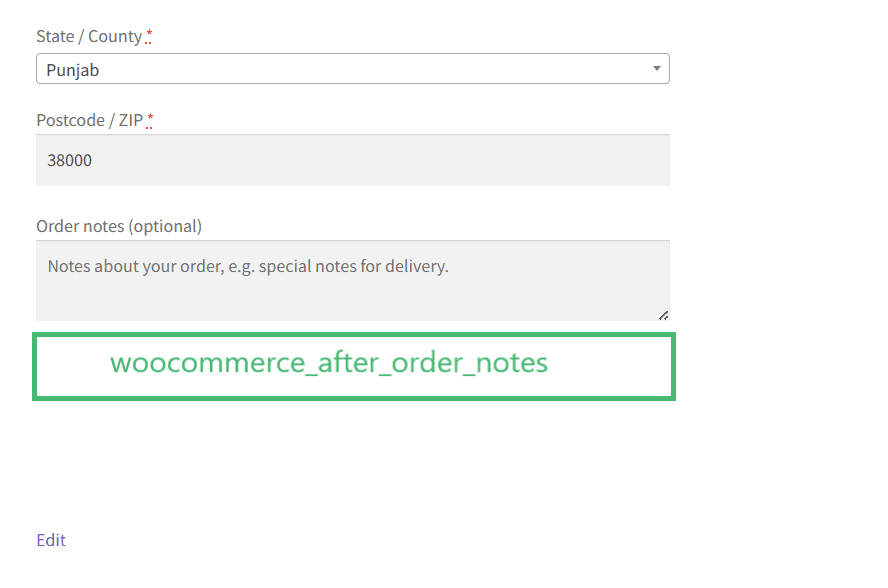
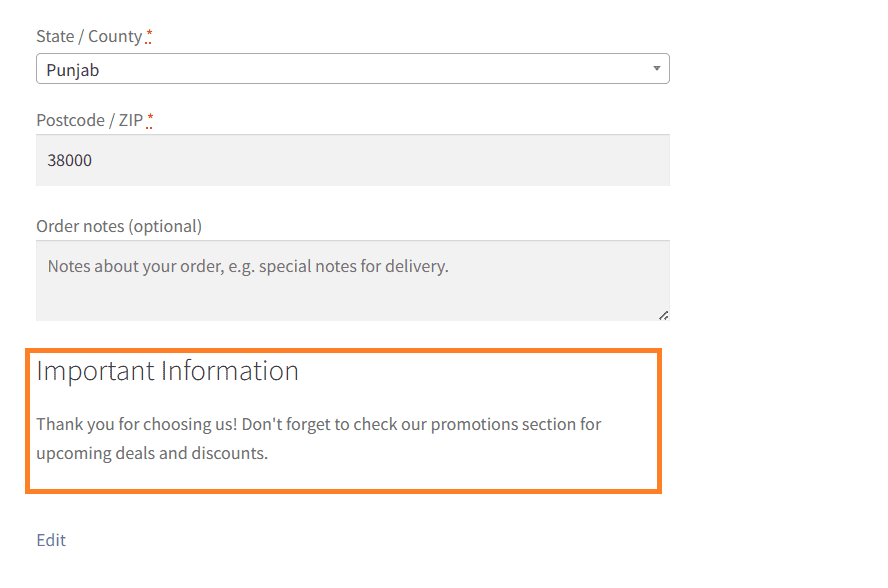
10. woocommerce_after_order_notes
It shows on the checkout page after the order notes section.
10.1. Display Promotional Message Using woocommerce_after_order_notes Hook
The following is the code snippet to add a custom note or promotional message after the notes section on the checkout. You can play with the code and display anything above the order notes section.
// Display additional information after the order notes on the WooCommerce checkout page.

function aovup_custom_additional_information() {
    echo "<div>
            <h3>Important Information</h3>
            <p>Thank you for choosing us! Don't forget to check our promotions section for upcoming deals and discounts.</p>
          </div>";
}
add_action('woocommerce_after_order_notes', 'aovup_custom_additional_information');
10.2. Final Results
Here are the final results after placing the above code snippet in WordPress.
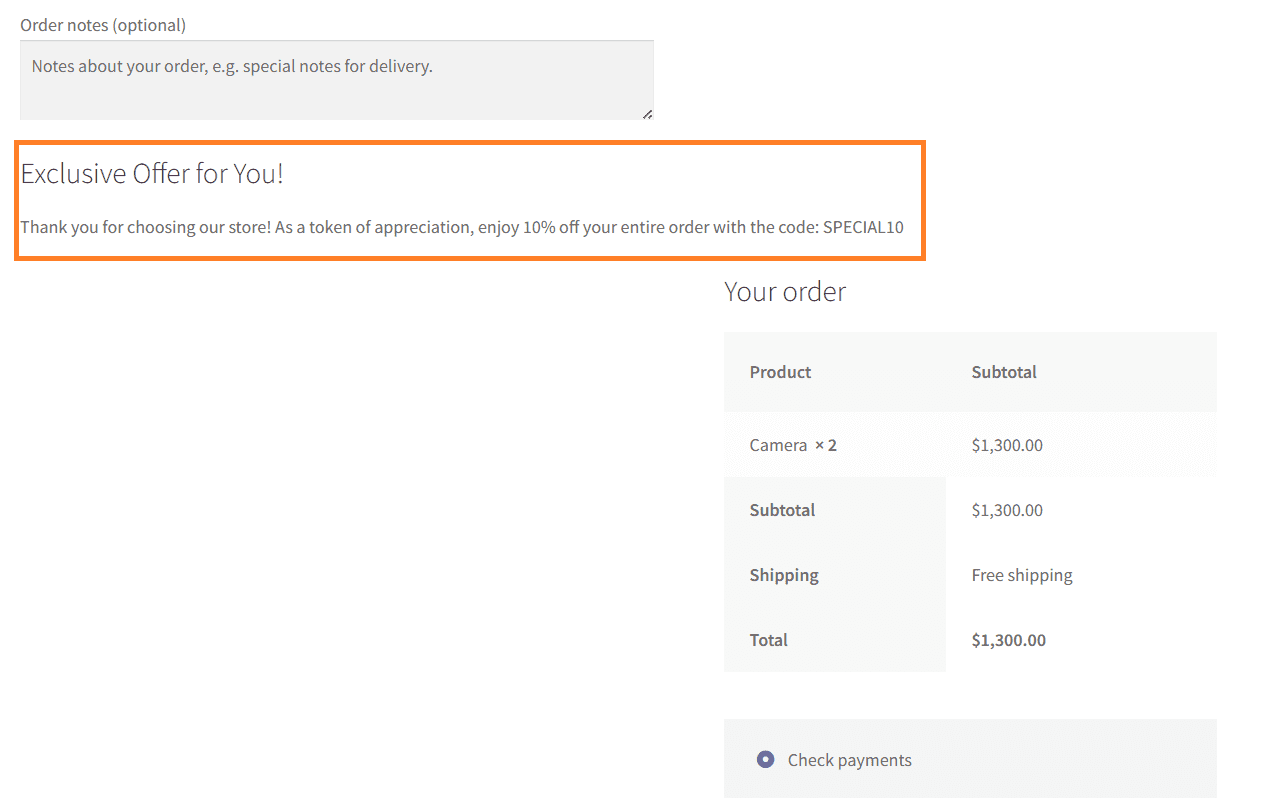
11. woocommerce_checkout_after_customer_details
The woocommerce_checkout_after_customer_details hook allows you to add content or custom elements after the customer details section on the WooCommerce checkout page
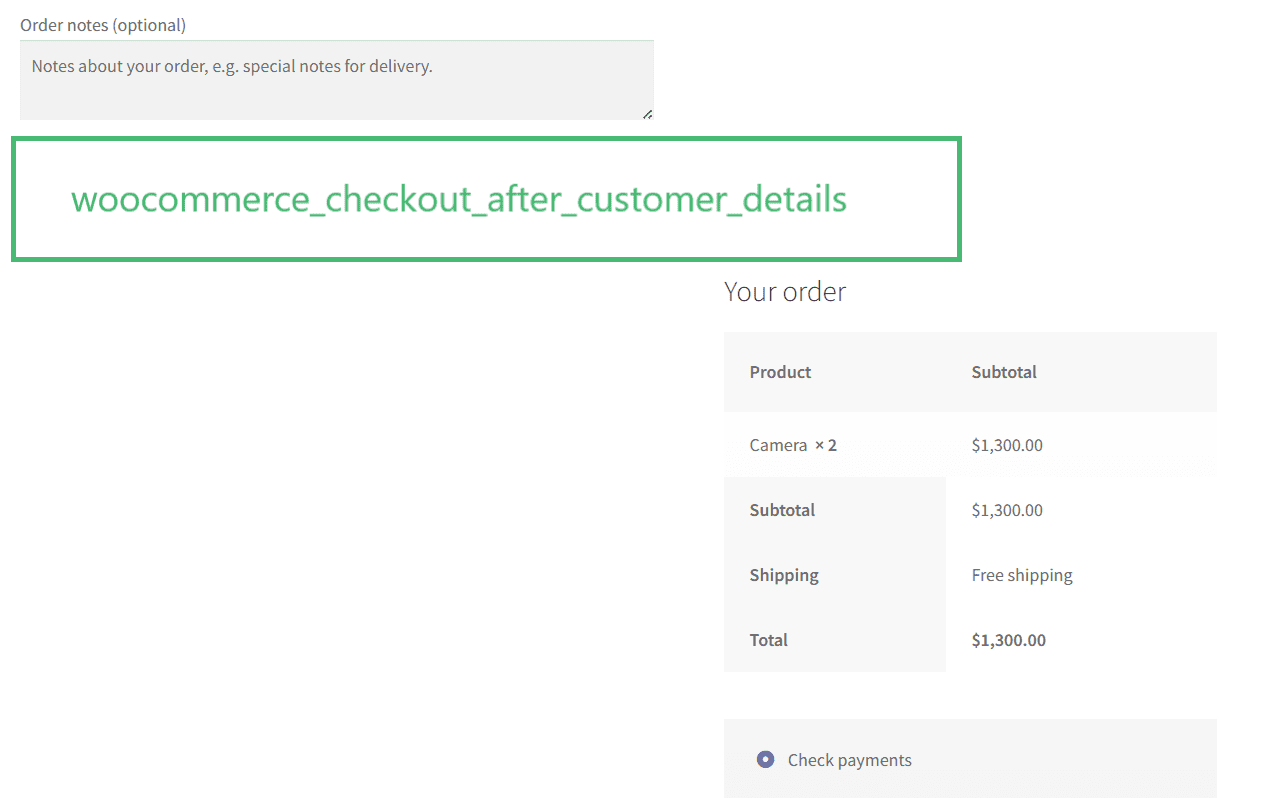
11.1. Display a Custom Offer Using woocommerce_checkout_after_customer_details Hook
The following is the code snippet to add a custom offer or note after the customer details section on the checkout page. You can play with the code and display anything above the order notes section.
Note: This hook will change the checkout page. By default, the checkout page has a two-column layout, but when you use this hook, it will shift the ‘Order Summary’ column below it (which can help create a single-column layout).
Also, it is important to mention that the order summary column position will change vertically only (not horizontally).
The code snippet follows:
/* Display a custom message or offer after the customer details on the WooCommerce checkout page. */

function aovup_custom_after_customer_details_message() {
    echo '<div>
            <h3>Exclusive Offer for You!</h3>
			<p>Thank you for choosing our store! As a token of appreciation, enjoy 10% off your entire order with the code: SPECIAL10</p>
          </div>';
}
add_action('woocommerce_checkout_after_customer_details', 'aovup_custom_after_customer_details_message');
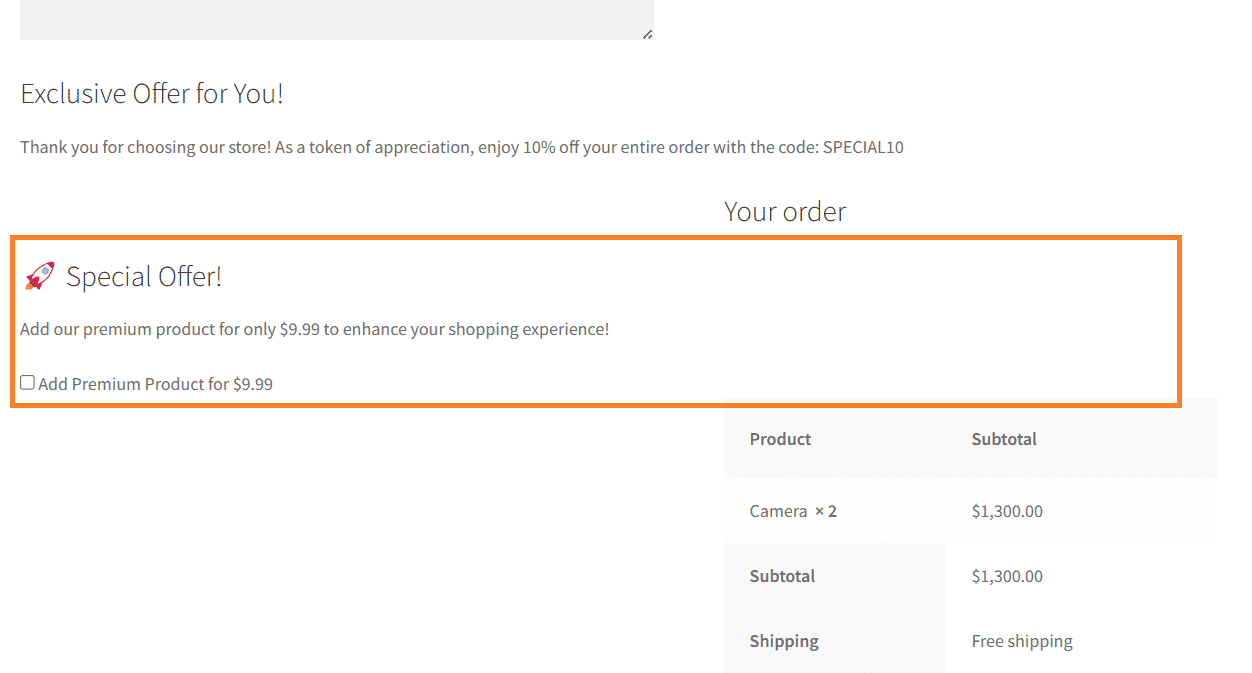
11.2. Final Results:
The final results are after placing the above code snippet in WordPress. As you can see, the order summary section was shifted below the custom offer text I added using the hook. The order summary section only changed its position vertically.
12. woocommerce_checkout_before_order_review
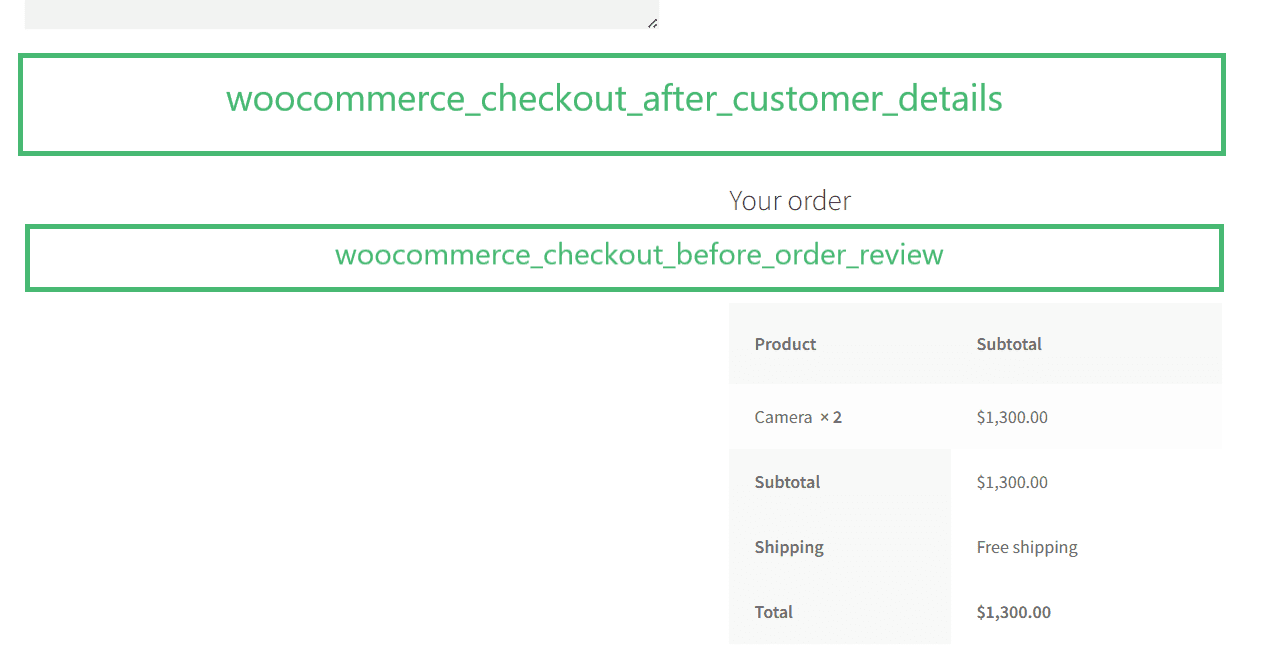
12.1. Show an Order Bump Using woocommerce_checkout_before_order_review Hook
To use this hook, I created a function named aovup_custom_order_bump that checks if the current page is the checkout page and then echoes a div containing a custom heading, a paragraph with the order bump offer, and a checkbox for the customer to opt-in.
Then, the woocommerce_checkout_before_order_review hook adds this custom content before the “Order Review” section.
The following is the code snippet:
/* Display an order bump before the order review section on the WooCommerce checkout page. */
function aovup_custom_order_bump() {
    // Check if it's the checkout page
    if (is_checkout()) {
        echo '<div class="custom-order-bump">
                <h3>🚀 Special Offer!</h3>
                <p>Add our premium product for only $9.99 to enhance your shopping experience!</p>
                <label>
                    <input type="checkbox" name="add_order_bump" value="1"> Add Premium Product for $9.99
                </label>
              </div>';
    }
}
add_action('woocommerce_checkout_before_order_review', 'aovup_custom_order_bump');
12.2. Final Results
I added the code to my store using a plugin and visited the checkout page. I could see the custom order bump.
Note: It is just to show you an example, and the above code doesn’t add a proper order bump to the desired location. It only displays the text and a checkbox (which can’t perform any action).
13. woocommerce_review_order_before_cart_contents
The woocommerce_review_order_before_cart_contents hook will help you add content or any sort of custom information before the cart contents in the order summary section on the WooCommerce checkout page.
It allows developers to add or modify content at that specific point by executing custom code or functions.
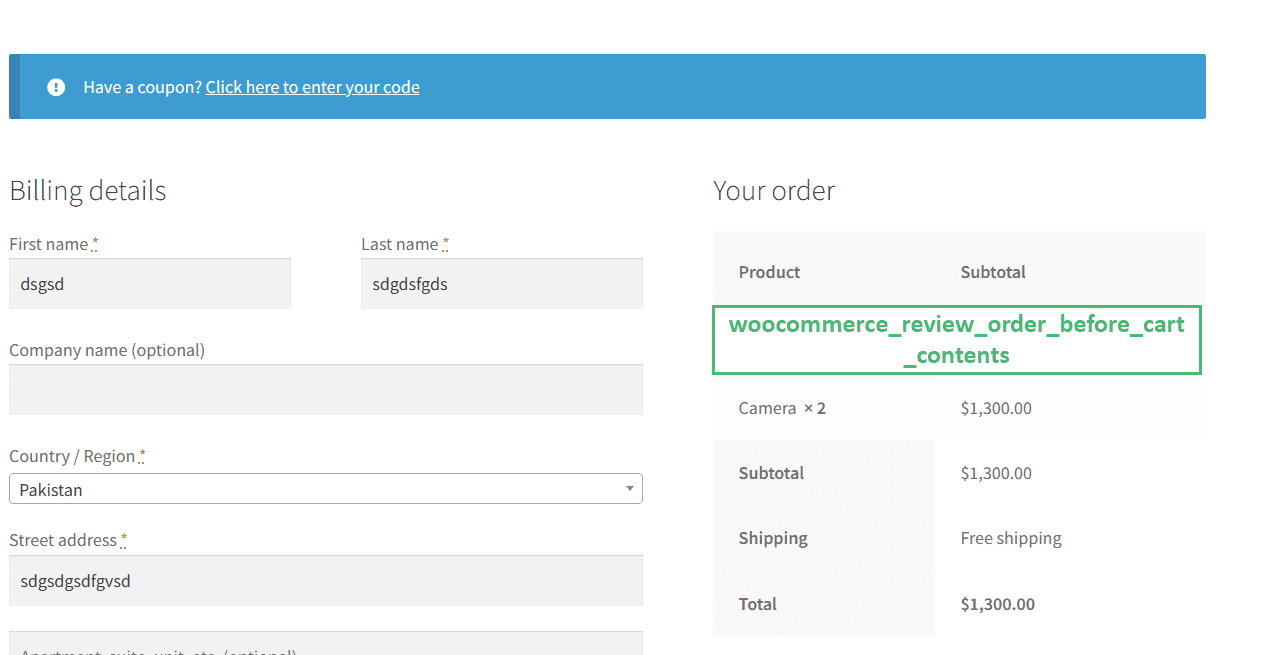
Code Example:
The following is an example code for displaying a notice above the cart contents in the order summary section on the checkout page.
/* Display information about eco-friendly packaging before the cart contents in the order review section. */
function aovup_custom_eco_friendly_message() {

    echo '<div>
            <h3>🌿 Eco-Friendly Packaging</h3>
            <p>At [Your Store Name], we are committed to sustainability. All our packaging materials are eco-friendly and recyclable. Thank you for supporting our efforts to reduce our environmental footprint!</p>
          </div>';
}
add_action('woocommerce_review_order_before_cart_contents', 'aovup_custom_eco_friendly_message');
14. woocommerce_review_order_after_cart_contents
This is the opposite of the previous hook, as it allows you to display any content below the cart in the order summary section on the checkout page.
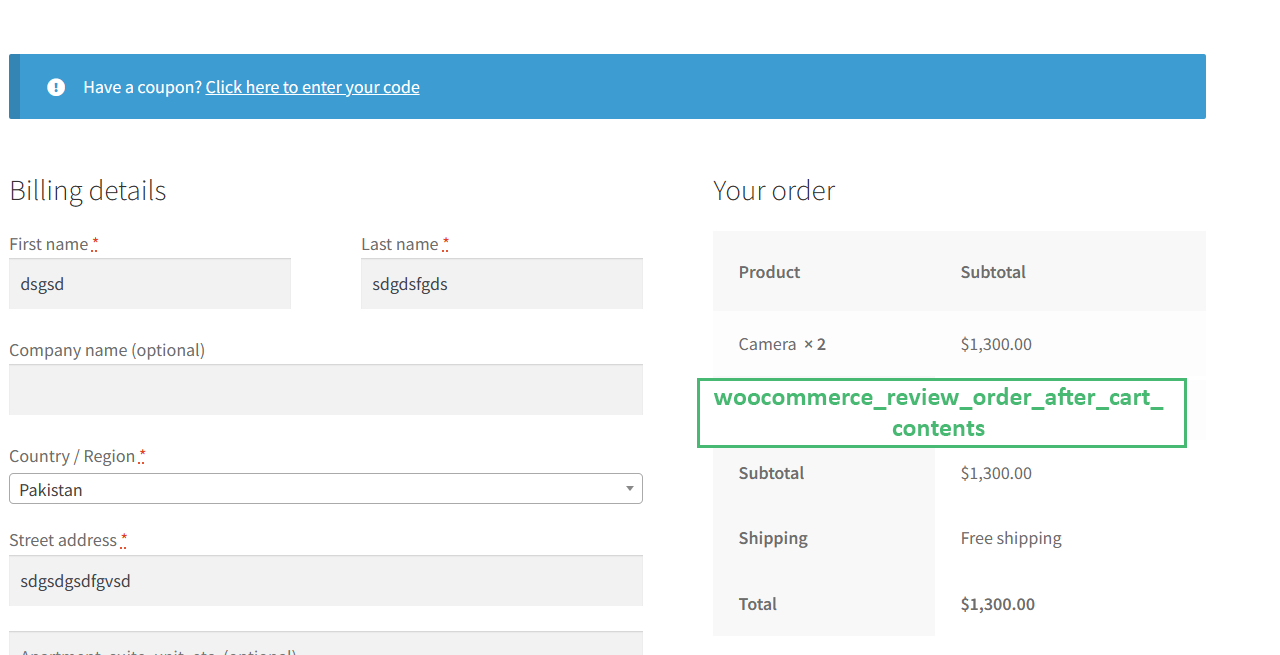
Code Example:
The following is a straightforward example that displays a text or a message below the cart contents and above the cart subtotal.
/**Display custom content after the cart contents in the order review section. */

function aovup_custom_after_cart_contents() {
    echo '<div>
            <p>Thank you for choosing [Your Store Name]! If you have any questions or need assistance, feel free to reach out to our customer support team.</p>
          </div>';
}
add_action('woocommerce_review_order_after_cart_contents', 'aovup_custom_after_cart_contents');
15. woocommerce_review_order_before_shipping
The woocommerce_review_order_before_shipping hook allows you to show the desired content above the shipping and below the subtotal in the order summary on the checkout page.
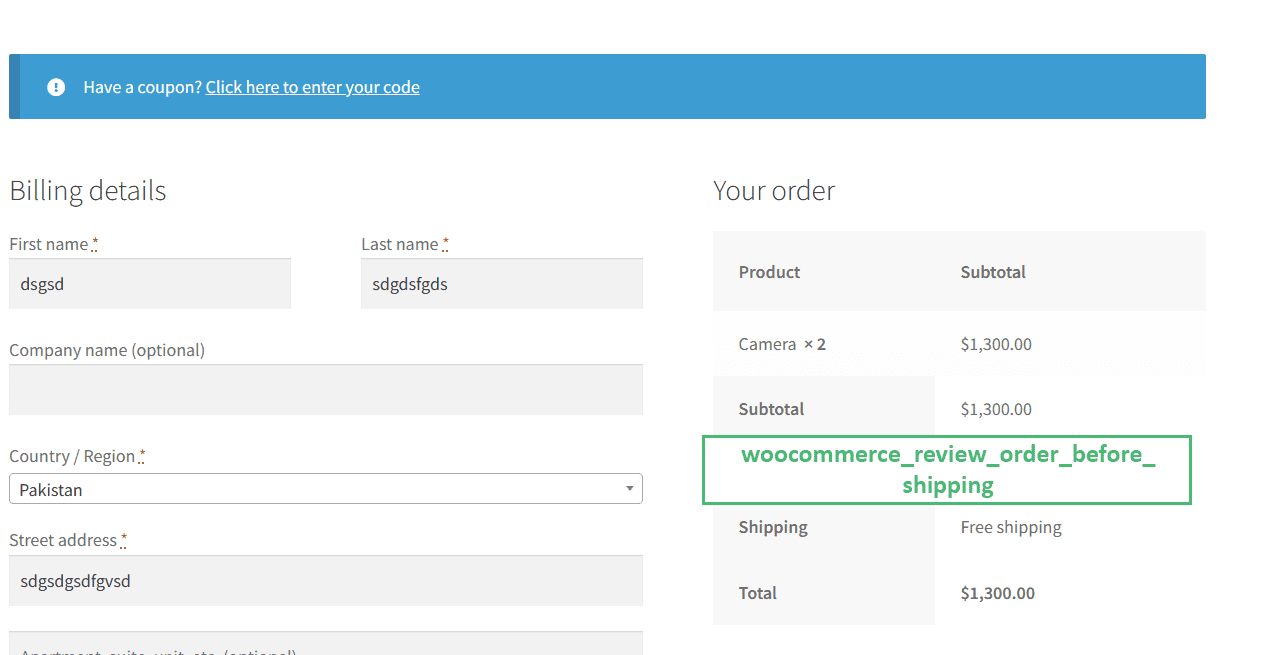
Code Example:
The following is a straightforward example that displays a text or a message below the subtotal and above the shipping options.
/* Display estimated delivery times before the shipping methods in the order review section. */

function aovup_custom_estimated_delivery_times() {
    echo '<div>
            <p>Please note the estimated delivery times may take more than usual(2-3 days) due to overload.</p>
          </div>';
}
add_action('woocommerce_review_order_before_shipping', 'aovup_custom_estimated_delivery_times');
16. woocommerce_after_shipping_rate
The woocommerce_after_shipping_rate hook allows you to add content or custom elements after each shipping rate option is displayed in the “Order Summary” section on the WooCommerce checkout page.
16.1. Add Text Below Each Shipping Method Using woocommerce_after_shipping_rate Hook
The following is a simple code example that displays a custom message list after each shipping method in the order summary section on the checkout page.
/*Displays additional information after each shipping rate in the order review section.*/

function aovup_custom_after_shipping_rate($method) {
    echo '<div>
            <p>Additional information for '.$method->label.':</p>
            <ul>
                <li>Estimated delivery time: 3-5 business days</li>
                <li>Package tracking available</li>
            </ul>
          </div>';
}
add_action('woocommerce_after_shipping_rate', 'aovup_custom_after_shipping_rate');
16.2. Final Results
Here are the results after placing the above code sample in one of my demo stores:

17. woocommerce_review_order_after_shipping
The woocommerce_review_order_after_shipping hook allows you to display custom content after the shipping methods in the order summary section on the checkout page.
Code Example:
The following example displays a thank you message for selecting the shipping method.
/* Display additional information after the shipping methods in the order review section.*/

function aovup_custom_after_shipping_methods() {
    echo '<div>
            <p>Thank you for choosing your shipping method. Here are some additional details:</p>
          </div>';
}
add_action('woocommerce_review_order_after_shipping', 'aovup_custom_after_shipping_methods');
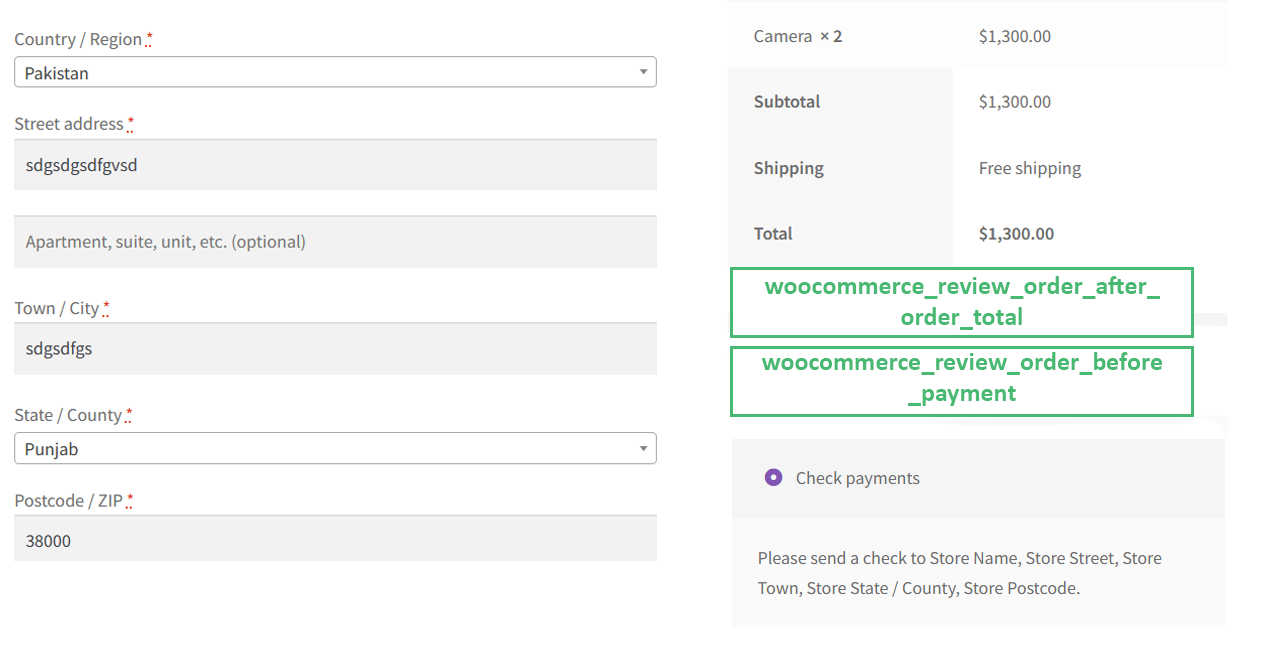
18. woocommerce_review_order_before_order_total
The woocommerce_review_order_before_order_total hook allows you to display the content above the cart total in the order summary section on the WooCommerce checkout page.
Note: I have highlighted all three hooks to give you a clear understanding of their positioning on the checkout page.
Code Example:
The following is the code example to help you use this hook:
/* Display additional information before the order total in the order review section.
 */

function aovup_custom_before_order_total() {
    echo '<div class="custom-before-order-total">
            <p>Thank you for shopping with us! Here is some important information:</p>
            <ul>
                <li><strong>Discount Applied:</strong> $5.00</li>
                <li><strong>Taxes:</strong> Included in the total</li>
            </ul>
          </div>';
}
add_action('woocommerce_review_order_before_order_total', 'aovup_custom_before_order_total');
19. woocommerce_review_order_after_order_total
The woocommerce_review_order_after_order_total hook allows you to display the content after the cart total in the order summary section on the WooCommerce checkout page.
Code Example:
The following is the code example to help you use this hook:
/* Display additional information after the order total in the order review section.*/

function aovup_custom_after_order_total() {
    echo '<p>Pricing also includes the taxes.</p>';
}
add_action('woocommerce_review_order_after_order_total', 'aovup_custom_after_order_total');
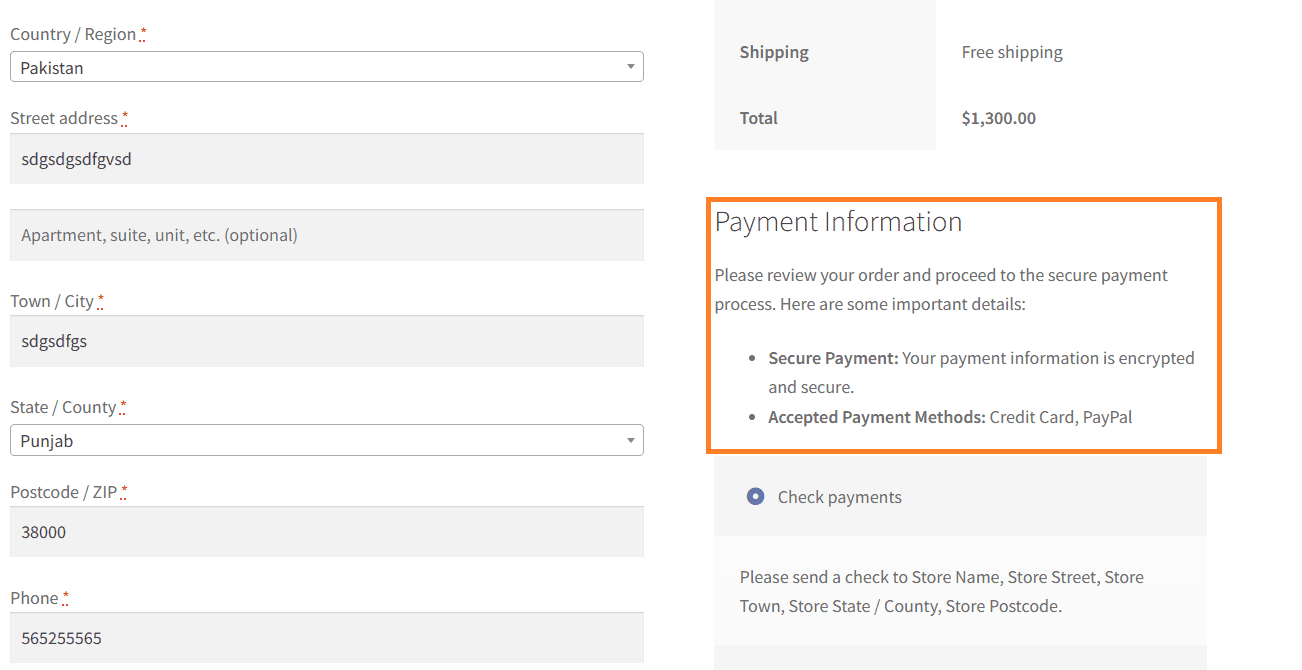
20. woocommerce_review_order_before_payment
The woocommerce_review_order_before_payment hook allows you to display additional information above the payment options on the checkout page.
20.1. Add Additional Payment Information Using woocommerce_review_order_before_payment Hook
The following is the code to add additional payment information above the payment section on the checkout page.
/*Display additional information before the payment section in the order review. */

function aovup_custom_before_payment() {
    echo '<div class="custom-before-payment">
            <h3>Payment Information</h3>
            <p>Please review your order and proceed to the secure payment process. Here are some important details:</p>
            <ul>
                <li><strong>Secure Payment:</strong> Your payment information is encrypted and secure.</li>
                <li><strong>Accepted Payment Methods:</strong> Credit Card, PayPal</li>
            </ul>
          </div>';
}
add_action('woocommerce_review_order_before_payment', 'aovup_custom_before_payment');
20.2. Final Results
Here are the final results after placing the above code snippet in my demo store.
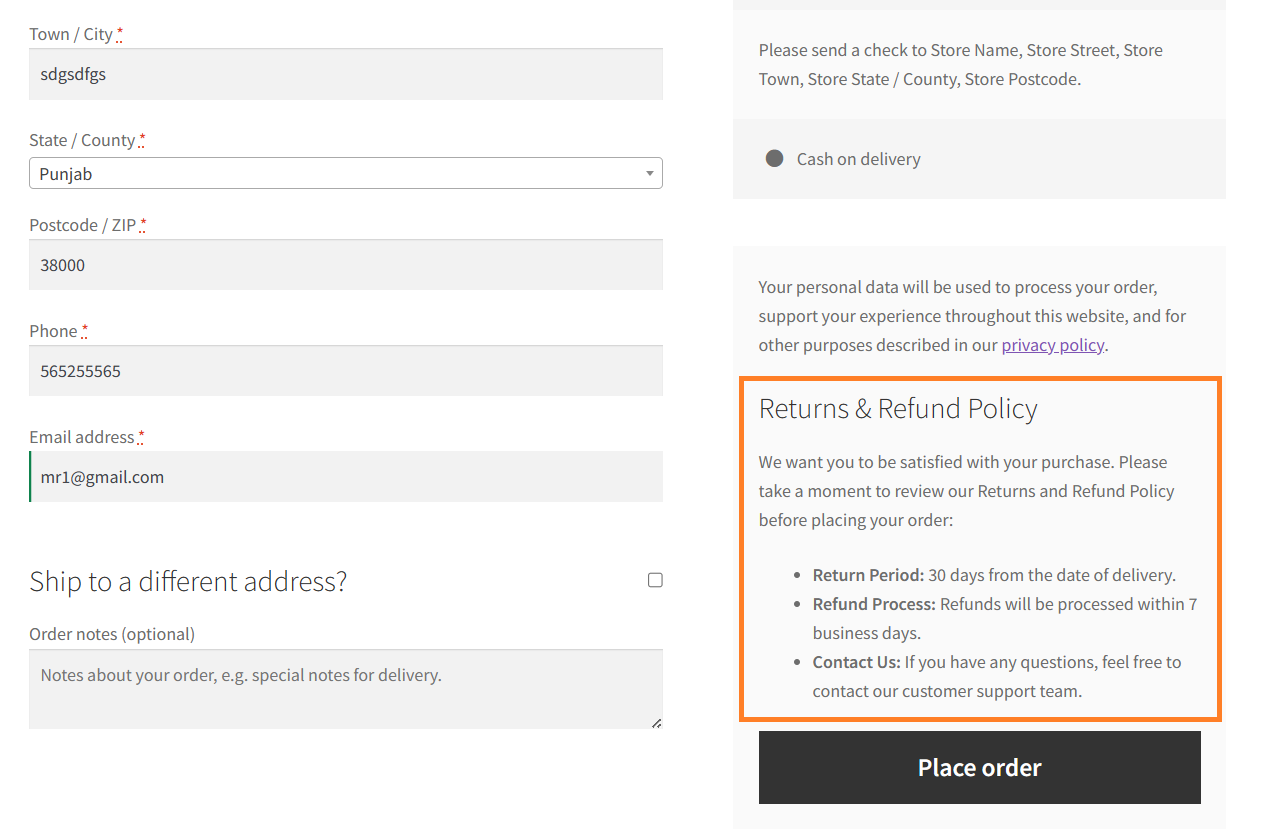
21. woocommerce_review_order_before_submit
The woocommerce_review_order_before_submit hook allows you to add text or any other type of custom content before the place order button and below the payment method on the checkout page.
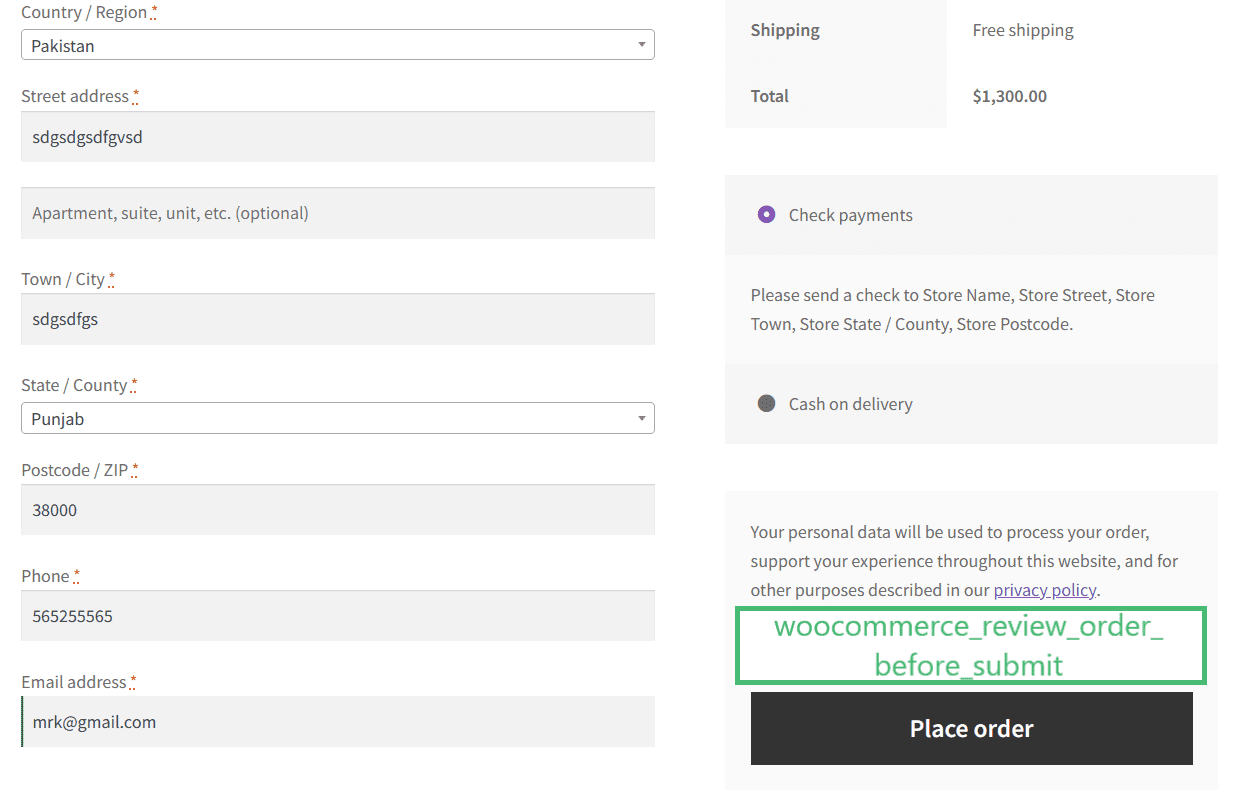
21.1. Display Return Policy Using the woocommerce_review_order_before_submit Hook
The following is the code example to help you display the return policy before the order placement button on the checkout page. It’ll also help you use this hook.
/* Display returns and refund policy information before the "Place Order" button in the order review. */

function aovup_custom_returns_refund_policy() {
    echo '<div>
            <h3>Returns & Refund Policy</h3>
            <p>We want you to be satisfied with your purchase. Please take a moment to review our Returns and Refund Policy before placing your order:</p>
            <ul>
                <li><strong>Return Period:</strong> 30 days from the date of delivery.</li>
                <li><strong>Refund Process:</strong> Refunds will be processed within 7 business days.</li>
                <li><strong>Contact Us:</strong> If you have any questions, feel free to contact our customer support team.</li>
            </ul>
          </div>';
}
add_action('woocommerce_review_order_before_submit', 'aovup_custom_returns_refund_policy');
21.2. Final Results
Here are the final results after placing the above code snippet in my demo store.
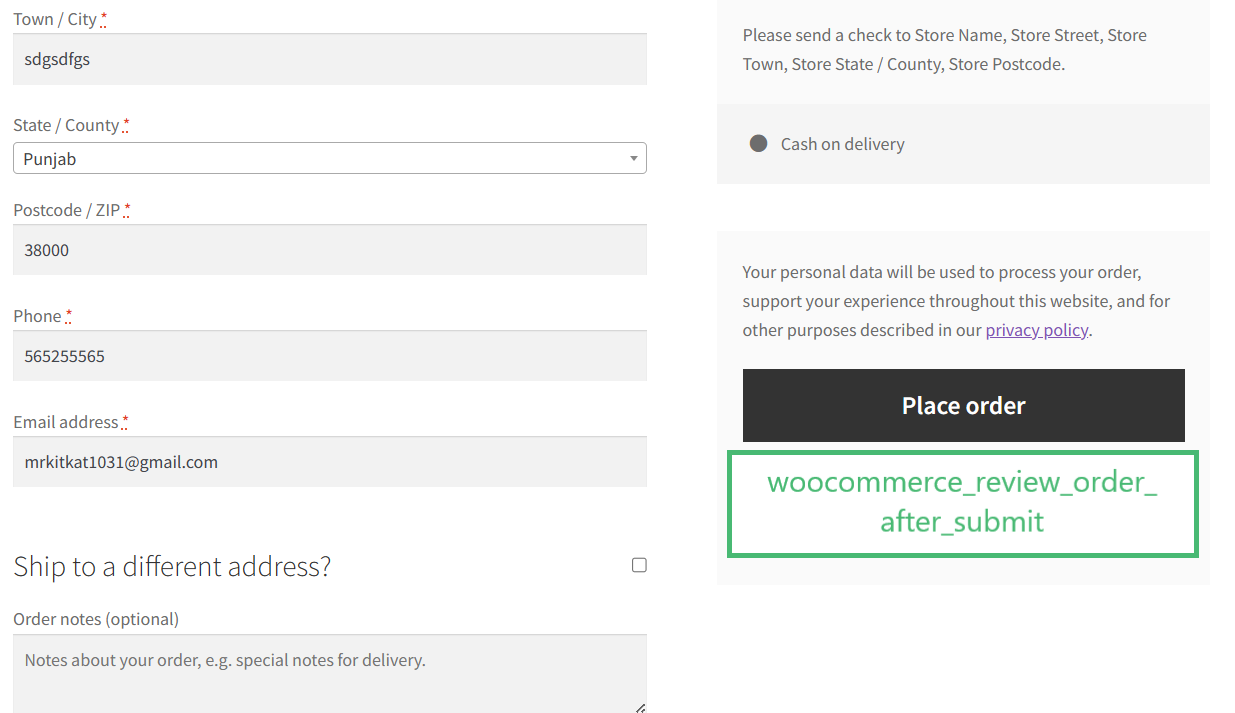
22. woocommerce_review_order_after_submit
The woocommerce_review_order_after_submit hook is triggered after the “Place Order” button in the “Order Review” section on the WooCommerce checkout page.
If you want to add content or perform actions after submitting the order, you might want to consider using the woocommerce_thankyou hook. After a successful order placement, this hook is triggered on the thank you page.
Code Sample:
The following is the code sample to help you use this hook.
Note: You can select the function name as you want, just make sure to select a unique function name. Also, you need to ensure that you pass the same name to the action hook.
function aovup_after_order_button() {
// Add code to display anything you want below the ‘Place Order’ button
}

add_action(‘woocommerce_review_order_after_submit’, ‘aovup_after_order_button’);
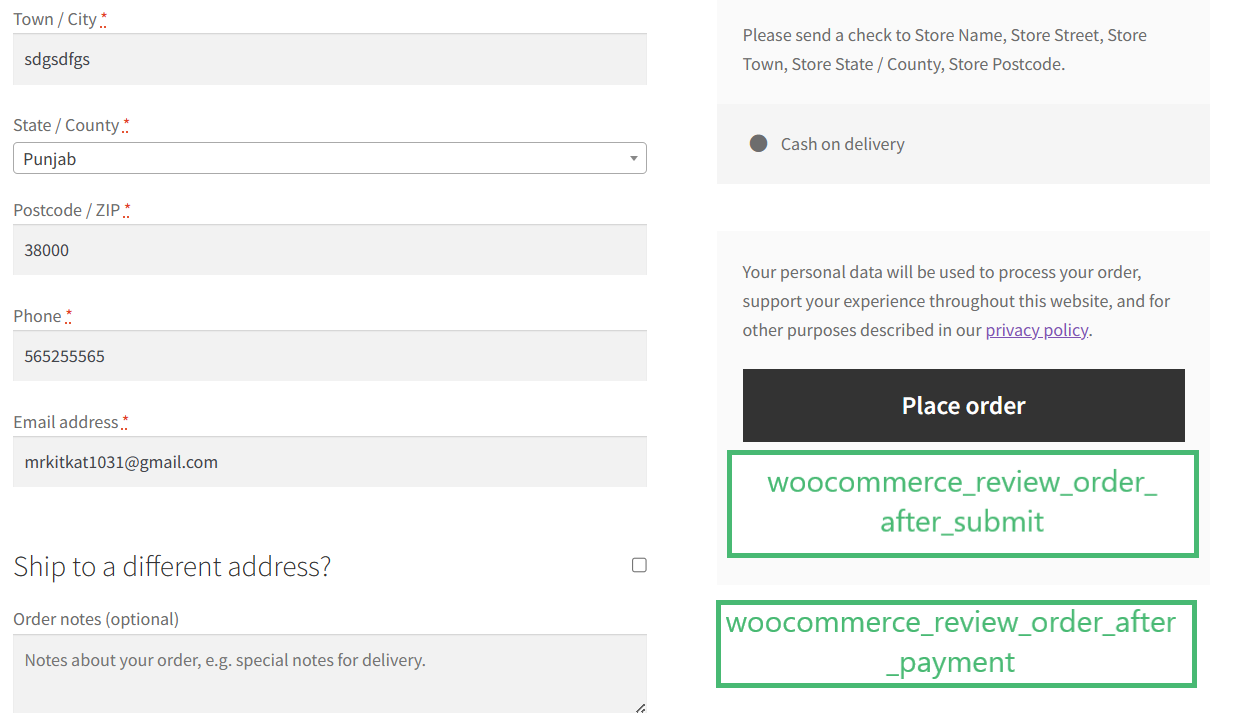
23. woocommerce_review_order_after_payment
The woocommerce_review_order_after_payment is triggered below the ‘Place Order’ button (below the woocommerce_review_order_after_submit hook) outside the order summary section on the checkout page.
Code Sample:
The following is the code sample to help you use this hook.
/* Display content below the place order button */

function aovup_outside_order_summary() {
    echo '<div>
            <p>Thank you for shopping with us. You will soon receive your order. In case of late deliveries or any inquiries, please contact customer support.</p>
          </div>';
}
add_action('woocommerce_review_order_after_payment', 'aovup_outside_order_summary');
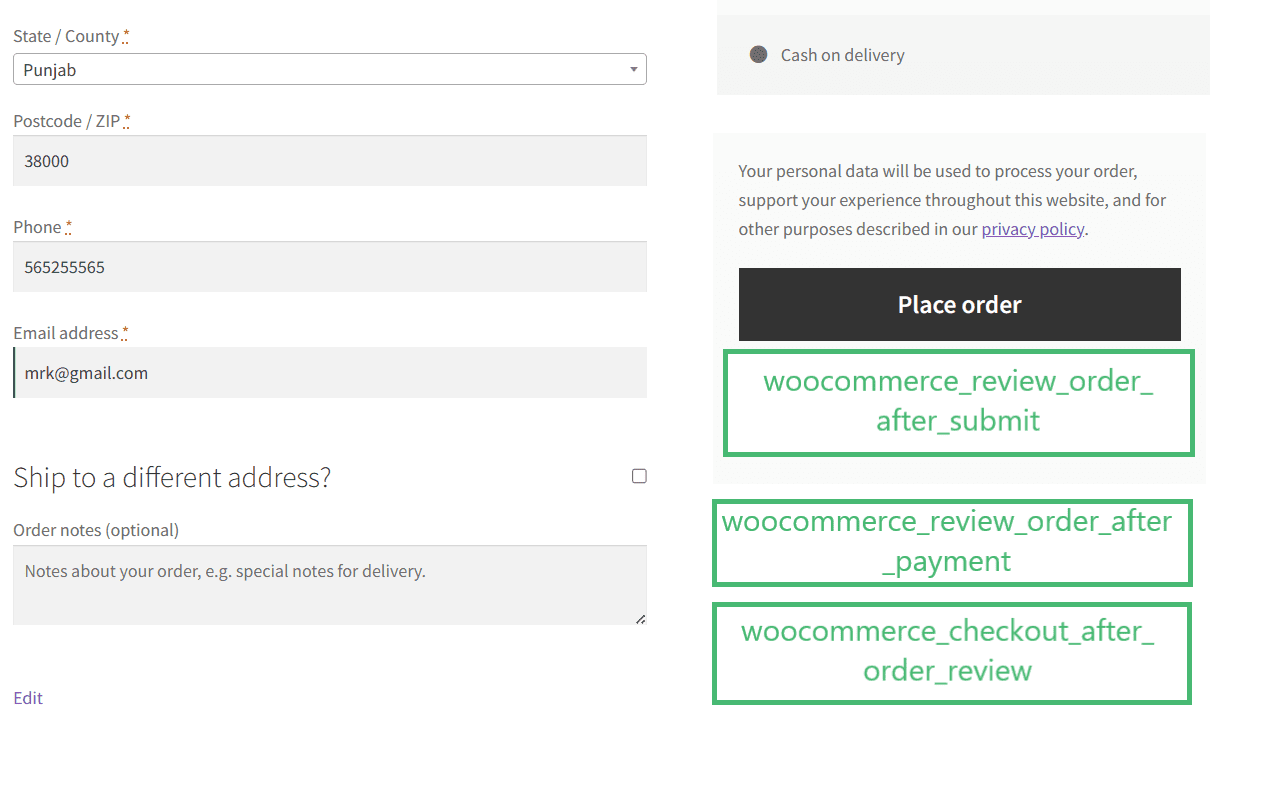
24. woocommerce_checkout_after_order_review
The woocommerce_checkout_after_order_review hook allows you to add content or custom elements after the order review section on the WooCommerce checkout page.
Code Example:
The following is the code sample to help you use this hook.
/* Display a notice after the order review section on the checkout page. */

function aovup_custom_after_order_review_notice() {
    echo '<div class="custom-after-order-review-notice">
            <p>Before you place your order, please double-check the shipping address and ensure all details are accurate. Once the order is confirmed, changes may not be possible.</p>
          </div>';
}
add_action('woocommerce_checkout_after_order_review', 'aovup_custom_after_order_review_notice');
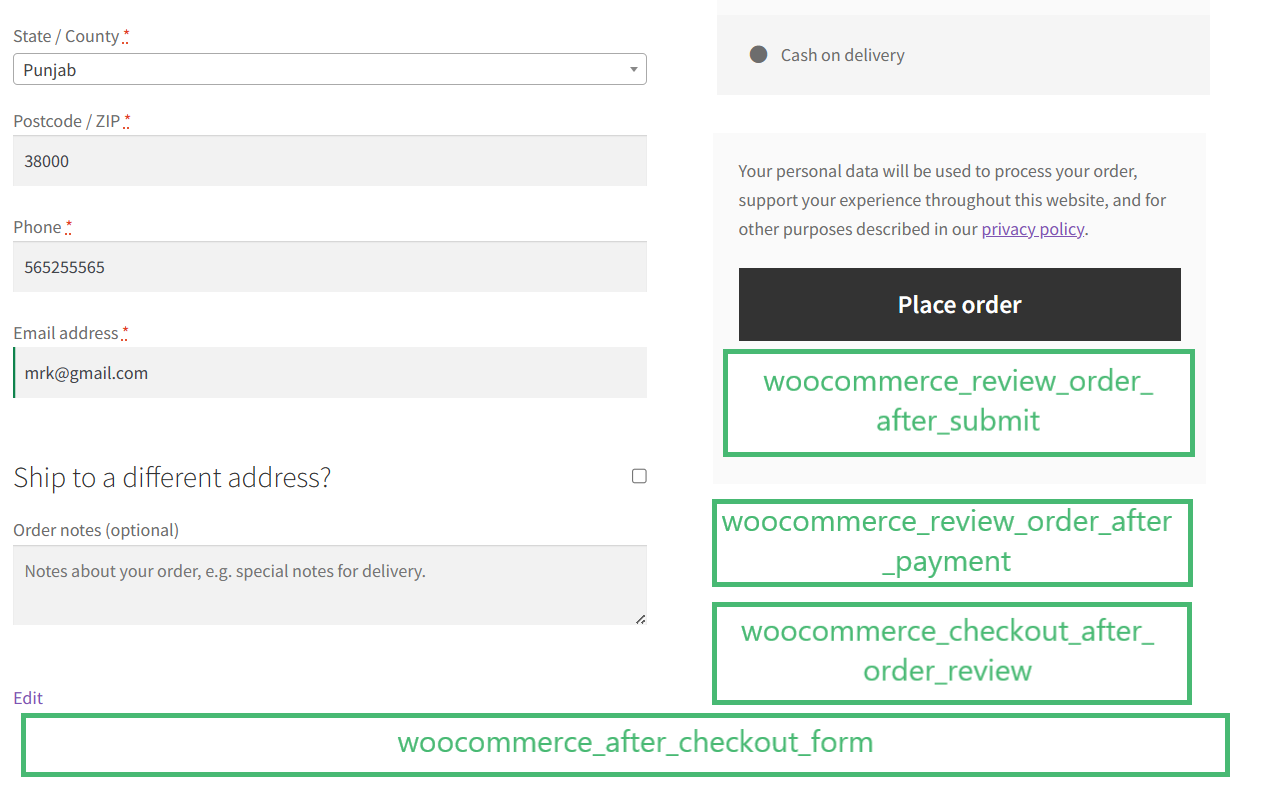
25. woocommerce_after_checkout_form
The woocommerce_after_checkout_form hook allows you to add content or custom elements after the entire checkout form on the WooCommerce checkout page.
Code Sample:
The following is the code sample to help you use this hook.
/* Display content below the place order button */

function aovup_outside_checkout() {
    // Add the desired code
}
add_action('woocommerce_review_order_after_payment', 'aovup_outside_checkout');
Final Words
That’s it for today’s guide.
I hope this guide was helpful to you and you learned about WooCommerce visual checkout page hooks and customize your checkout page. I have also shared some simple examples for each hook to give you a better understanding.
It is one of the most important pages in an online store, and as a developer, you should know how to customize it according to your client’s requirements.
Here are a few other guides that will help you get one step closer to becoming an advanced WordPress developer.


