In today’s article, I’ll walk you through the step-by-step process of creating a custom WooCommerce add-to-cart link. I’ll explain two methods to get the final results, you can use the one that you find easy to use.
You can paste this link anywhere in your store pages or posts or even in emails to let customers directly go to the checkout page and make a purchase. We’ll be covering different use cases as well.
So without any further ado, let’s straight jump into the tutorial.
On This Page
- 1 Why Should You Use a Custom Add-To-Cart Link?
- 2 How to Create a WooCommerce Add-To-Cart Link?
- 2.1 1. Method 1: Custom Add-to-cart links Using AIO Checkout Plugin
- 2.2 2. Method 2: Create WooCommerce Add-To-Cart Links Manually
- 3 Conclusion
Why Should You Use a Custom Add-To-Cart Link?
Creating a custom “Add to Cart” link in WooCommerce can be a powerful tool for online store owners. Here are some compelling reasons why you might want to create custom “Add to Cart” links:
1. Direct Marketing Campaigns
If you are running email campaigns and social media advertisements to promote and sell your products, a direct add-to-cart link will allow your customers to purchase with a single click which will improve the customer’s shopping experience.
2. Landing Pages & Promotions
If you are using a landing page for a special product, you can link the direct purchase link with the call to action(CTA) button so customers can purchase it on the spot without going through several steps.
3. QR Codes for Physical Marketing
You can embed a custom “Add to Cart” link within a QR code on physical marketing materials, like flyers or posters. When scanned, the product is added directly to the customer’s cart.
4. Enhanced Control
Custom “Add to Cart” links provide more control over where and how you present the buying opportunity to potential customers. Whether it’s within a blog post, in a sidebar widget, or as a part of a custom-designed page, it’s all about strategically placing the buying opportunity.
While the standard product pages and “Add to Cart” buttons serve their purpose, custom “Add to Cart” links in WooCommerce provide store owners with more flexibility and strategic control, enhancing marketing efforts and improving user experience.
There could be other reasons why you want to create a custom WooCommerce add-to-cart link. The process of creating custom cart links is the same despite the reason for its creation.
How to Create a WooCommerce Add-To-Cart Link?
As mentioned above, I’ll explain two different methods to create add-to-cart links. With the first method, we will use AIO Checkout to allow us to create and manage our add-to-cart links.
1. Method 1: Custom Add-to-cart links Using AIO Checkout Plugin
The first method to create add-to-cart links for products so customers can directly purchase them is by using the AIO Checkout plugin by AovUp.
It is an advanced plugin that allows you to add several features to your store to optimize the average order value and customer experience on the cart and checkout pages.
The following are the steps to create a WooCommerce add-to-cart link using this plugin.
1.1. Install and Activate the AIO Checkout Plugin
First, we need to install and activate the AIO Checkout plugin to improve the customer’s shopping experience.
Download the AIO Checkout plugin from the AovUp store. It also has a free version, but to follow along with this tutorial, you’ll need to purchase its Pro version.

Once you have downloaded it, navigate to the Plugins » Add New from your WordPress admin dashboard, and click the Upload button to upload the downloaded file to install and activate the plugin.
Once you have installed and activated the plugin, navigate to AIO Checkout from your WordPress dashboard.
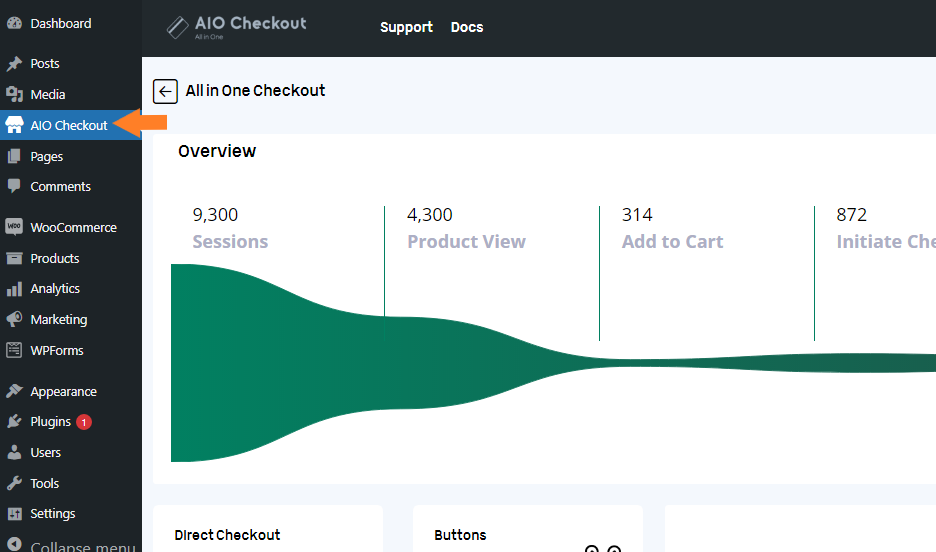
1.3. Open the Buy Link Settings
Once on the plugin’s general settings page, we need to open the ‘Buy Link’ section’s settings to create a direct purchase or add-to-cart links for specific products.
Simply, hover your mouse over the ‘Buy Link’ section and click it to open its settings.

1.4. Create a WooCommerce Add-To-Cart Link
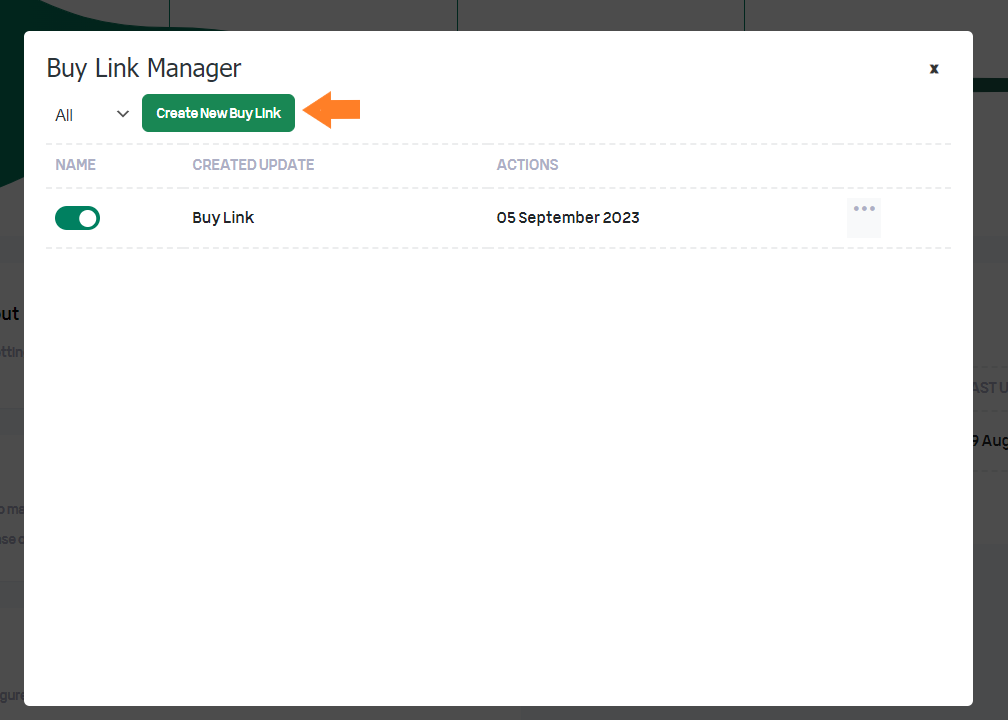
Once you click it, a pop-up will appear from where you can create the buy now links. Here you’ll also be able to see the buy-now or add-to-cart links that you have already created.
You can even enable to disable the links easily.
To create a new add-to-cart link, click the ‘Create New Buy Link’ button at the top of the pop-up.
There are different use cases for creating the add-to-cart links that will take customers directly to the checkout page for making a purchase.
I’ll explain each use case one by one.
1.4.1. Create Add To Cart Link For Simple Products
The first use case is creating add-to-cart links for simple products. It is a very straightforward process to create links for such products.
Once you click the ‘Create New Buy Link’ button, the following screen will appear.

1. Select the Product
First, you need to select the product for which you want to create the link i.e., If you have a product named ‘Gucci Shoes’ and you want to create a direct purchase link for this product.
You first need to select it. To do so, click the ‘Add Product’ button and a new field will appear above it from where you can select the product and its quantity.
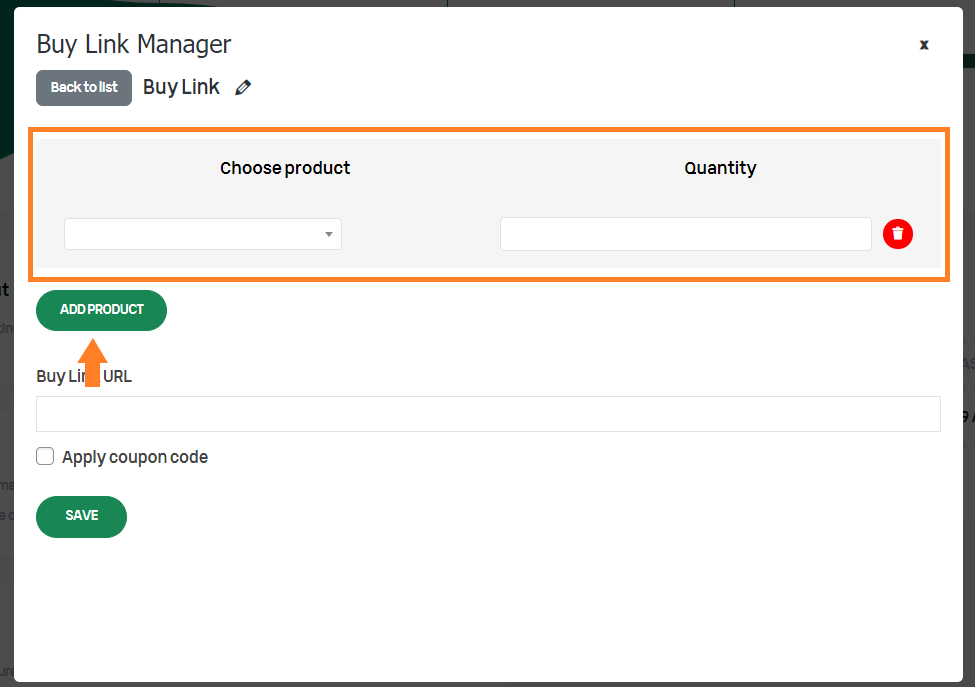
From the ‘Choose Product’ dropdown, search for the simple product for which you want to create the add-to-cart link.
You can simply enter the product name to search for it, Once you found it, click it to select it.
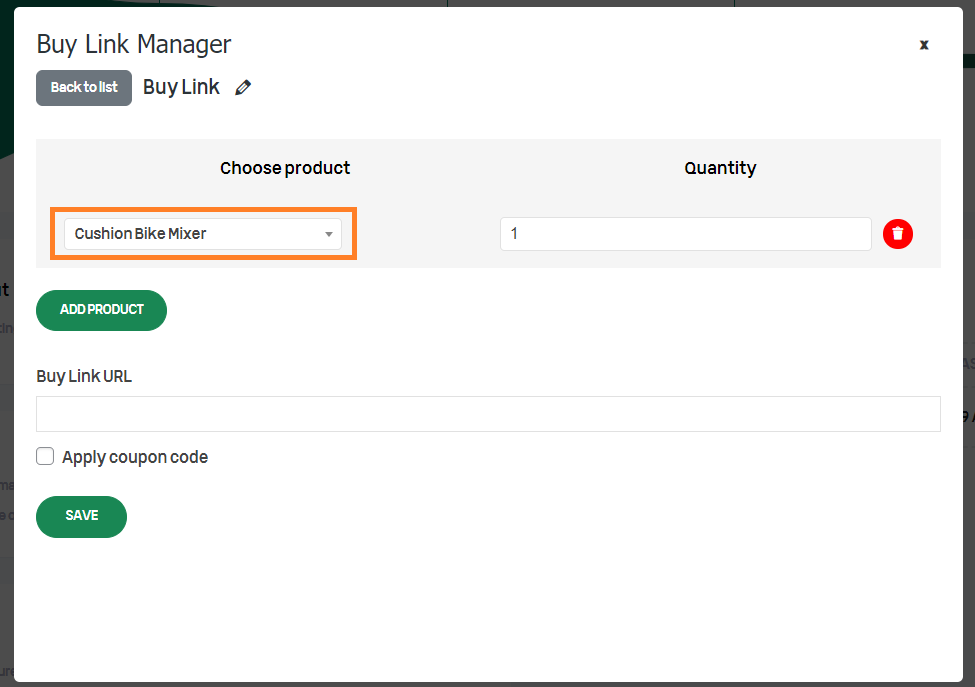
2. Select the Product Quantity
Next, you need to select the product quantity that you want to offer. If you have set it to ‘2’ whenever a customer clicks the add-to-cart link, 2 quantities of this product will be added to their cart.
You can select the quantity as per your offerings but for this tutorial, I am leaving it to ‘1’ quantity so only 1 quantity of this product will be added to the user’s cart when they click the add-to-cart link.

1.4.2. Create Add To Cart Link For Variable Products
I’ll leave the above link as it is and create a new link for variable products by clicking the ‘Create New Buy Link’ button as explained at the start of the fourth step of this article.
One thing I would like to mention here is that it will work for any type of variable product whether they are digital products or physical.
I have already selected the variable product from the ‘Choose Product’ dropdown to quickly explain the necessary settings.
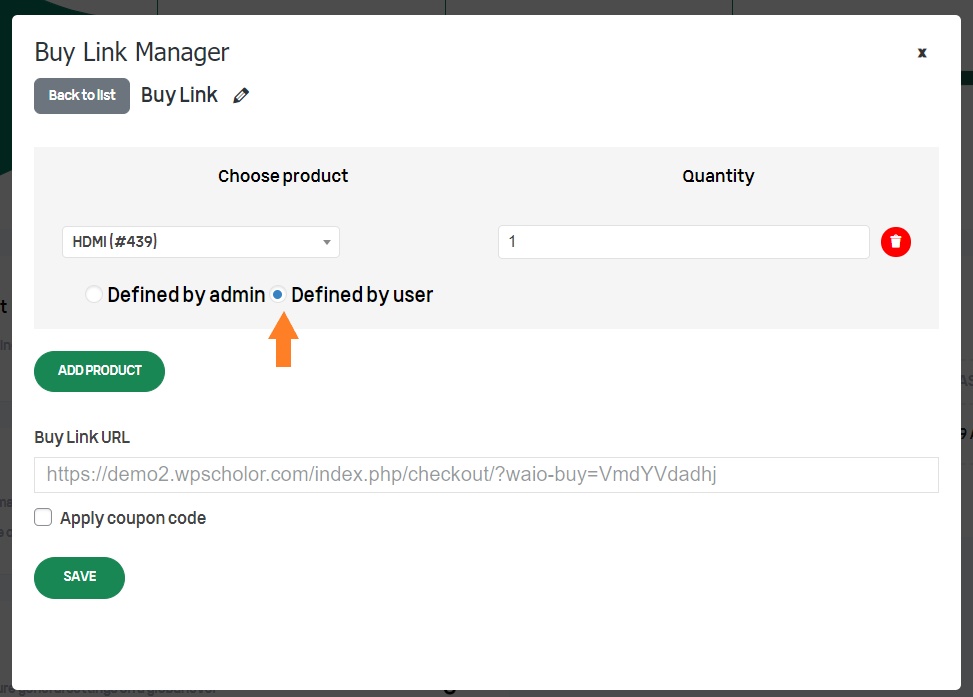
Once you select a variable product, you’ll get two new options below it. These options will only be displayed if you have selected the variable product.

1. Defined by Admin
The first option you’ll see is the ‘Defined by Admin’ which means you as the store admin can select the product variation you want to offer to customers using the add-to-cart link.
Click the ‘Defined by Admin’ option and select the variation you want customers to purchase using the buy now link.
Once selected, you’ll see all the available variations of the product. I had created only one variation attribute so I could see only the ‘Size’ variation.

Once the product is selected, you can click the ‘Save’ button to get the add-to-cart link in the ‘Buy Link URL’ field. You can use this link anywhere to allow customers to directly purchase the selected variation without going through the product and cart pages.
I have already saved it so I could see the add-to-cart link in the ‘Buy Link URL’ field.

2. Defined by Users
The second option is ‘Defined by Users’ which will allow the customers to select the variation they want to purchase.
If you have selected this option, when the users click the add-to-cart link, there’ll be a pop-up on the front end from where they can select the product variation and move directly to the checkout page to purchase it.
I’ll share the results later in this article, but for now, you can simply follow the use case that suits best your needs.
To allow customers to select the variations they want, click the ‘Defined by user’ option.
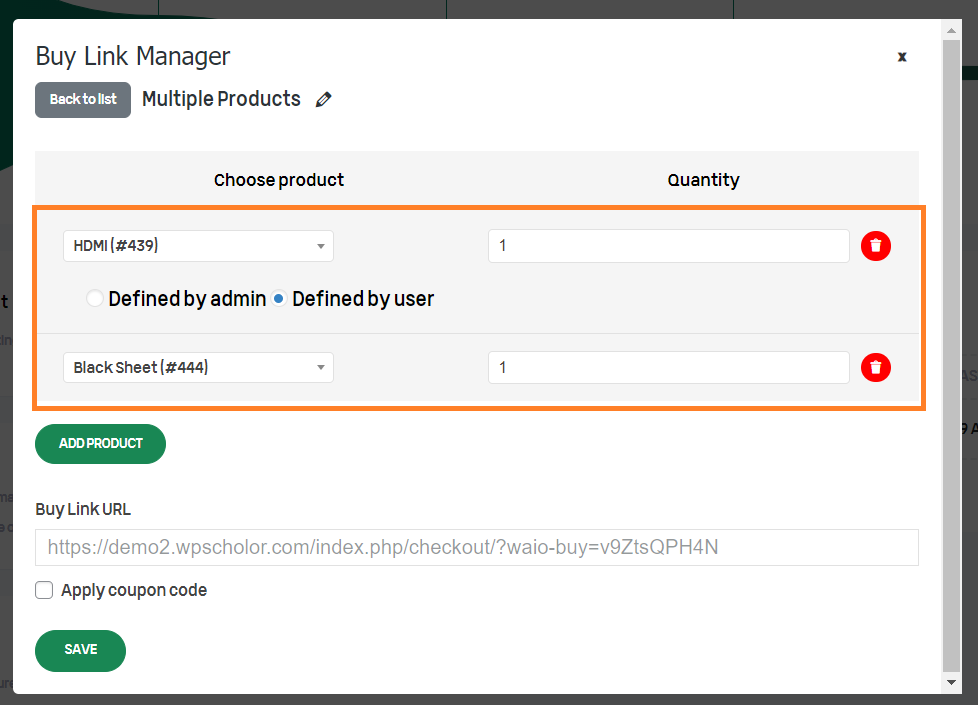
1.4.3. Create Add To Cart Link For Multiple Products
The third use case is creating the add-to-cart link for multiple products. In simple words, you can select or offer multiple products using the custom add-to-cart link.
You can select any type (digital, physical, variable, affiliate, or grouped) of products, it will work for all of them.
Once you’ve added one product, click the ‘Add Product’ button again to select another product. To show you an example, I have already selected a simple and a variable product.
1.5. Auto Apply Coupon at Checkout (Optional)
It is an optional step but it can help you get great results. If you want you can auto apply a coupon code to the checkout. Whenever the user clicks the add-to-cart link, they’ll be redirected to the checkout page where the coupon code is already applied.
It will encourage the customers to quickly make a decision and purchase the offer. It will also build the customer’s trust as you are offering them a discount.
To add the coupon, you can click the ‘Apply Coupon Code’ button and add the coupon code in the ‘Coupon Code’ field.
Note: Make sure you have already created the coupon code. If not, you first need to create a coupon code by navigating to Marketing > Coupons from your WordPress dashboard.
I have already created a coupon code and added it to the ‘Coupon Code’ field.

1.6. Save Settings
Once you have adjusted the link settings, don’t forget to save the settings by clicking the ‘Save’ button at the bottom of the pop-up to save the settings.
Note: A few screenshots above are taken after saving the settings. You won’t see the link in the ‘Buy Link URL’ field until you save the settings.

1.7. Final Results
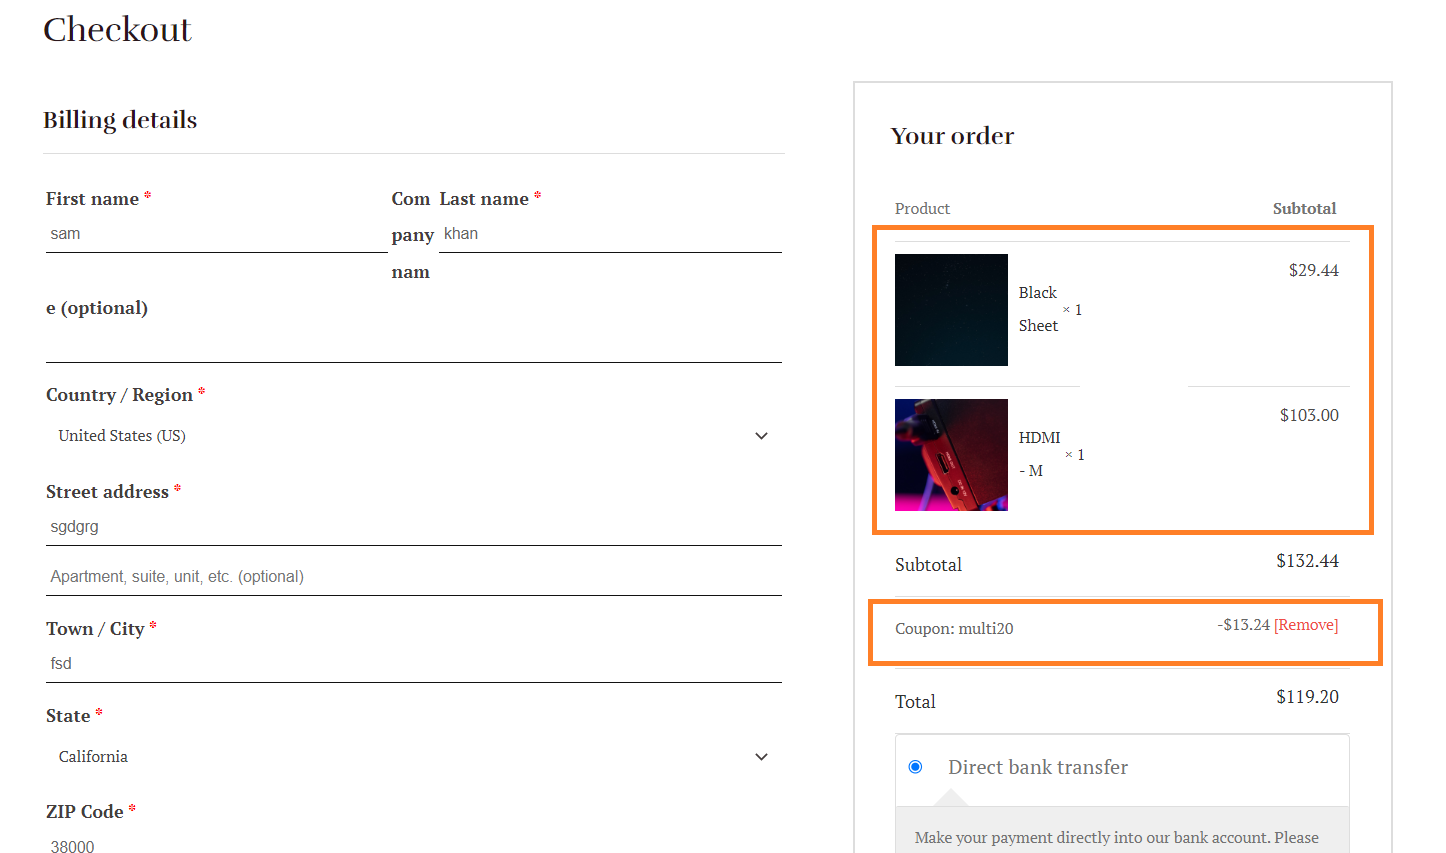
Once the settings are saved, you can copy the link and paste it into the browser to see if it working or not.
I am using the link for multiple products and the ‘Defined by user’ setting for variation settings including the coupon code.
When I posted the link to my browser’s address bar, you can see in the screenshot below that I could see a pop-up from where I could select the variation and click the ‘Add All to Cart’ button to add the selected variation to the cart.

I selected the variation and added it to my cart. As you can see both products were added to my cart and the coupon code was also applied successfully.
Now, I could fill in my billing details, pay for the order, and simply complete the checkout.
2. Method 2: Create WooCommerce Add-To-Cart Links Manually
The second method to create the WooCommerce add-to-cart link is creating it manually. It may be difficult for you if you are working with links or code for the first time.
But I’ll try to explain it easily so you can understand it as well and if you want you can use this method and create links manually.
I’ll create links for simple and variable products. You can make adjustments to them according to your needs.
2.1. Create a WooCommerce Add-To-Cart Link Manually For Simple Products
The following are the steps to create the WooCommerce add-to-cart link manually for simple products.
2.1.1. Get the Product ID
To create a link manually for simple products, first, you will need to find the product ID. To get the ID, navigate to Products > All Products from your WordPress dashboard and hover over your mouse to the simple product for which you want to create an add-to-cart link.
You will find the ID for that specific product. Make sure to copy the ID or remember it, as we’ll be using it later in this article.

2.1.2. Copy the Code
Once you have copied the product ID, now you can customize the following snippet to match your needs and create the add-to-cart link for one of the simple products from your store.
https://yourdomain.com/checkout/?add-to-cart=459&quantity=1
The following are the things you need to change in the above code snippet to make it work for your store or site.
- Make sure to change the ‘yourdomain.com’ with your domain name like ‘https://aovup.com’
- If you want to redirect customers to a different page than the checkout page, the following parameters will help you.
- To redirect the customers to the cart page, replace the ‘checkout’ with ‘cart’
- To redirect the customers to any other page of your store, replace the ‘checkout’ with the slug of that page.
- If you do not want to redirect customers to any page then make sure to delete the ‘/checkout’ from the above code.
- Make sure to replace ‘459’ with your product ID.
- If you want to offer more than 1 quantity of the product, make sure to replace ‘1’ with the quantity number you want to offer to customers using this direct link.
Note: You cannot add two different products to the cart if you create the add-to-cart link manually.
2.1.3. Final Results
When I adjusted the link as per my requirements and pasted it into the browser’s address bar, I was redirected to the checkout page. Also, the exact product was added to my cart which shows that the link is working correctly.
You can now paste this link to any button or text within your website to allow customers to purchase the product in a single click.

2.2. Create Add-To-Cart Link Manually For Variable Products
The following are the steps to create a WooCommerce add-to-cart link manually for product variations.
2.2.1. Get the Variation ID
To create a custom add-to-cart link for a product variation, you need to get the variation ID. To get the ID, navigate to Products > All Products from your WordPress dashboard and hover over your mouse to the variable product for which you want to create an add-to-cart link.
Once you are on the product edit page, scroll to the Product Data section and click the ‘Variations’ tab from the left options.
Here you’ll get all the variations you have created for this specific product. You will see the ID of each variation right beside it. Copy the variation ID that you want to offer to customers using the link as we’ll be using it later.

2.2.2. Copy the Code
Once you have copied the product variation ID, now you can customize the following snippet to match your needs and create the add-to-cart link for one of the variations of the variable product from your store.
https://yourdomain.com/checkout/?add-to-cart=459&quantity=1
Make sure to adjust the above link as per your requirements as mentioned in the ‘Add-To-Cart Link Manually For Simple Products’ section. Instead of adding the simple product ID, make sure to add the variation ID that we copied in the previous step.
I have already replaced it with my domain name and the variation product ID that I want to offer to customers.
Note: You cannot add two different products to the cart if you create the add-to-cart link manually.
2.2.3. Final Results
When I adjusted the link as per my requirements and pasted it into the browser’s address bar, I was redirected to the checkout page. Also, the exact product was added to my cart which shows that the link is working correctly.
You can now paste this link to any button or text within your website to allow customers to purchase the product variation in a single click.

Conclusion
That’s it for today’s article.
I hope it was helpful to you and you were able to learn something from it and create the WooCommerce add-to-cart links. Instead of using the manual way to create custom cart links for products, I recommend you use the AIO Checkout plugin.
Ready to get started? Download the AIO Checkout plugin now!


