By default, WooCommerce shows a price range for variable products. What if you want to change the variable product price display?
Don’t worry. I got you covered here!
As an online store owner, you may want to change the WooCommerce variable product price display to make customers feel more comfortable and improve the customer experience.
In today’s guide, I’ll show you how to change the variable product price display in WooCommerce and the different possibilities for displaying the variable product. I’ll use the code to get the final results. You can simply copy and paste the code into your store to make things work.
This guide will help you regardless of your coding expertise. So buckle up, and let’s jump into the tutorial.
On This Page
How to Change the WooCommerce Variable Product Price Display?
Customizing the variable product price display can give customers more precise and transparent pricing information. This helps them make informed decisions and reduces confusion about the cost of different variations.
Here, I’ll share different ways or use cases to change the price display. You can use any of the use cases and move forward with it.
1. Display the Minimum Price
Instead of showing a price range, you can choose to display only the minimum price among the variations. This option works well if the price differences between variations are relatively small.
Displaying the minimum price can emphasize the most affordable option, attracting budget-conscious customers and potentially increasing sales.
Follow the following steps to display the minimum price and change the variable product price display.
1.1. Code to Display the Minimum Price for Variable Products
Following is the code to display the minimum price for the variable products. It will change the variable product price display on the shop and product pages.
// Display the minimum price for variable products
add_filter('woocommerce_variable_sale_price_html', 'woosuite_custom_variable_product_price', 10, 2 );
add_filter('woocommerce_variable_price_html', 'woosuite_custom_variable_product_price', 10, 2 );

function woosuite_custom_variable_product_price( $price, $product ) {
    // Check if it's a variable product
    if ( $product->is_type('variable') ) {
        // Get all variations for the product
        $variations = $product->get_available_variations();

        // Loop through variations to find the minimum price
        $min_price = null;
        foreach ( $variations as $variation ) {
            $variation_price = floatval($variation['display_price']);

            // Set the initial minimum price or update it if a lower price is found
            if ( $min_price === null || $variation_price < $min_price ) {
                $min_price = $variation_price;
            }
        }

        // Display the minimum price
        if ( $min_price !== null ) {
            $price = wc_price($min_price);
        }
    }

    return $price;
}
1.2. Understanding the Code (Optional)
It is an optional step, but it will help you better understand what the code does and how it works. I’ll explain each line of the code snippet so you’ll better understand it.
1. The following two lines add filters to modify the HTML output of the sale price and regular price for variable products. The filters are hooked to the ‘woocommerce_variable_sale_price_html’ and ‘woocommerce_variable_price_html’ hooks.
Both filters call the woosuite_custom_variable_product_price function to handle the modifications.
// Display the minimum price for variable products
add_filter(‘woocommerce_variable_sale_price_html’, ‘woosuite_custom_variable_product_price’, 10, 2 );
add_filter(‘woocommerce_variable_price_html’, ‘woosuite_custom_variable_product_price’, 10, 2 );
2. This function, woosuite_custom_variable_product_price, accepts two parameters: $price and $product. It is responsible for customizing the variable product price display.
function woosuite_custom_variable_product_price( $price, $product ) {
3. This condition checks if the product is variable. If it is, the code inside the condition is executed.
if ( $product->is_type(‘variable’) ) {
4. This line recovers all the available variations for the product. It assigns the variations to the $variations variable, which is an array.
$variations = $product->get_available_variations();
5. Next, a variable $min_price is initialized as null. It will be used to store the minimum price found among the variations.
$min_price = null;
6. The loop iterates over each variation and checks the price for each one. It compares the variation price with the current minimum price ($min_price). If the variation price is lower or if $min_price is still null (i.e., no minimum price has been set yet), it updates $min_price with the new minimum price.
foreach ( $variations as $variation ) {
$variation_price = floatval($variation[‘display_price’]);
if ( $min_price === null || $variation_price < $min_price ) {
$min_price = $variation_price;
}
}
7. After finding the minimum price, this condition checks if a minimum price was found (i.e., if $min_price is not null). If a minimum price exists, it sets the $price to the formatted price using the wc_price() function.
if ( $min_price !== null ) {
$price = wc_price($min_price);
}
8. Finally, the modified price is returned from the function.
return $price;
1.3. Paste the Code to Your Store
Finally, you need to paste the above code into your online store to display the minimum variable price.
I have used a plugin to add the code to my demo store.

1.4. Final Results
Here are the final results upon adding the code snippet to my store.
Note: When the user selects the variation from the variation dropdown, they will see the price below it. The price display will remain the same.
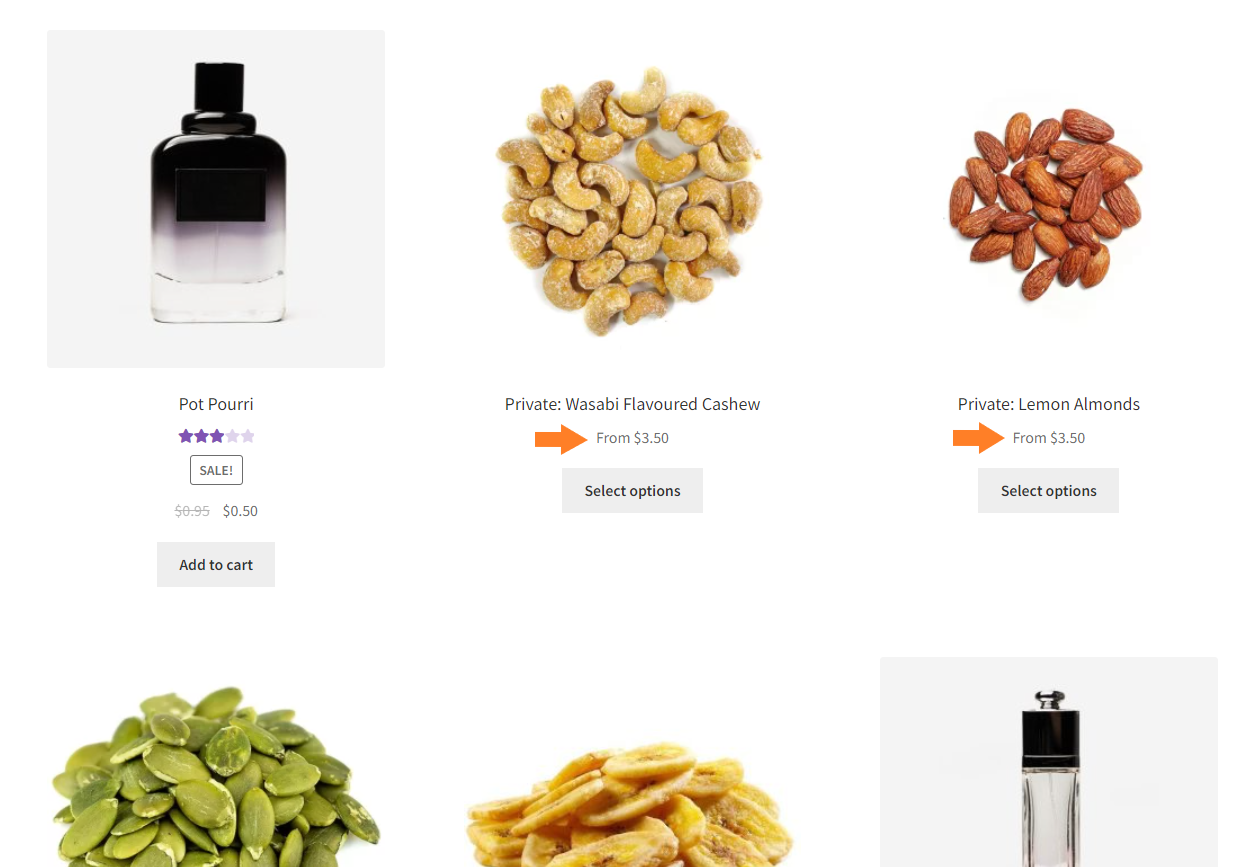
Similarly, When I visited the shop page of my store, I could only see the minimum price for all the variable products.

2. Display the Maximum Price
This use case will allow you to show only the maximum price among the variations. This approach can be helpful when the most relevant or popular choice is the highest-priced variation.
Showcasing the maximum price can draw attention to premium variations, encouraging customers to consider higher-end choices and boosting revenue.
Follow the following steps to display the maximum price and change the variable product price display.
2.1. Code to Display the Maximum Price for Variable Products
Following is the code to display the maximum price for the variable products. This code will find the highest-priced variation of a product and display it on the front end.
// Display the maximum price for variable products
add_filter('woocommerce_variable_sale_price_html', 'woosuite_custom_variable_product_price', 10, 2);
add_filter('woocommerce_variable_price_html', 'woosuite_custom_variable_product_price', 10, 2);

function woosuite_custom_variable_product_price($price, $product) {
    // Check if it's a variable product
    if ($product->is_type('variable')) {
        // Get all variations for the product
        $variations = $product->get_available_variations();

        // Loop through variations to find the maximum price
        $max_price = null;
        foreach ($variations as $variation) {
            $variation_price = floatval($variation['display_price']);

            // Set the initial maximum price or update it if a higher price is found
            if ($max_price === null || $variation_price > $max_price) {
                $max_price = $variation_price;
            }
        }

        // Display the maximum price
        if ($max_price !== null) {
            $price = wc_price($max_price);
        }
    }

    return $price;
}
2.2. Understanding the Code (Optional)
This code is similar to the previous example, but instead of finding the minimum price, it finds the maximum price among the available variations.
It updates the $max_price variable if a higher price is found during the loop. Finally, it displays the maximum price by setting the $price to the formatted price using the wc_price() function.
2.3. Paste the Code to Your Store
Finally, you need to paste the above code into your online store to display the minimum variable price.

2.4. Final Results
Here are the final results upon adding the code snippet to my store.
Note: When a user selects the variation from the variation dropdown, they will see the price below it. The price display will remain the same.

3. Display the Price Range With “From”
Instead of just showing the price range, you can add the word “From” before the minimum price. This indicates that the displayed price is the starting point, and variations may have higher prices.
Follow the following steps to display the maximum price and change the variable product price display.
3.1. Code to Display the Price Range With “From”
Following is the code to display the minimum price for the variable products with ‘From.’
This code will find the lowest-priced variation of a product and display it on the front end, indicating that the price starts here.
// Display the price range with "From" for variable products
add_filter('woocommerce_variable_price_html', 'woosuite_custom_variable_product_price', 10, 2);

function woosuite_custom_variable_product_price($price, $product) {
    // Check if it's a variable product
    if ($product->is_type('variable')) {
        // Get all variations for the product
        $variations = $product->get_available_variations();

        // Get the minimum and maximum prices
        $prices = array();
        foreach ($variations as $variation) {
            $variation_price = floatval($variation['display_price']);
            $prices[] = $variation_price;
        }

        // Set the price range
        $min_price = min($prices);
        $max_price = max($prices);

        // Format the price range with "From"
        if ($min_price === $max_price) {
            $price = wc_price($min_price);
        } else {
            $price = sprintf(__('From %s', 'woocommerce'), wc_price($min_price));
        }
    }

    return $price;
}
3.2. Understanding the Code (Optional)
The above code adds a filter to modify the HTML output of the variable product price. It hooks to the ‘woocommerce_variable_price_html’ filter and calls the woosuite_custom_variable_product_price function to handle the modifications.
The woosuite_custom_variable_product_price function checks if the product is variable and retrieves all available variations. It then gathers the prices of the variations into an array.
Next, the minimum and maximum prices are determined using the min() and max() functions based on the collected prices.
The price range is formatted by checking if the minimum and maximum prices are equal. If they are the same, the price is set to the formatted minimum price only. Otherwise, the price is set to the formatted minimum price with the “From” prefix using sprintf().
Finally, the modified price, either the single price or the price range with “From”, is returned from the function.
3.3. Paste the Code to Your Store
Finally, you need to paste the above code into your online store to display the minimum variable price.

3.4. Final Results
Here are the final results upon adding the code snippet to my store.
Note: When a user selects the variation from the variation dropdown, they will see the price below it. The price display will remain the same.
The shop page will also display the prices with the “From” prefix and then the minimum price of the product variation.
4. Display the Price of the Selected Variation
Another use case is that instead of showing a price range upfront, you can wait for the customer to select a variation and then display the specific price.
Customizing the price display based on the selected variation allows for a more dynamic and interactive shopping experience. Customers can see the exact price relevant to their chosen options, making the process more engaging and user-friendly.
Follow the following steps to display the maximum price and change the variable product price display.
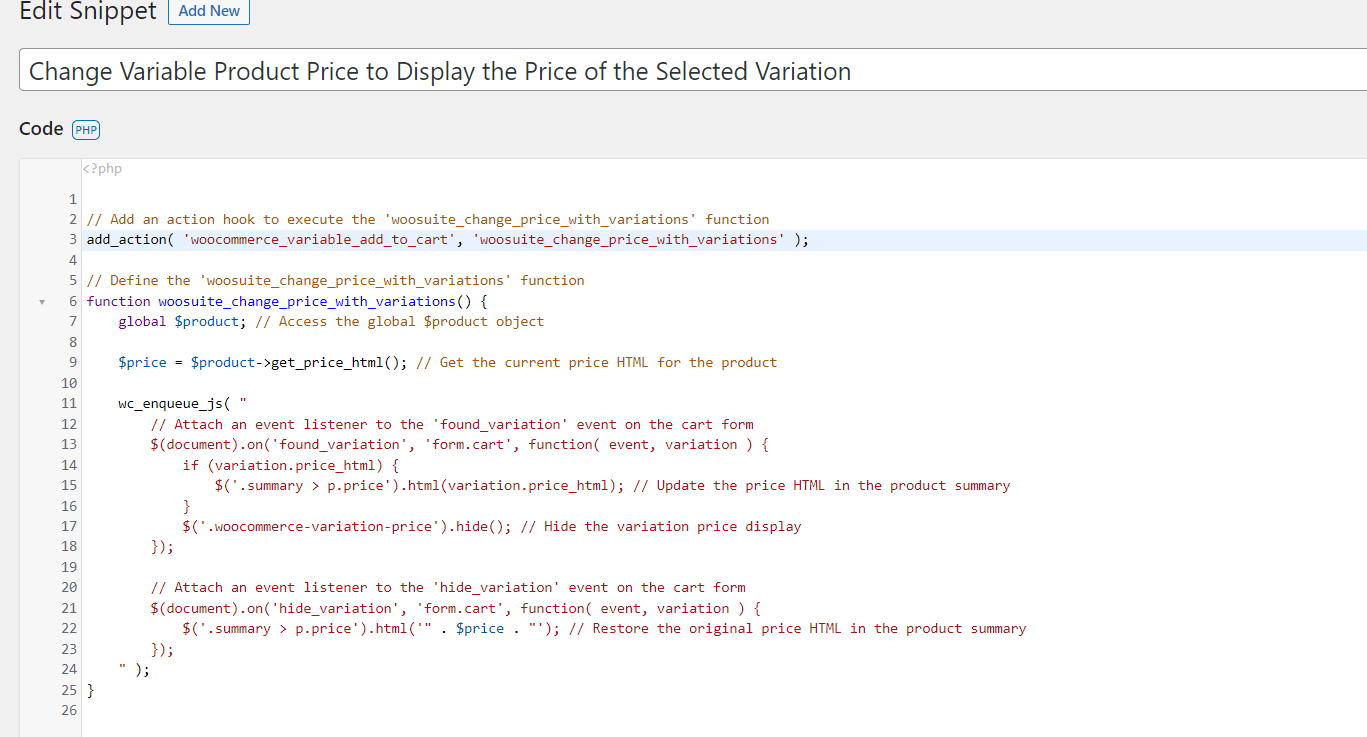
4.1. Code to Display the Price of the Selected Variation
Following is the code to display the price of the selected variation.
// Display the price of the selected variation dynamically
add_action( 'woocommerce_variable_add_to_cart', 'woosuite_change_price_with_variations' );

// Define the 'woosuite_change_price_with_variations' function
function woosuite_change_price_with_variations() {
    global $product; // Access the global $product object

    $price = $product->get_price_html(); // Get the current price HTML for the product

    wc_enqueue_js( "
        // Attach an event listener to the 'found_variation' event on the cart form
        $(document).on('found_variation', 'form.cart', function( event, variation ) {
            if (variation.price_html) {
                $('.summary > p.price').html(variation.price_html); // Update the price HTML in the product summary
            }
            $('.woocommerce-variation-price').hide(); // Hide the variation price display
        });

        // Attach an event listener to the 'hide_variation' event on the cart form
        $(document).on('hide_variation', 'form.cart', function( event, variation ) {
            $('.summary > p.price').html('" . $price . "'); // Restore the original price HTML in the product summary
        });
    " );
}
4.2. Understanding the Code (Optional)
The following explanation will help you understand the code effectively.
- The code defines a new function called woosuite_change_price_with_variations that will be executed when the woocommerce_variable_add_to_cart action is triggered.
- The global $product object is accessed inside the function, representing the currently displayed product.
- The current price HTML for the product is obtained using the $product->get_price_html() method and stored in the $price variable.
- The wc_enqueue_js() function is used to enqueue the following JavaScript code, ensuring it is loaded on the page where this function is executed.
- The JavaScript code attaches event listeners to the found_variation and hide_variation events on the cart form.
- When a variation is found (selected) by the user (found_variation event), the code checks if the ‘variation.price_html’ exists. If it does, it updates the HTML of the element with the class ‘summary > p.price’ (which typically represents the price display in the product summary) with the ‘variation.price_html’.
- Additionally, the code hides the element with the class ‘woocommerce-variation-price’, which represents the variation price display.
- When no variation is selected by the user (hide_variation event), the code restores the original price HTML in the product summary by setting it back to the value stored in the $price variable.
4.3. Paste the Code to Your Store
Finally, you need to paste the above code into your online store to display the price of the selected variation.
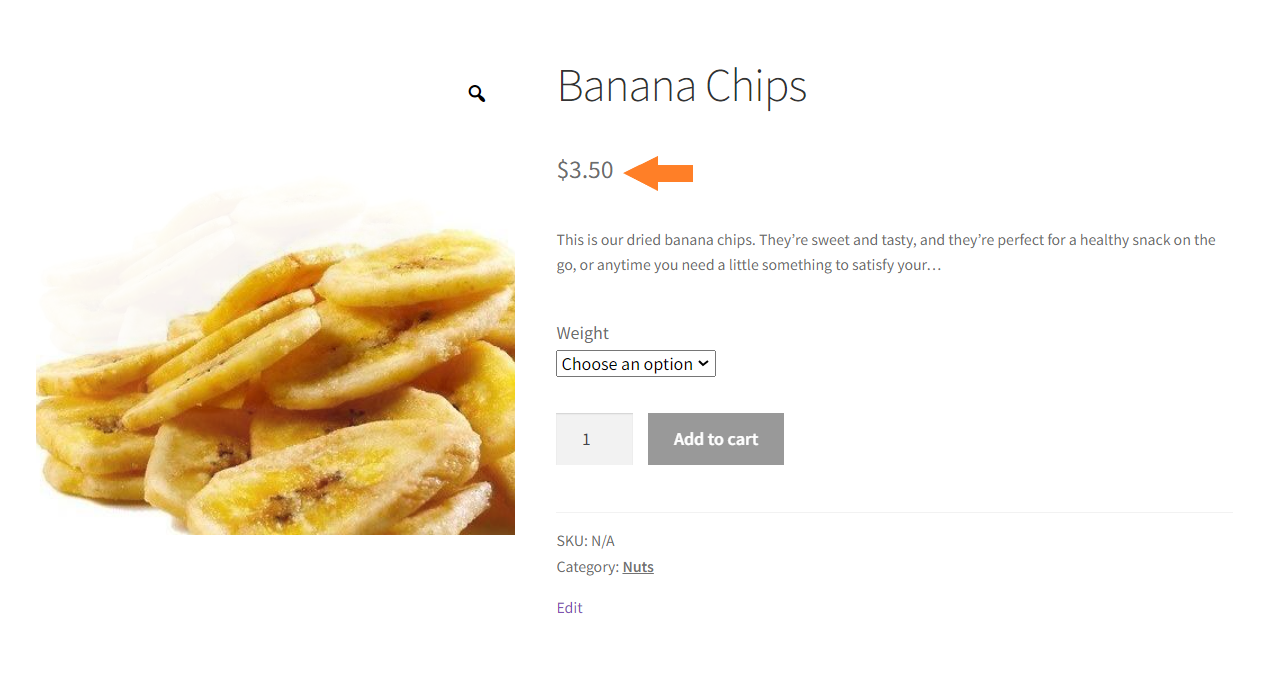
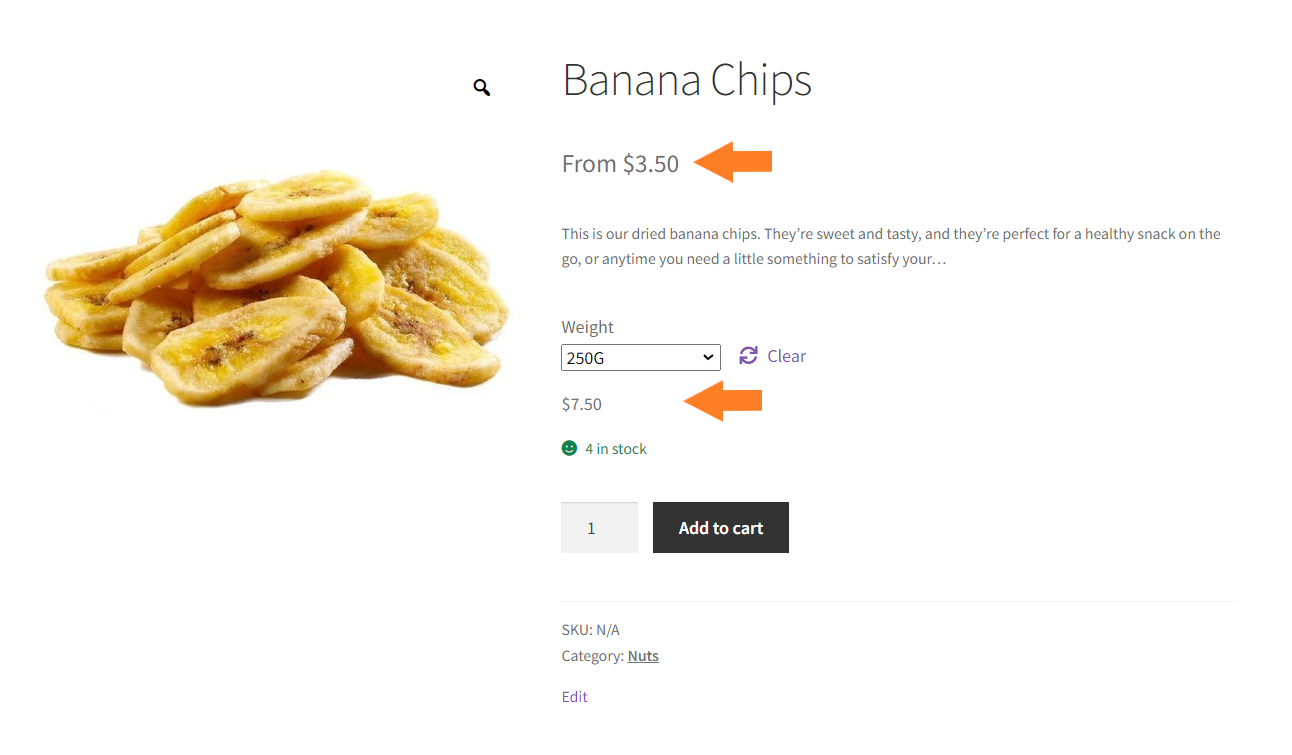
4.4. Final Results
Here are the final results upon adding the code snippet to my store. When I selected a variation from the dropdown, I could see the price of the chosen variation.

Final Thoughts
I hope this guide was helpful to you and you were able to change the WooCommerce variable product price display without any hustle.
You just need to identify the use case, copy its code from this guide, and paste it into your WooCommerce store to get things going as you want. You don’t need to be a technical expert to follow up on this tutorial.
Moreover, you can use the Dynamic Pricing Discount Rules plugin to show different prices based on specific conditions.


