Selling online is growing daily, and offering your customers multiple payment gateways has proven to be very beneficial in terms of sales and profits.
It provides a win-win situation for both you and your customers. It will allow your customers to buy the items from your store and pay for them later at the end of the month and at the time you select.
So in today’s article, I’ll show you how to create a pay later system with the help of a WooCommerce pay later plugin. I’ll also show you how to improve the customer’s experience more effectively.
But first, let’s talk about a few benefits of using a WooCommerce pay later plugin system.
On This Page
- 1 Benefits of Using a WooCommerce Pay Later Payment System
- 2 How to Create a Store Having WooCommerce Pay Later System?
- 3 Wrapping Up
Benefits of Using a WooCommerce Pay Later Payment System
Here are a few benefits of using a WooCommerce pay later plugin that can enlighten your thoughts on adding this payment method and letting your customers pay later for their purchase.
1. Improve Sales
Letting your customers pay later for their purchases can help you get more sales. Maybe you are selling a limited stock of an expensive item, and a few of your customers don’t have the money to pay for it.
You can offer them a pay later payment method that will allow them to buy it and pay later, which will ultimately affect your sales in the long term and make you a good profit.
2. Customer Loyalty
You can increase customer loyalty by making Pay Later options available to them. Due to this, your customers will continue to purchase products from your store. They will frequently use the Pay Later options to reduce the pressure of making a significant upfront payment.
3. Encourage Customers to Pay More
You can upsell products on your store by enabling WooCommerce Pay later. Assume you sell Apple AirPods and AirPods Pro for $99 and $199 on your WooCommerce store.
When someone comes in looking for the $99 regular AirPods, you can tempt them to buy the $199 AirPods Pro with Pay later options. You can double the cart value this way.
Now that we know a few benefits of using the WooCommerce pay later plugins, let’s dive in to create a store with the WooCommerce pay later system.
How to Create a Store Having WooCommerce Pay Later System?
You can follow the following steps to create a store having a WooCommerce pay later system.
1. Setup a WooCommerce Store
Note: You can skip this step if you already have the WooCommerce store.
You require web hosting and a domain name to install WordPress and WooCommerce to create an online store.
I am assuming that you already have the domain and hosting. If you don’t have it yet, you must first purchase it to follow the process.
The cheapest Starter package, which would run you $8 per month, should be plenty for new stores.
You’ll also require a domain name, which you’ll most likely want to be the name of your store. Look for a domain name that closely resembles the name of your store and is simple to remember, such as mystore.com.
1.1. Install and Activate the WooCommerce Plugin
To install the WooCommerce plugin, navigate to Plugins » Add New from your WordPress admin dashboard and search for the “woocommerce” in the search bar.
You will need to click the Install Now button on the plugin to install it and then click on the Activate button.
I have already installed and activated the plugin. That is why it is displaying the Active button.

1.2. Fill in the Store Information
Once the plugin is installed and activated, you’ll be redirected to the Installed Plugins page. Click on the “Settings” button below the WooCommerce plugin name.
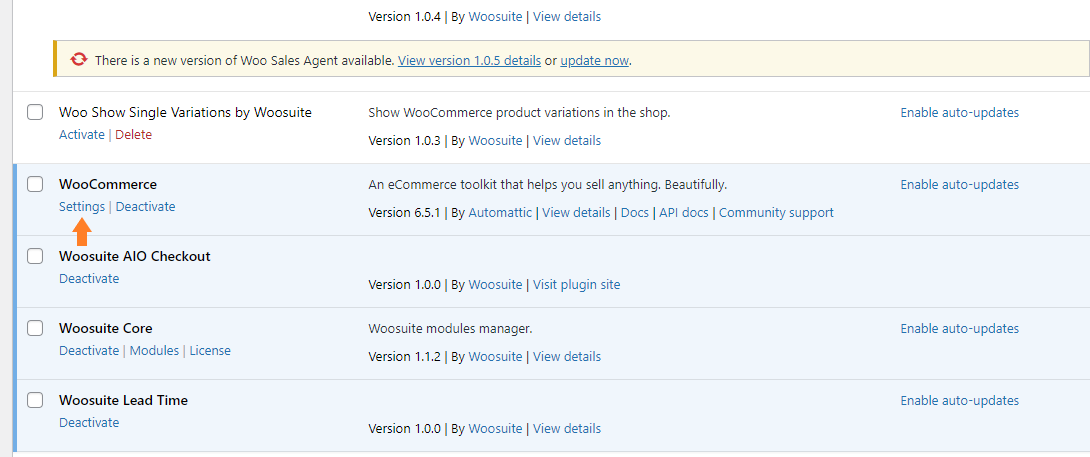
By clicking it, you’ll be redirected to the settings of WooCommerce. Here you can fill in the store details, restrict shipping areas, add payment methods, and make other vital settings.

2. Add Products to Your Store
Once you have set up the store and the information, now you need to add a few products to your store. You will need to add each of your unique items using a particular WooCommerce product.
To add a product, navigate to WordPress Admin Dashboard, and click the Products » Add New. After that, you’ll reach a page from where you can add the product’s information, like the title, description, price, image, and more.

3. Add a WooCommerce Pay Later Plugin
The next step is to add a WooCommerce pay later plugin to your store so your customers can add credits and use their balance to pay for their purchases.
I’ll mention a few plugins here you can use to create a pay later system in your WooCommerce store.
3.1. Affirm Payment Gateway
It is the official WooCommerce extension that you can install in your WooCommerce store and create a WooCommerce pay later system. It will allow your customers to add credits and use the balance to pay for their purchases.

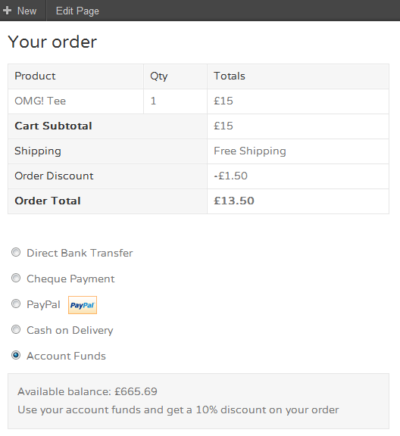
3.2. Accounts Funds
It is another extension that you can get from WooCommerce’s extension store. It provides customers with an online wallet on your WordPress website, where they can add funds, top up their balance, and use their balance to pay for orders.
You can use any of the abovementioned ones, and they work perfectly fine with all the WordPress and WooCommerce themes and plugins.
Moreover, If you want customers to set up an automatic monthly payment to pay off a set amount each month, then you probably want to use the WooCommerce Subscriptions extension. Both the plugins mentioned above work perfectly fine with this extension too.
You can also add more payment methods if you want. You can follow the Best Payment Methods for WooCommerce article to choose other payment methods.
4. Improve Your Shop Page Using WooCommerce Product Table Plugin
Default WooCommerce is suitable for a few stores. Still, if you want to add more to the customer’s experience, you want to allow your customers to view the product information on the shop page instead of having them navigate to each product page for the info.
Well, WooCommerce Product Table exactly helps you with that. This plugin allows displaying your products in a more user-friendly table layout instead of 3 or 4 products in a row.

Also see:
5. Add Pay Later Payment Method Restriction
Now, you can skip this step if you don’t want to allow all your customers to use the pay later payment method.
But if you only want to allow a few of your regular or special customers to pay later for their purchases using the credit balance, then you want to use a few more handy plugins.
5.1. Conditional Shipping and Payments Plugin
The Conditional Shipping and Payments plugin will help you to add payment method restrictions.
This plugin helps you to add payment method restrictions based on the user roles. You can allow a specific group of users to use the pay later payment method while the other users can make the purchase using the available ones.
This way, you continue to sell to all of your customers and make them happy.

.
Wrapping Up
I hope this article helped you learn everything you need to know about the pay later system. Still, if you got any questions, please leave them in the comments. I would love to answer all of your questions.
Alternatively, you can contact our customer support for further assistance. They are quick in replying and assisting. They typically respond within a day or less.
Download the WooCommerce Product Table plugin to help streamline your ordering process!


