Sometimes you may want to create orders manually and send the invoices to the customer’s email or there could be some other reasons. It would be great if they could pay directly from the invoice without having to navigate to your store and create the order themselves.
It is possible if you add a payment link to the invoice. Unfortunately, WooCommerce doesn’t provide you with any way to do so. You will need to use third-party plugins or dive into the code to send invoices with a payment link.
This article will guide you through the process of sending WooCommerce invoices with a payment link. Without any further ado, let’s jump into the tutorial.
On This Page
How to Send WooCommerce Invoice With a Payment Link?
To send the invoices with a payment link, there are two ways. I’ll explain both of them one by one.
Method 1: Using a Plugin
The first method to send invoices with a payment link is by using a plugin. There are multiple plugins available in the market (paid and free) that can help you do so.
I’ll use the Sliced Invoices plugin to send the invoices to customers with a payment link. The following are the steps to do so.
1.1. Install and Activate the Plugin
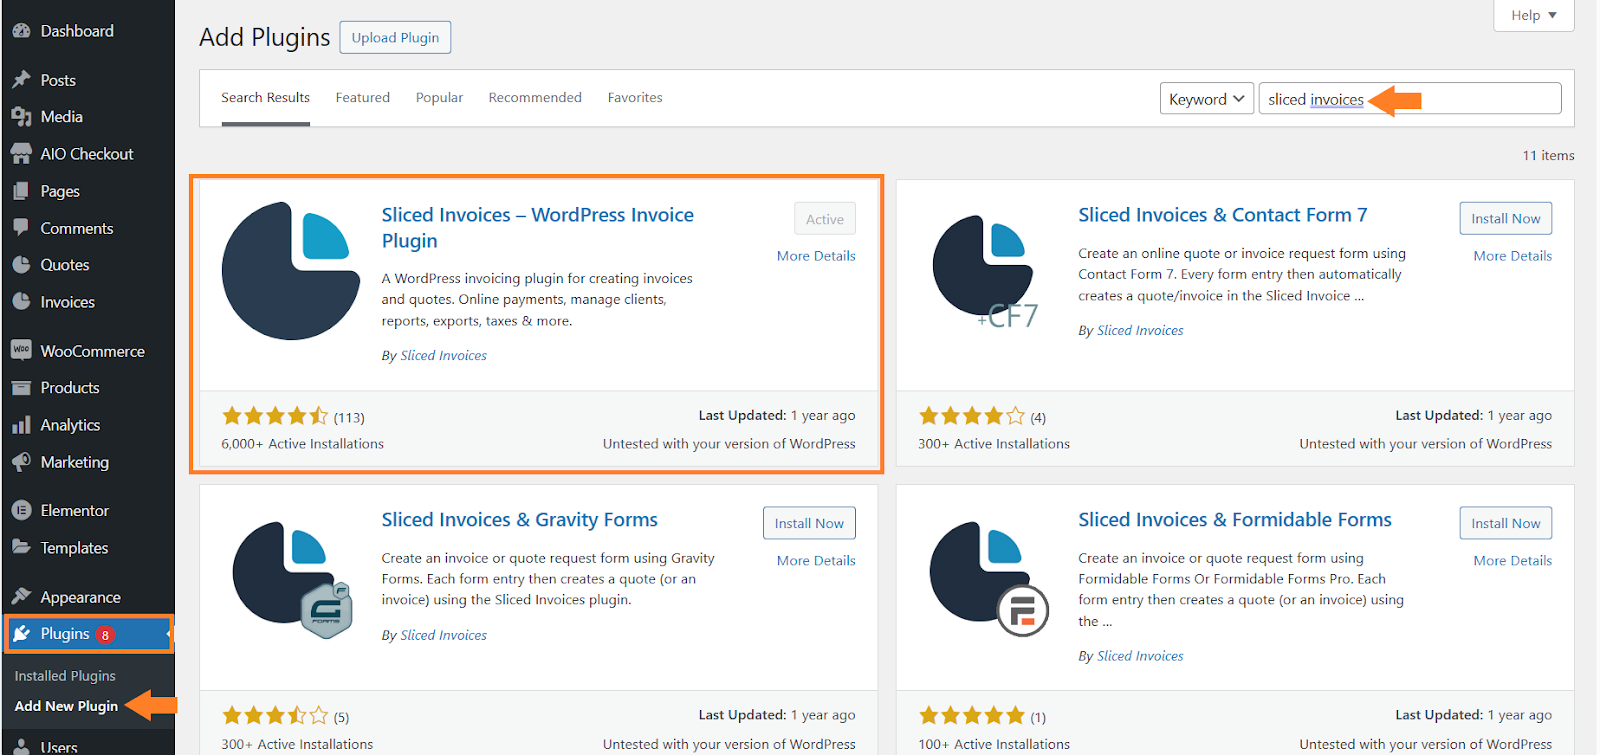
First, we need to install the required plugin that will help us to send the invoices with a payment link. To install it, navigate to Plugins > Add New from your WordPress dashboard and search for ‘sliced invoices’ in the search bar.
You will see an ‘Install Now’ button right beside the plugin’s name. Click it to install the plugin. Once the plugin is installed, it will be replaced by the ‘Activate’ button.
You need to click it, to activate and use the plugin.
Note: I have already installed and activated the plugin so I could see the ‘Active’ button.
1.2. Configure the Sliced Invoices Settings
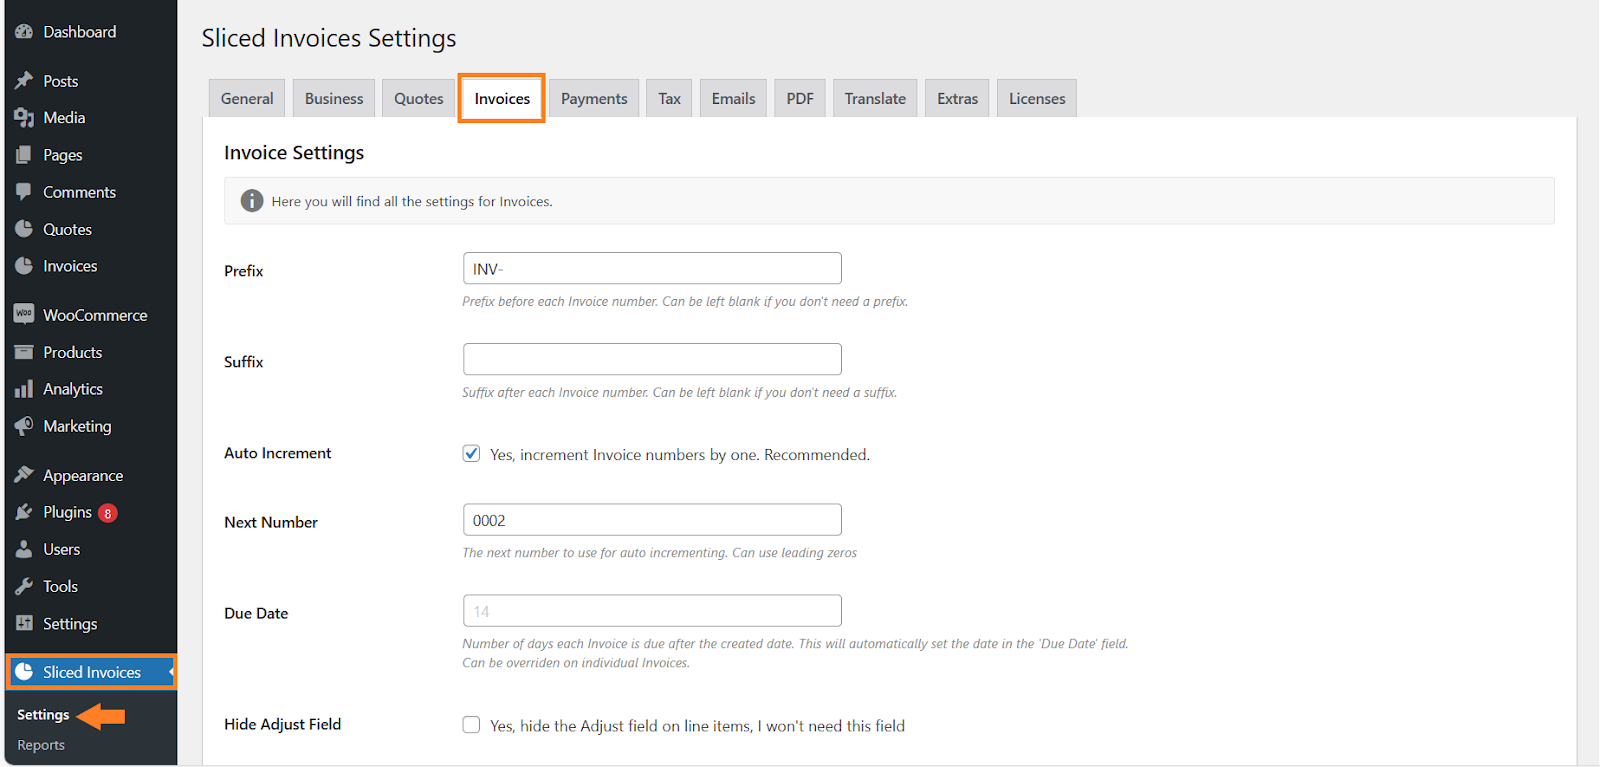
After the plugin has been installed and activated successfully, we need to make some configurations to adjust it as per our requirements. To do so, navigate to Sliced Invoices > Settings from your WordPress dashboard.
From here, you can add prefixes to the invoice number, enable admin notifications, and adjust other invoice settings.
1. Enable Admin Notices
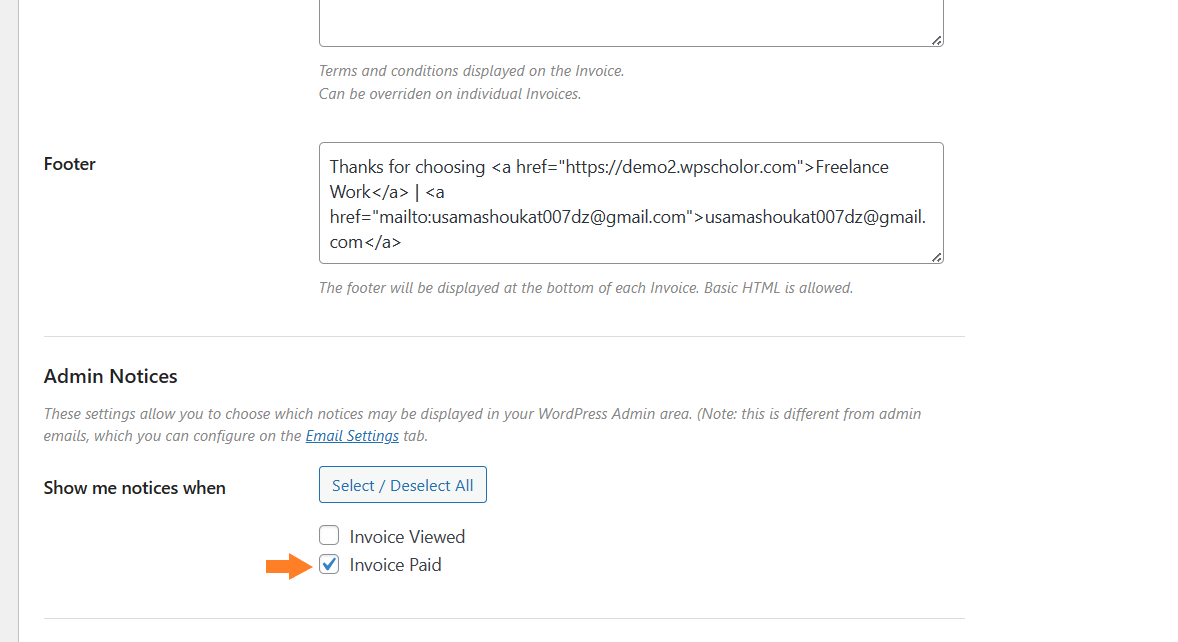
You can leave the prefix to default and move to the next section to enable the admin notices. You can select when you as an admin want to receive the email notifications. You will have two options:
- Invoice viewed
- Invoice paid
I am selecting the ‘Invoice Paid’ option as I only want to receive notifications, whenever an invoice has been paid.
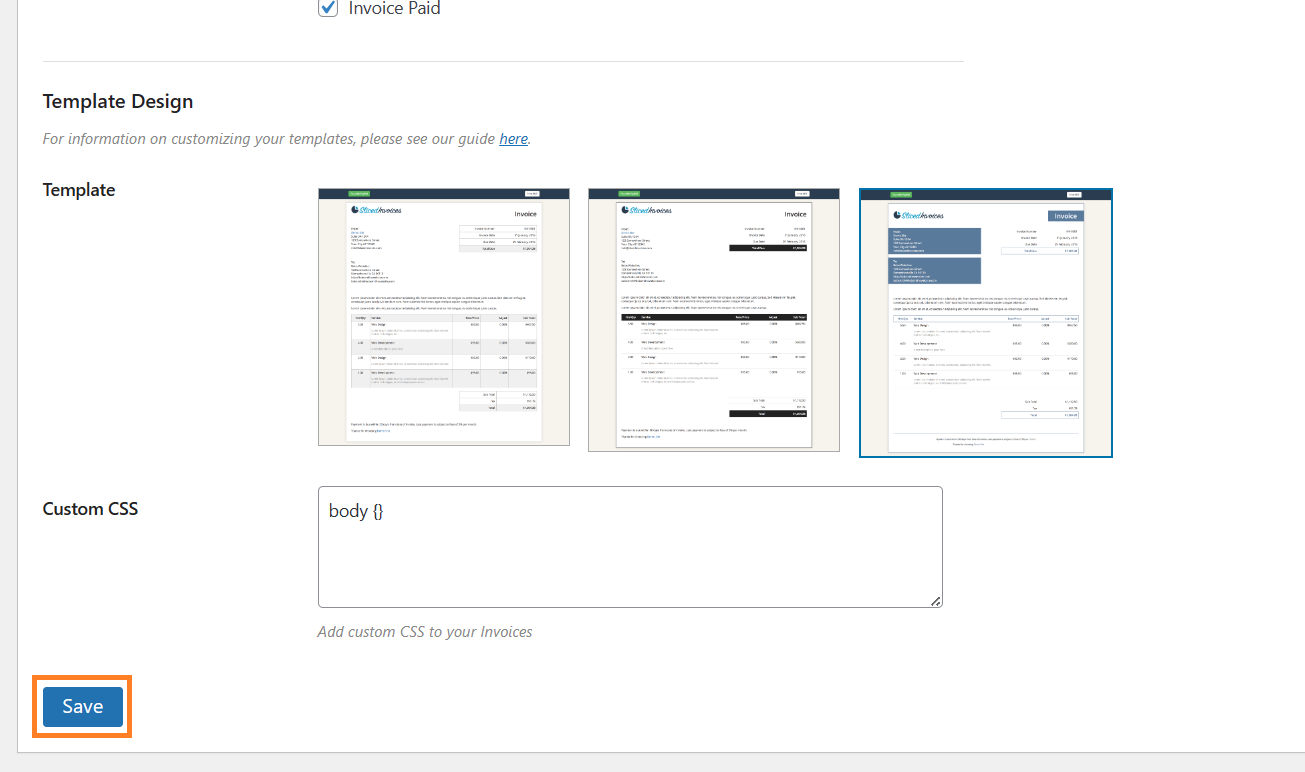
2. Select the Template Design
Next, you need to select the invoice design. The plugin gives you three templates, you can use the one that you like the most.
I have used the third template. To select it, you just need to click the template you want to use.

3. Click Save
Once you have adjusted the invoice settings, click the blue ‘Save’ button to save the settings.
1.3. Configure the Payment Settings
After that, you need to set the payment link in the invoice so customers can directly pay using that link. But first, we need to set up the payment method.
This plugin allows you to add bank details on the invoice and customers can transfer the money to the bank by copying the details from the invoice OR you can create a link to allow customers to pay via PayPal or any other payment method you have installed on your store.
I’ll be enabling the PayPal payment method. To do so, click the ‘Payment’ tab in the sliced plugin’s settings.
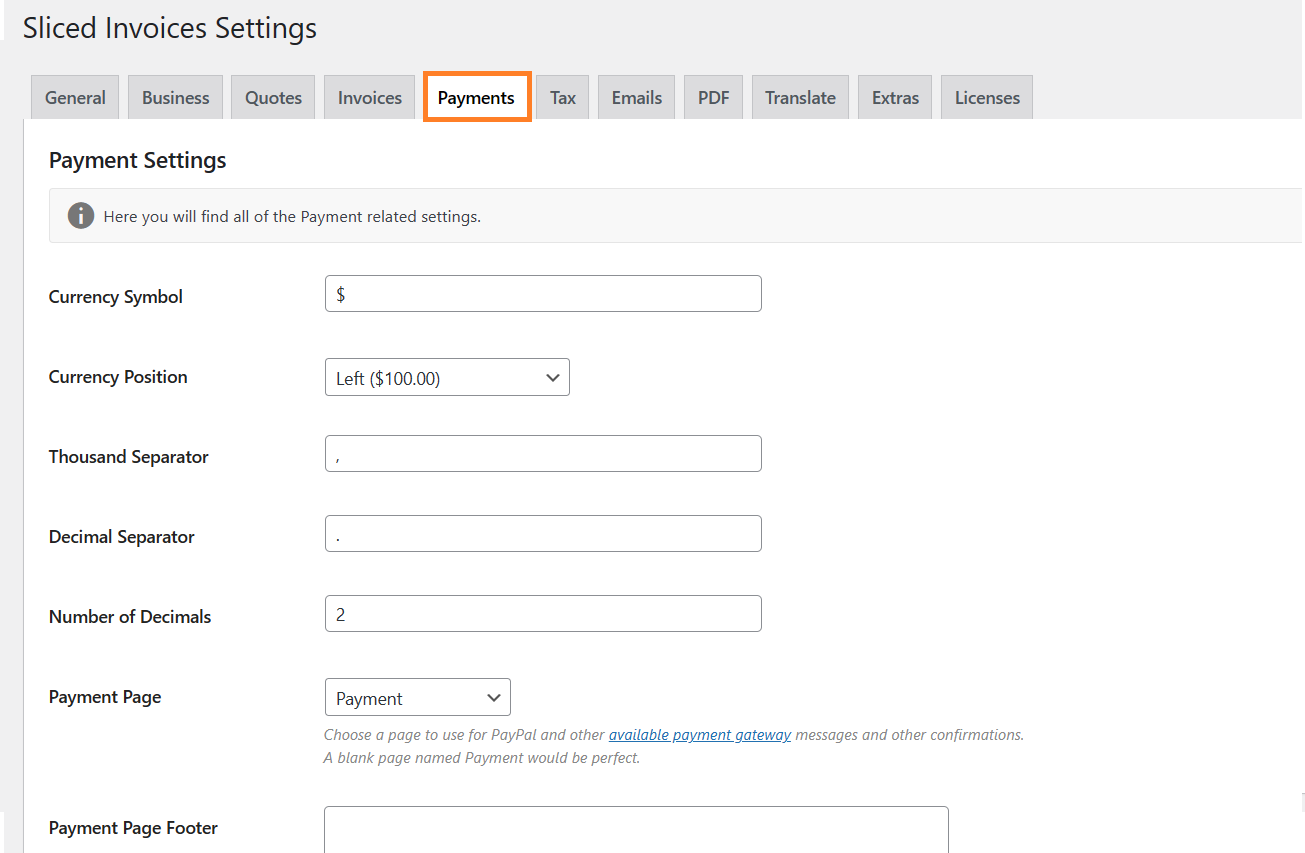
1. Enable the PayPal Gateway
From here, you can also change the currency symbol and adjust other settings. We’ll be focusing on configuring the PayPal payment method.
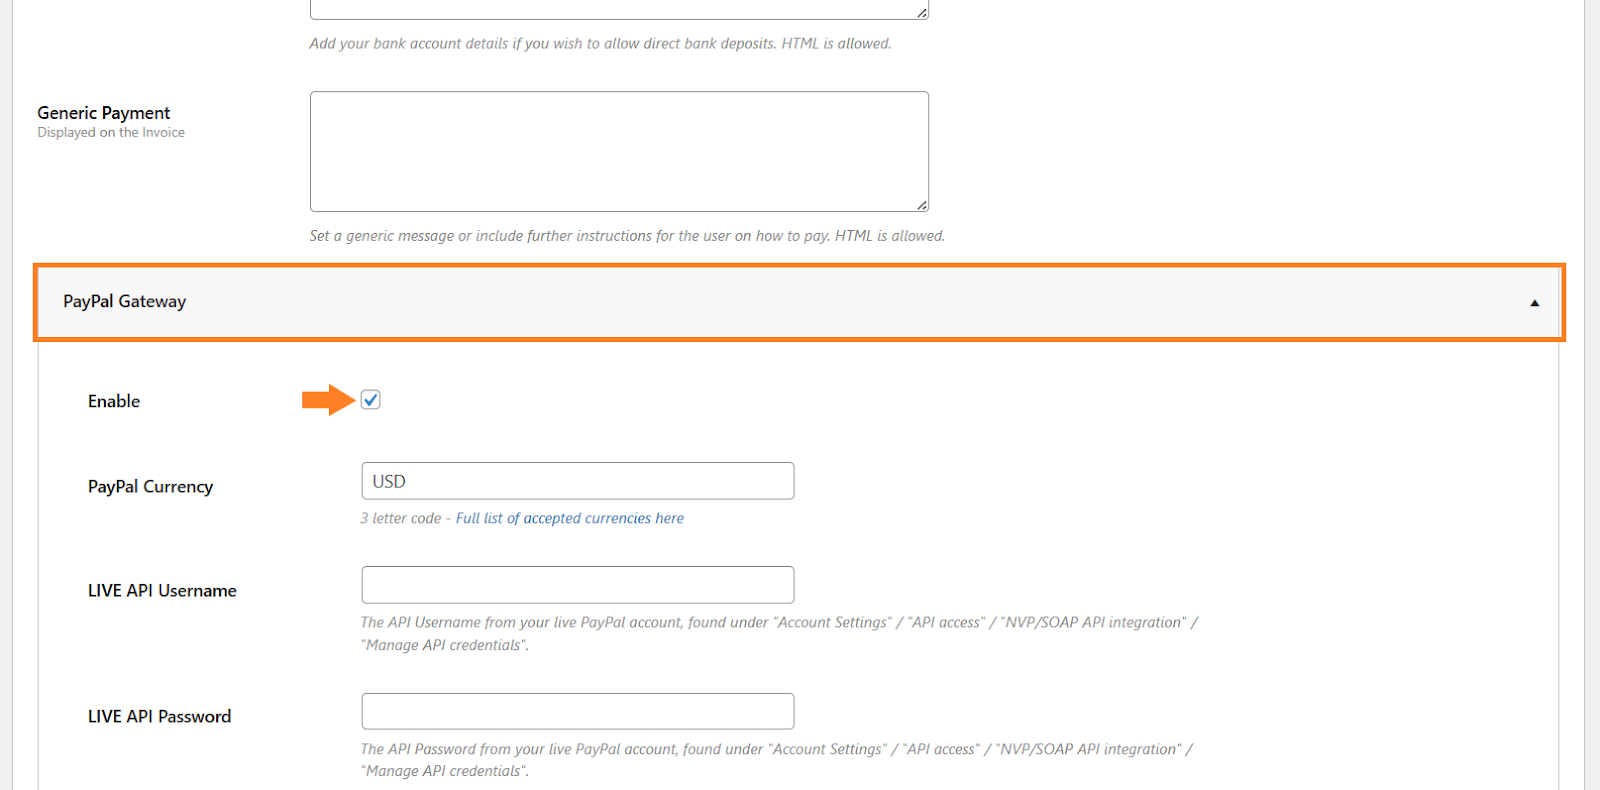
First, we need to enable it, to do so, scroll to the bottom of the page and expand the ‘PayPal Gateway’ tab by clicking it. Once opened, check the ‘Enable’ checkbox to enable the PayPal payment gateway.
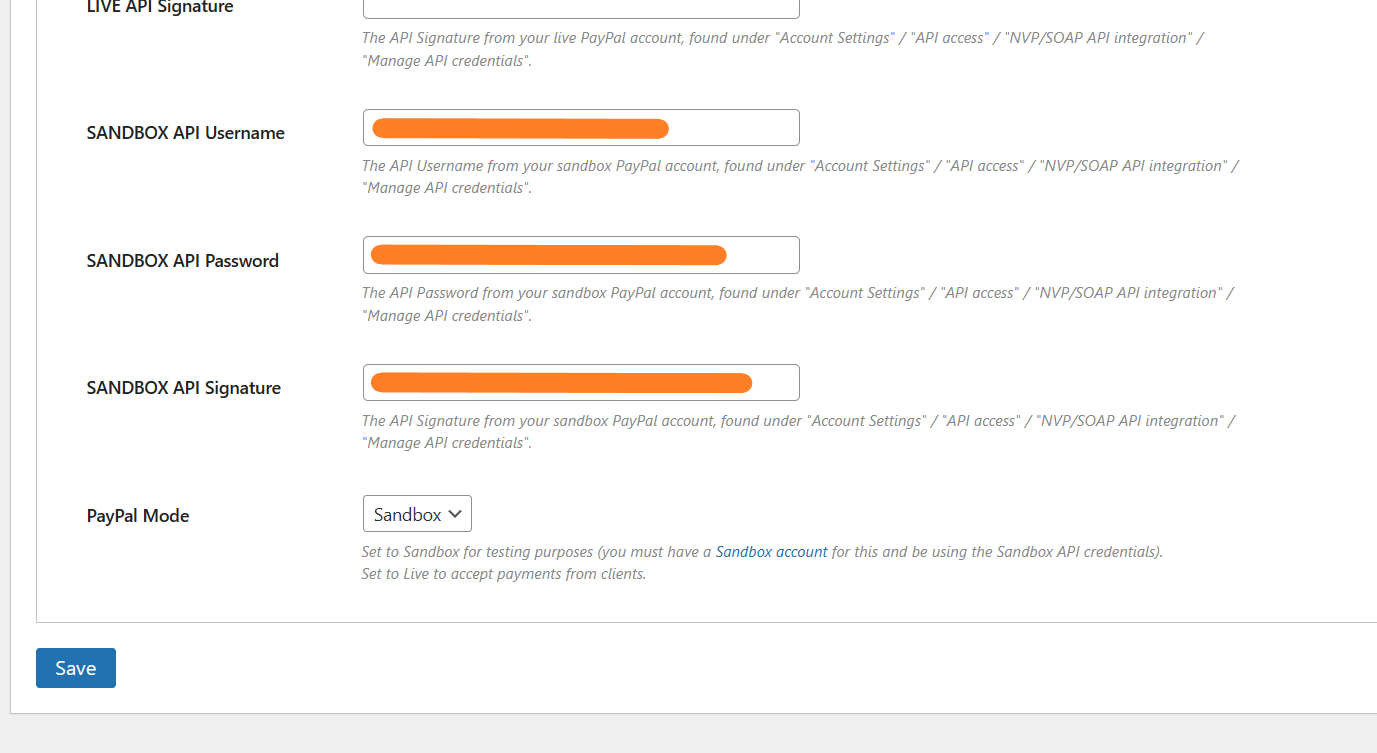
2. Select the PayPal Mode
After enabling it, we need to select its mode. It provides two modes:
- Sandbox: If you want to test it first before making it live, you will need to select the ‘Sandbox’ mode.
- Live: If you want to make it live, you will need to select the ‘Live’ mode.
I recommend you test the gateway before making it live so scroll to the bottom of the page and select the ‘Sandbox’ from the ‘PayPal Mode’ dropdown. However, if you want to make it live directly, make sure to select the ‘Live’ option.

3. Add the PayPal Credentials
After enabling the sandbox mode, we need the PayPal sandbox credentials to use and test the PayPal payment gateway. You will need the following three keys:
- Sandbox API Username
- Sandbox API Password
- Sandbox API Signature
You will get the SandBox credentials from your PayPal account. Once you get them, you need to paste them in the SandBox fields.
Note: If you have selected live mode in the previous step, you will need to get the live API details.
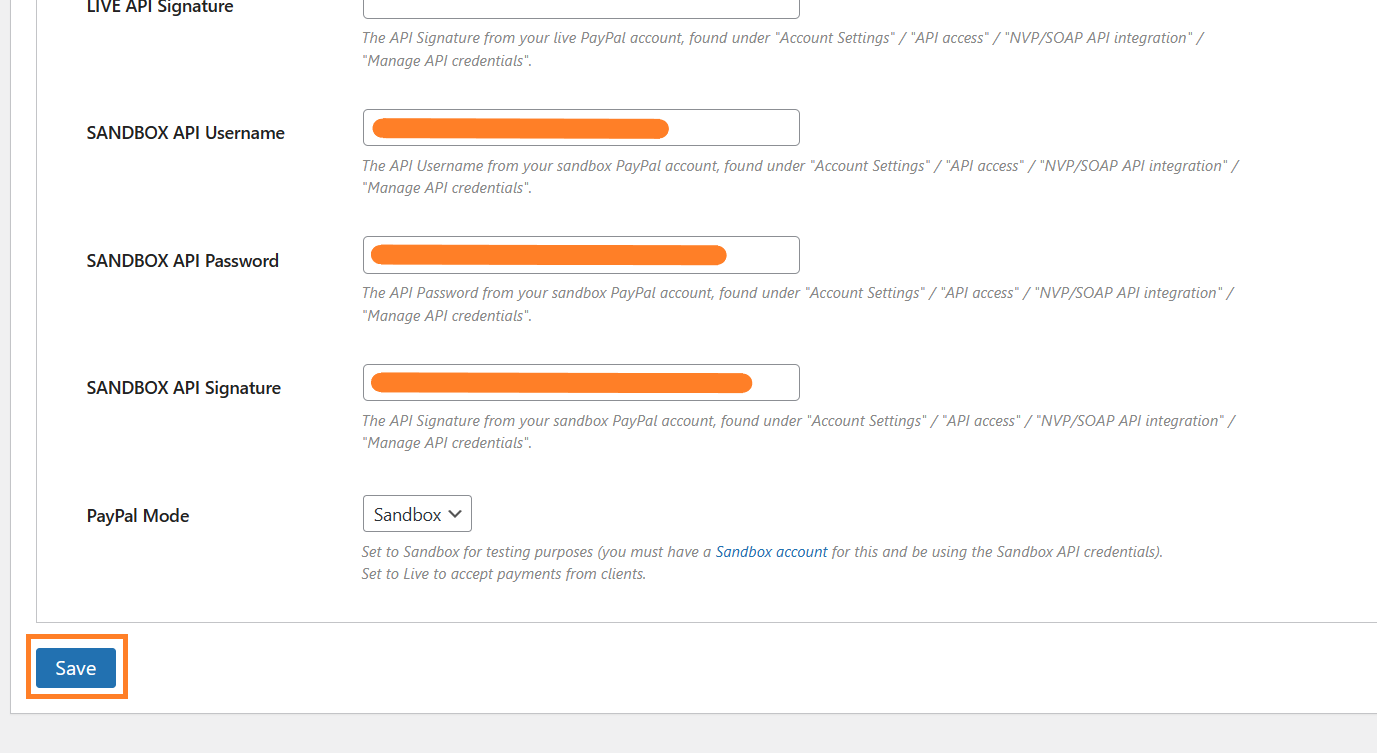
4. Save Settings
Once you have the sandbox credentials, click the blue ‘Save’ button at the bottom left corner of your screen to save the settings.
You can also explore the other settings of this plugin, but I am leaving that to you as I want to keep this tutorial to the point. But the plugin allows you to configure the tax settings, edit the email templates, and a lot more.
1.4. Create the WooCommerce Invoice With a Payment Link
Next, we need to create an invoice to test it. To do so, navigate to Invoices > Add New Invoice from your WordPress dashboard.
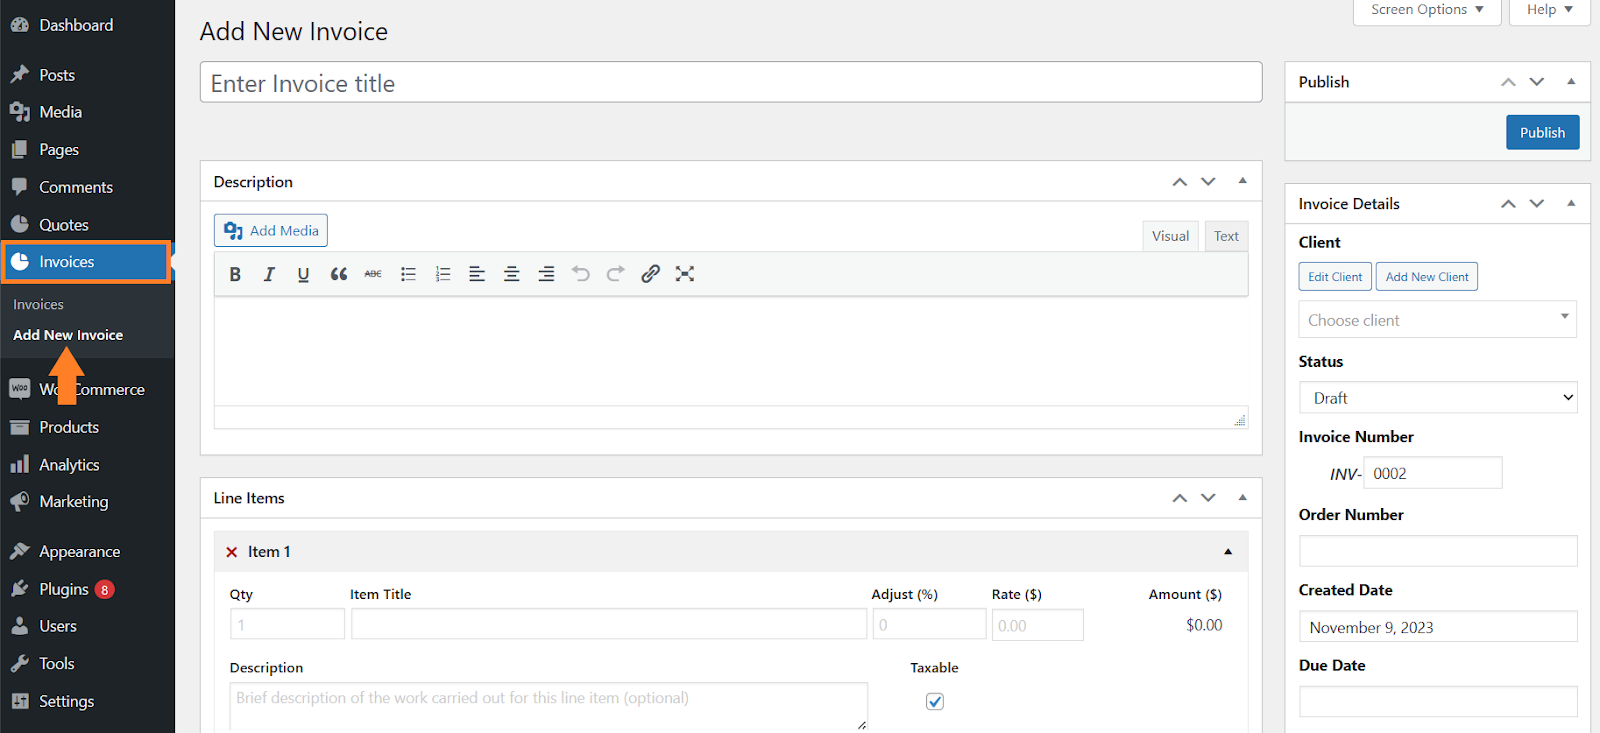
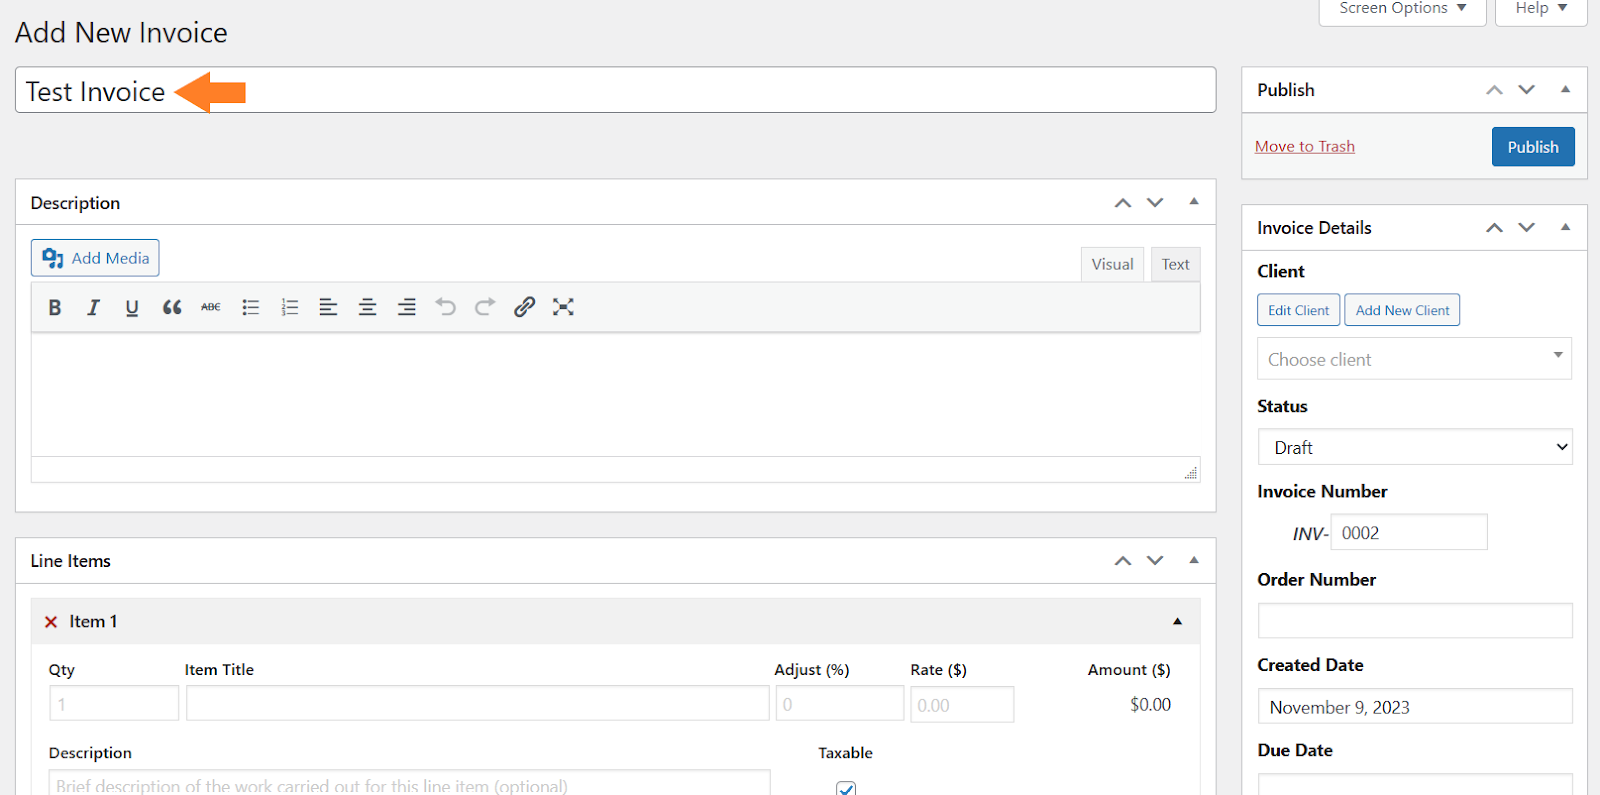
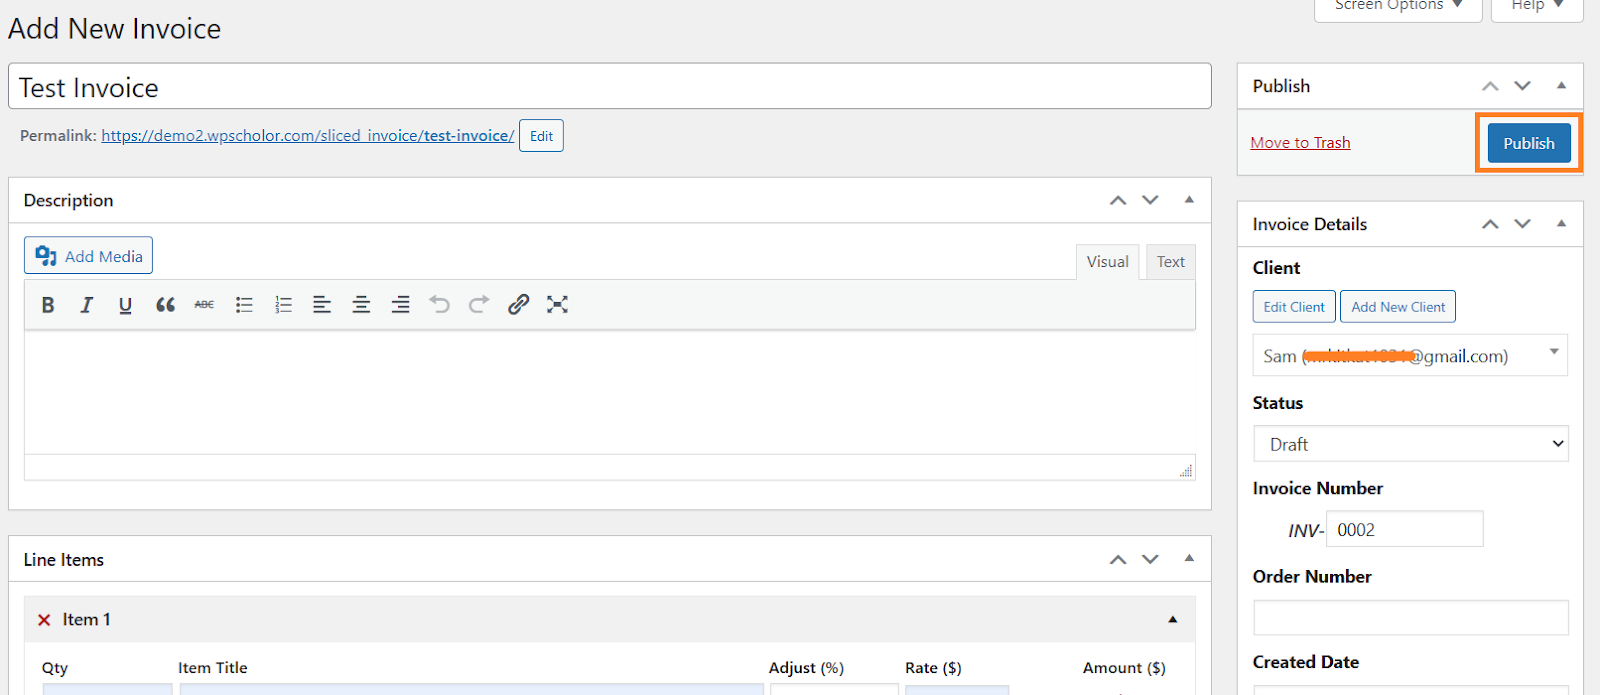
1. Add the Invoice Title
In the ‘Title’ field, add the title for the invoice. You can add anything you want, as it will only be shown to the admin in the dashboard.
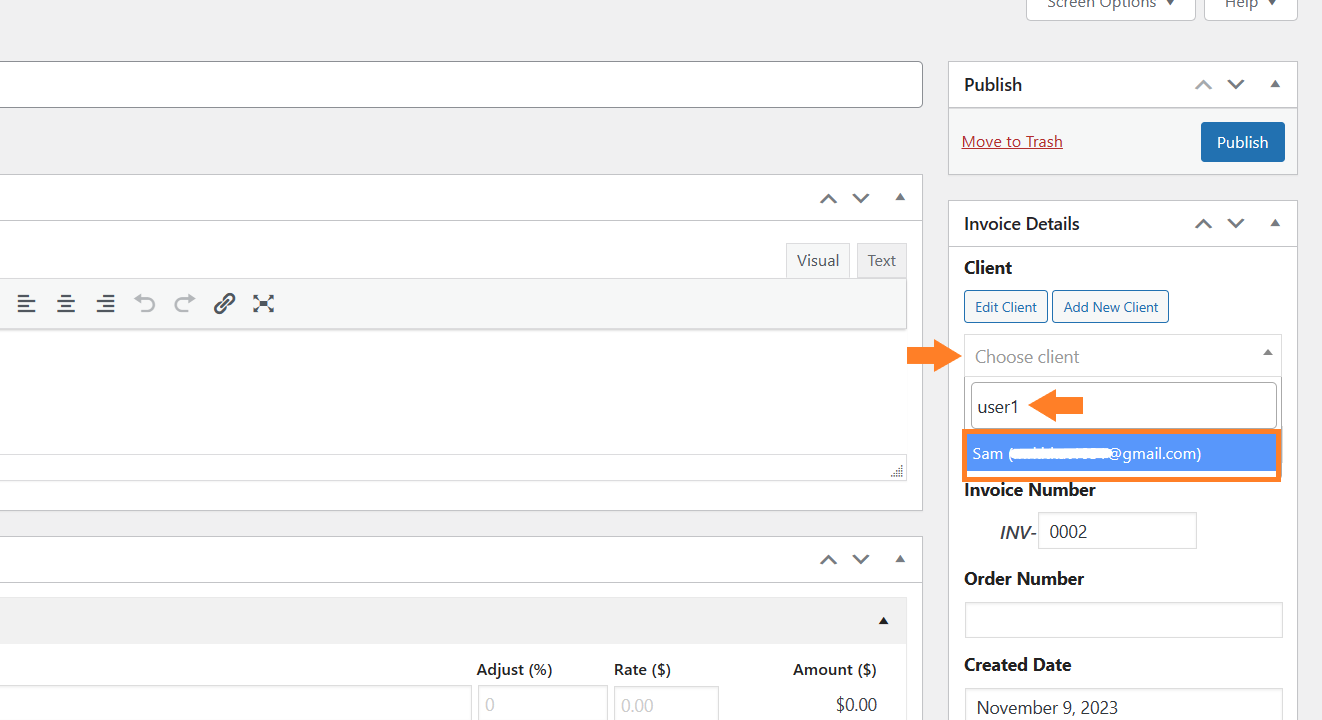
2. Add the Client
After that, you need to select the client for whom you want to create this invoice. You can create a new client or select one of the existing users in your store.
I’ll be selecting an existing user. To select it, you need to enter the username of the user in the ‘Choose Client’ field. Once you get the user, click it to select it.
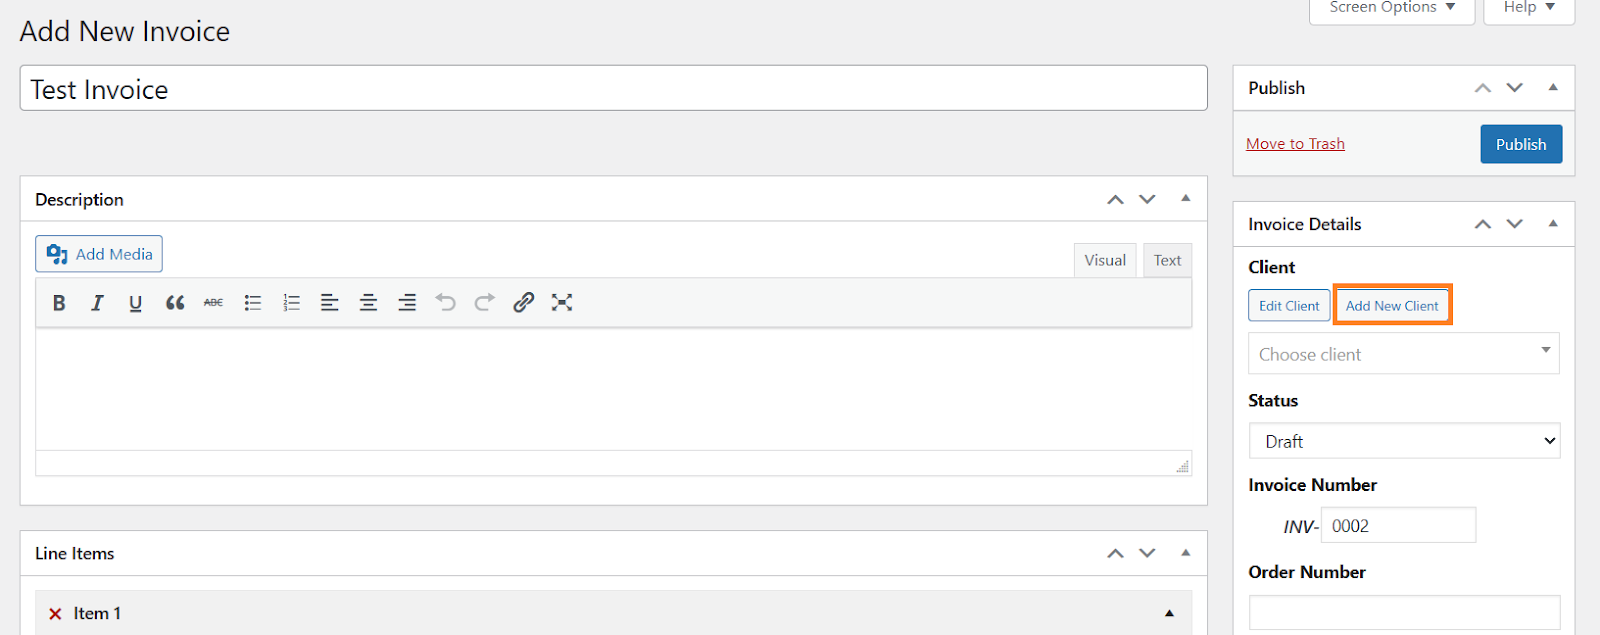
If you want to create a new client, you need to click the ‘Add New Client’ button and fill in the required information. Don’t forget to add the client’s email as it will be used to send them the invoice.
3. Add the Item Details
Next, we need to add the item or product details in the ‘Line Items’ section, for which we are creating this invoice. You can add the item’s quantity, price, title, description, and a lot more.
I have added the test details to show you an example:
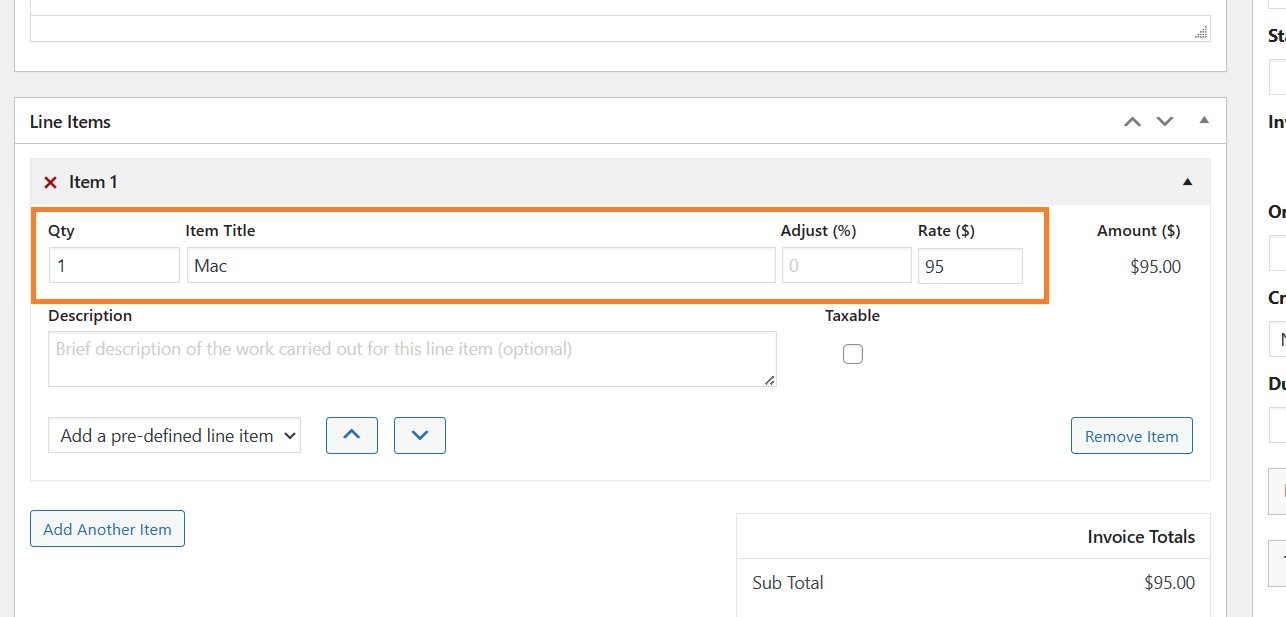
You can also select whether this item is taxable or not. I have left it to default (unchecked) but it depends on your product and the region.
Moreover, you can create an invoice for multiple items by clicking the ‘Add Another Item’ button.
4. Add the Payment Link
Next, you need to add the payment link to the invoice. To do so, expand the ‘Payment Settings’ section and check the ‘PayPal’ checkbox.
If you have installed the ‘Stripe’ plugin to your store, you can create a Stripe payment link as well.
Remember, if you haven’t set up the PayPal payment method (live or sandbox mode) you won’t see the ‘PayPal’ checkbox in the payment settings section.
You can also configure the tax settings.

5. Publish the Invoice
Once you have adjusted the invoice settings, click the ‘Publish’ button to publish the invoice.
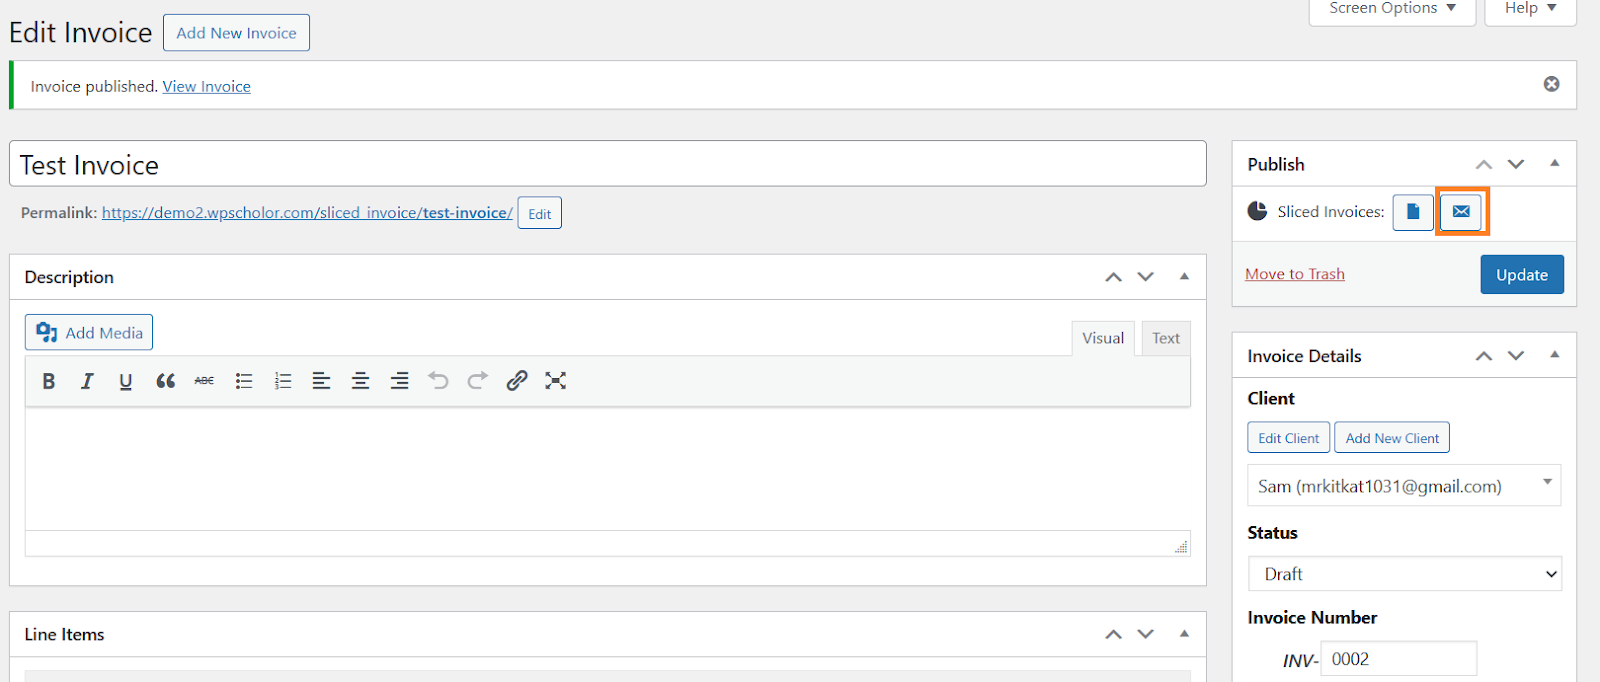
1.5. WooCommerce Send Invoice With a Payment Link
Once the invoice is published, you’ll see new options above the ‘Update’ button. You will get the option to:
- Send the invoice to the client’s email.
- Download the invoice in PDF.
If you want to send the invoice manually to your customers like creating the email or using any other source to send the PDF, you can download the invoice PDF.
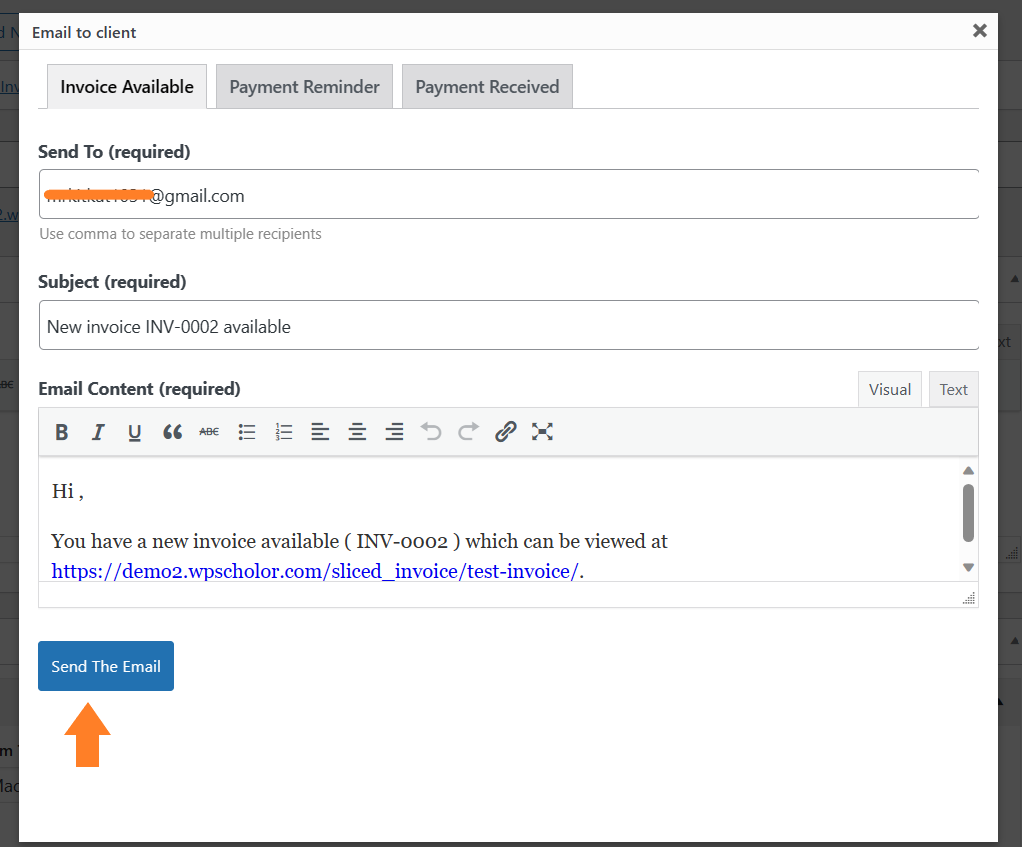
But, if you want to send the invoice right now, you can click the email icon to open a popup to send the invoice to the customer.
From the popup, you can edit the email content to match your needs. You can even send this invoice to multiple recipients but make sure to separate the email with a comma.
Once done, you can click the ‘Send this Email’ button to send the email. I am leaving it to the default content.
1.6. Final Results
Once you hit the button, the email will be sent. It will have a link to the invoice which will have a payment link and customers will be able to pay for their order using this link.
To test it, I visited the email account of the customer to whom I sent the invoice, and as you can see in the screenshot below the email was received.
When I opened it, I could see a link to the invoice.
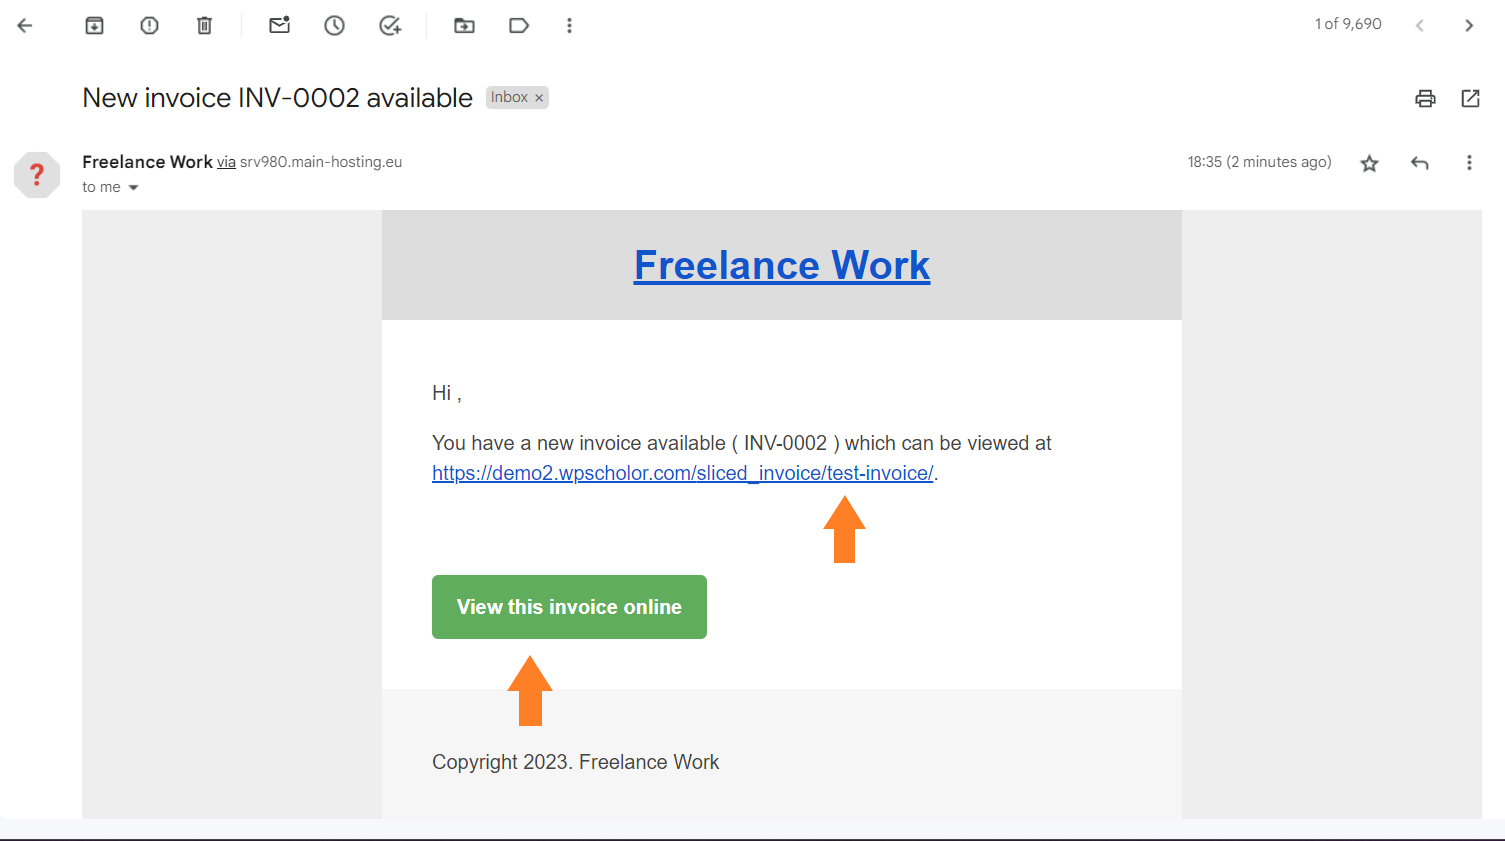
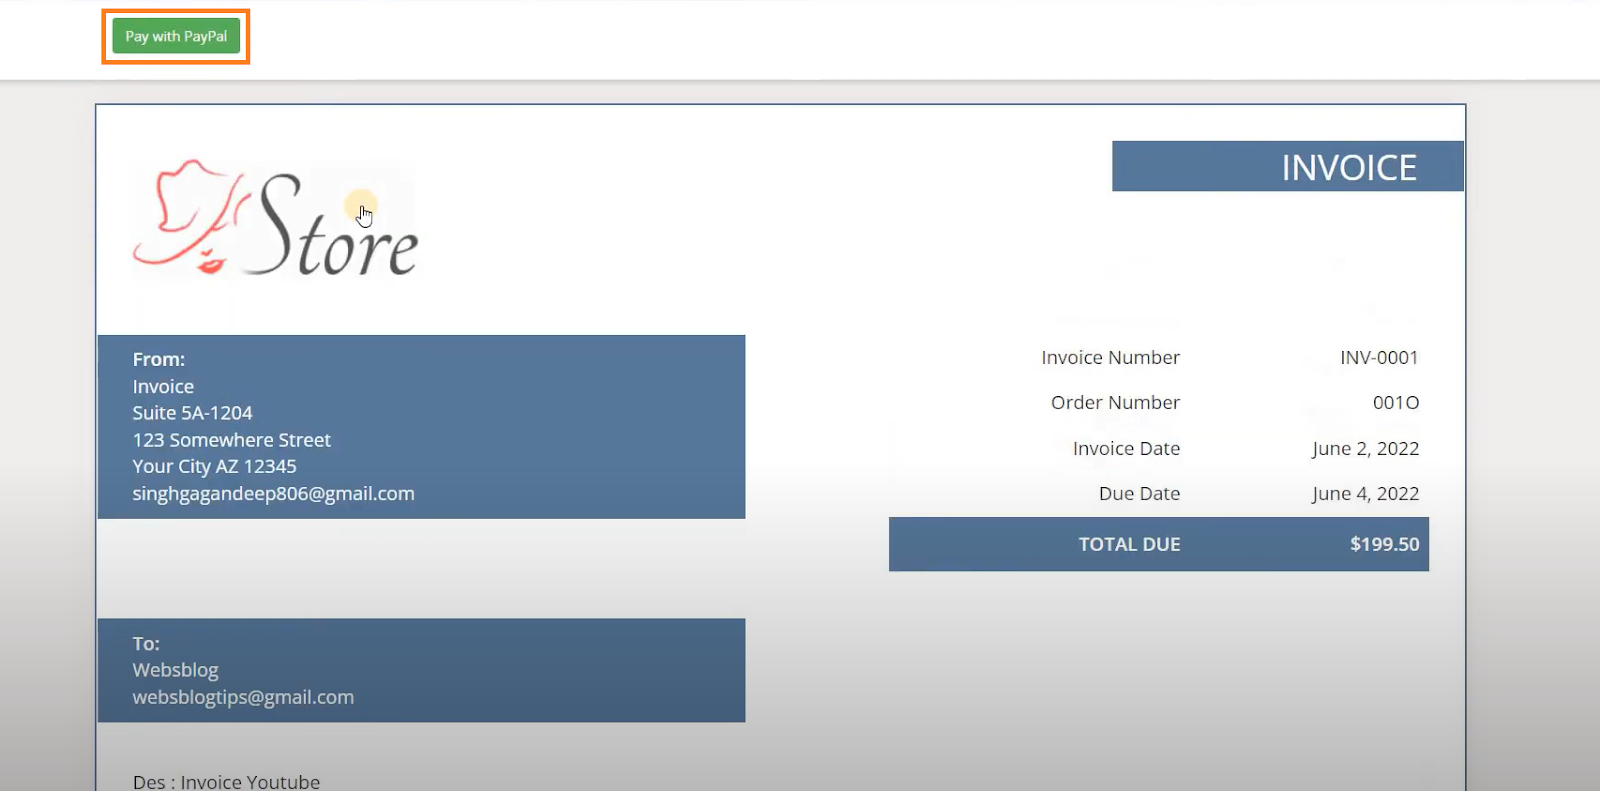
When I viewed the invoice, I could also see the ‘Pay With PayPal’ button at the top to allow customers to pay for their invoice. You can also see the template that we used was applied successfully.
After clicking the button, customers will be able to pay using their PayPal account.
Method 2: Using the Custom Code
The second method to send the WooCommerce invoices with a payment link is by using the code. It might be a bit difficult for you to follow this method if you don’t have any technical or coding experience.
For this, you don’t need any third-party plugins. You will need a bit of coding experience to customize the existing customer invoice email template.
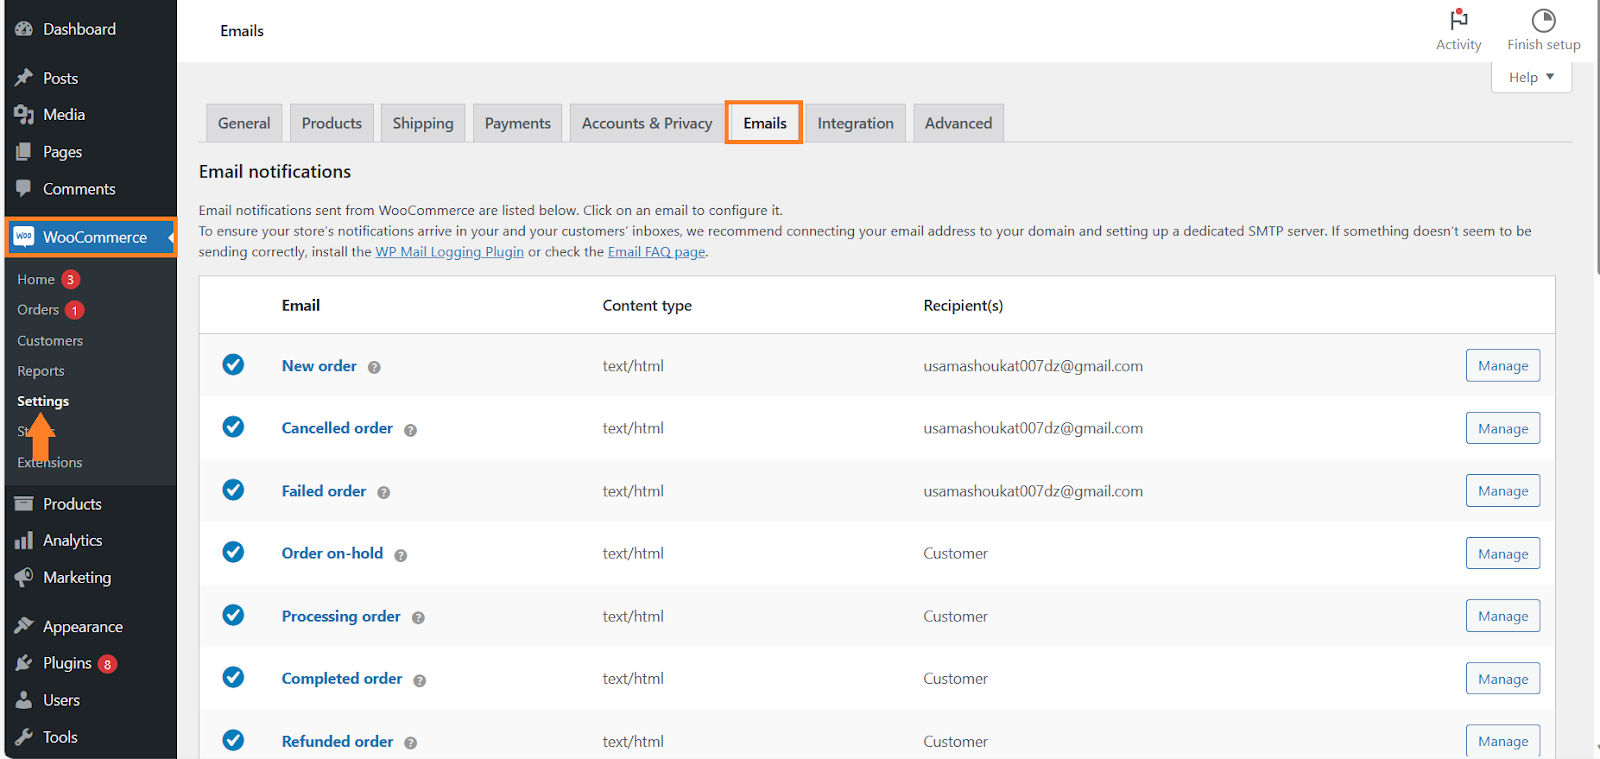
To do so, navigate to WooCommerce > Settings > Emails from your WordPress dashboard.
2.2. Copy the Email Template to Your Theme
After that, we need to edit the default email template and add the payment link to it. To do so, we will first need to copy the default email template of the customer invoice to our active theme.
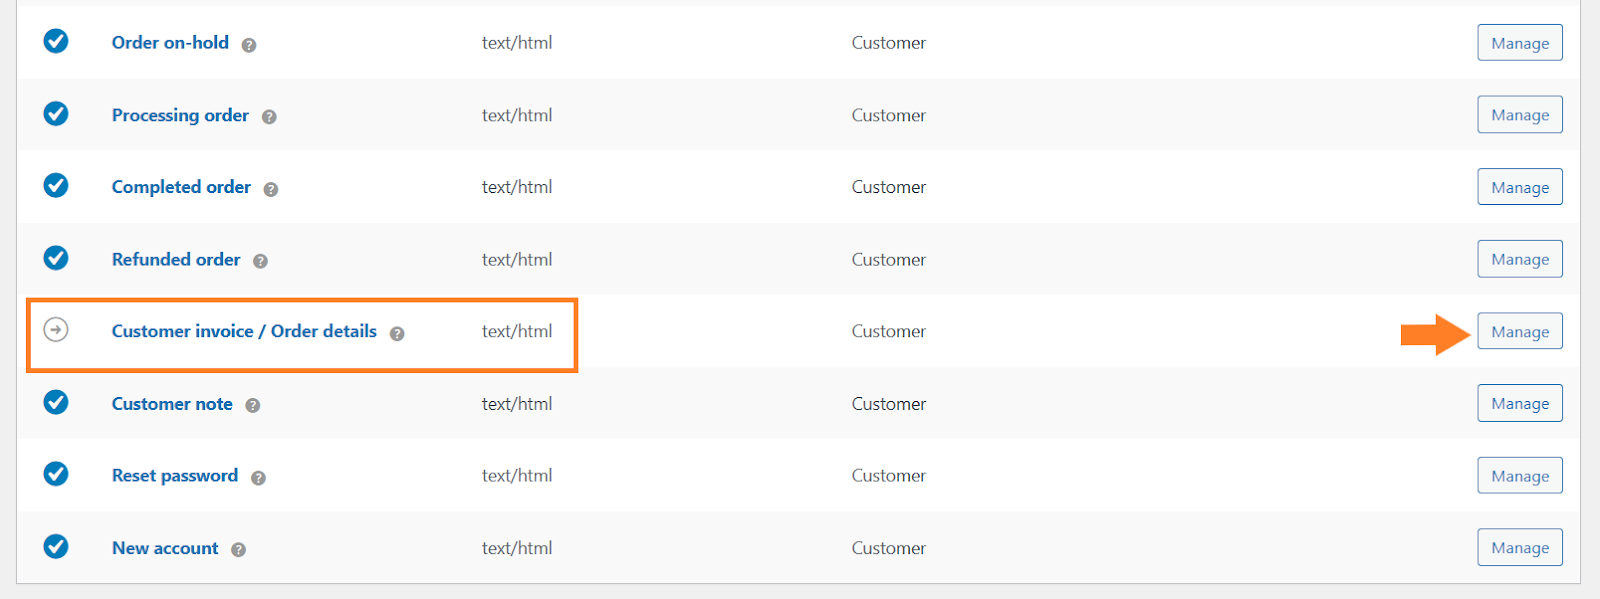
You need to click the ‘Manage’ button in front of the ‘Customer invoice / Order details’ email.
1. Copy the File to the Theme
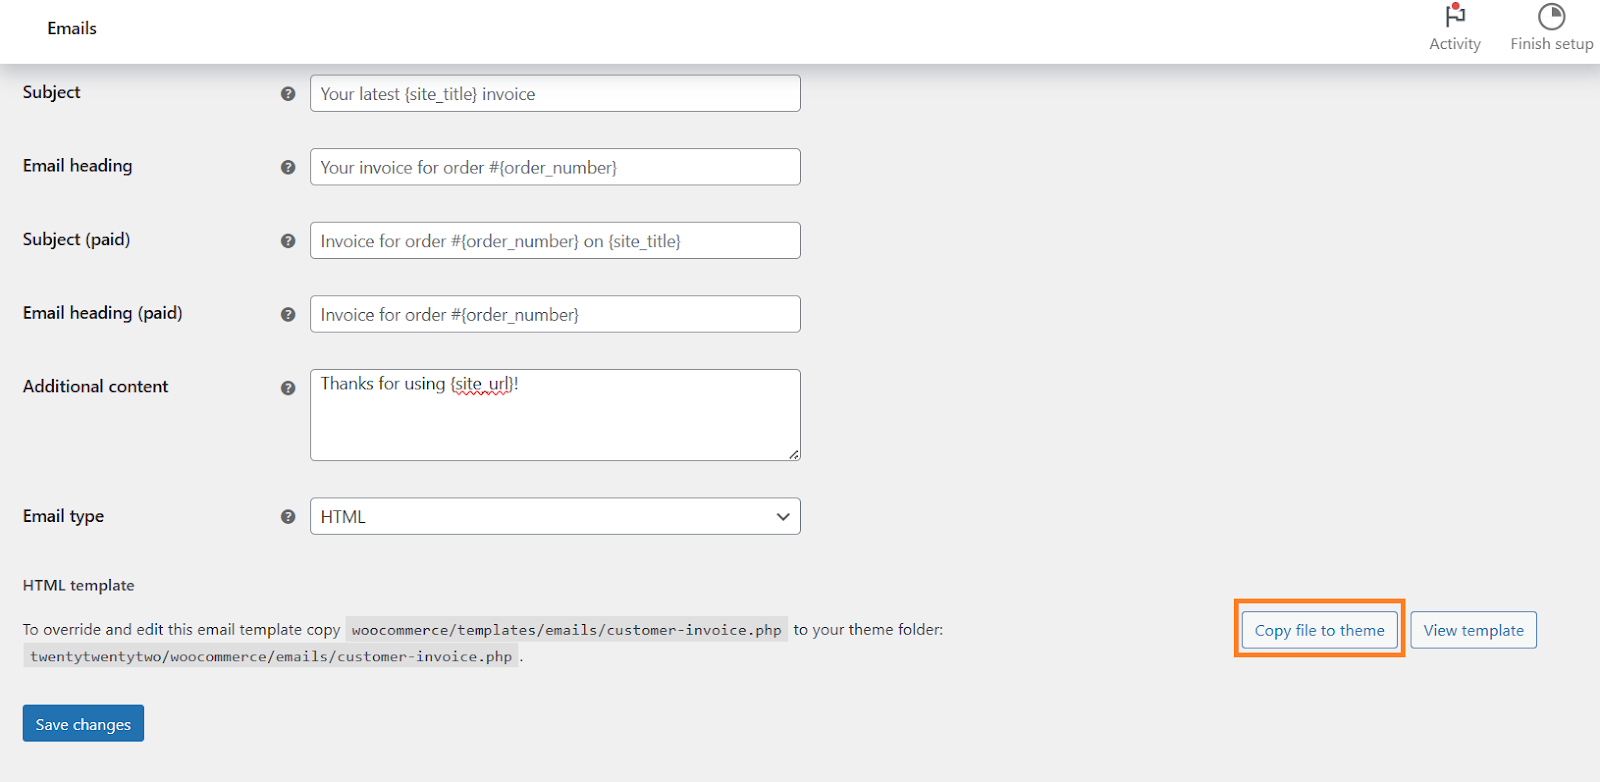
After clicking it, you will be redirected to the page from where you can edit the email details like the subject, content, and more.
You can do that by yourself but we need to focus on the HTML template of the email. WooCommerce has a default email template for customer invoice, we need to override and edit it.
To override and edit this email template copy woocommerce/templates/emails/customer-invoice.php to your theme folder: yourtheme/woocommerce/emails/customer-invoice.php.
To copy the file, you can click the ‘Copy file to theme’ button.
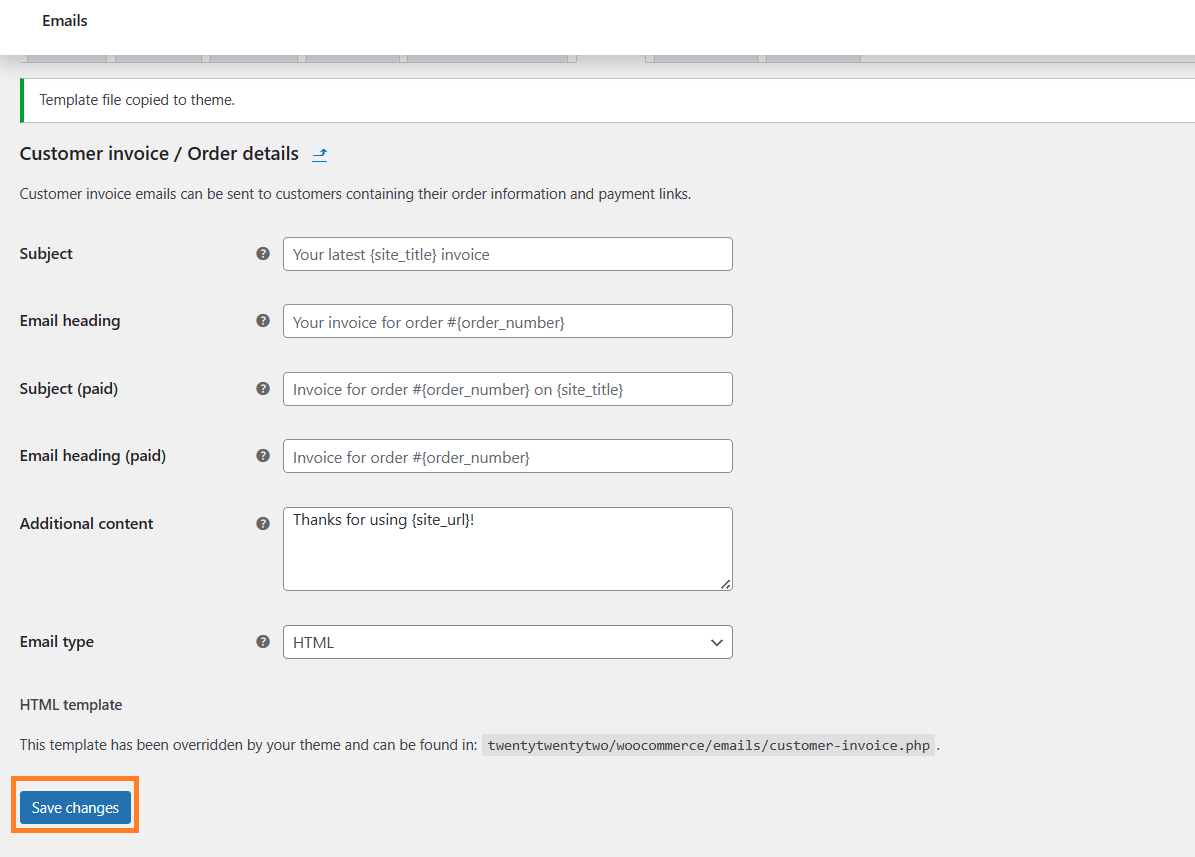
2. Save Changes
Once the file is copied successfully to your theme, hit the blue ‘Save Changes’ button at the bottom left corner of your screen to save the settings.
2.3. Edit the Email Template
Now, to edit the email template, you need to go to the file that you just copied to your theme. For example, yourtheme/woocommerce/emails/customer-invoice.php.
There are multiple ways to edit the file in WordPress. You can edit the files via cPanel, FTP, code editor plugin, or more. I will not go into the details of each method and if you want you can explore them by yourself.
I will edit the theme files using the theme editor. Most themes have enabled it to allow its users to edit the theme files and make customizations to them as per their requirements.
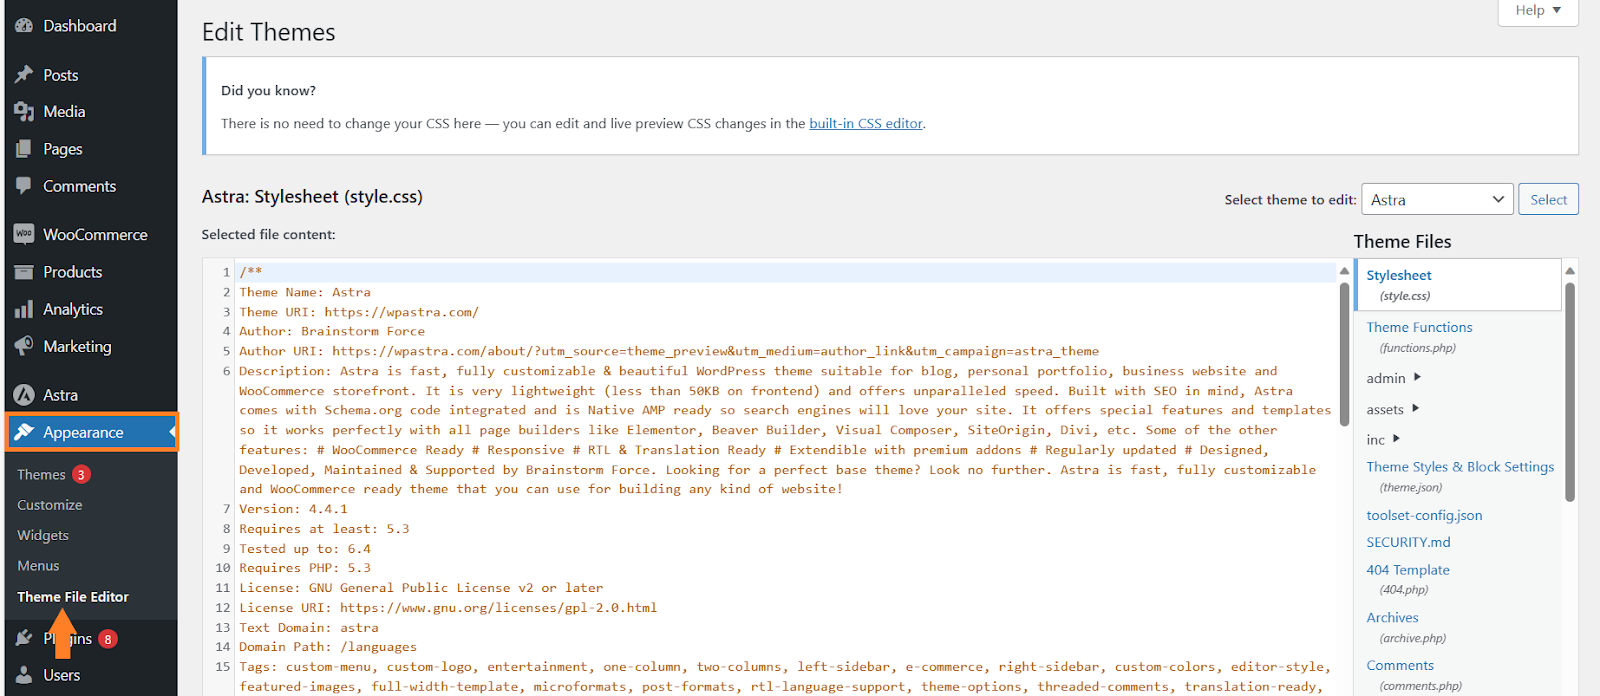
1. Go to Theme File Editor
You will need to navigate to Appearance > Theme File Editor from your WordPress dashboard to edit the theme files.
Note: If you cannot find the theme file editor, you will need to go to the file manager of your hosting and navigate to the folder where you have installed WordPress. After that, look for the wp-config.php file and edit it.
Once you edit it, you will need to find the following line:
define(‘DISALLOW_FILE_EDIT’, true);
Once found, make sure to replace it with:
define(‘DISALLOW_FILE_EDIT’, false);
Don’t forget to save the file before closing.
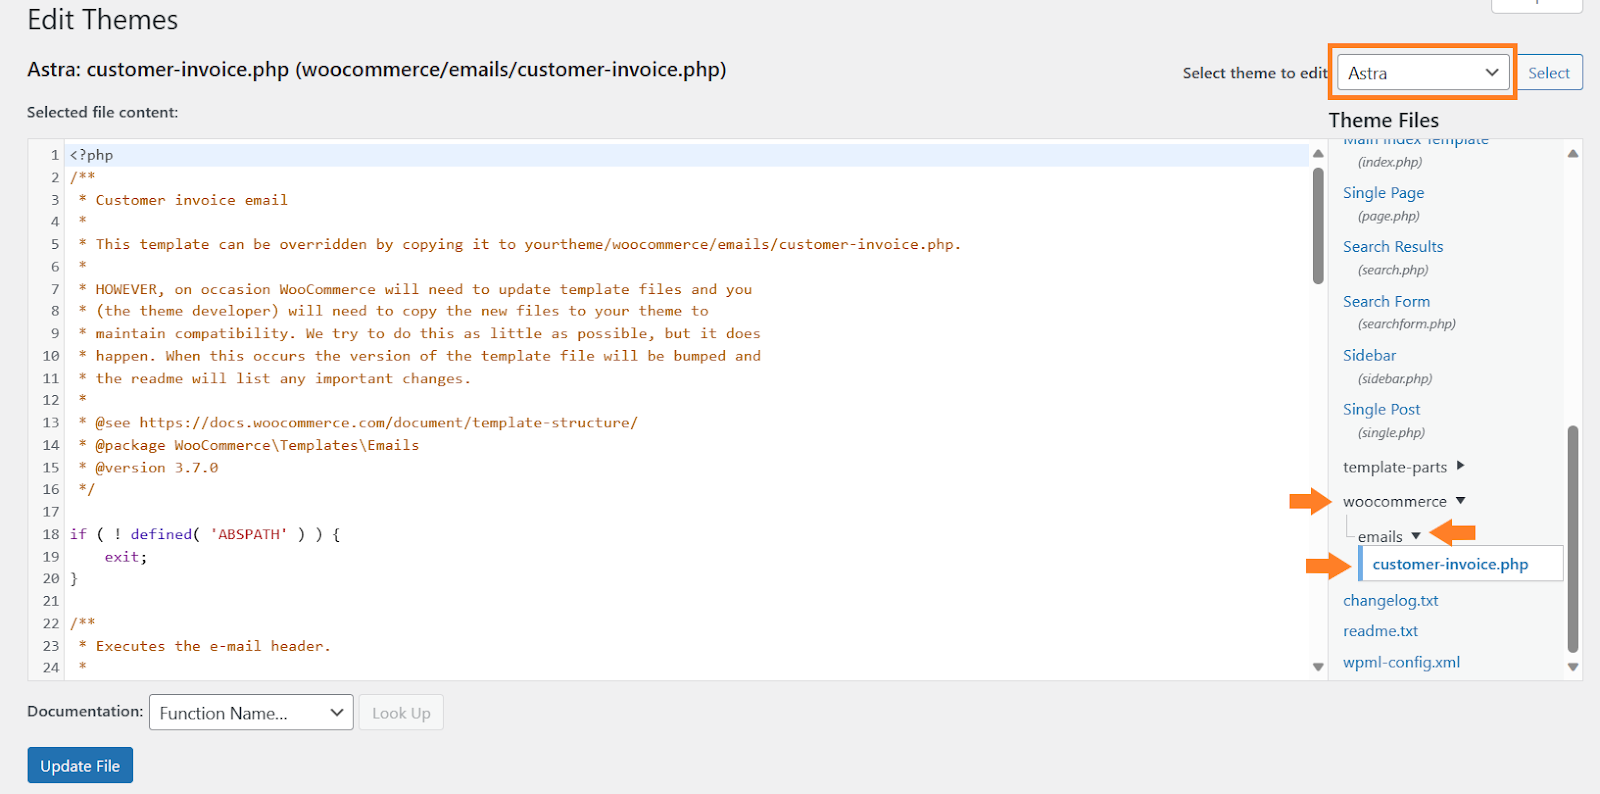
2. Edit the Customer Invoice File
Once on the theme edit page, make sure you have selected the currently active theme from the above dropdown.
After that, you need to navigate to woocommerce > emails > customer-invoice.php file and click it to edit it.
2.4. Copy the Code
Once you have spotted the file to edit, you need to copy the following template code to add a payment link to the invoice:
<?php

if ( ! defined( 'ABSPATH' ) ) {
    exit;
}

/**
 * Executes the e-mail header.
 *
 * @hooked WC_Emails::email_header() Output the email header
 */
do_action( 'woocommerce_email_header', $email_heading, $email ); ?>

<?php /* translators: %s: Customer first name */ ?>
<p><?php printf( esc_html__( 'Hi %s,', 'woocommerce' ), esc_html( $order->get_billing_first_name() ) ); ?></p>

<?php if ( $order->needs_payment() ) : ?>
    <p>
    <?php
    printf(
        wp_kses(
            /* translators: %1$s Site title, %2$s Order pay link */
            __( 'An order has been created for you on %1$s. Your invoice is below, with a link to make payment when you’re ready: %2$s', 'woocommerce' ),
            array(
                'a' => array(
                    'href' => array(),
                ),
            )
        ),
        esc_html( get_bloginfo( 'name', 'display' ) ),
        '<a href="' . esc_url( $order->get_checkout_payment_url() ) . '">' . esc_html__( 'Pay for this order', 'woocommerce' ) . '</a>'
    );
    ?>
    </p>

    <p><?php printf( __( 'To complete your payment, click the following link: %s', 'woocommerce' ), '<a href="' . esc_url( $order->get_checkout_payment_url() ) . '">' . __( 'Pay Now', 'woocommerce' ) . '</a>' ); ?></p>

<?php else : ?>
    <p>
    <?php
    /* translators: %s Order date */
    printf( esc_html__( 'Here are the details of your order placed on %s:', 'woocommerce' ), esc_html( wc_format_datetime( $order->get_date_created() ) ) );
    ?>
    </p>
<?php endif; ?>

<?php
/**
 * Hook for the woocommerce_email_order_details.
 *
 * @hooked WC_Emails::order_details() Shows the order details table.
 * @hooked WC_Structured_Data::generate_order_data() Generates structured data.
 * @hooked WC_Structured_Data::output_structured_data() Outputs structured data.
 * @since 2.5.0
 */
do_action( 'woocommerce_email_order_details', $order, $sent_to_admin, $plain_text, $email );

/**
 * Hook for the woocommerce_email_order_meta.
 *
 * @hooked WC_Emails::order_meta() Shows order meta data.
 */
do_action( 'woocommerce_email_order_meta', $order, $sent_to_admin, $plain_text, $email );

/**
 * Hook for woocommerce_email_customer_details.
 *
 * @hooked WC_Emails::customer_details() Shows customer details
 * @hooked WC_Emails::email_address() Shows email address
 */
do_action( 'woocommerce_email_customer_details', $order, $sent_to_admin, $plain_text, $email );

/**
 * Show user-defined additional content - this is set in each email's settings.
 */
if ( $additional_content ) {
    echo wp_kses_post( wpautop( wptexturize( $additional_content ) ) );
}

/**
 * Executes the email footer.
 *
 * @hooked WC_Emails::email_footer() Output the email footer
 */
do_action( 'woocommerce_email_footer', $email );
?>
Explanation:
It is a WooCommerce email template for customer invoices. It checks if payment is required for an order, and if so, it includes a link for the customer to pay. The payment link is dynamically generated using WooCommerce functions.
The code ensures proper placement within the email template and includes both a general payment message and a specific “Pay Now” link.
The conditional structure ensures that the payment link is only displayed when payment is needed. Remember to replace ‘woocommerce’ with your actual text domain.
The text domain will help you if you want to translate it into any other language. If not, you can remove it.
2.5. Replacing the Default Email Template
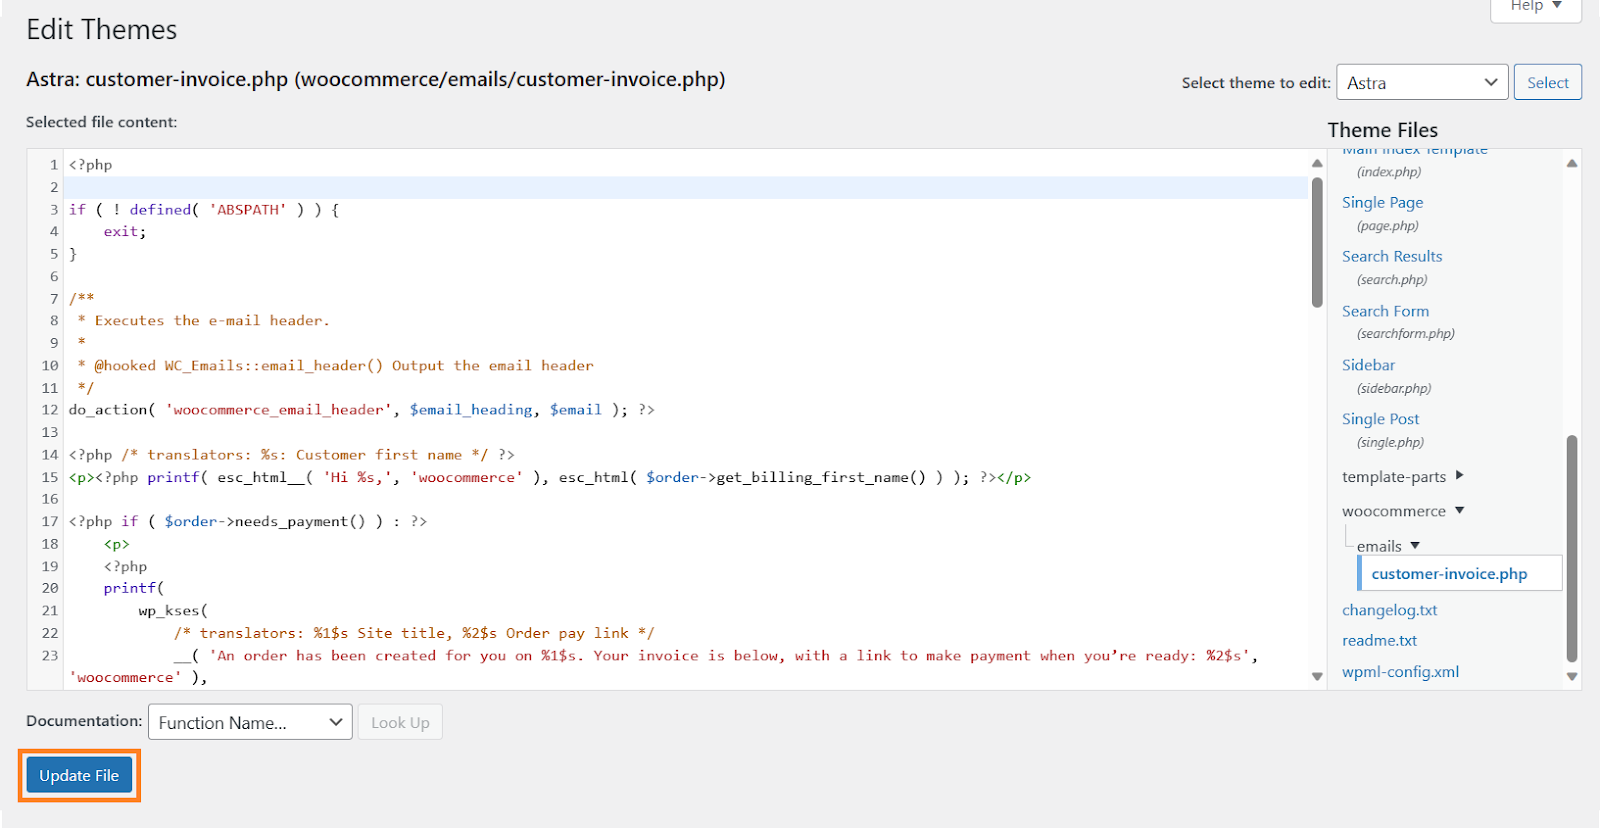
Once you have copied the above template code, head back to the WordPress dashboard and press Ctrl+A on your keyboard to select all the code, and then press Ctrl+V to paste the new code that you just copied.
Once you have pasted the new template code, don’t forget to hit the blue ‘Update File’ button at the bottom left of the page to save the file.
2.6. Final Results
Once the file is updated successfully, let’s test the final results.
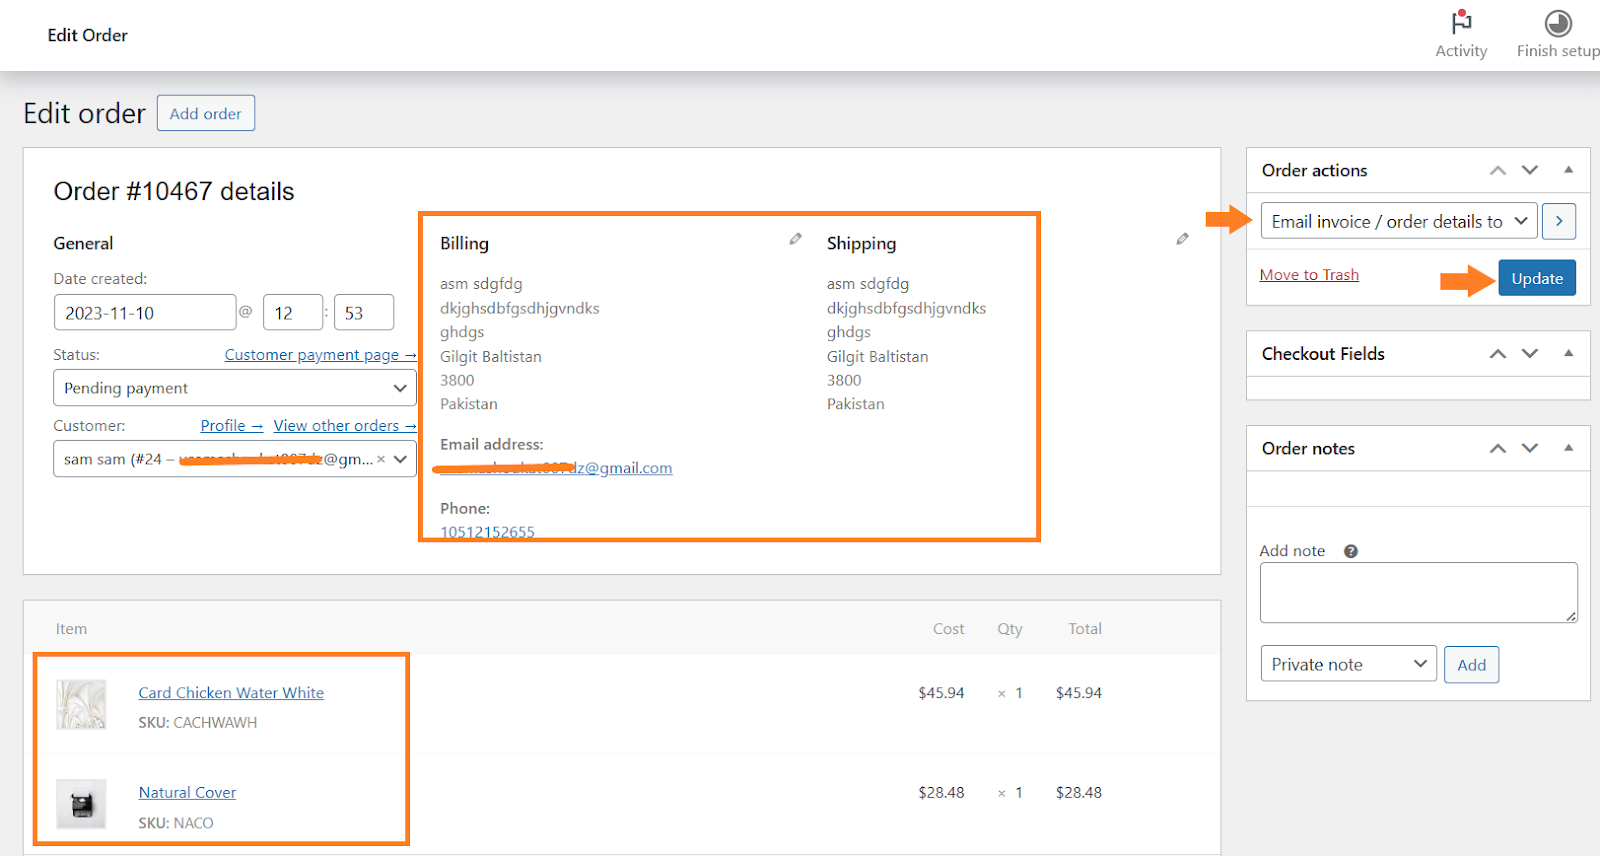
To test the final results, I created a custom order by navigating to WooCommerce > Orders > Add New from the WordPress dashboard and added the product and customer details.
After that, I selected the ‘Email invoice/order details to customer’ option from the order options section and sent the invoice to customers.
This is the email that I received in the customer inbox:
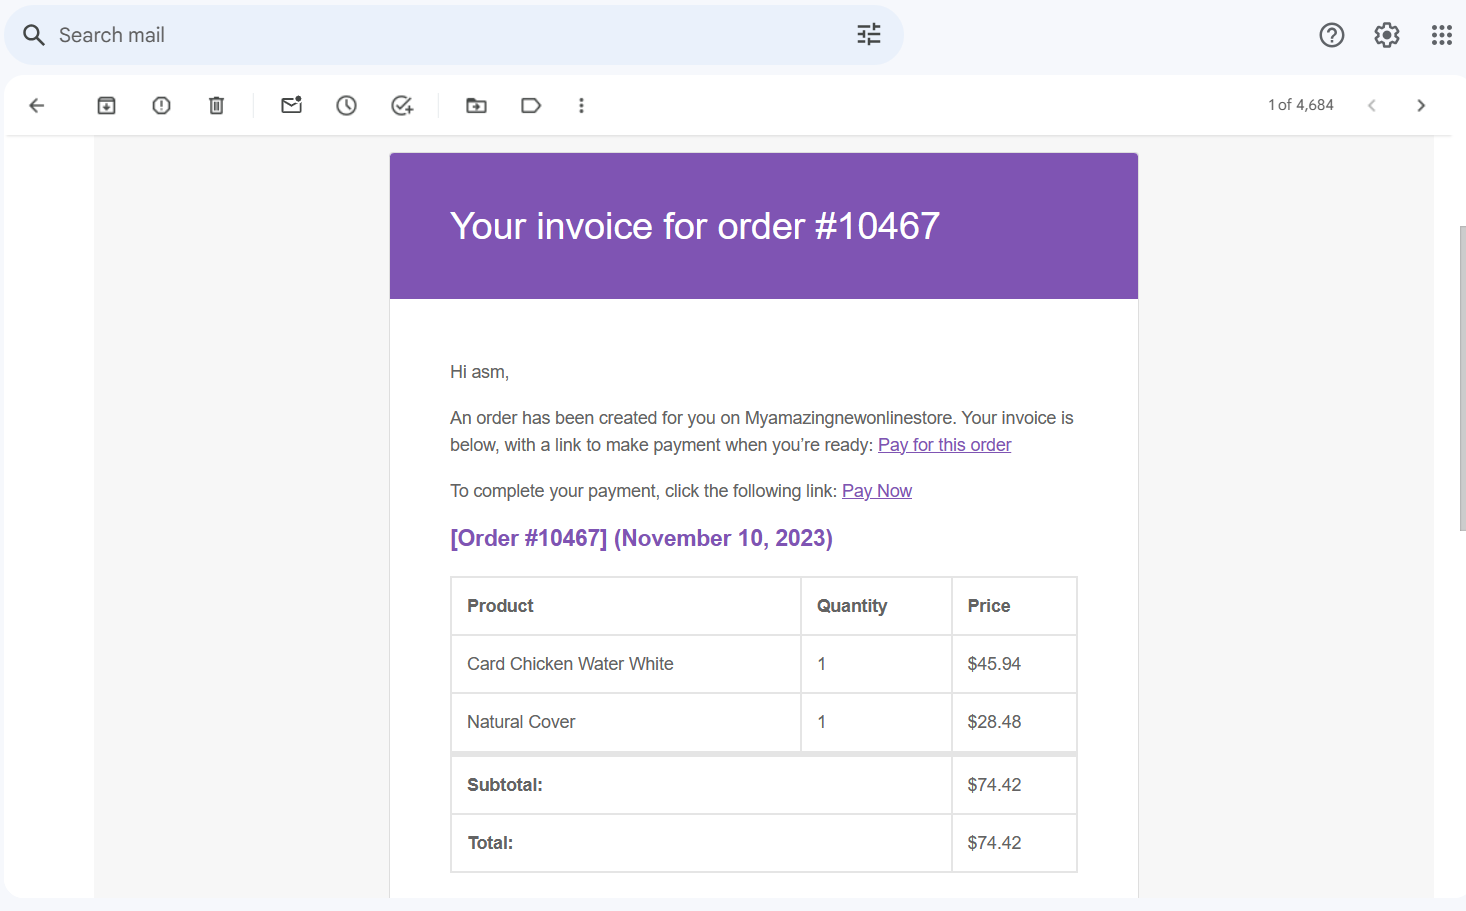
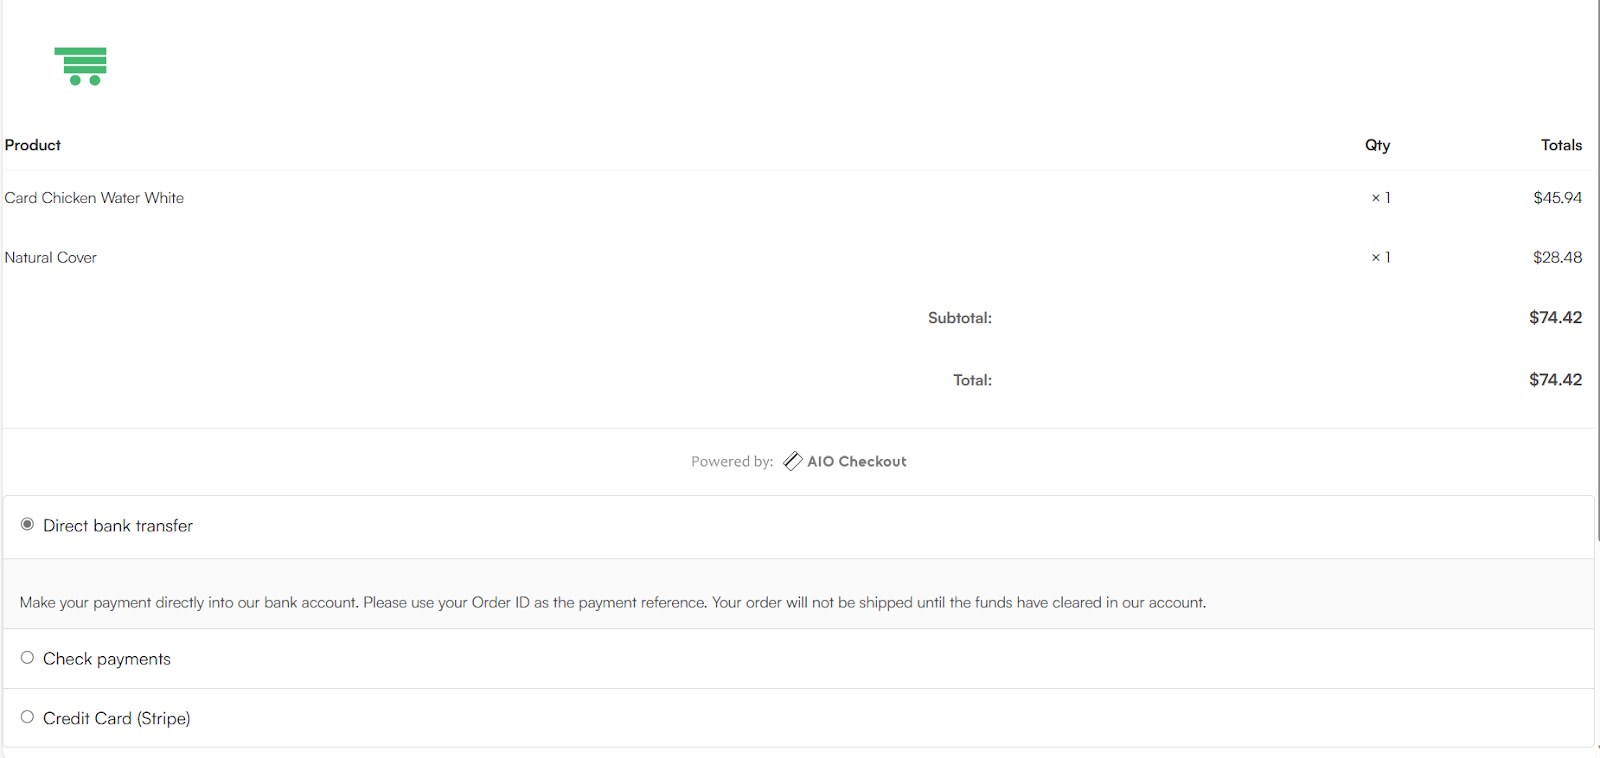
When I clicked the ‘Pay Now’ link, I was redirected to the WooCommerce checkout from where I could select the payment method, add the details, and pay for the order.
Conclusion
That’s it for today’s article.
I hope it was helpful to you and you were able to send WooCommerce invoices with a payment link to your customers to allow them to pay for their orders without having to fill in the details. It will help you simplify the payment process for your customers and more.
You can use any method that suits best your needs. If you have technical coding experience, you can even enhance the template code that I provided to you and enhance the customer experience.
OR you can use the plugin method to allow customers to pay directly via PayPal or any other online payment method that you have added to your store, without having them navigate to your store’s checkout.


