Shopify is one of the best eCommerce platforms to build web stores for tech-savvy users and non-technical people. It offers loads of powerful themes and extensions to choose from to add varied features to your store.
But, still, Shopify has some problems which make users switch to other eCommerce platforms. One of the common reasons behind this is their pricing plans.
WooCommerce is one among them. It is the top contender of Shopify and captures over 26% share in the eCommerce market. It comes with excellent functionality and tons of apps and themes.
This tutorial will help you migrate from Shopify to WooCommerce in a few easy steps.
Continue reading this guide to figure out how to move Shopify stores to WooCommerce in a few steps.
On This Page
Why Choose WooCommerce?
There are tons of reasons to choose WooCommerce. One of the best reasons is, that it is open source meaning anyone can use or modify it in any way they deem fit. Take a quick overview of WooCommerce’s Pros and Cons in the next section.
Pros Of WooCommerce
- It is a free and open-source platform with no limitations.
- You can make changes in your WooCommerce store without any restrictions.
- It offers plenty of free plugins and themes to add new features to your Woostore.
- WooCommerce provides flexibility and complete control over its system.
- It offers powerful tools to analyze and evaluate your eCommerce store performance.
- You can use different payment methods and add multiple payment gateways.
- It comes with an intuitive and interactive user interface.
Cons Of WooCommerce
- You don’t get dedicated customer support to ask your queries.
- Not all plugins and themes are available for free.
- You will need to spend some time managing your store.
- Using too many resources can affect your eCommerce store speed.
- Settings should be configured properly. Otherwise, it can lead the site to break.
- You will need to manage and perform security audits by yourself.
Prerequisites to Migrate the Shopify Store to WooCommerce
WordPress and WooCommerce both are free and open-source CMS. Yet, to install them, you will need some additional resources. And, these would definitely be under your budget. To run an eCommerce store, you will need a few things beforehand. Have a look at them below:
- Domain Name: Before migrating your store, you have to buy a domain name of your choice. You can purchase domain names from different platforms like GoDaddy, Hostinger, Big Rock, etc. Try to buy a domain that is easy to read, remember, and spell. Make sure it doesn’t include numbers unless your brand name has it.
Domain Name Example: Woosuite.com.
Here Woosuite is our brand name, and (.com) is the extension.
- Hosting: Hosting would be necessary to shift your Shopify store to WooCommerce. You can understand hosting as a digital space to store all your website’s files. You can resonate it with your device storage but in an online version. There are multiple hosting providers offering hostings at affordable pricing.
- Install WordPress: After buying and pointing the domain with your hosting ISP, you have to install WordPress on your hosting. Nowadays, hosting providers offer an option to install WordPress with a single click.
You can refer to different guides present on the web. So, make sure to get them before going further. Otherwise, there would be no point in migrating your store without these.
How to Move Shopify Store to WooCommerce?
We will now go through each step in detail. To make it better to understand for you, I have also attached the image with each step. Please follow all the steps carefully to avoid errors. So, follow the guide on how to move a Shopify store to WooCommerce.
1. Install WooCommerce
Note: If you already installed WooCommerce on your WordPress site, you can skip this step and follow the next step.
Installing WooCommerce is relatively easy. Follow the given steps to do that.
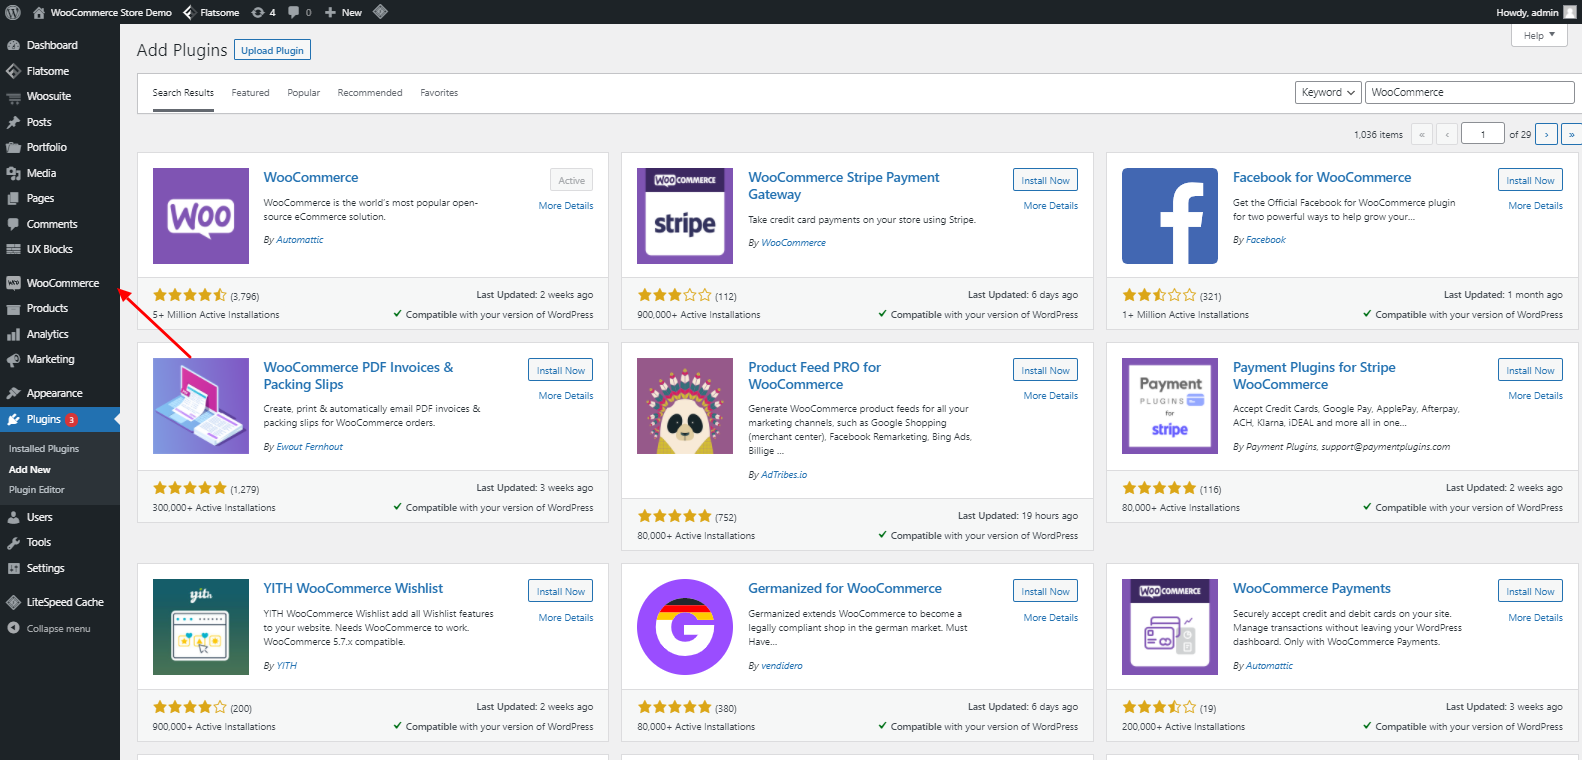
First, log in to your WordPress dashboard. Search for the Plugin section in the WordPress tool menu. Click on the Add New option under the Plugin section. It will redirect you to a new page. There you will find different plugins with a search bar on the top.
WordPress Dashboard: Plugins > Add New > Search Bar
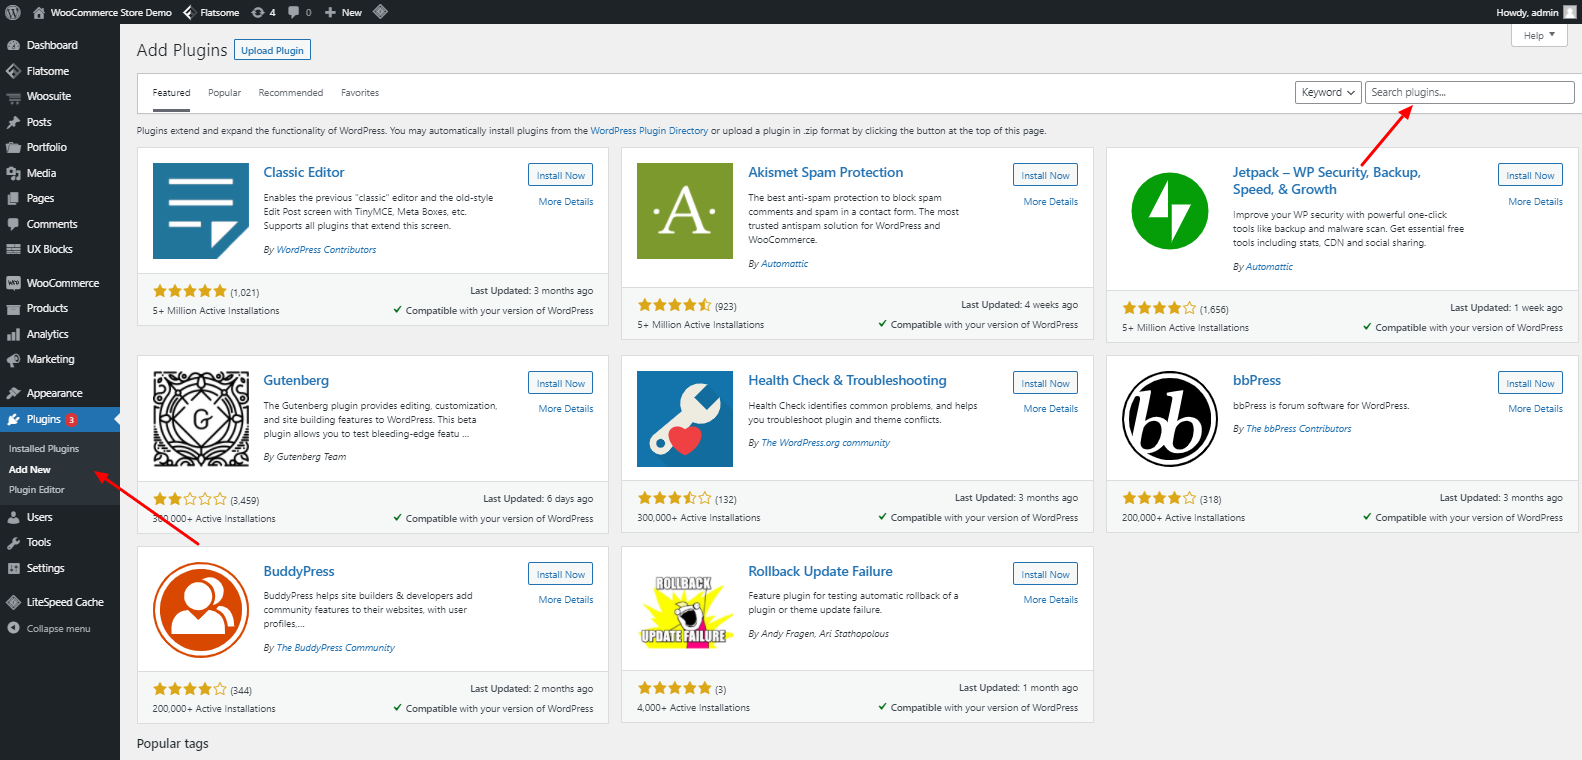
Write WooCommerce in the search bar and press Enter. After that, it will show some plugins on the screen matching your query. From all of the plugins, you have to look for a plugin called WooCommerce. You can follow the same as mentioned in the given image.
WordPress Dashboard: Plugins > Add New > Search Bar > WooCommerce
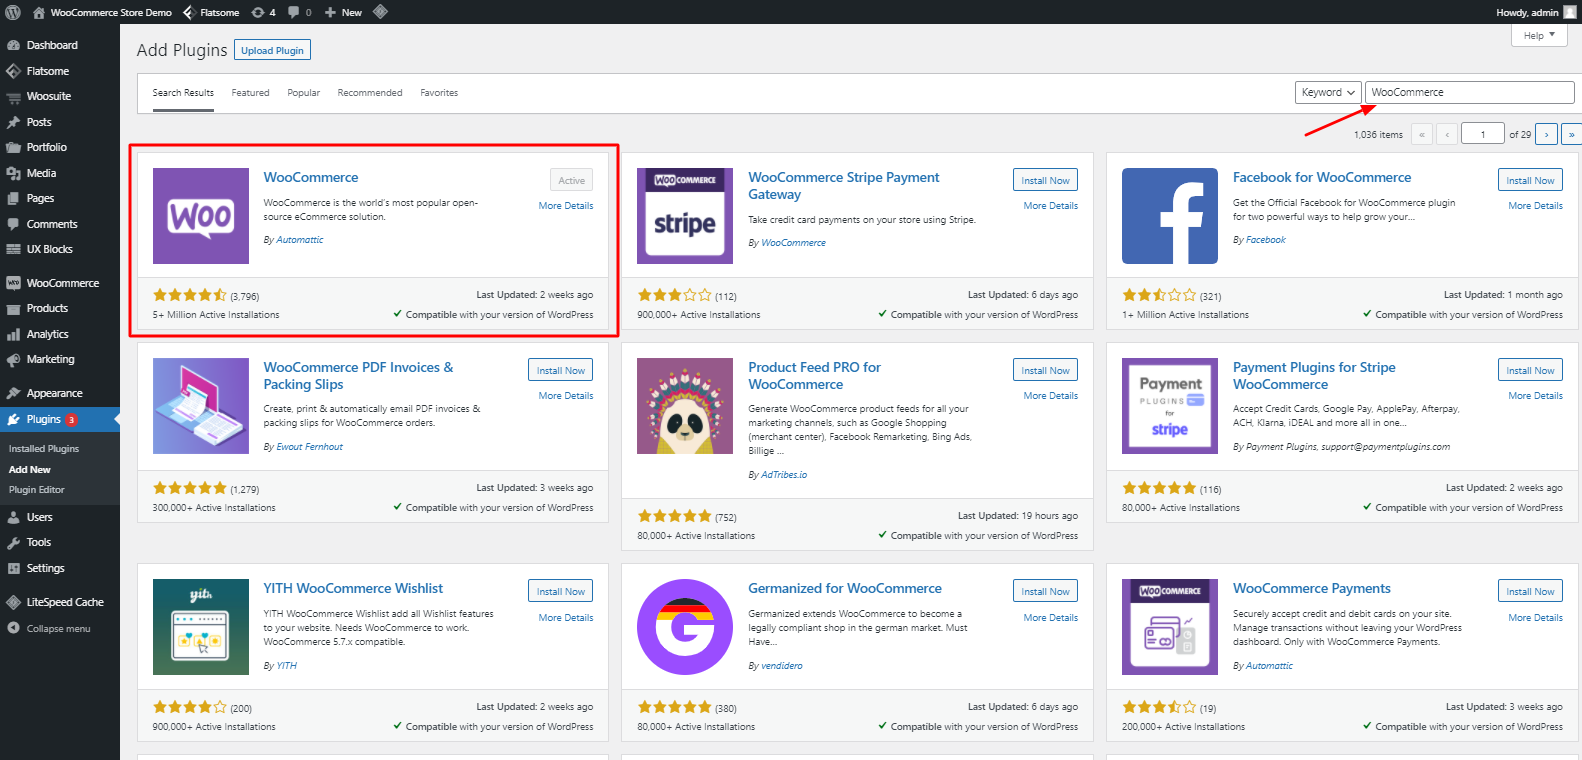
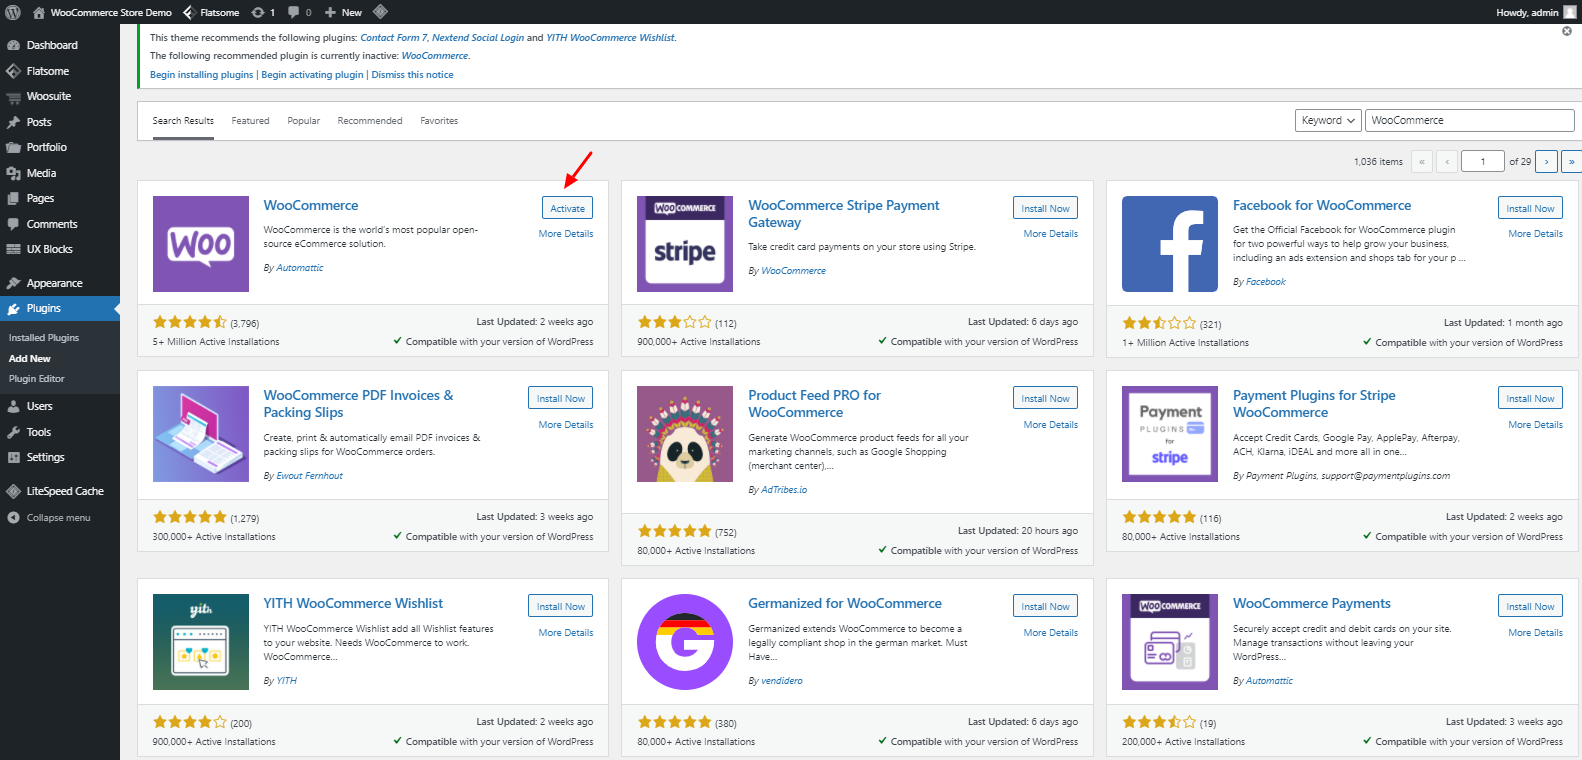
After finding the WooCommerce plugin, click on the Install button. Now, it will take a few seconds to install. This depends on your internet connectivity and website speed as well.

After installing the plugin, the Install button will be replaced with the Activate button. Click on the Activate button, and wait until it installs.
WordPress Dashboard: WooCommerce Plugin > Install Now > Activate
After Activating the plugin, the Activate button would be replaced with the Active button. And, that button won’t be clickable.
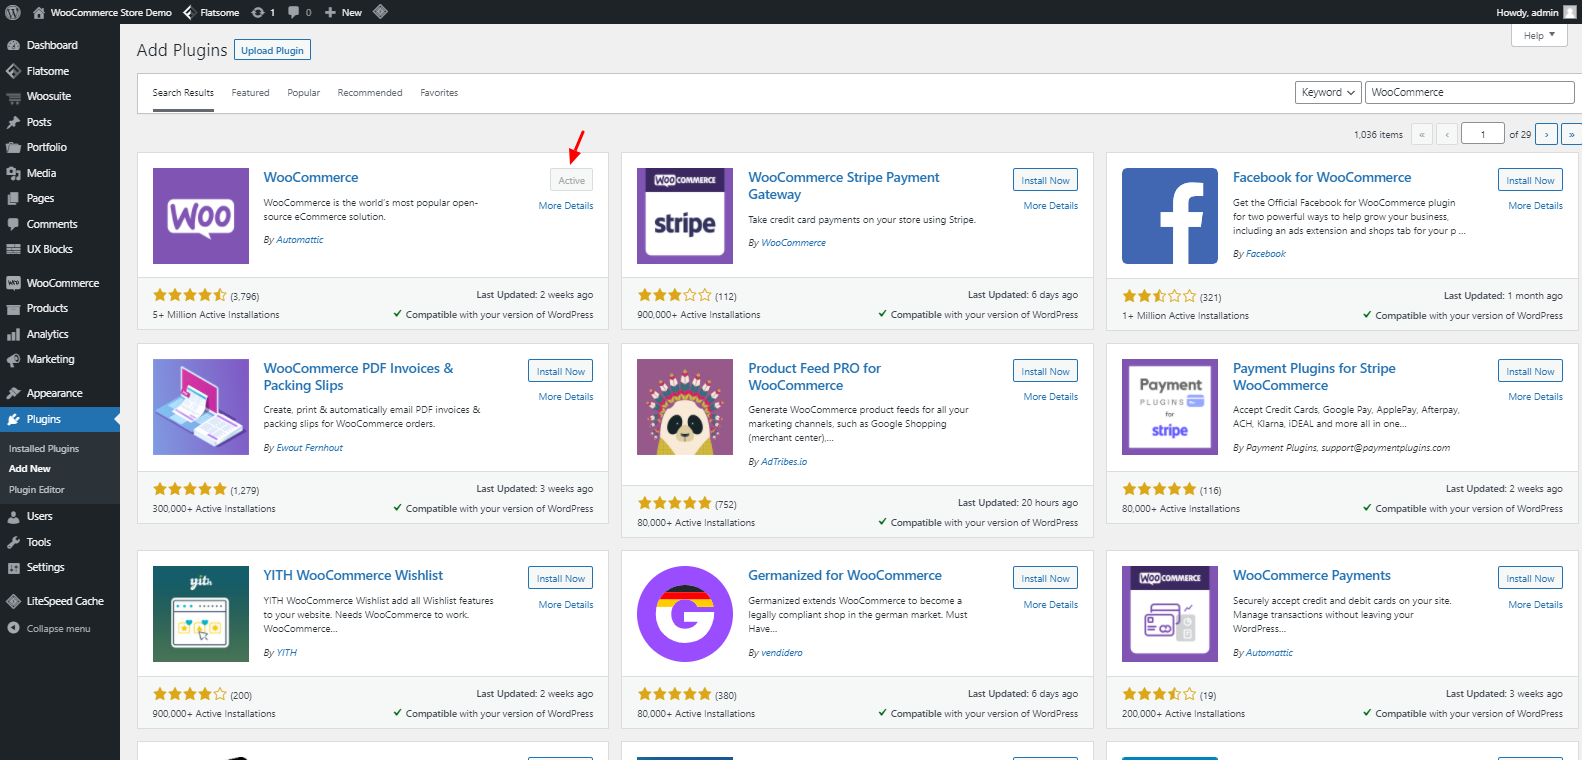
We have now installed WooCommerce. After that, you will see a new option under the WordPress toolbar called WooCommerce.
We have installed WooCommerce in WordPress. The next step is to perform basic steps like configuring the WooCommerce, customizing the theme, etc.
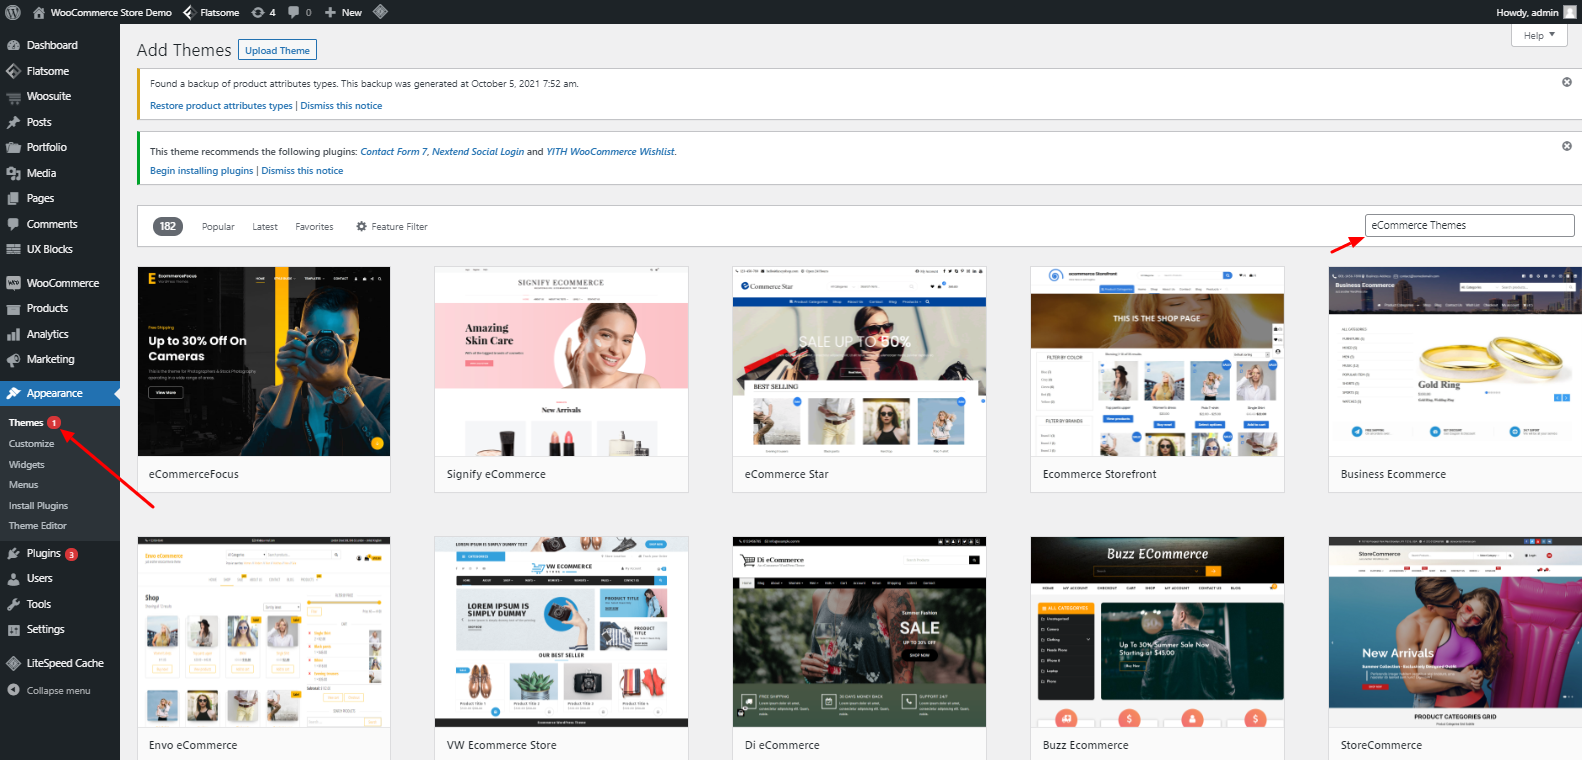
You can find different Themes under the Appearance section. You can follow the summarized process to discover different themes for your eStore.
WordPress Dashboard: Appearance > Themes > Add New > Search eCommerce Store Themes
Else, you can get themes from WooCommerce Theme Store. Click Here to visit the WooCommerce Themes Store.

2. Manually Export Data From Shopify
Shopify allows us to export all our Shopify data into a CSV file. You can import all your Shopify data, including customers, products, orders, categories, images, and more. In this step, we will export the Shopify data and import it to WooCommerce. Yet, we will do this manually.
2.1 Export the Products From Shopify
Open your Shopify dashboard and navigate to the Product section. In the products section, you will see all your Shopify products on one page. On the top of the Products page, you will see an Export option. Click on the Export option.
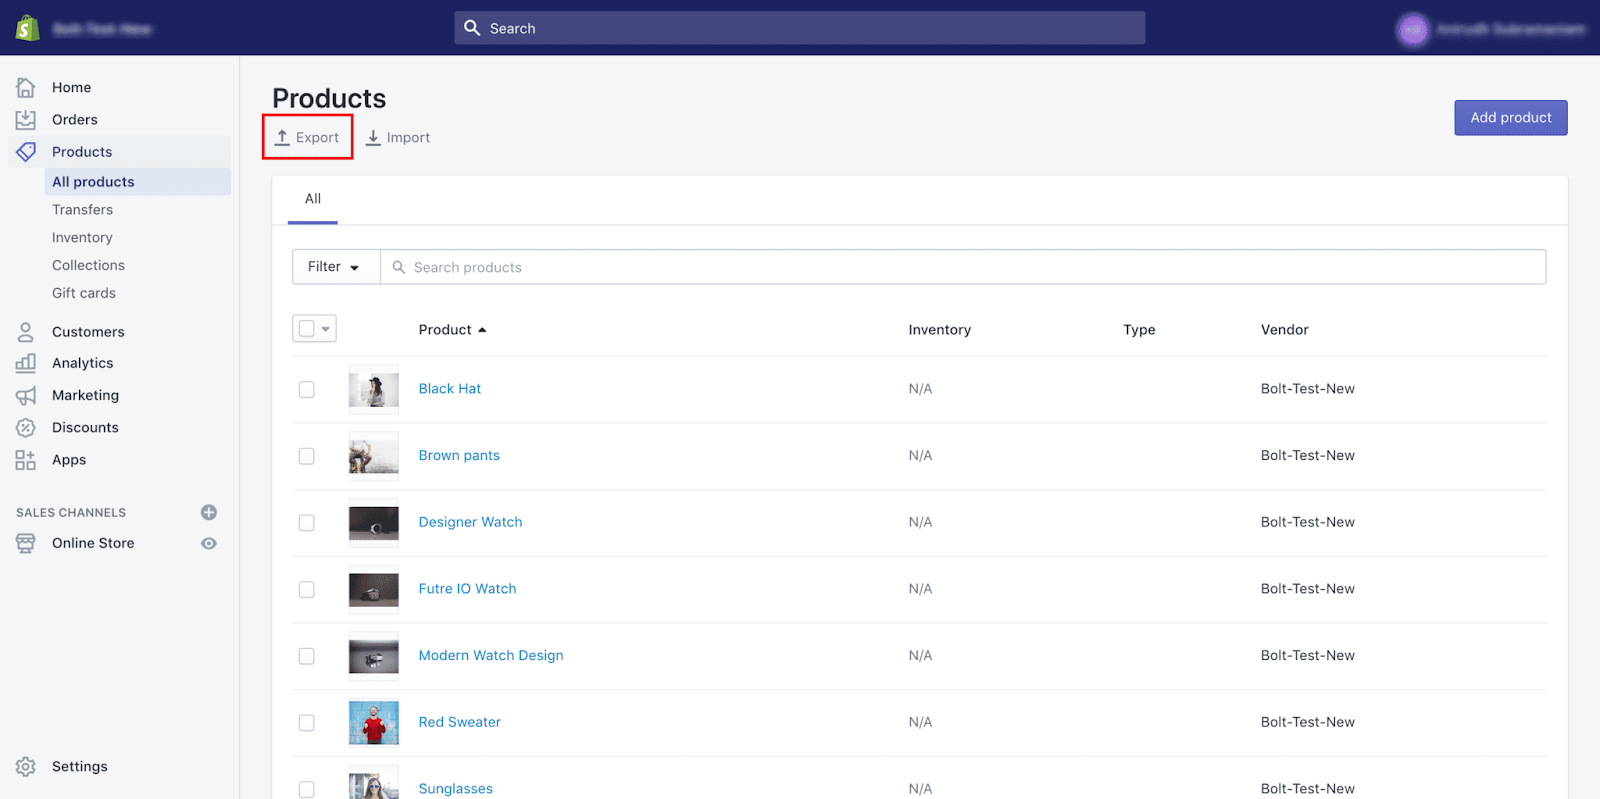
After clicking on the Export option, you will get a popup including some options. We will need to make some tweaks. In the Popup, select the Export option to All Products and Export as an option to CSV for Excel, Numbers, or other spreadsheet programs.
This will import all your products with all the information like Description, Images, and others.
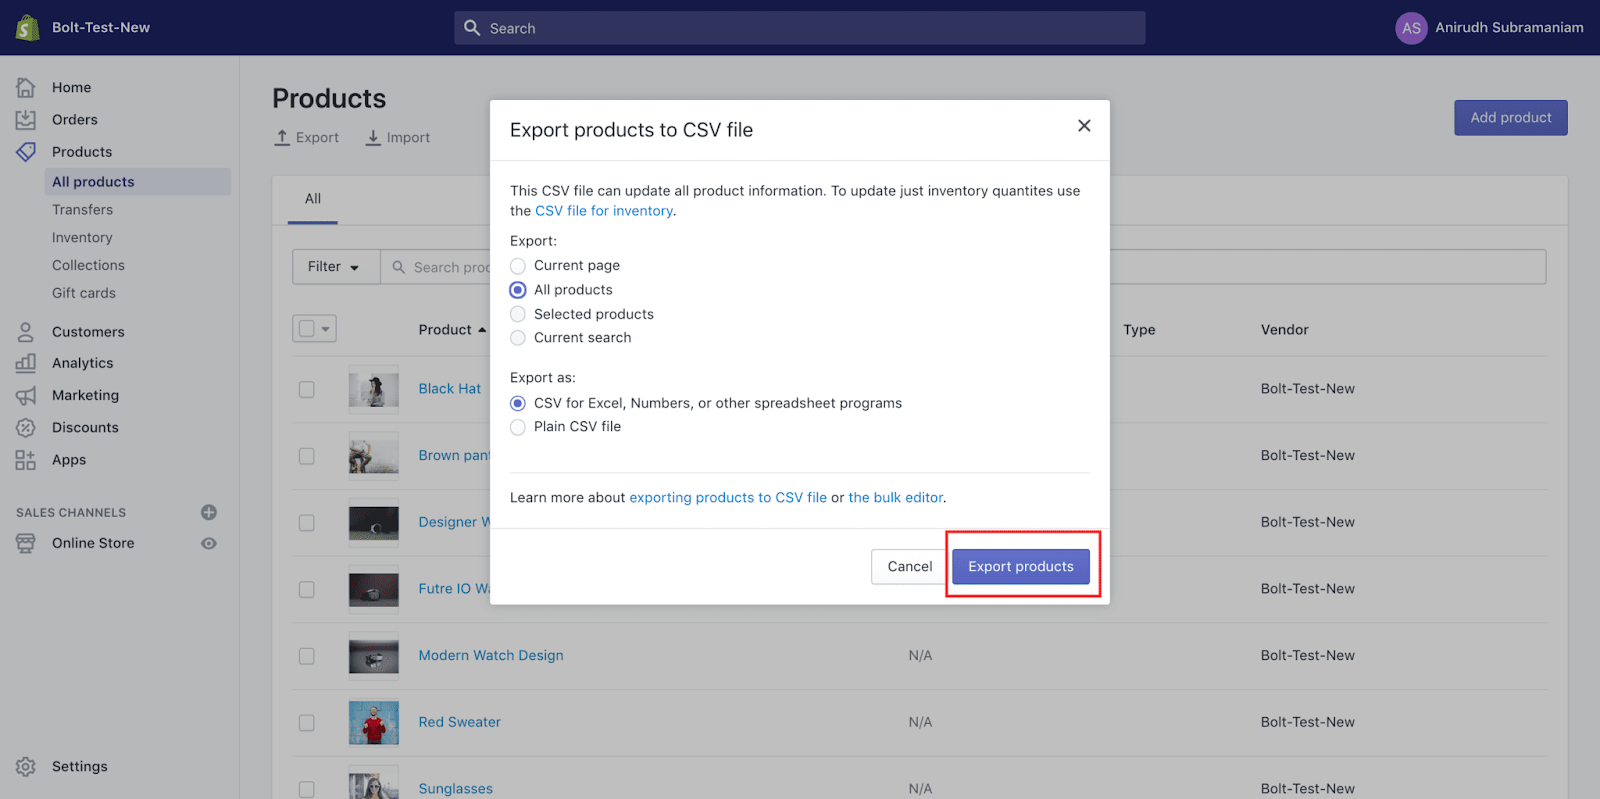
After selecting the recommended options, click on Export Products. It will start exporting all your products in a CSV file. You will receive the CSV to the email ID registered with your Shopify store account.
Shopify Dashboard > Products > Export > Export Products
2.2 Export the Customers From Shopify
Head over to your Shopify dashboard and look for the Customers section. In the Customers section, you will see all your customers with their details. Along with that, you will have all your pending orders. On the top of the Customers page, you will see an Export option. Click on the Export option.
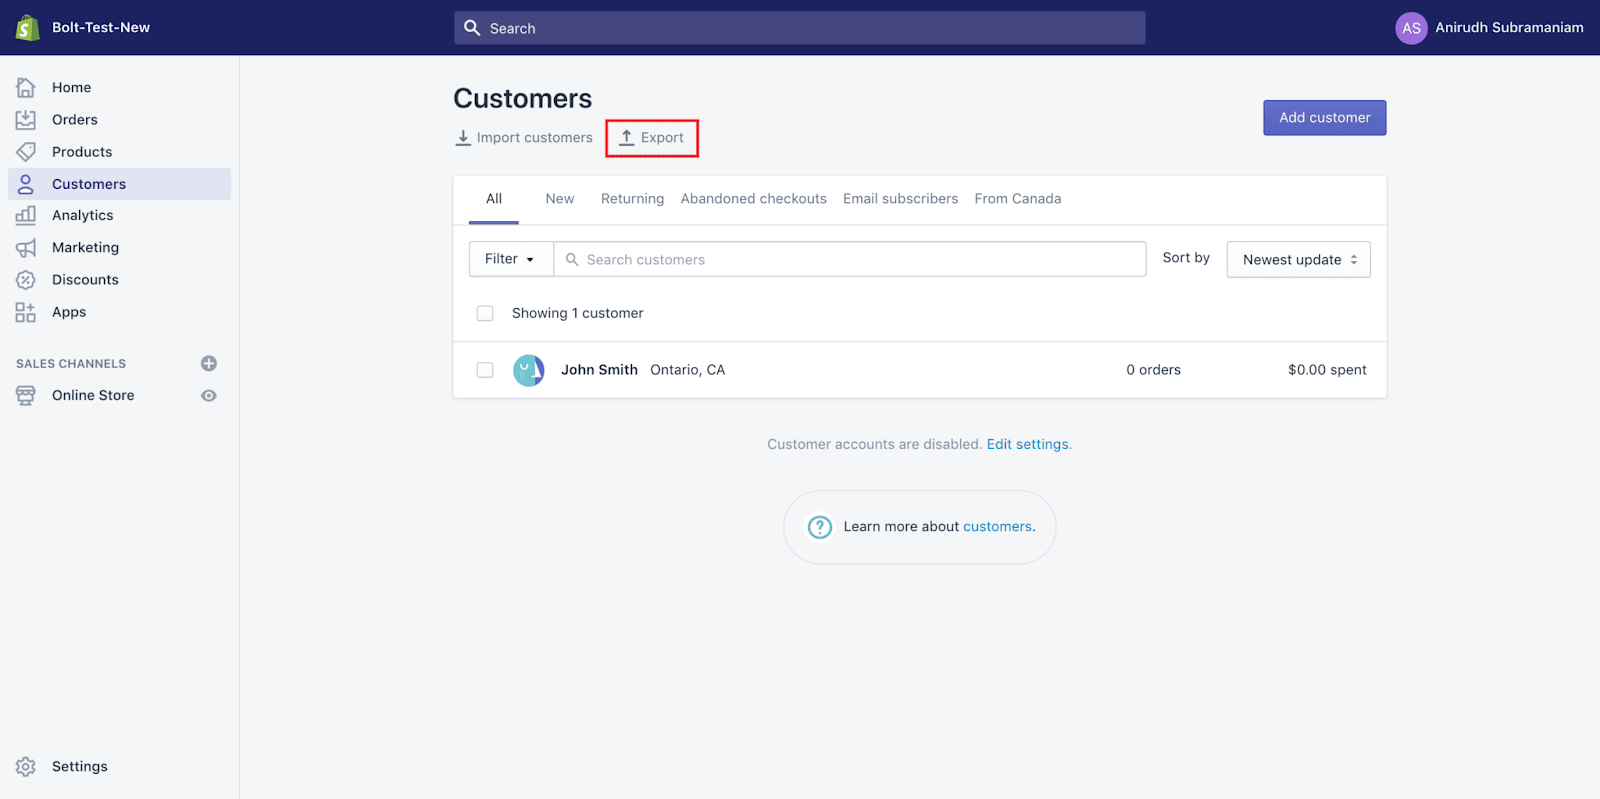
After clicking on the Export option, you will see a popup containing different options. We will need to select from the options. From the Popup, select the Export option to All Customers and Export as to CSV for Excel, Numbers, or other spreadsheet programs.
It will export all the customers and email you the CSV file on your registered email ID with your Shopify account.
Shopify Dashboard > Customers > Export > Export Customers
2.3. Export the Orders From Shopify
Open your Shopify dashboard and navigate to the Orders section. In the Orders section, you will see all your orders with payment mode and a few more information. On the Orders page, you will see an Export option. Click on the Export option.

After clicking on the Export Option, you will see a popup containing some settings. From the Popup, select the Export option to All Orders and Export as to CSV for Excel, Numbers, or other spreadsheet programs.
It will start exporting all the products and email the Orders CSV file to the email account registered with your account.
Shopify Dashboard > Order > Export > Export Orders
We are done exporting all the data from our Shopify store. Now, we will import the data to our WooCommerce store manually in the next section.
3. Manually Importing Shopify Content to WooCommerce
Note: If you want to do it automatically, you can jump to the next section.
Remember the CSV files you got after exporting all your Shopify data. We will use those data to import them to our WooCommerce store manually. Follow the given step carefully to avoid mistakes.
3.1 Manually Importing the Products to WooCommerce
Log into your WordPress dashboard, and search for All Products in the toolbar. Click on the All Products option.
It will redirect you to a new page showing all your products on it. At the top of the page, you will get an Import option. Click on the Import option.

After clicking on the Import button, you will get a page asking for the Products CSV file. Click on Choose File button, and choose your Product CSV file from your computer storage. After selecting the CSV File, click on Continue.
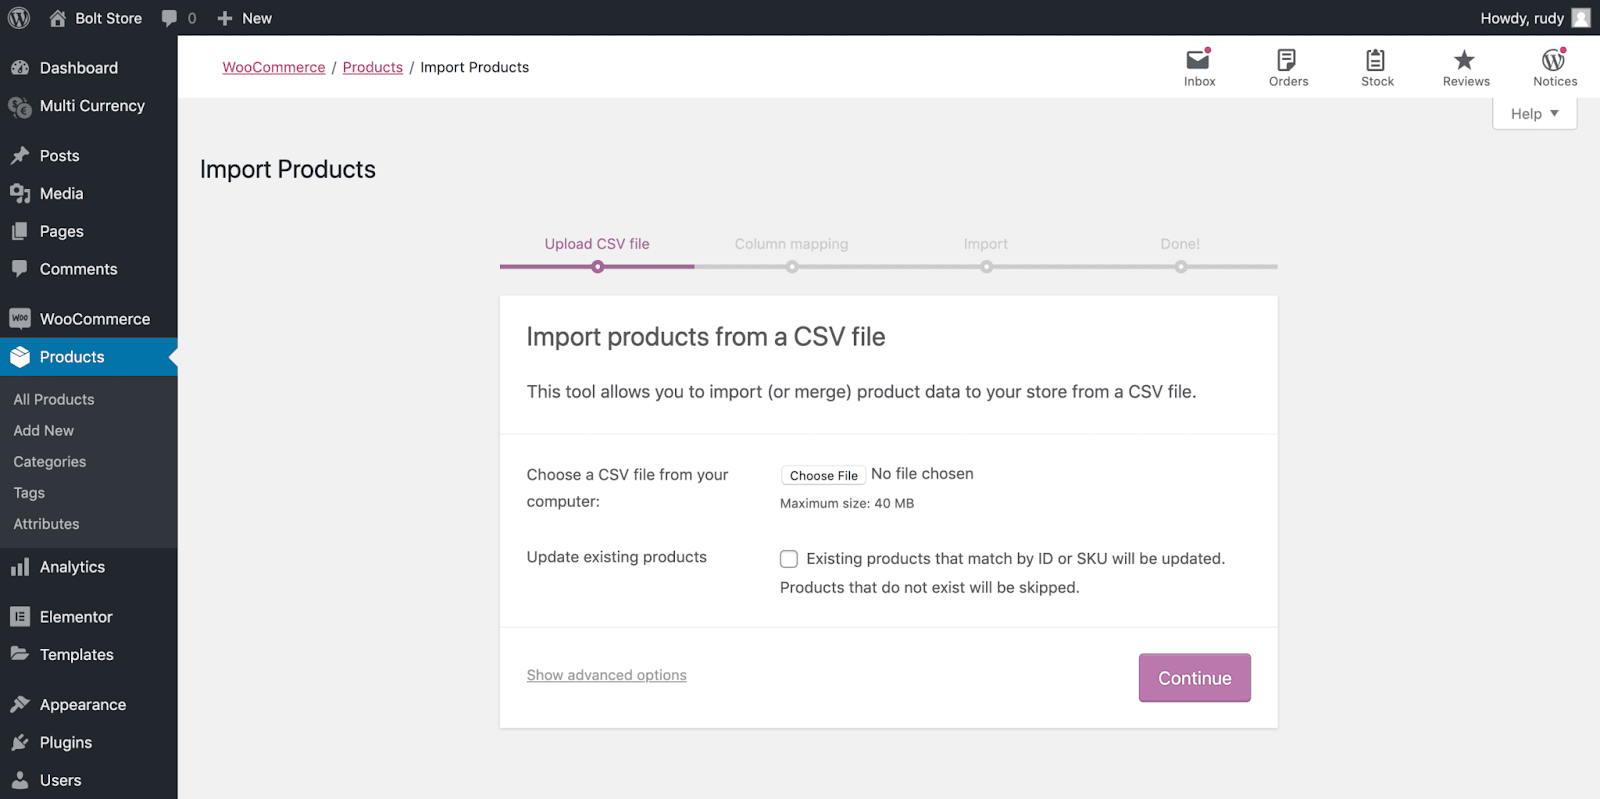
The Page will redirect you to a new page called Column Mapping. On this page, you have to match the column names with your Shopify CSV file. If you feel some fields are missing, you can add them manually. Yet, there would be less chance that fields are missing.

After doing all of that, click on Run the Importer. Now, it will start importing the Products to your WooCommerce store. Wait till it gets finished.
WordPress Dashboard: Products > Import > Choose the File > Run the Importer
3.2 Manually Importing the Customers to WooCommerce
Log into your WordPress dashboard, and search for WooCommerce in the toolbar. In the WooCommerce section, click on Customers.
It will redirect you to a new page with all the Customer details on it. As you are creating a new WooCommerce store, you will initially find zero Customers.
At the top of the page, you will get an Import option. Click on the Import option.
After clicking on the Import option, you will get a page asking for the Customer CSV file. Click on Choose File button, and choose your Customer CSV file from your computer. After selecting the File, click on Continue.
The Page will redirect you to a new page called Column Mapping. On this page, you have to match the column name with your Shopify CSV file. If you feel some fields are missing, you can add them manually.
After doing all of that, click on Run the Importer. Now, it will start importing the Customers to your WooCommerce store.
WordPress Dashboard: Customers> Import > Choose the File > Run the Importer
3.2 Manually Importing the Orders to WooCommerce
Log into your WordPress dashboard, and search for WooCommerce in the toolbar. In the WooCommerce section, click on Orders.
It will redirect you to a new page with all the Orders details on it. As you are creating a new WooCommerce store, you will find zero orders on the page.
At the top of the page, you will get an Import Option. Click on the Import option.
After clicking on the Import option, you will get a page asking for the Orders CSV file. Click on Choose File button, and choose your Orders CSV file from your computer. After selecting the File, click on Continue.
The Page will redirect you to a new page called Column Mapping. On this page, you have to match the column name with your Shopify CSV file. If you feel some fields are missing, you can add them manually.
After doing all of that, click on Run the Importer. Now, it will start importing the Customers to your WooCommerce store.
WordPress Dashboard: Orders> Import > Choose the File > Run the Importer
We have finally imported the Shopify Products, Customers, and Order to our WooCommerce store in a few steps. Now, you can check the Products by visiting the All Product section. Follow the same with their respective options.
So, we migrated the Shopify store to WooCommerce manually. We performed all the steps by ourselves. Want to know how to import Shopify products to WooCommerce automatically? Read the next section to do that.
How to Automatically Import Shopify Products to Your WooCommerce Store?
To perform all these steps, we are going to use the WooCommerce recommended service called Cart2Cart. Cart2Cart will make the importing process simple, faster, and straightforward. The best part is, that your Shopify store would be online, and you won’t lose any sales. It can help you import different kinds of Shopify data.
- Product information (names, descriptions, SKUs, prices, weights, and variants)
- Product categories (names, descriptions, URLs)
- Customer information (names, emails, addresses, etc.)
- Order information (IDs, dates, statuses, quantities, discounts, and shipping details)
- Coupon information (names, codes, discounts)
- Blog post information (titles, descriptions, dates, URLs, content, and images)
- Page information (titles, dates, URLs, and statuses)
1. Install the Cart2Cart Plugin
To import the data automatically, you will need to install the Cart2Cart plugin in your WordPress. Follow the steps to install the Cart2Cart plugin.
Log in to your WordPress dashboard. Then, search for the Plugins section in the WordPress tool menu. Click on the Add New options under the Plugins section. Now, there you will find a new page showing different plugins. Also, there you will get a Search Bar.
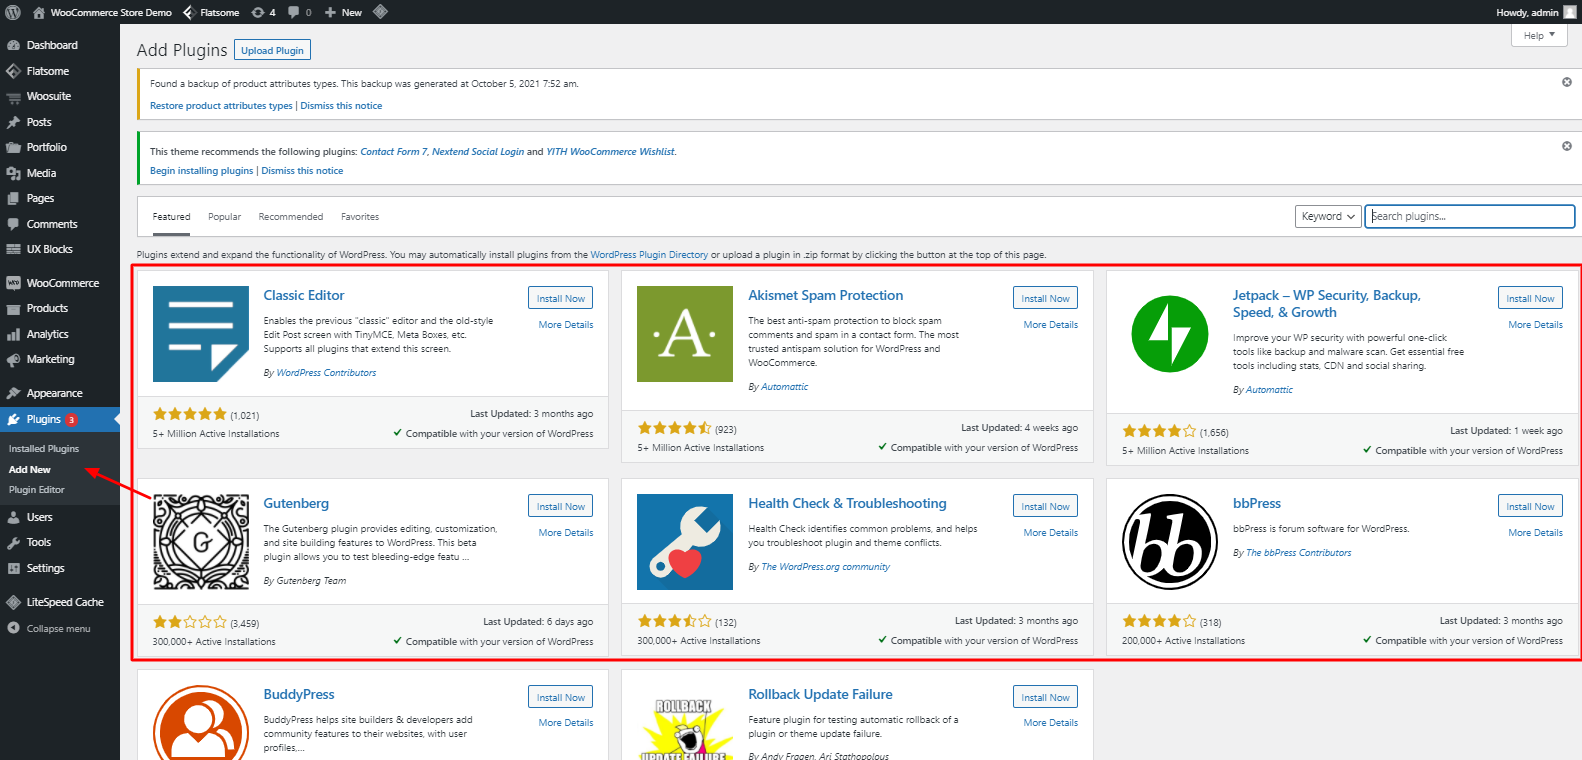
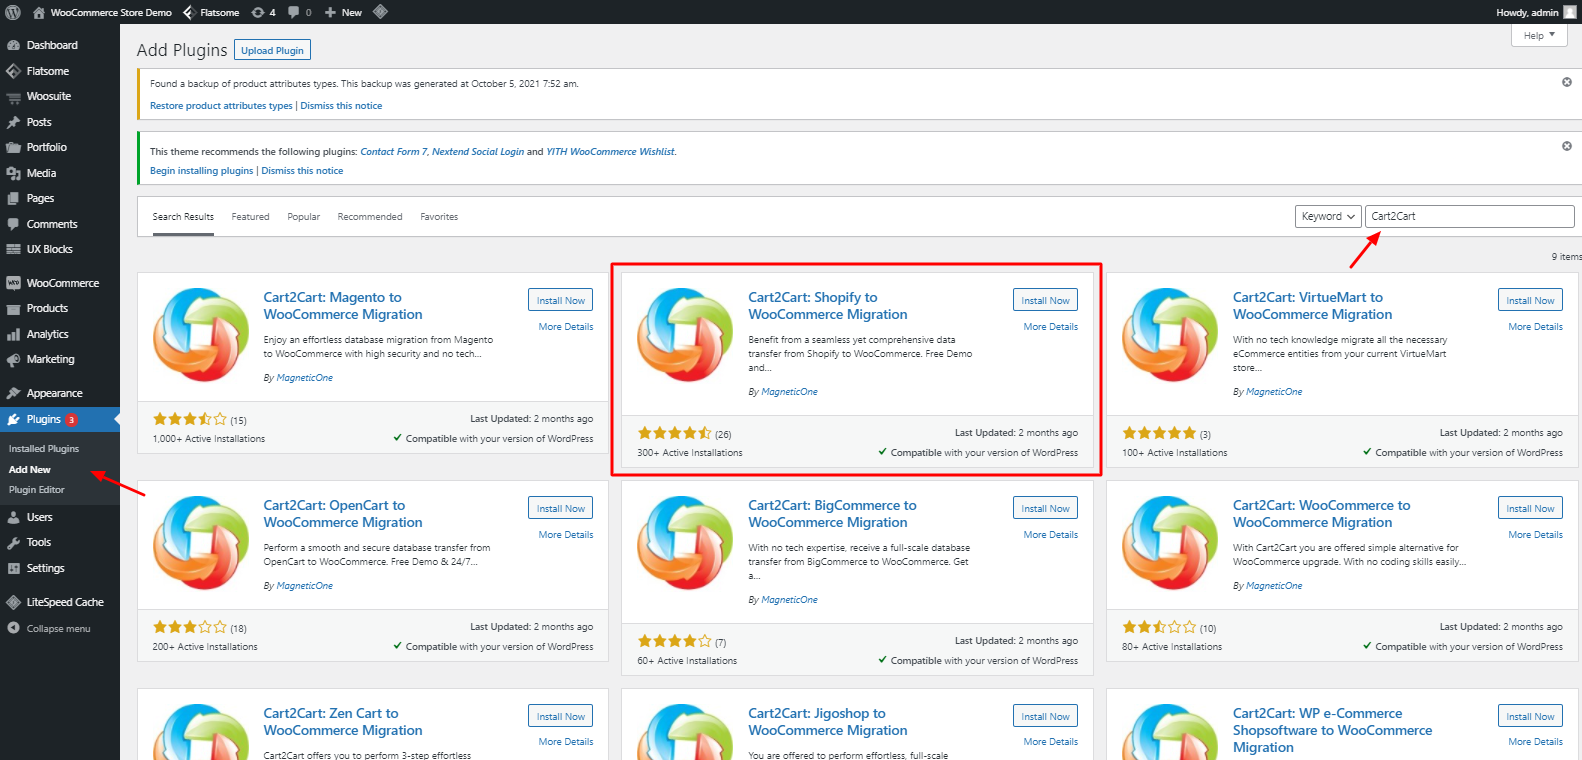
Write Cart2Cart in the Search Bar and press Enter. After that, it will show some plugins on the screen matching your query. Here comes the confusing part. You will get a lot of plugins named Cart2Cart with the same logo. You will need to look for a Cart2Cart: Shopify to WooCommerce Migration plugin from all the plugins.
Note: Don’t install other Cart2Cart plugins to perform this step. Otherwise, you won’t achieve the desired rules.
After finding the particular plugin, click on the Install Now button. The plugin might take a few seconds to install, depending on your internet connectivity and website speed.

After installing the plugin, the Install button will be replaced with the Activate button. So, click on the Activate button, and wait for a few seconds.
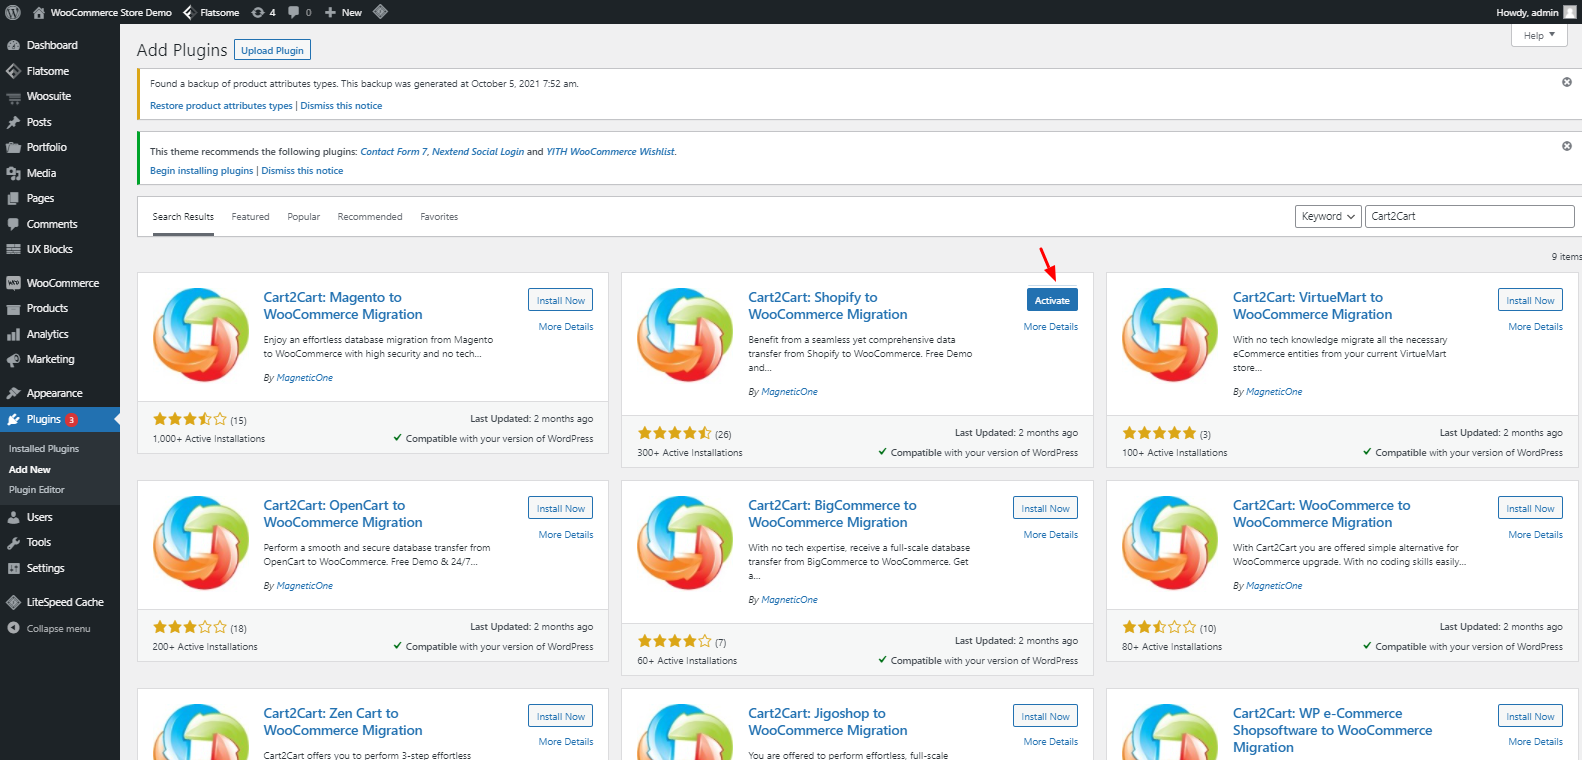
WordPress Dashboard: Plugins > Add New > Search Bar > Cart2Cart > Cart2Cart: Shopify to WooCommerce Migration
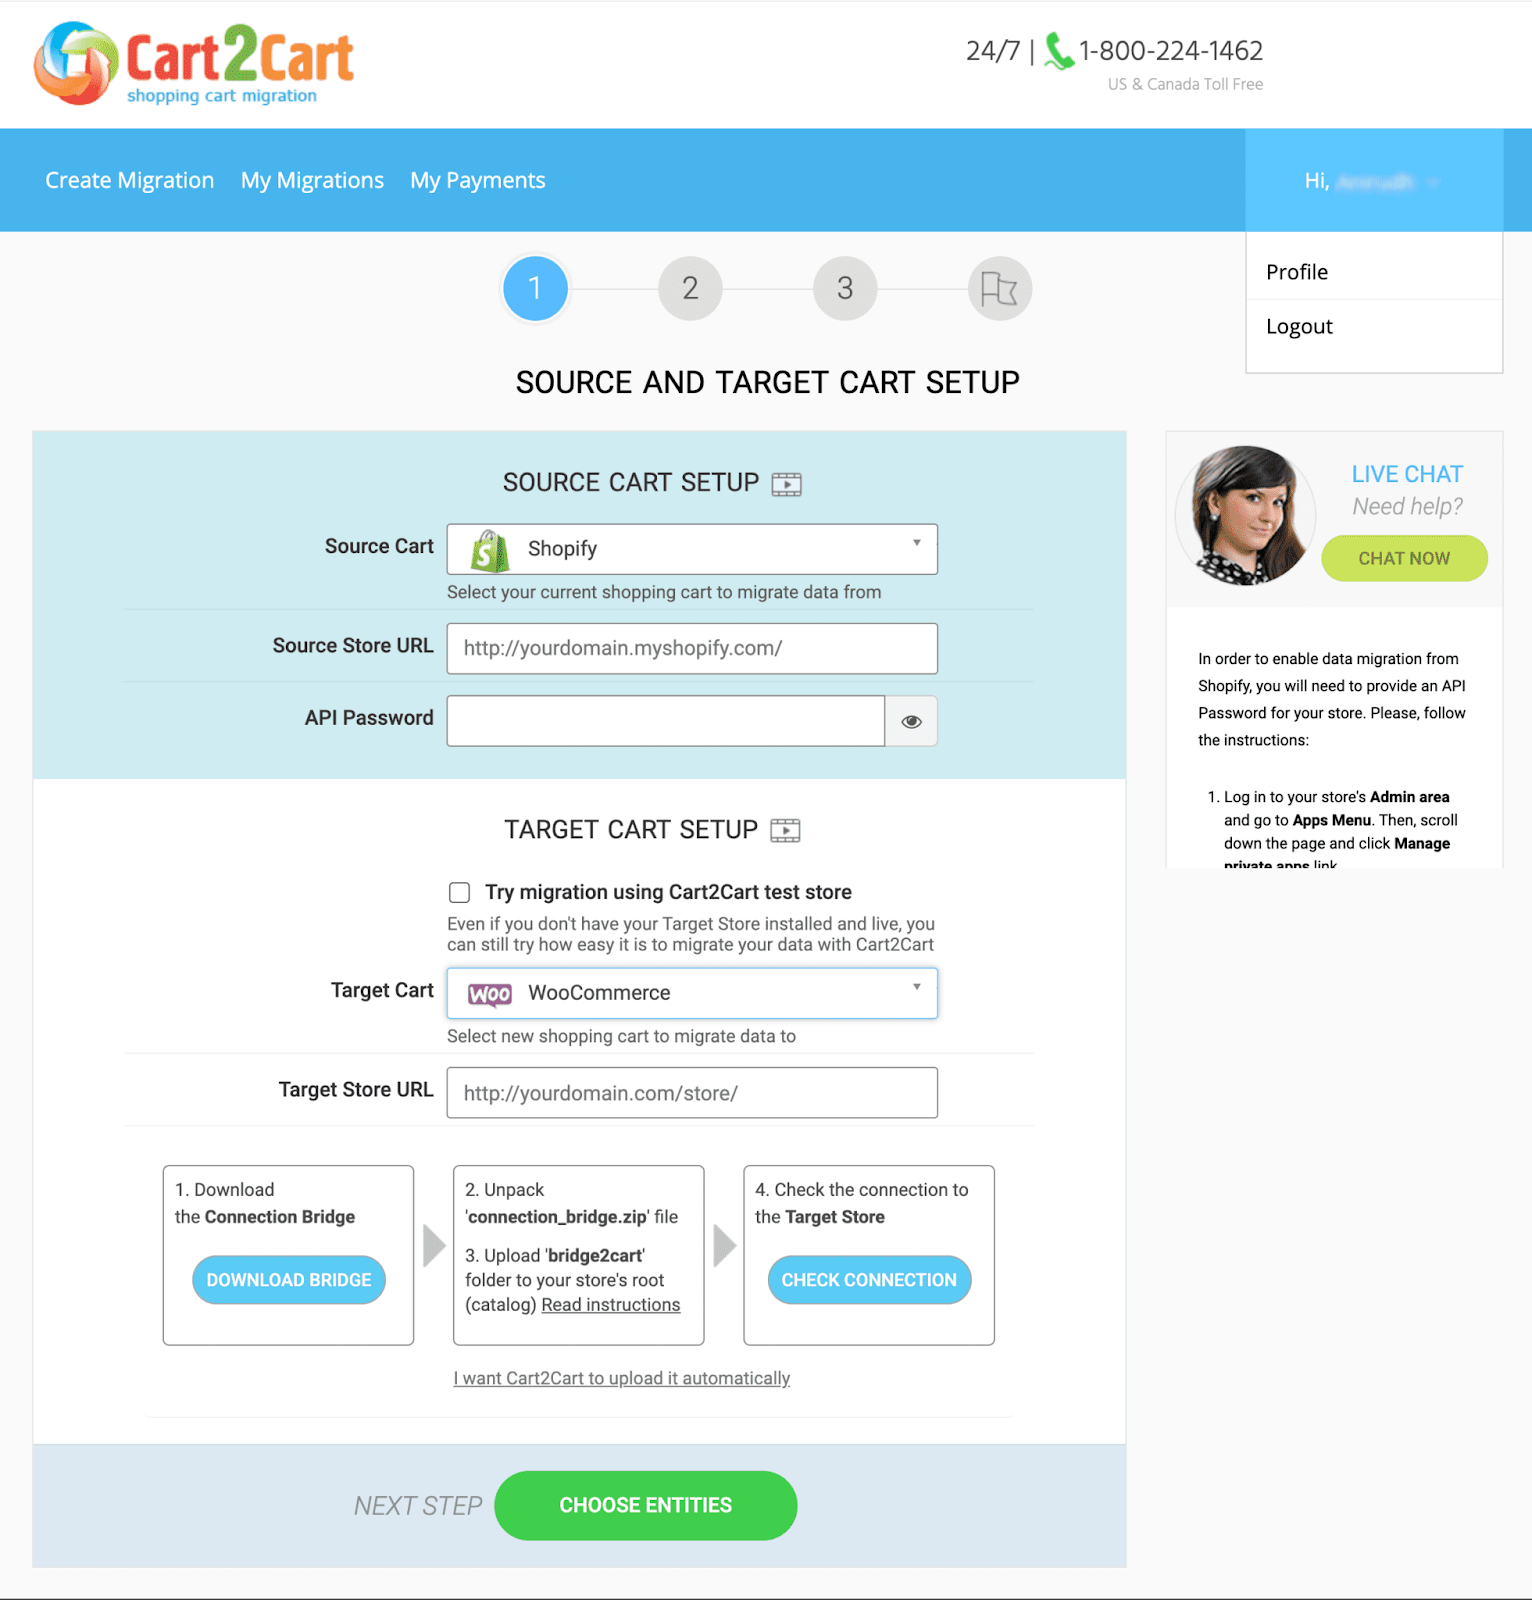
2. Import the Shopify Products With Cart2Cart
Visit the Cart2Cart site, and create a new account. From there, select the Source Cart to be Shopify, and choose the Target Cart to be WooCommerce. In the Source URL, enter your Shopify Store URL. In the Target Store URL, add your WooCommerce store URL.
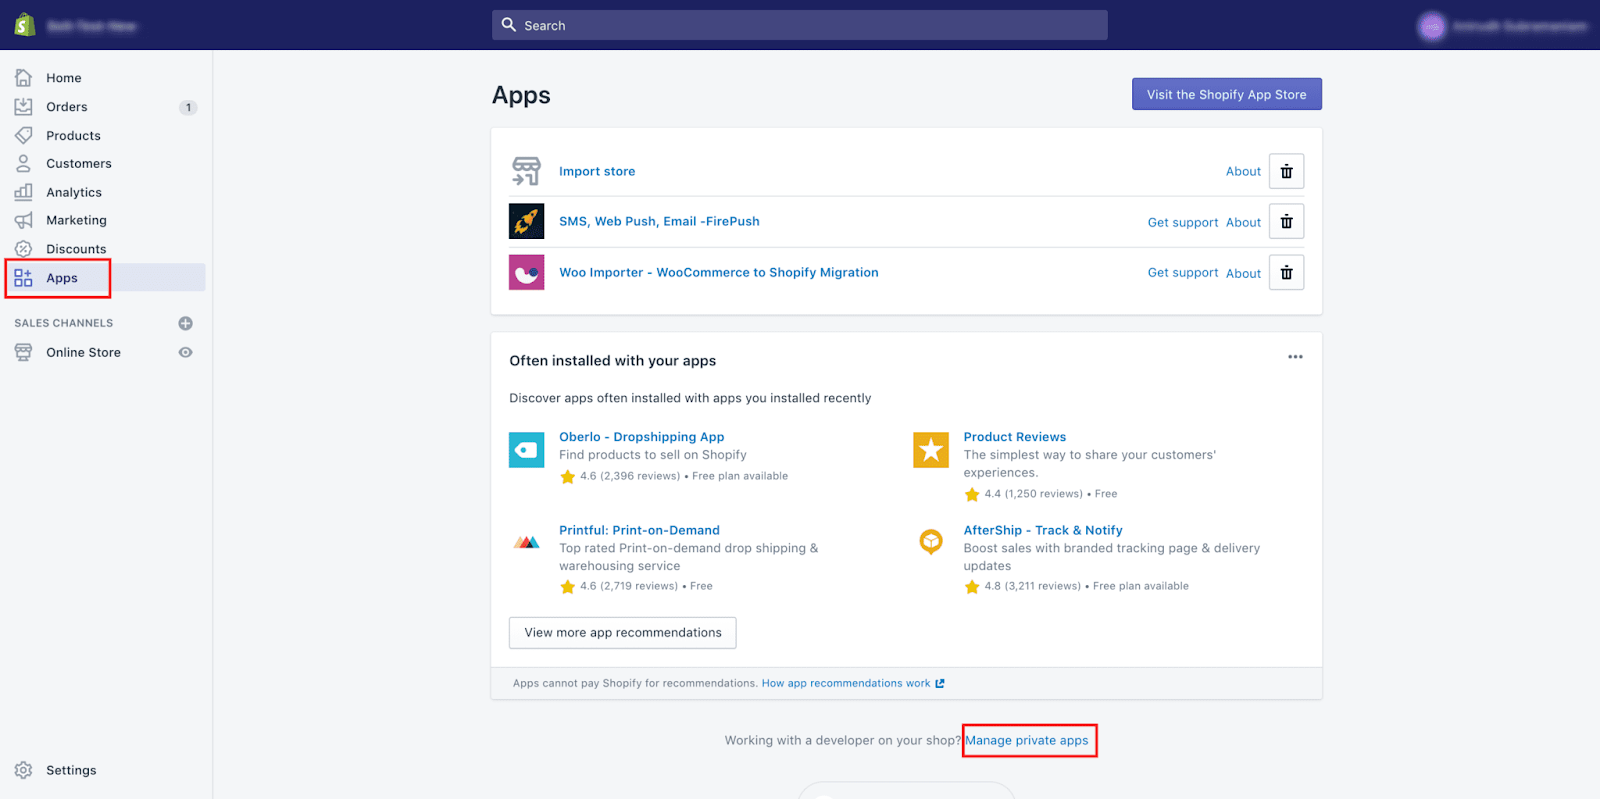
Now, to move further, you will need the API Password from your Shopify Store. So visit the Shopify account and go to the Apps section. And click on Manage Private Apps.
In the Apps section, click on Create A New Private App. After clicking on it, enter the Title of the App – Cart2Cart under the Private App name.
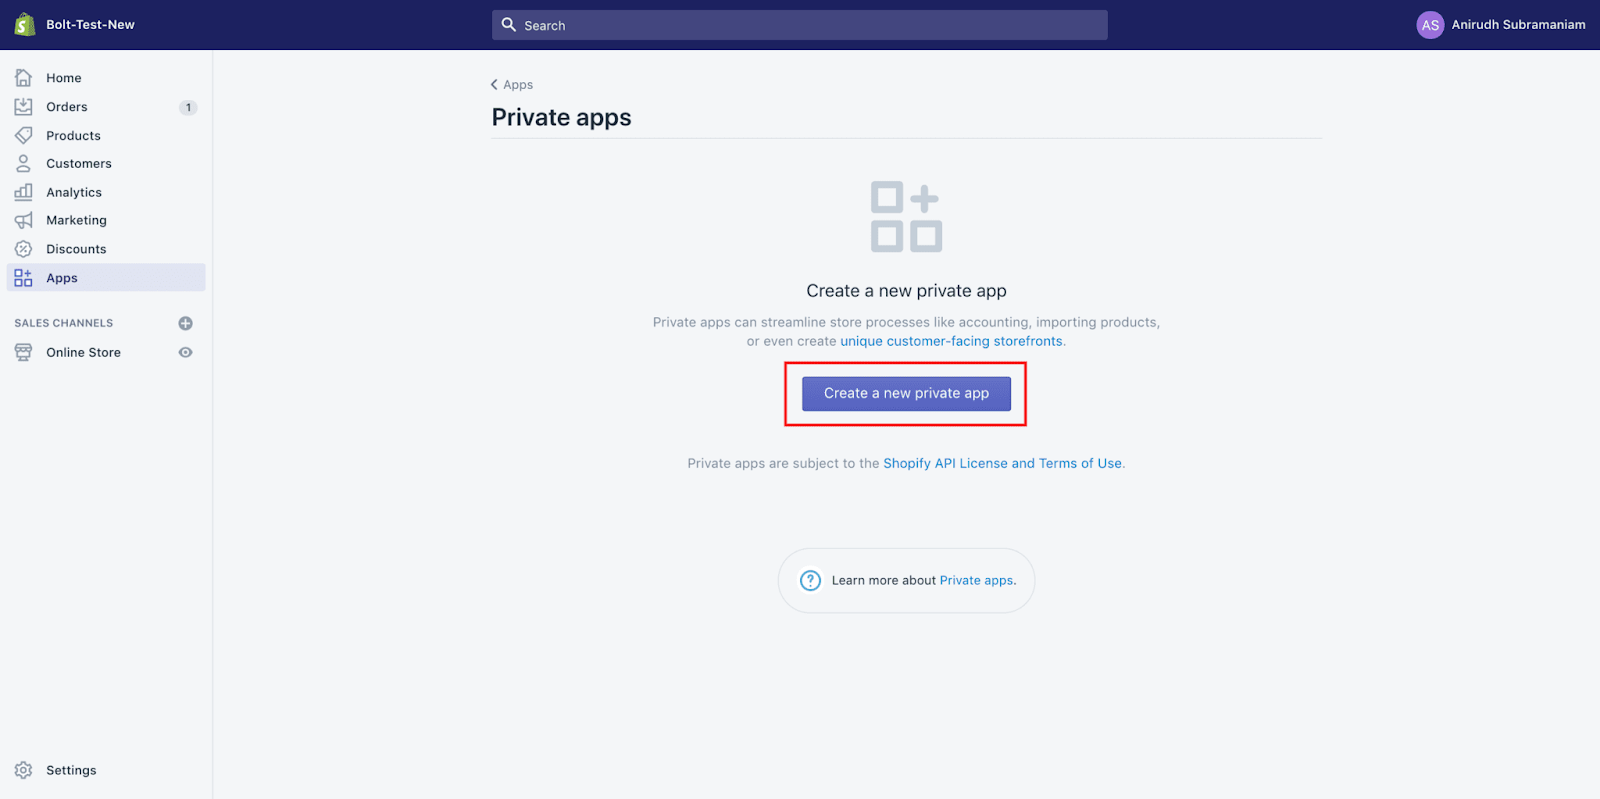
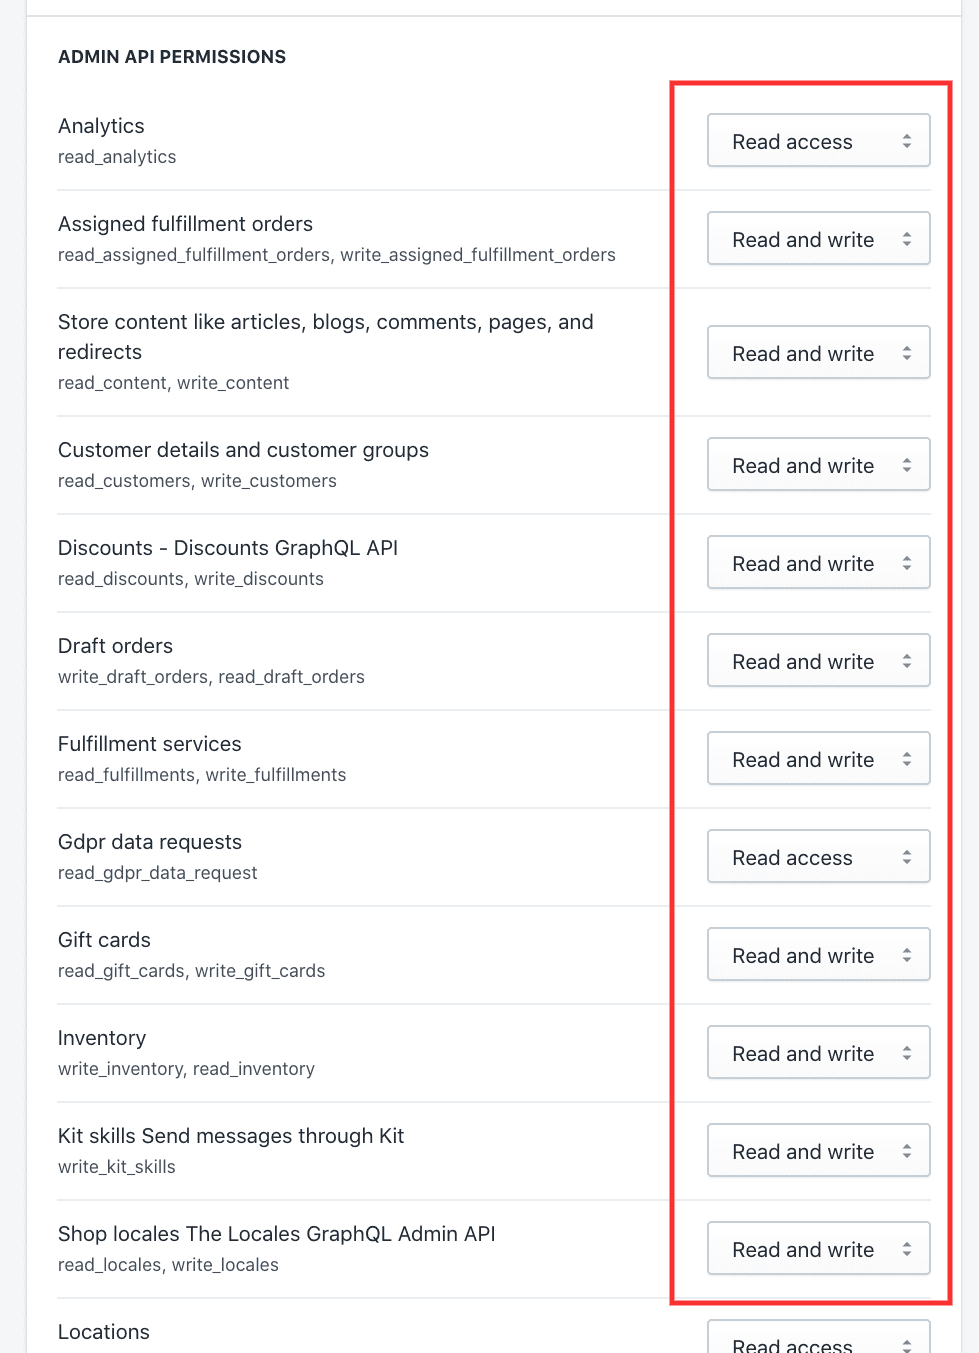
After performing the above steps, you will need to change the permissions. By default, the permission would be set to No Access. As we are providing access to Cart2Cart to view our data, we will need to change all the permissions to Read and Write. And click on the Save button to save these settings.
Now, Shopify will generate an API password, and you have to copy that. You will find additional information on the page like API key, Password, Example URL, and Shared Secret.
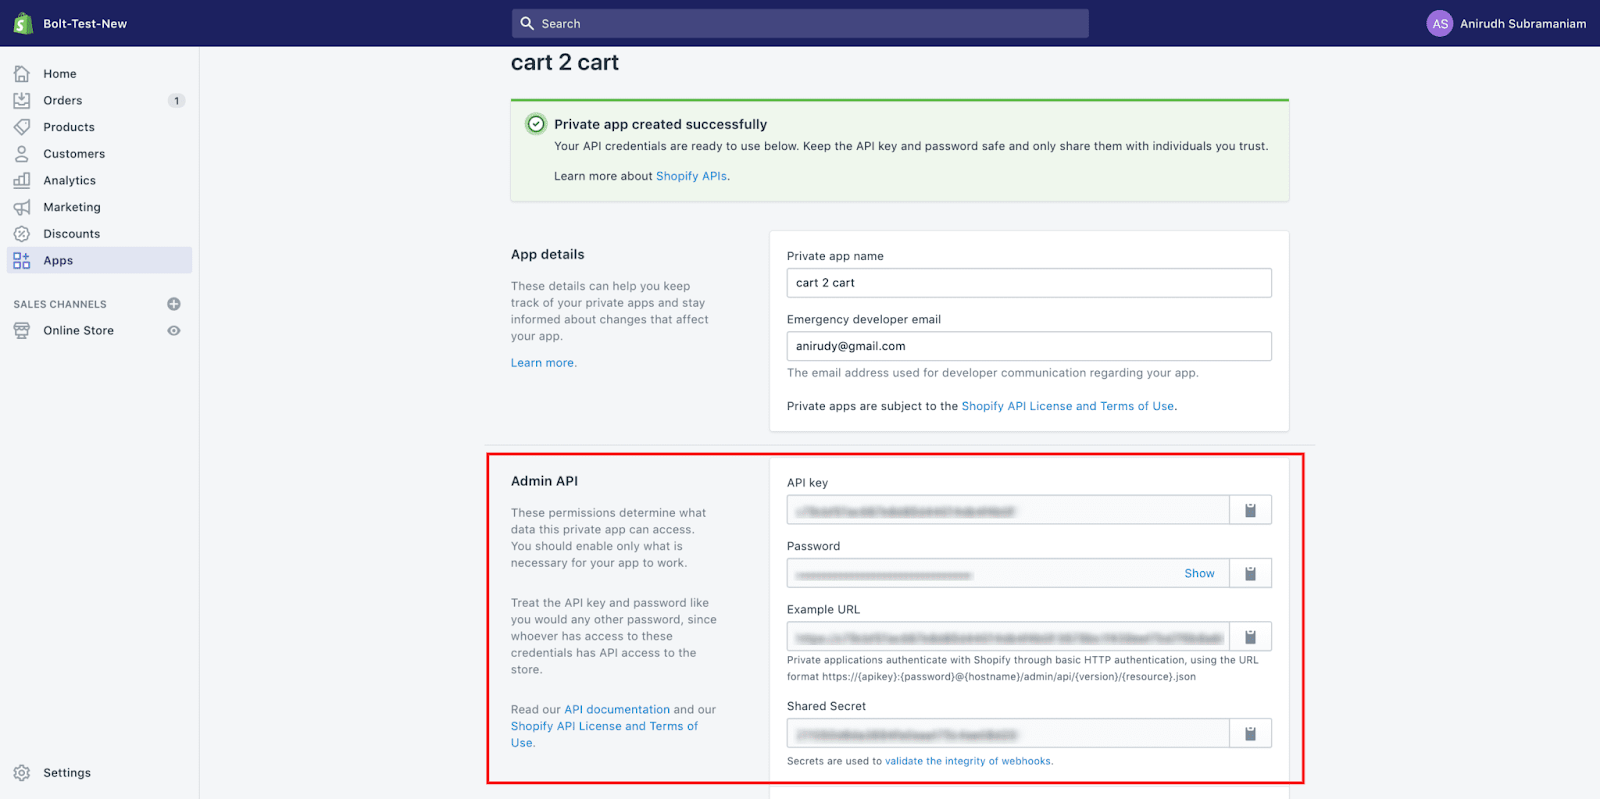
So, copy the API password and paste it into the API Password field present on the Cart2Cart page.
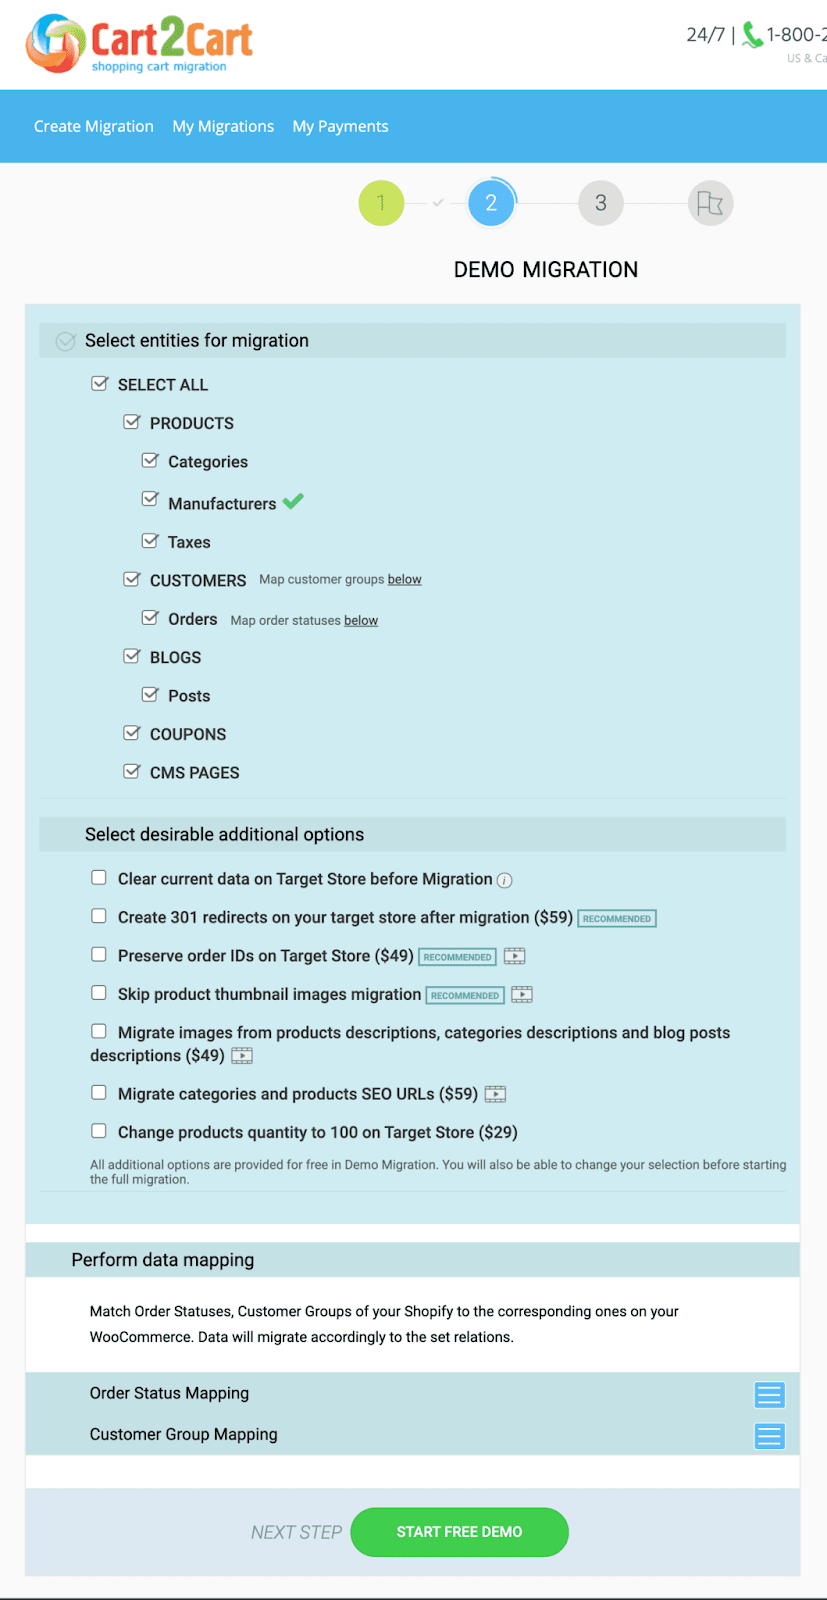
After that, click to choose entities you want to migrate under Select entities for migration. In this case, I’m selecting all. This will import everything related to Products, Customers, Orders, Blogs, Images, etc.
Now, you will get notified once the migration is complete. On the current page, you will see the progress. It will show what has been migrated and what hasn’t. It might take a few minutes to complete the whole process.

3. Checking The Imported Data
In the previous step, we migrated the Shopify data to our WooCommerce store. Now, in this step, we will check whether all the data is visible and correct.
Visit the WordPress dashboard, and check everything individually. For instance, visit the Product page, and match all the products you have created. Do the same with Blogs, Pages, Orders, Customers, and others.
Conclusion
In this article, we tried two methods of doing it – Manual and Automatic. Manual is good if you want to perform all the steps with care. Whereas, Automatic process helps you migrate the data in fewer steps and quickly. I hope you understood all the steps carefully and implemented the same in your WooCommerce store.
That’s all for this article.


