Creating a mix-and-match product is a great way to let customers combine complementary items and increase your average order value. It allows customers to choose products from a list and combine them to make their own unique product.
Mix and Match products are ideal for creating products like gift baskets, product bundles, and wine boxes.
In today’s article, I’ll walk you through the step-by-step process of creating a WooCommerce mix and match product in a few simple steps with the help of the WooCommerce Mix and Match plugin.
It is one of the best and easiest-to-use plugins for creating mix-and-match products.
On This Page
- 1 Use Cases of WooCommerce Mix and Match Products
- 2 How to Create a WooCommerce Mix and Match Product?
- 2.1 1. Install and Activate the WooCommerce Mix and Match Plugin
- 2.2 2. Add Products to Your Store
- 2.3 3. Create a Mix and Match Product
- 2.4 4. Configure the Mix and Match Product
- 2.5 5. Enable Popup for Theme Compatibility (Optional)
- 2.6 6. Hide the Individual Child Products from the Shop (Optional)
- 2.7 7. Final Results
- 3 Wrapping Up
Use Cases of WooCommerce Mix and Match Products
There are several exciting ways that you can use the WooCommerce mix-and-match products. The following are the most popular ones.
1. Restaurants
Green Chef is using the mix-and-match idea as a subscription box. They have a menu that updates every week.
They allow customers to select the meal from different categories, select the box size, log in, enter their address and payment details, and finally select the first day of subscription.
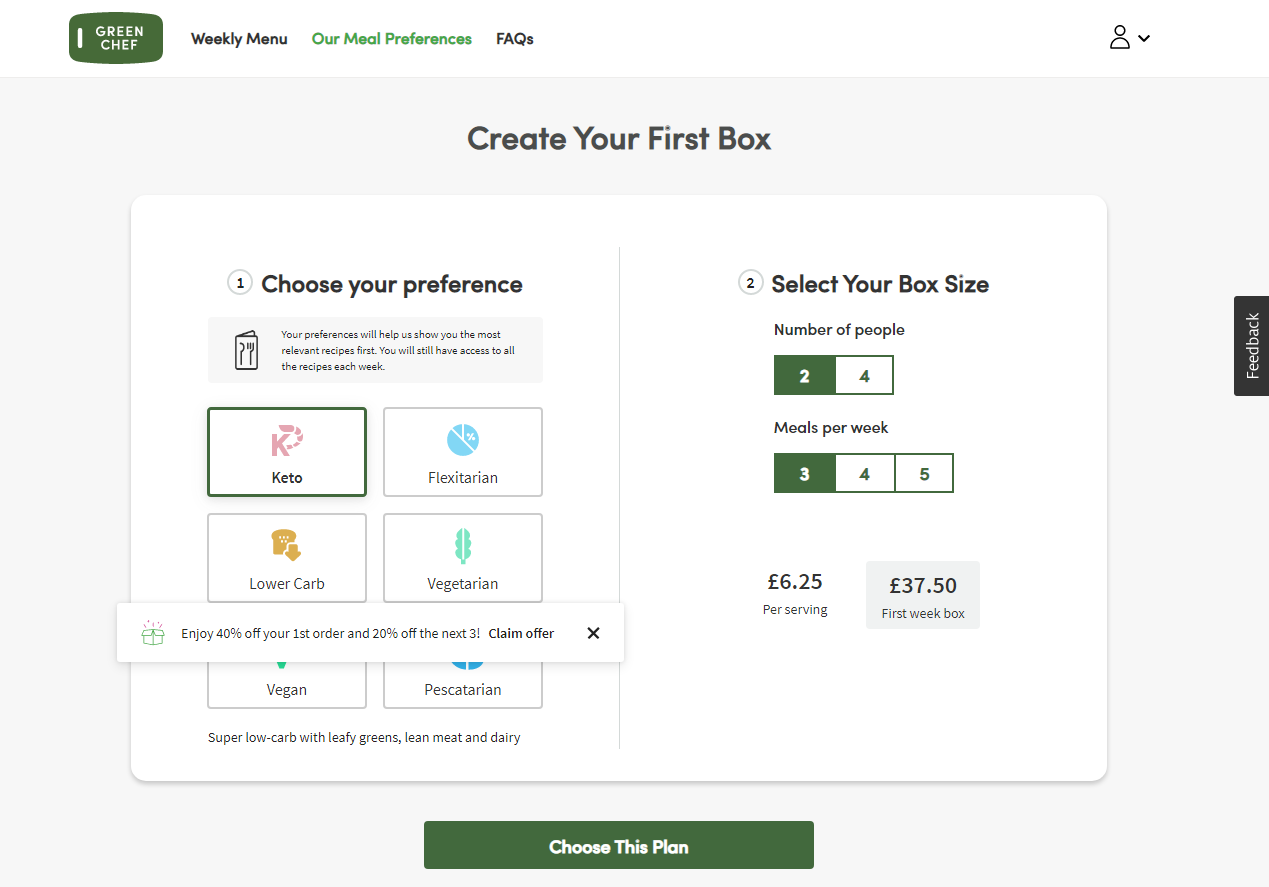
Customers can select how many meals they want per week, and they’ll be automatically charged weekly from their card.
It’s an excellent idea to offer subscription boxes with different mix-and-match options. They also offer a discount on the first purchase to attract more customers.
2. Beauty Kit
WOW Skin Science is another excellent example to discuss. They use the mix-and-match strategy to offer customers complimentary products and increase the average order value (AOV).
The customers can select the shampoo & conditioner set, and then they’re prompted to the next steps and add further items to their beauty kit box.

In the first step, customers can select one product; after that, they’ll see step 2. They can choose only one product. In the last step, they’ll select the final product to complete their mix-and-match beauty kit box.
They are offering complimentary products to the users, which means collectively, these products will help them more.
3. Doughnut Shop
Last but not the least way to use the mix-and-match strategy. You can use the mix-and-match feature to upsell. This way you can sell more of the same or similar products.
Let’s take an example of a doughnut shop where customers can create their own doughnut box. They can select doughnuts from the available ones, add them to their cart and get a discount.

This is an excellent example of upselling with the help of a mix-and-match strategy. This will help you increase the average order value (AOV) and revenue. It will also benefit users because they’ll get all their favorite doughnuts at a discounted price.
Also, this is the example we’ll be using today. So without further ado, let’s jump into it.
How to Create a WooCommerce Mix and Match Product?
I’ll create a Doughnut mix-and-match product so the customers can get the selected doughnut flavors in a box as one product.
To create a WooCommerce mix-and-match product, please follow the following steps.
1. Install and Activate the WooCommerce Mix and Match Plugin
Note: You can skip this step if you have already installed and activated the WooCommerce Mix and Match Plugin.
To install the WooCommerce Mix and Match plugin, you must install the Woosuite Core plugin and activate your Woosuite license key. We have created a Quick Start Guide for you to figure out how to install and activate the WooCommerce Mix and Match plugin.
2. Add Products to Your Store
We need to add products to the store. These will be the products within the mix-and-match product, and users can order all these products as a single product with their own combination.
Follow the following steps to add products to your WooCommerce store.
1. From WordPress Admin Dashboard
To add a product, navigate to WordPress Admin Dashboard, and click on the Products » Add New.
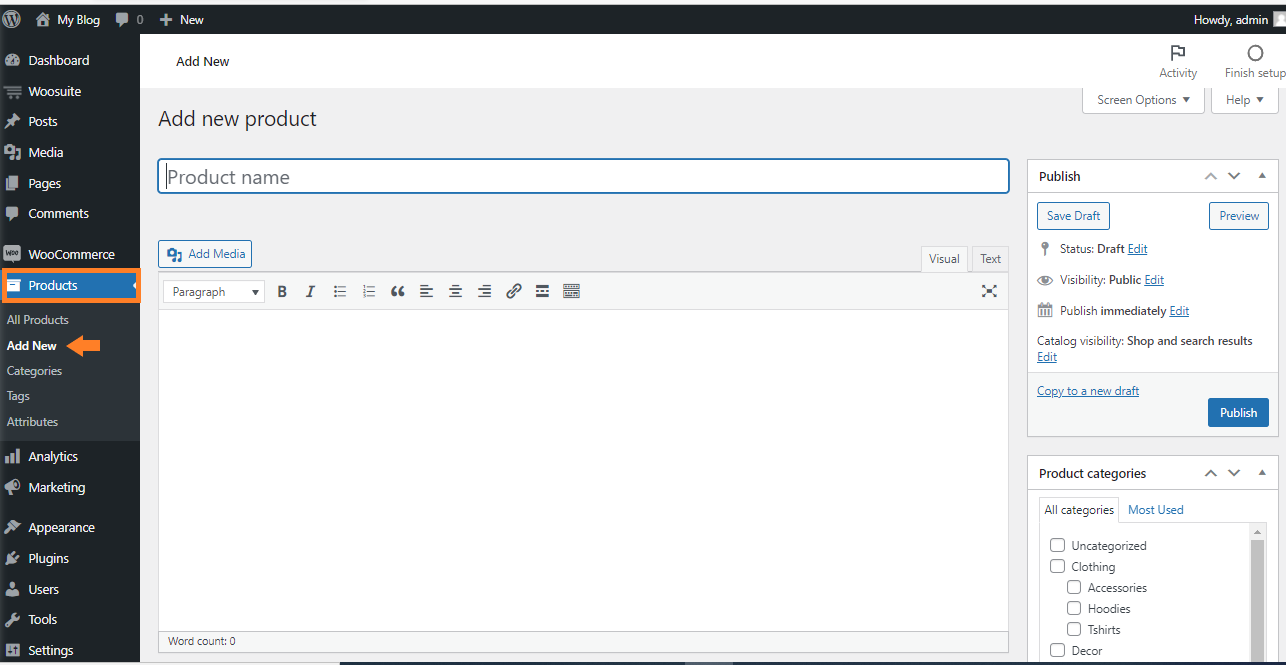
2. Enter Product Name
In the Product Name field, enter the name of the product.

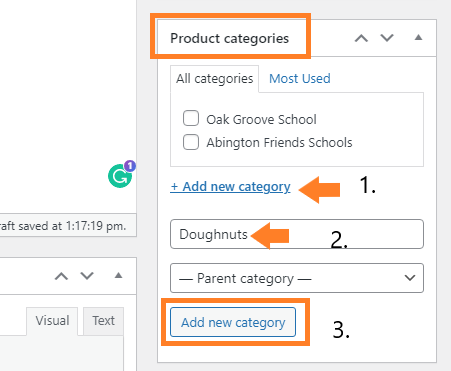
3. Add the Product to a Category
After that, we need to add the product to a category to keep the products organized, and it will also help you in later steps.
First, you need to create a category,
1. Click the ‘Add New Category’ button in the ‘Product Categories’ section.
2. Then, a new will be added below it, enter the name of the category.
3. After that, click the ‘Add New Category’ button to add it.
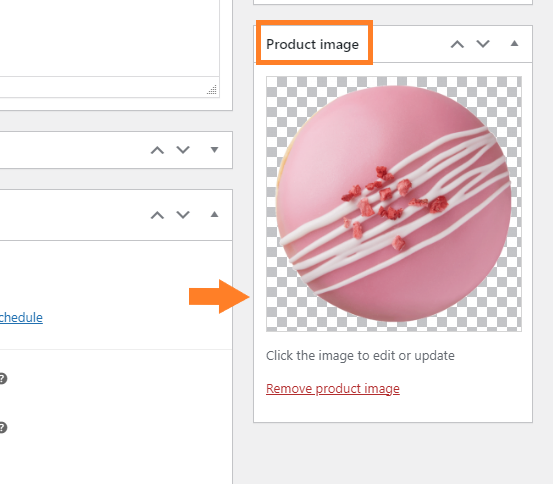
4. Add Product Image
Scroll to the ‘Product Image’ section, and add your product’s image. As I have taken the example of a doughnut, I’ll be adding the image of a doughnut.
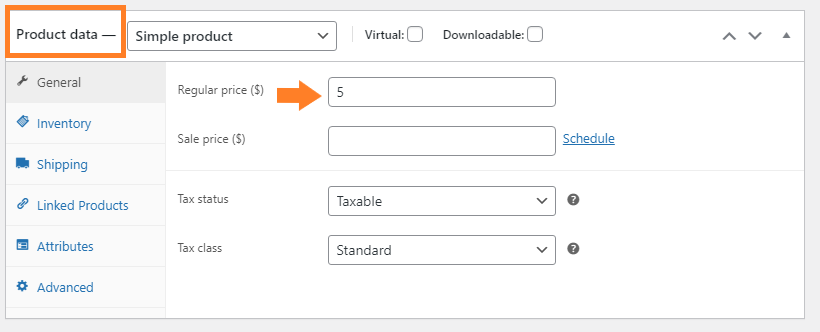
5. Enter the Product Price
Now, scroll to the ‘Product Data’ section, and in the ‘Regular Price’ field, enter the product’s price.
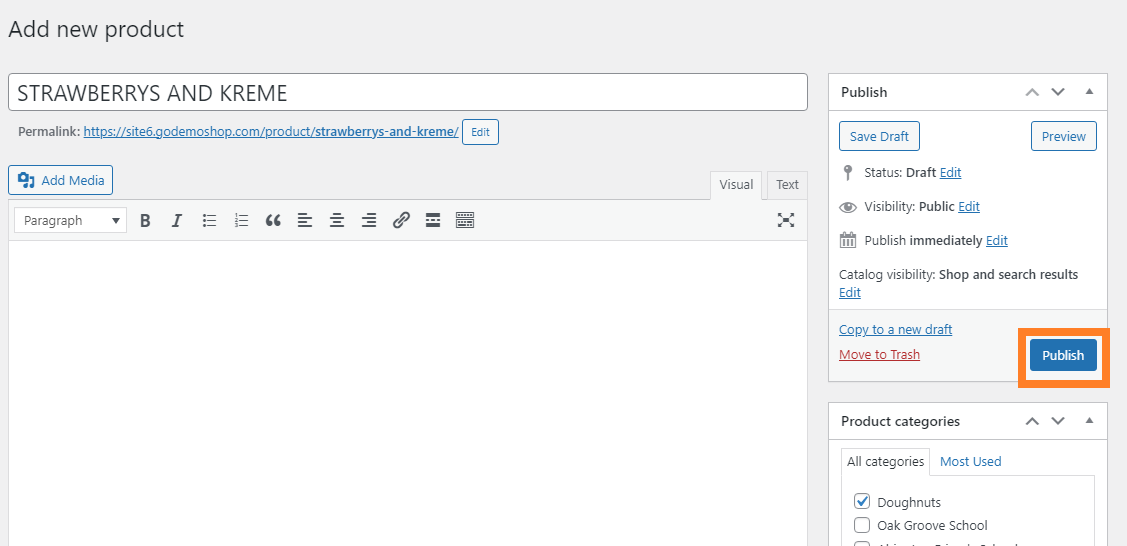
6. Publish Product
Now finally, click the ‘Publish’ button to publish the product.
Once you set up your first product, repeat this process until you’ve added all the products you’d like to sell. I have added the following items.

3. Create a Mix and Match Product
Once you have created the products, you want to offer your customers in a mix-and-match product. Now is the time to create the min-and-match product.
To create a product, please follow the above basic steps. After filling in the basic information, scroll to the ‘Product Data’ section.
You’ll get a few options from the ‘Product Data’ dropdown, but you must select the ‘Mix and Match Product’ option.

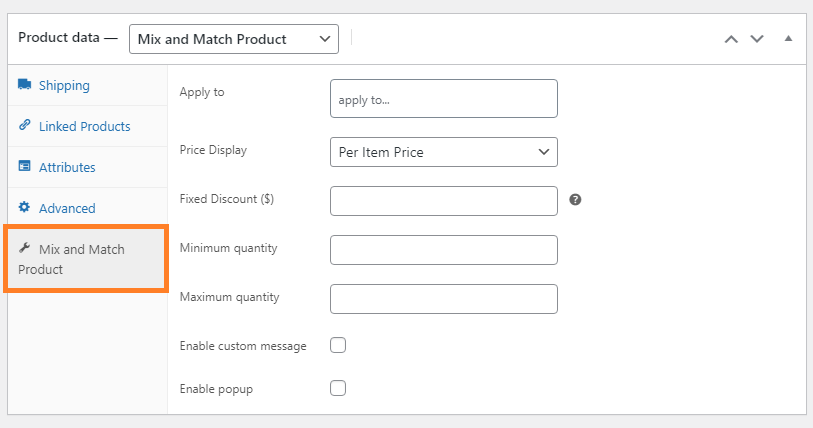
4. Configure the Mix and Match Product
Once you select the data type, you’ll see a few new tabs on the left of the product data section.
1. Click the Mix and Match Product
Click the ‘Mix and Match Product’ tab to configure it.
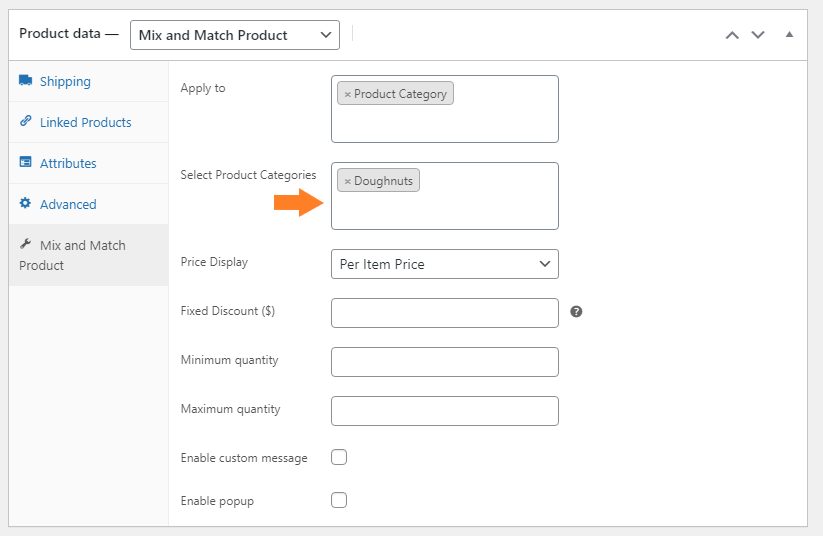
2. Select the Product Category
In the ‘Apply to’ field, you’ll get three options.
- Product
- Product Category
- Product Tag
As we have assigned ‘Product Category’ to the products we created in step 2, please select the ‘Product Category’ option.
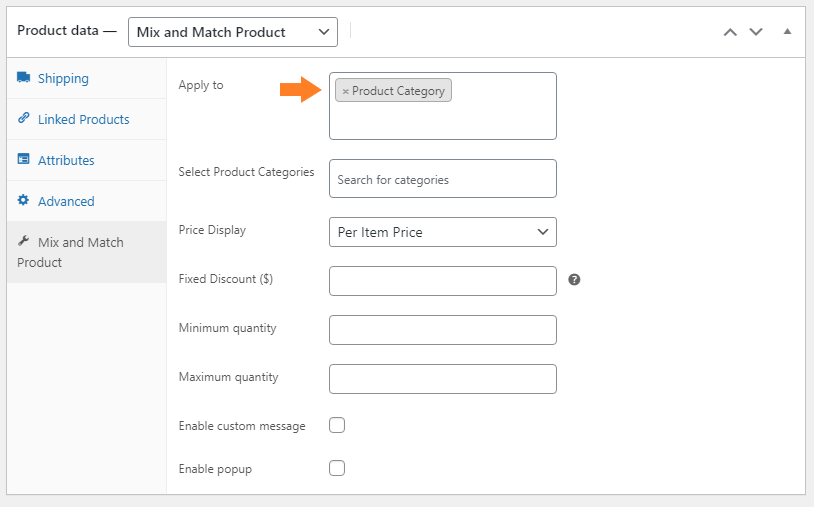
Once you select it, a new ‘Select Product Categories’ field will be added below it. From that field, please select the category from which you want to add the products to the mix-and-match product.
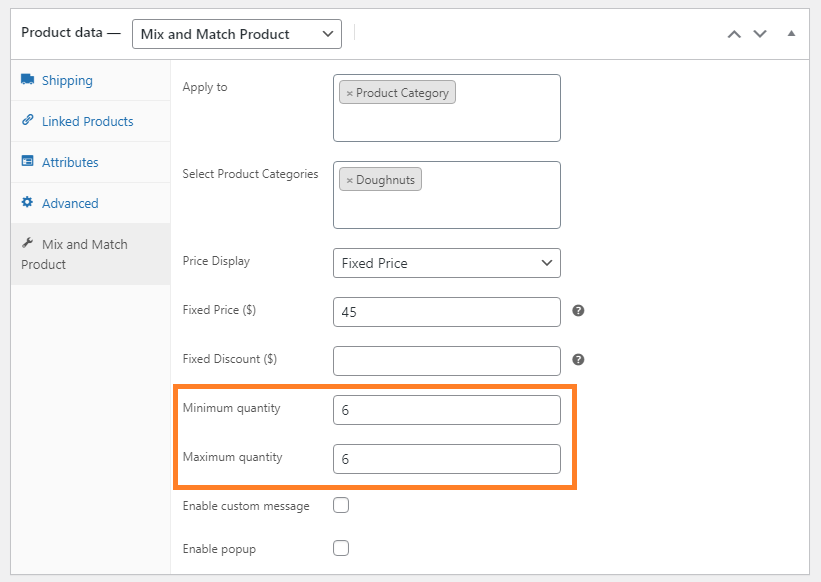
3. Select Price Display
From the ‘Price Display’ dropdown, you’ll get two options.
- Per Item Price
- Fixed Price
Select the ‘Fixed Price’ option. You can also select the other option. It entirely depends on your choice.

4. Enter the Price of Mix and Match Product
In the ‘Fixed Price’ field, enter the product’s price.

5. Enter the Maximum and Minimum Quantity
Now in the ‘Minimum Quantity’ and ‘Maximum Quanmtity’ fields, please enter the quantities users can buy collectively.
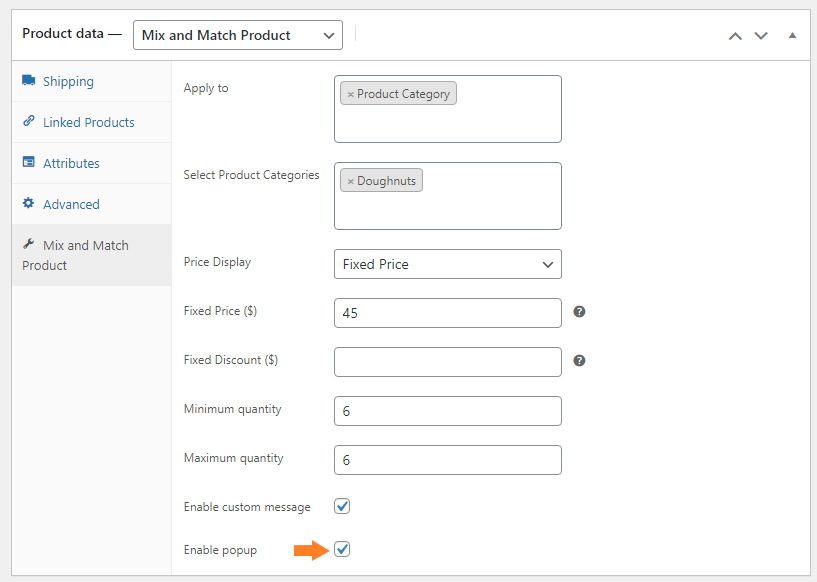
6. Enable the Custom Message
Check the ‘Enable Custom Message’ checkbox to allow the customers to send a custom message while ordering the product. It is optional and depends on your choice.

5. Enable Popup for Theme Compatibility (Optional)
Some themes may not support the mix-and-match products, so in that case, users can enable the popup to make your theme compatible with the mix-and-match product.
Enabling it will create a popup from where users can mix and match the products they want and add them to their cart as a single product.
Also, if your theme is compatible with mix-and-match products, you can still enable the popup. It entirely depends on your choice.
To enable it, check the ‘Enable Popup’ checkbox in the mix-and-match product settings.
I am using the Storefront theme, which is completely compatible with the mix-and-match products, but I still enabled the popup.
1. Publish Product
Now finally, click the ‘Publish’ button to publish the product.
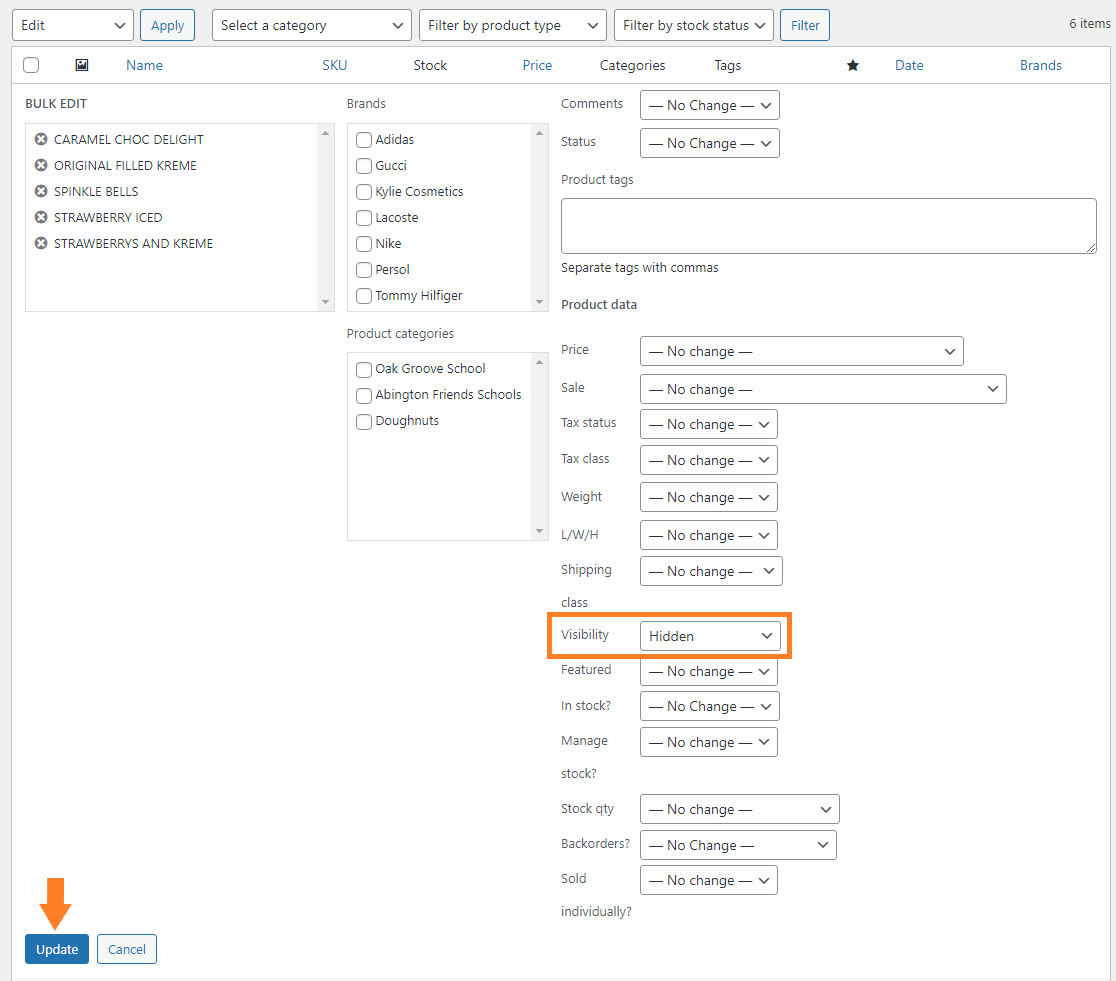
6. Hide the Individual Child Products from the Shop (Optional)
It is an optional step. You can hide the individual products from the shop page so that the customers won’t be able to buy them alone.
To do so, you need to change the visibility of the products. Select all the child products by clicking the boxes beside their names.
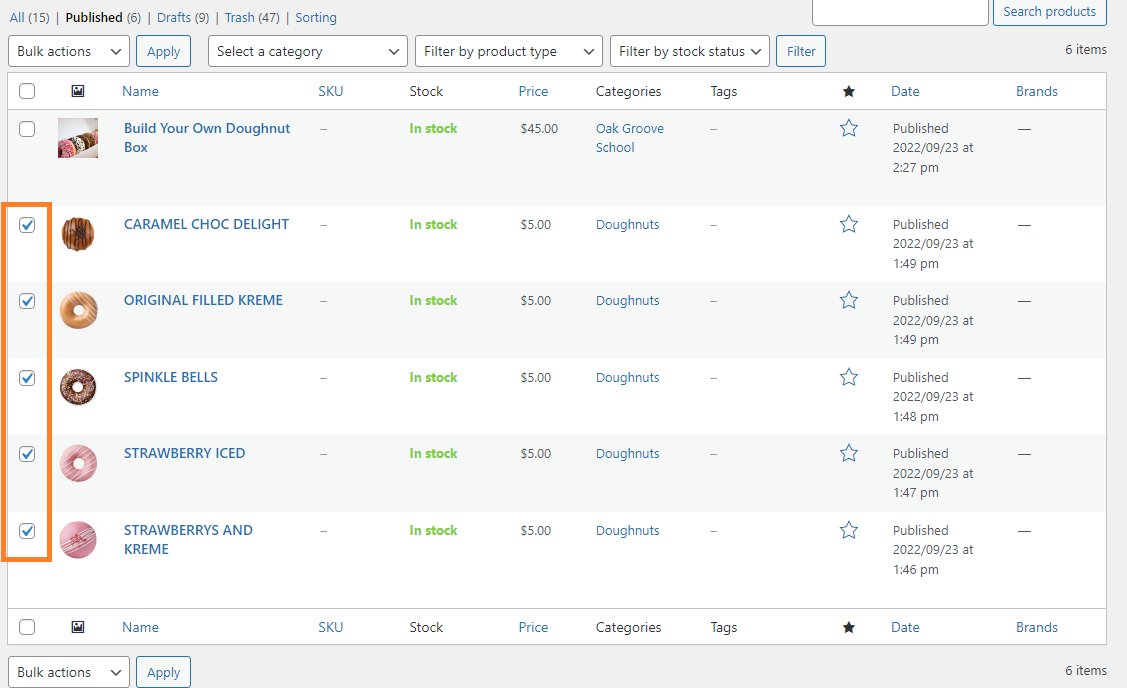
1. Edit the Products at Once
Now select the ‘Edit’ option from the ‘Bulk actions’ dropdown and click the ‘Apply’ button to edit all the selected products at once.
Note: Do not select the Mix and Match product.

2. Change the Visibility of all the Selected Products
Please select ‘Hidden’ to change the visibility from the ‘Visibility’ dropdown. This will hide the child products from the shop and search pages.
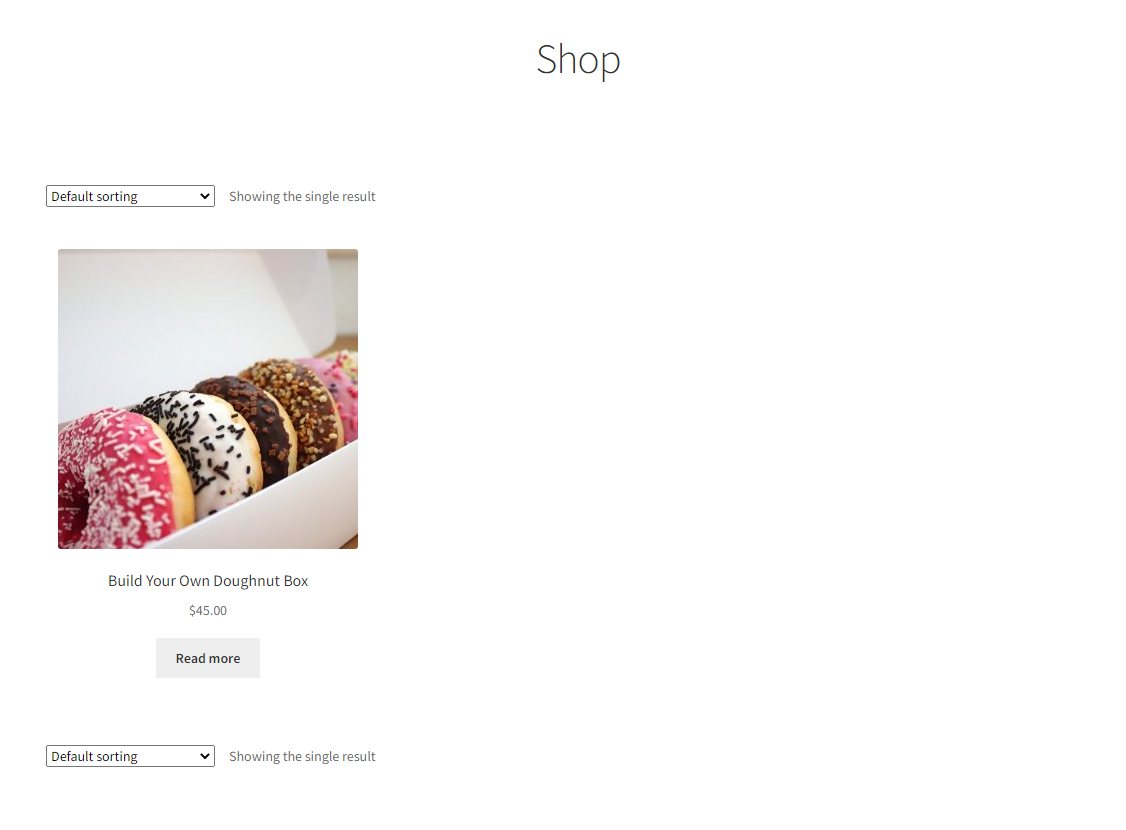
7. Final Results
Let’s test it and see the final results.
Visit your store’s shop page, and you’ll notice that only the mix-and-match product will be displayed, while the child products won’t be displayed on the shop page.
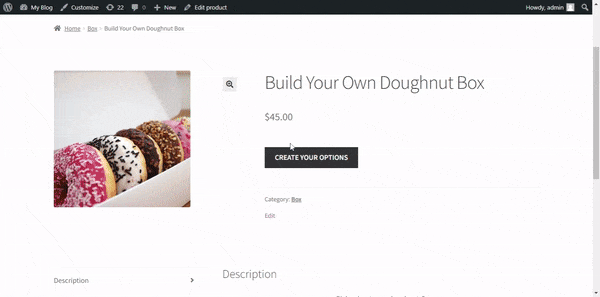
Upon clicking the product, you’ll be redirected to the product page, and when you click the ‘Create Your Options’ button, a popup will appear from where you can mix and match the products and add the selected ones to your cart with a custom message.
You’ll see a bar indicating the number of products you added and the maximum number of products you can add to the box. You can also send a custom gift message.
Wrapping Up
That’s it for today’s article.
Now you know how to create a WooCommerce mix-and-match product. It’s up to you to play with the settings of the WooCommerce Mix and Match plugin. You can also offer discounts if you have set the price as the ‘Per Item Price’ option.
Letting customers mix and match products is a great way to improve the customer experience and increase the average order value (AOV). WooCommerce Mix and Match plugin is perfect and the best one to help you with that.
Ready to get started? Download the WooCommerce Mix and Match plugin and build something great at your store!


