WooCommerce is a robust eCommerce platform that comes with all the necessary features to fulfill orders. It provides four different order statuses which help you to manage the orders more conveniently.
But if you want to add a custom order status in WooCommerce, you need to use a piece of custom code. This is because the default order statuses may not satisfy your use case.
By adding a custom order status you as an online store owner can better manage the orders and provide a more customized and better user experience to your customers.
In today’s article, I’ll share the code to add the WooCommerce custom order status. I’ll also explain each line or block of the code to help you understand it.
So, without any further ado, let’s jump into it.
On This Page
How to Add WooCommerce Custom Order Status?
By default, WooCommerce gives you seven different order statuses which you can use accordingly. Here’s the list of default custom order statuses.
- Pending payment
- Failed
- Processing
- Completed
- On hold
- Canceled
- Refunded
Adding a custom order status to WooCommerce involves using hooks provided by WordPress and WooCommerce.
Here’s a step-by-step code snippet to add a custom order status called “Awaiting Dispatch” to WooCommerce:
1. Register the New Custom Order Status
The following code adds a new order status called “Awaiting Dispatch” to WooCommerce. It registers this custom order status with appropriate display settings and adds it to the list of available order statuses in WooCommerce.
Note: Ensure to change the ‘Awaiting Dispatch’ label in the code to the order status you want to create.
Code:
add_action('init', 'aovup_register_awaiting_dispatch_order_status');
function aovup_register_awaiting_dispatch_order_status() {
    register_post_status('wc-awaiting-dispatch', array(
        'label'                     => 'Awaiting Dispatch',
        'public'                    => true,
        'exclude_from_search'       => false,
        'show_in_admin_all_list'    => true,
        'show_in_admin_status_list' => true,
        'label_count'               => _n_noop('Awaiting Dispatch <span class="count">(%s)</span>', 'Awaiting Dispatch <span class="count">(%s)</span>')
    ));
}

add_filter('wc_order_statuses', 'aovup_add_awaiting_dispatch_to_order_statuses');
function aovup_add_awaiting_dispatch_to_order_statuses($order_statuses) {
    $order_statuses['wc-awaiting-dispatch'] = 'Awaiting Dispatch';
    return $order_statuses;
}
Explanation:
- The code uses WordPress hooks and functions to extend WooCommerce functionality. The add_action function is used to register a custom order status and the add_filter function is used to add the custom order status to the list of WooCommerce order statuses.
- The add_action function is called with the hook ‘init’ and the callback function ‘aovup_register_awaiting_dispatch_order_status’. This means that when WordPress initializes, the aovup_register_awaiting_dispatch_order_status function will be executed.
- Inside the aovup_register_awaiting_dispatch_order_status function, the register_post_status function is used to define and register the custom order status ‘wc-awaiting-dispatch’. The parameters provided for this function include:
- ‘label’: The display label for the custom order status, which is “Awaiting Dispatch” in this case.
- ‘public’: Whether the status should be publicly queryable (true in this case).
- ‘exclude_from_search’: Whether to exclude this status from search results (false in this case).
- ‘show_in_admin_all_list’: Whether to display this status in the admin order list (true in this case).
- ‘show_in_admin_status_list’: Whether to display this status in the admin order status dropdown (true in this case).
- ‘label_count’: A translation function that provides a label for the status count, indicating the number of orders with this status.
- The add_filter function is called with the hook ‘wc_order_statuses’ and the callback function ‘aovup_add_awaiting_dispatch_to_order_statuses’. This filter allows you to modify the list of order statuses displayed in WooCommerce.
- Inside the aovup_add_awaiting_dispatch_to_order_statuses function, the parameter $order_statuses is an associative array containing the existing order statuses. The function adds a new entry to this array, associating the custom order status key ‘wc-awaiting-dispatch’ with the label ‘Awaiting Dispatch’.
- The modified $order_statuses array is then returned from the function.
2. Add to the List of Bulk Actions (Optional)
If you want to add this new status to the list of available bulk actions in WooCommerce, you can use the following code:
Note: Ensure to change the ‘Mark Awaiting Dispatch’ labels in the code to the order status you want to create.
add_filter('bulk_actions-edit-shop_order', 'aovup_add_awaiting_dispatch_bulk_action');
function avoup_add_awaiting_dispatch_bulk_action($bulk_actions) {
    // Add a new bulk action named "Mark Awaiting Dispatch"
    $bulk_actions['mark_awaiting-dispatch'] = 'Mark Awaiting Dispatch';
    return $bulk_actions;
}

add_filter('handle_bulk_actions-edit-shop_order', 'aovup_handle_mark_awaiting_dispatch_bulk_action', 10, 3);
function aovup_handle_mark_awaiting_dispatch_bulk_action($redirect_to, $doaction, $post_ids) {
    if ($doaction !== 'mark_awaiting-dispatch') {
        return $redirect_to;
    }

    foreach ($post_ids as $post_id) {
        $order = wc_get_order($post_id);
        $order->update_status('awaiting-dispatch');
    }

    $redirect_to = add_query_arg('bulk_awaiting_dispatch_orders', count($post_ids), $redirect_to);
    return $redirect_to;
}
The code block consists of two parts. Here’s the explanation for both.
Explanation of Part 1:
This first part of the code is:
add_filter('bulk_actions-edit-shop_order', 'aovup_add_awaiting_dispatch_bulk_action');
function aovup_add_awaiting_dispatch_bulk_action($bulk_actions) {
    // Add a new bulk action named "Mark Awaiting Dispatch"
    $bulk_actions['mark_awaiting-dispatch'] = 'Mark Awaiting Dispatch';
    return $bulk_actions;
}
Here’s the explanation of it:
- This code uses the add_filter function to modify the bulk actions available on the order list page (edit-shop_order).
- The function aovup_add_awaiting_dispatch_bulk_action is the callback function that adds a new bulk action. It updates the $bulk_actions array by adding a new entry for the custom bulk action.
- In this case, the bulk action key is ‘mark_awaiting-dispatch’, and the displayed label is ‘Mark Awaiting Dispatch’.
Explanation of Part 2:
The 2nd part of the code is:
add_filter('handle_bulk_actions-edit-shop_order', 'aovup_handle_mark_awaiting_dispatch_bulk_action', 10, 3);
function aovup_handle_mark_awaiting_dispatch_bulk_action($redirect_to, $doaction, $post_ids) {
    if ($doaction !== 'mark_awaiting-dispatch') {
        return $redirect_to;
    }

    foreach ($post_ids as $post_id) {
        $order = wc_get_order($post_id);
        $order->update_status('awaiting-dispatch');
    }

    $redirect_to = add_query_arg('bulk_awaiting_dispatch_orders', count($post_ids), $redirect_to);
    return $redirect_to;
}
Here’s the explanation of this code:
This part of the code handles the action when the “Mark Awaiting Dispatch” bulk action is selected and executed. It uses the handle_bulk_actions-edit-shop_order filter.
The function aovup_handle_mark_awaiting_dispatch_bulk_action is the callback function for handling the bulk action.
- The first condition checks if the $doaction variable (the selected bulk action) is not ‘mark_awaiting-dispatch’. If this condition is met, the function simply returns the original $redirect_to value, meaning no action is taken.
- If the bulk action is ‘mark_awaiting-dispatch’, the code enters a loop that iterates through the array of $post_ids, which are the IDs of the selected orders.
- For each order, it retrieves the order object using wc_get_order($post_id).
- It then updates the status of each order to ‘awaiting-dispatch’ using the update_status method.
- After updating all selected orders, it modifies the $redirect_to URL to include a query parameter bulk_awaiting_dispatch_orders with the count of processed orders. This parameter can be used to display a success message or perform other actions after the bulk action is executed.
Finally, the modified $redirect_to URL is returned.
3. Copy the Complete Code
Here’s the complete code that you can copy and paste into your store.
add_action('init', 'aovup_register_awaiting_dispatch_order_status');
function aovup_register_awaiting_dispatch_order_status() {
    register_post_status('wc-awaiting-dispatch', array(
        'label'                     => 'Awaiting Dispatch',
        'public'                    => true,
        'exclude_from_search'       => false,
        'show_in_admin_all_list'    => true,
        'show_in_admin_status_list' => true,
        'label_count'               => _n_noop('Awaiting Dispatch <span class="count">(%s)</span>', 'Awaiting Dispatch <span class="count">(%s)</span>')
    ));
}

add_filter('wc_order_statuses', 'aovup_add_awaiting_dispatch_to_order_statuses');
function aovup_add_awaiting_dispatch_to_order_statuses($order_statuses) {
    $order_statuses['wc-awaiting-dispatch'] = 'Awaiting Dispatch';
    return $order_statuses;
}

add_filter('bulk_actions-edit-shop_order', 'aovup_add_awaiting_dispatch_bulk_action');
function aovup_add_awaiting_dispatch_bulk_action($bulk_actions) {
    // Add a new bulk action named "Mark Awaiting Dispatch"
    $bulk_actions['mark_awaiting-dispatch'] = 'Mark Awaiting Dispatch';
    return $bulk_actions;
}

add_filter('handle_bulk_actions-edit-shop_order', 'aovup_handle_mark_awaiting_dispatch_bulk_action', 10, 3);
function aovup_handle_mark_awaiting_dispatch_bulk_action($redirect_to, $doaction, $post_ids) {
    if ($doaction !== 'mark_awaiting-dispatch') {
        return $redirect_to;
    }

    foreach ($post_ids as $post_id) {
        $order = wc_get_order($post_id);
        $order->update_status('awaiting-dispatch');
    }

    $redirect_to = add_query_arg('bulk_awaiting_dispatch_orders', count($post_ids), $redirect_to);
    return $redirect_to;
}
4. Paste the Code to Your WooCommerce Store
To paste the code to your store, there are multiple ways. You can use the one that suits you the best. I have used a plugin to paste the code to my demo store.

If you don’t know how to add a code snippet to your WooCommerce store, read this guide.
5. Final Results
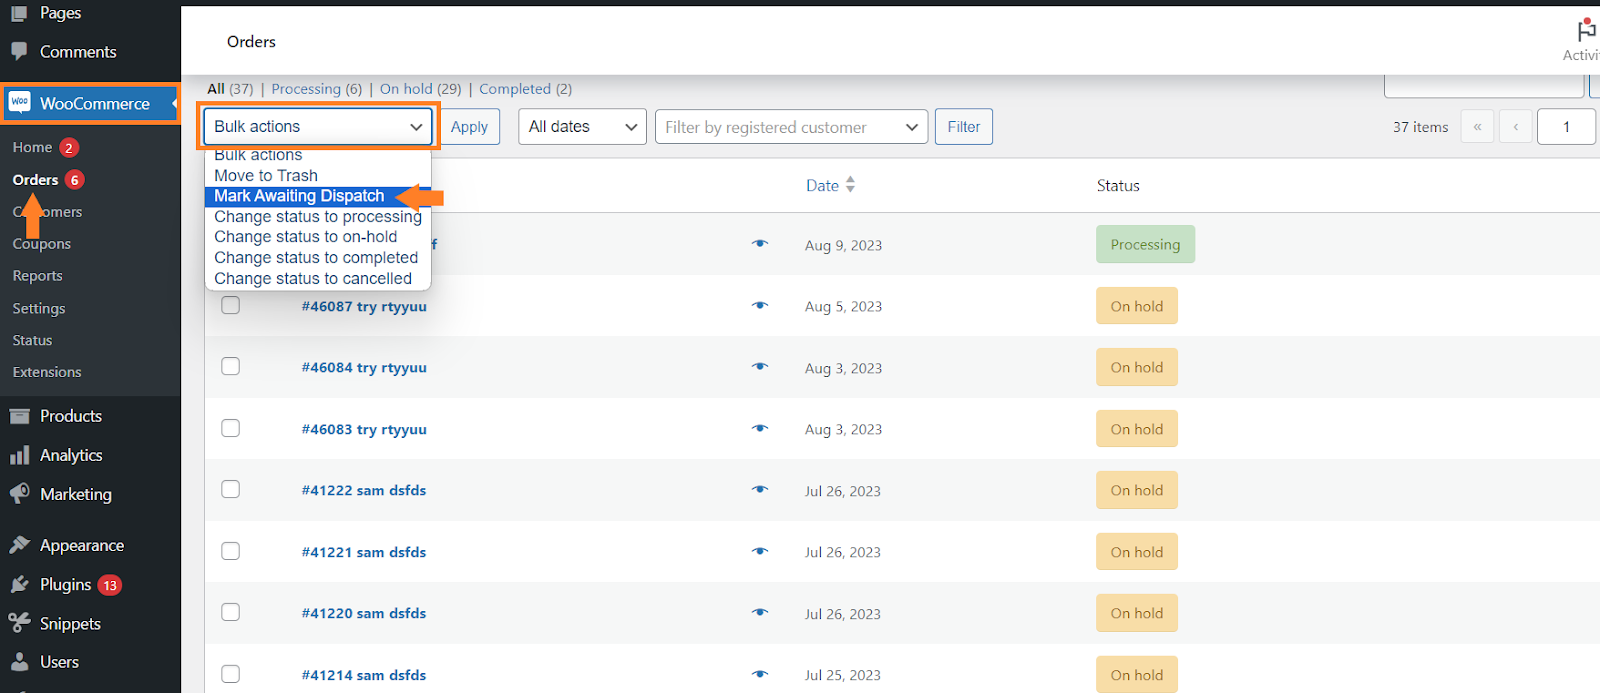
To check the final results, navigate to WooCommerce >> Orders from your WordPress dashboard. Here you’ll see all the orders you received in your store.
First, let’s check if the custom order status is available in the ‘Bulk Actions’ dropdown. To check it, click the dropdown and you’ll see all the available options.
As you can see in the screenshot I could see the custom order status.
Now if you click any order and try to change its order status to the custom order status, its status will be changed. I have changed it, as you can see in the screenshot below.

Conclusion
That’s it for today’s article.
I hope it was helpful and clear to you and you were able to add a custom order status in WooCommerce easily. Adding a custom order status can be of great value for customers and store owners.
It will give a more personalized experience to the customers and you’ll be able to streamline your order management process. You can add as many order statuses to your store but remember to change the labels and the function names accordingly.
Here are a few other articles to help you improve order management.


