This guide will walk you through the steps to create a WooCommerce catalog mode without using a plugin. By implementing custom code snippets, you can disable the ‘Add to Cart’ button and hide product prices, transforming your WooCommerce store into a product showcase.
It is beneficial if you want to display your products without selling them directly from your site or if you want customers to contact you to get the pricing.
Let’s dive in and explore how you can achieve this with some simple PHP code.
On This Page
How to Create a WooCommerce Catalog Mode Without Plugin?
To create a WooCommerce catalog mode, I’ll use a code snippet to hide the cart button and product prices from the shop/category and individual product pages.
You can display a button or a link to the contact us page to let customers contact you for the pricing. You can also create an inline form or a pop-up as per your requirements.
I’ll simply show a button that redirects users to the contact page.
First, let’s understand the code snippet to give you a better understanding. The code consists of three blocks, and I’ll explain each one.
1. Remove Add to Cart Button From All Pages
The first part of the code removes the add-to-cart button from the shop, category, and individual product pages.
In this section, the add_action function is used to call the woosuite_remove_add_to_cart_buttons function when WordPress initializes. This function removes the ‘Add to Cart’ button from the product summary and shop loop item in WooCommerce.
Here’s the first part of the code:
// Remove Add to Cart button from all pages
add_action('init','woosuite_remove_add_to_cart_buttons');
function woosuite_remove_add_to_cart_buttons() {
    remove_action('woocommerce_after_shop_loop_item', 'woocommerce_template_loop_add_to_cart');
    remove_action('woocommerce_single_product_summary', 'woocommerce_template_single_add_to_cart', 30);
}
2. Hide Product Prices From All Pages
In the 2nd part of the code snippet, I have removed the product prices from all the pages.
The add_filter function is used to modify the HTML of the product price in WooCommerce. It calls the woosuite_hide_product_price function, which returns an empty string for the price of a product, effectively hiding it.
Here’s the 2nd part of the code:
// Hide product prices on all pages
add_filter('woocommerce_get_price_html','woosuite_hide_product_price', 10, 2);
function woosuite_hide_product_price( $price, $product ) {
    return '';
}
3. Adding a ‘Contact Us for Pricing’ Button On All The Pages
In the third part of the code, I have displayed a contact us button on all the pages to allow customers to contact you to get the product pricing and learn more about the purchasing process.
The add_action function is used to add the ‘Contact Us for Pricing’ button to the shop loop items and single product summary in WooCommerce.
The woosuite_add_contact_us_button function outputs an HTML anchor tag that links to the ‘/contact’ page and has the text ‘Contact Us for Pricing,’ creating the button.
Note: You can replace the /contact with the slug of your store’s contact page.
// Add Contact Us button on all pages
add_action('woocommerce_after_shop_loop_item', 'woosuite_add_contact_us_button', 10 );
add_action('woocommerce_single_product_summary', 'woosuite_add_contact_us_button', 31 );
function woosuite_add_contact_us_button() {
    echo '<a href="/contact" class="button alt">Contact Us for Pricing</a>';
}
4. Copy the Complete Code
Now that we have understood each section, we can combine and copy the code. Here’s the complete code.
// Remove Add to Cart button from all pages
add_action('init','woosuite_remove_add_to_cart_buttons');
function woosuite_remove_add_to_cart_buttons() {
    remove_action('woocommerce_after_shop_loop_item', 'woocommerce_template_loop_add_to_cart');
    remove_action('woocommerce_single_product_summary', 'woocommerce_template_single_add_to_cart', 30);
}

// Hide product prices on all pages
add_filter('woocommerce_get_price_html','woosuite_hide_product_price', 10, 2);
function woosuite_hide_product_price( $price, $product ) {
    return '';
}

// Add Contact Us button on all pages
add_action('woocommerce_after_shop_loop_item', 'woosuite_add_contact_us_button', 10 );
add_action('woocommerce_single_product_summary', 'woosuite_add_contact_us_button', 31 );
function woosuite_add_contact_us_button() {
    echo '<a href="/contact" class="button alt">Contact Us for Pricing</a>';
}
5. Paste the Code
Once you have copied the code, you can add it to your store. There are multiple ways to add code snippets to WordPress. Here’s the complete guide to help you.
I have used the plugin to add the above code to my demo store.

6. Final Results
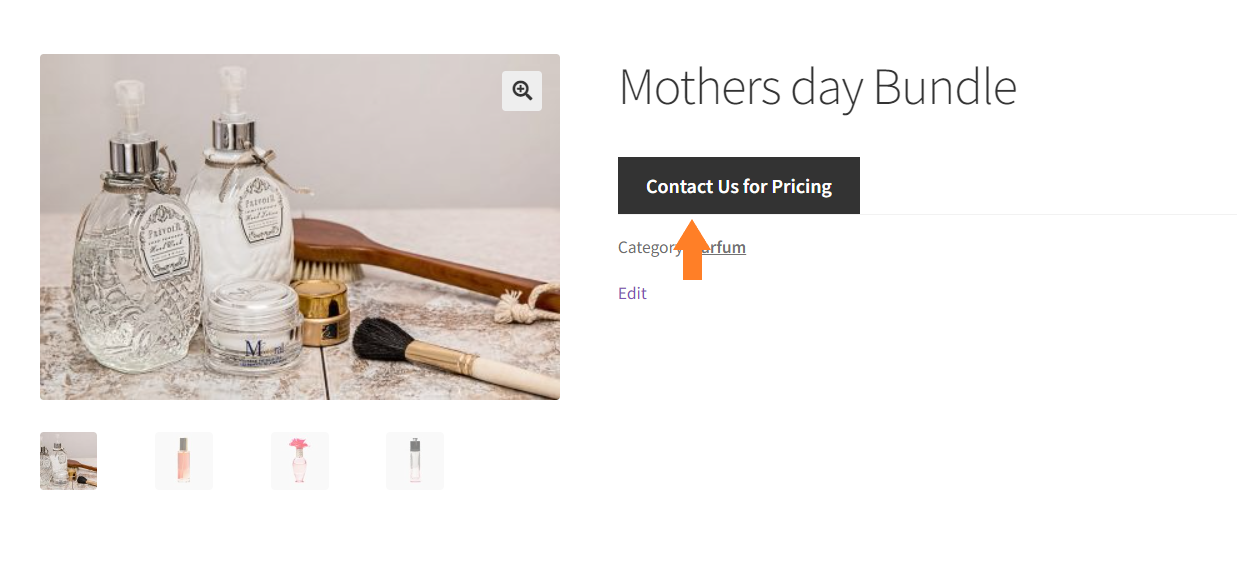
After pasting the code, visit your store’s shop or category page. I visited my demo store’s shop page and could see the contact us button instead of the product price and the add-to-cart button.

Similarly, if you visit the product pages, you will see a contact button instead of the pricing and cart buttons. Here’s what I got on my demo store after adding the code snippet.
Note: Want to Create a WooCommerce Catalog Mode Using a Plugin?
If you are finding the code method a bit difficult, don’t worry. I got you covered here as well. I have created a guide to help you create a catalog mode using a plugin without a single line of code.
Conclusion
That’s it for today’s article.
I hope it was helpful to you and you were able to create a catalog mode on your WooCommerce store using the code. I have explained the code so even a beginner can use and understand it.
But if you want a deeper understanding, I recommend learning about the WooCommerce hooks and actions.


