Do you want to add a handling fee per product in WooCommerce?
If yes, then you’ve landed at the right place!
WooCommerce is very limited in terms of adding extra features. You need to use a third-party plugin or add a piece of custom code for each feature you want.
Like the other extra features, you cannot add a handling fee per product in WooCommerce. You need to use a plugin or custom code the feature.
Unfortunately, there were no plugins that could help you add a handling fee per product in WooCommerce. So you need to go the hard way to add a handling fee per product in WooCommerce, which means you need to custom code this feature to your WooCommerce WordPress store.
But don’t worry. Thanks to the Dynamic Pricing & Discount Rules plugin by Woosuite, you can add this feature in a few clicks without using a single line of code.
So in today’s article, I’ll walk you through the step-by-step process of adding a handling fee per product in WooCommerce with the help of the Dynamic Pricing & Discount Rules plugin.
Here’s a quick sneak peek of the final results.

On This Page
- 1 Why Do You Need to Add a Handling Fee Per Product?
- 2 How to Add a Handling Fee Per Product in WooCommerce?
- 2.1 1. Install and activate the Dynamic Pricing & Discount Rules Plugin
- 2.2 2. Navigate to Dynamic Pricing Rules
- 2.3 3. Navigate to Checkout Fees Tab
- 2.4 4. Add Pricing Group
- 2.5 5. Set Checkout Fee Label
- 2.6 6. Set the Fee Type and Amount Based on the Cart Items
- 2.7 7. Apply the Condition
- 2.8 8. Save Changes
- 2.9 9. Final Results
- 3 Wrapping Up
Why Do You Need to Add a Handling Fee Per Product?
Adding a handling fee per product in WooCommerce means your users will be charged a small fee per product in the cart. There could be several reasons you want to set a handling fee per product in WooCommerce.
Let’s understand with an example.
Example: Let’s say you are selling glass crockery in your store. You are offering a premium service of shipping to the users because there are chances that the piece might get broken while shipping.
So you need to take proper care of it to deliver it to the customers safely and in good condition.
You can charge an extra fee per product in WooCommerce. Let’s say a user buys two products. He’ll be charged a fee of $5 for each product i.e., 2×5=$10.
It is one of the biggest reasons to add a handling fee per product in WooCommerce. So without further ado, let’s jump into the tutorial.
How to Add a Handling Fee Per Product in WooCommerce?
Follow the following steps to add a handling fee per product in WooCommerce with the help of the WooCommerce Dynamic Pricing & Discount Rules plugin.
1. Install and activate the Dynamic Pricing & Discount Rules Plugin
Note: You can skip this step if you have already installed and activated the Dynamic Pricing & Discount Rules plugin.
To install the Dynamic Pricing & Discount Rules plugin, you will need to install the Woosuite Core plugin and activate it with the help of a license key. We have created a Quick Start Guide for you to figure out how to install and activate the Dynamic Pricing & Discount Rules plugin.
Once you have installed and activated the plugin, navigate to Woosuite » Dynamic Pricing Rules from your WordPress dashboard.

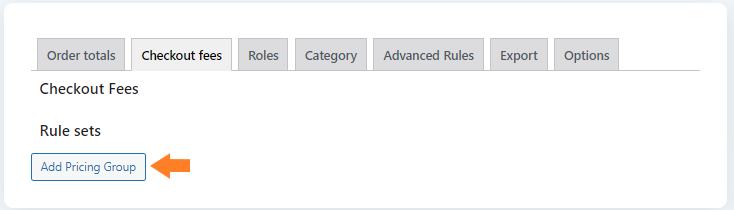
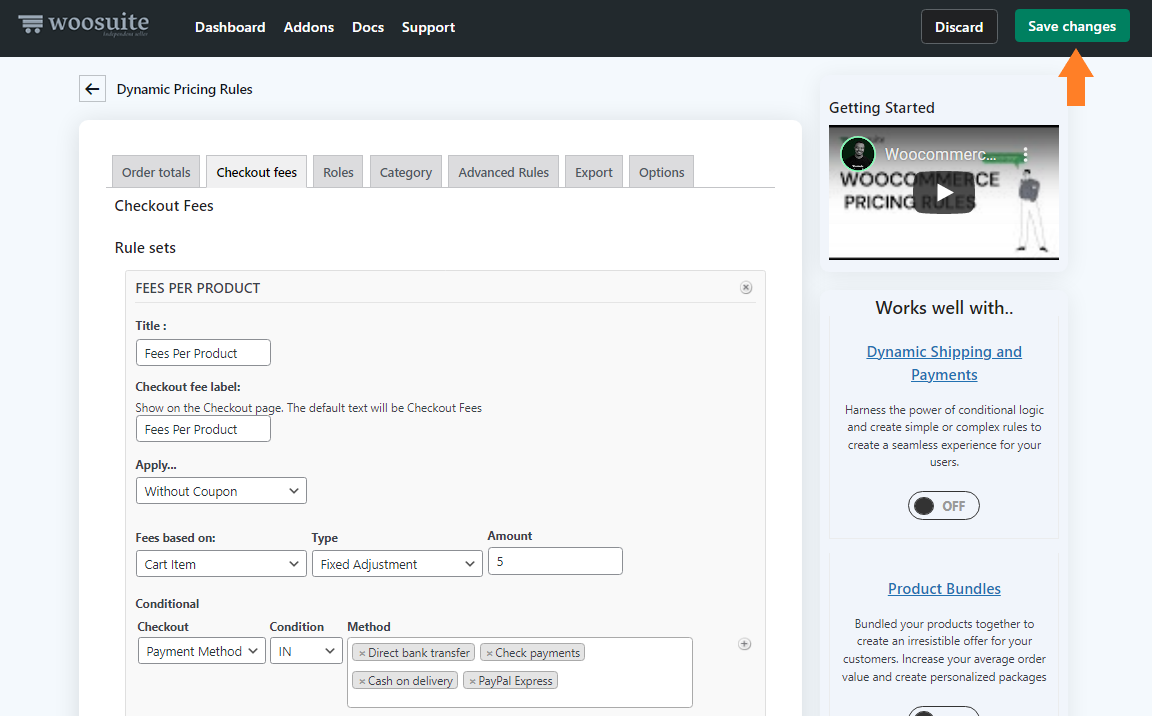
Now, navigate to the Checkout Fees tab. Depending on conditions, you can add fixed or percentage custom fees at the checkout. We’ll be adding fees per product in the later steps.

4. Add Pricing Group
Click on the Add Pricing Group button to add custom fees at checkout.
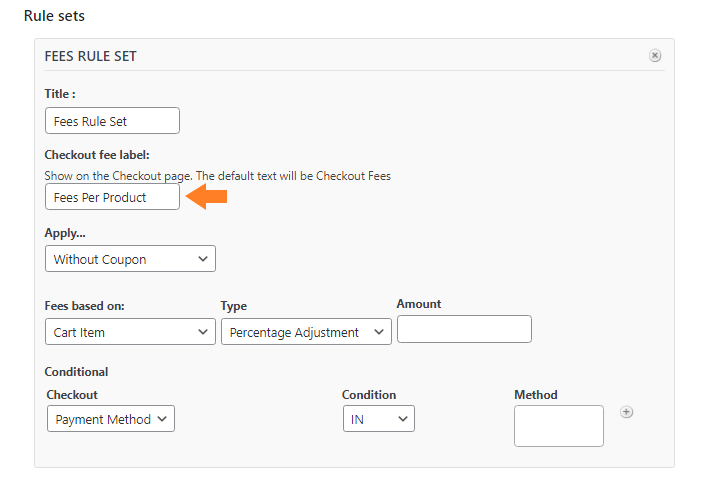
5. Set Checkout Fee Label
Now in the Checkout Fee Label field, set the label to show on the checkout page.
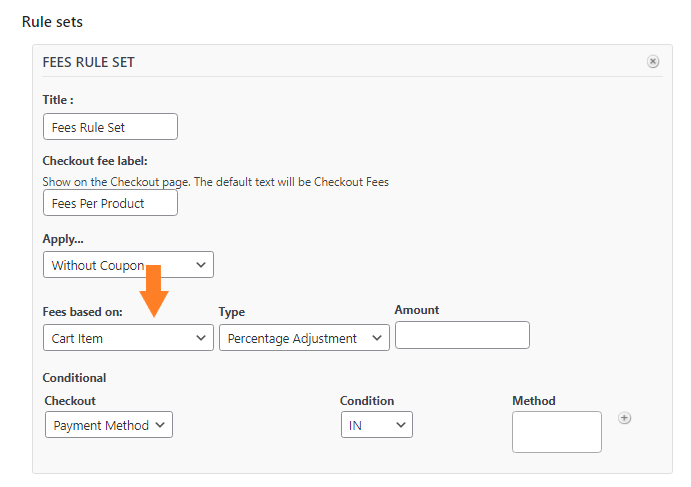
6. Set the Fee Type and Amount Based on the Cart Items
Here, we need to create a rule so that the users will be charged a fee per product in the cart. So from the “Fees Based on” dropdown, select the “Cart Item.”
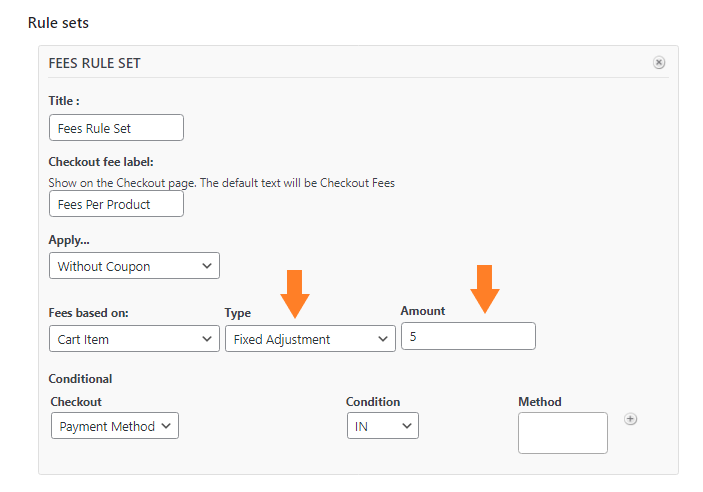
1. Set the Fee Type and Amount
Afterward, select “Fixed Adjustment” from the “Type” dropdown and set the amount in the Amount field. For this tutorial, I have set the amount as $5.
Note: You can also add fees based on percentage adjustments.
7. Apply the Condition
We need to add a condition, so the fee per product applies at the checkout.
Note: Remember that the fee won’t be applied at the checkout or cart page without adding the condition.
You can add conditions on:
- Payment Method
- Shipping Method
For this tutorial, I have added the “Payment Method” condition. Ensure that “Payment Method” is selected from the “Checkout” option and “IN” is selected from the “Condition” dropdown.
After that, in the “Method” field, select all the payment methods available in your store. If you want, you can apply the fee for specific payment gateways.

8. Save Changes
Finally, click the “Save Changes” button at the top right corner of your screen to save the changes.
9. Final Results
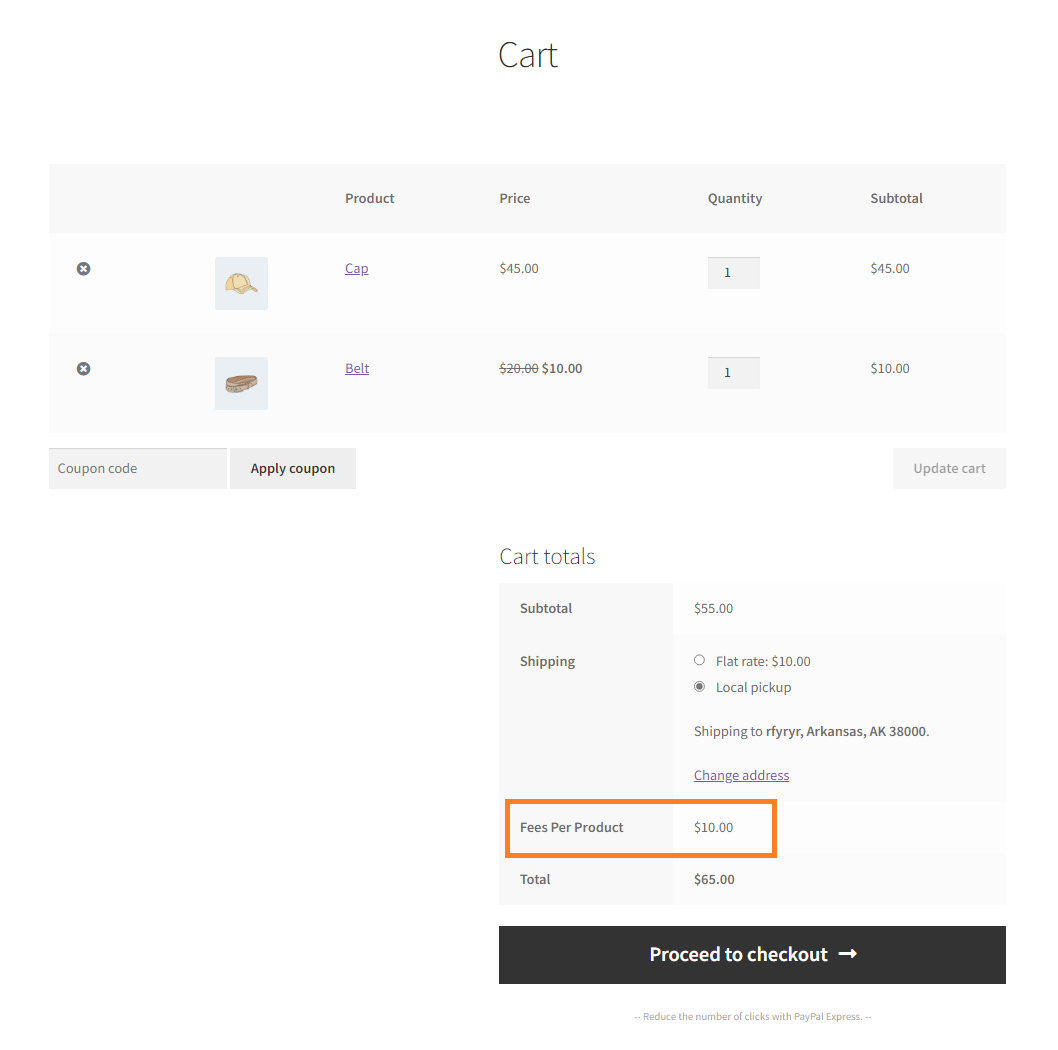
Now let’s test whether it works or not.
I added two products to my cart and visited the cart page. In the previous steps, I set a fee of $5 based on cart items. As I added two products, the fee per product is $10.
Similarly, if you increase the quantity of a product, it will be considered a separate product, and the fee will add to the cart’s total.
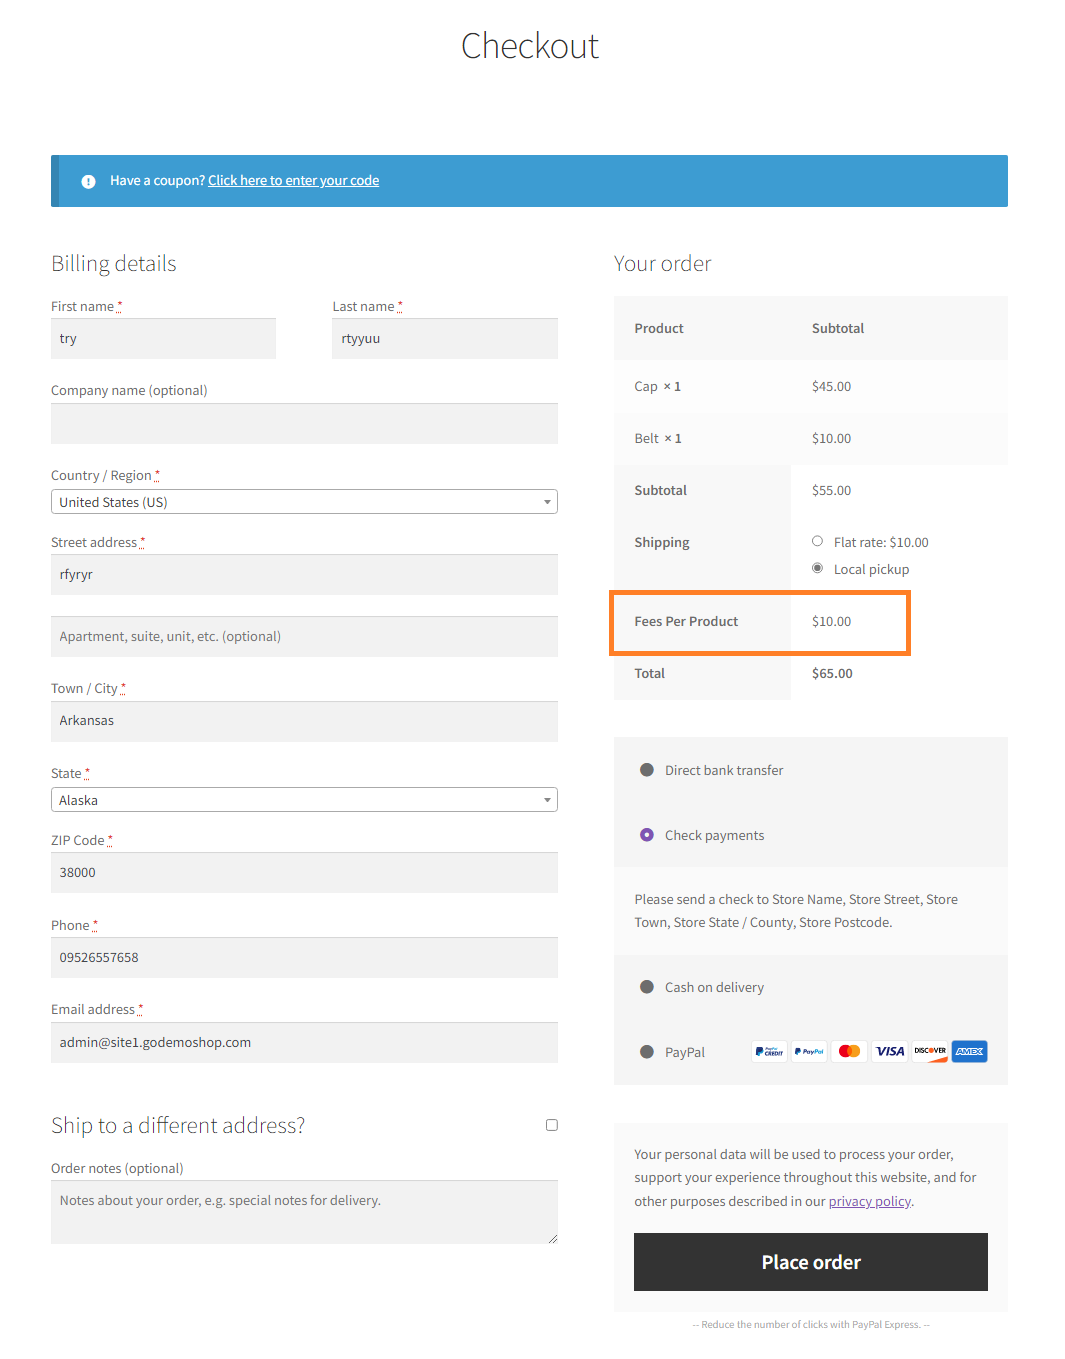
You can also see the label on the checkout page and remember that the fee will be applied no matter the selected payment method. As in the previous steps, we applied the fee per product for all the payment methods.
Wrapping Up
That’s it for today’s tutorial.
Now you know how to add a handling fee per product in WooCommerce without using any code.
Dynamic Pricing & Discount Rules plugin will also help you to add additional checkout fees and create different types of discounts, such as storewide discounts, user-based discounts, category-based discounts, and much more.
If this article helped you, please share it with your friends!
Also, if you want to share your thoughts or have any questions, please post them down in the comments section. I would love to read your reviews and answer all your questions. Download the Dynamic Pricing & Discount Rules plugin and build something great at your store!


