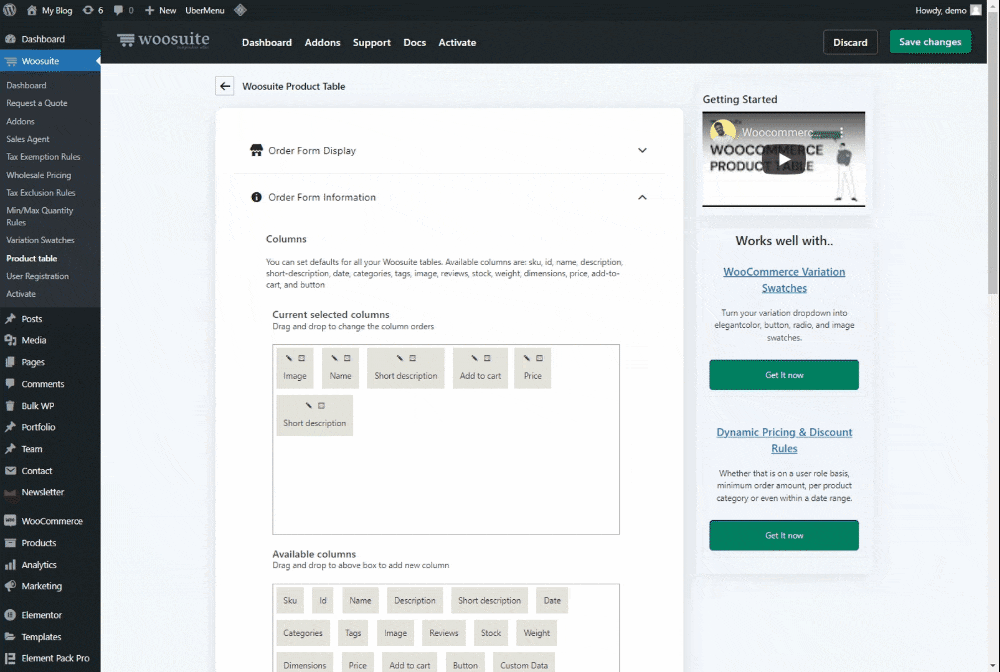
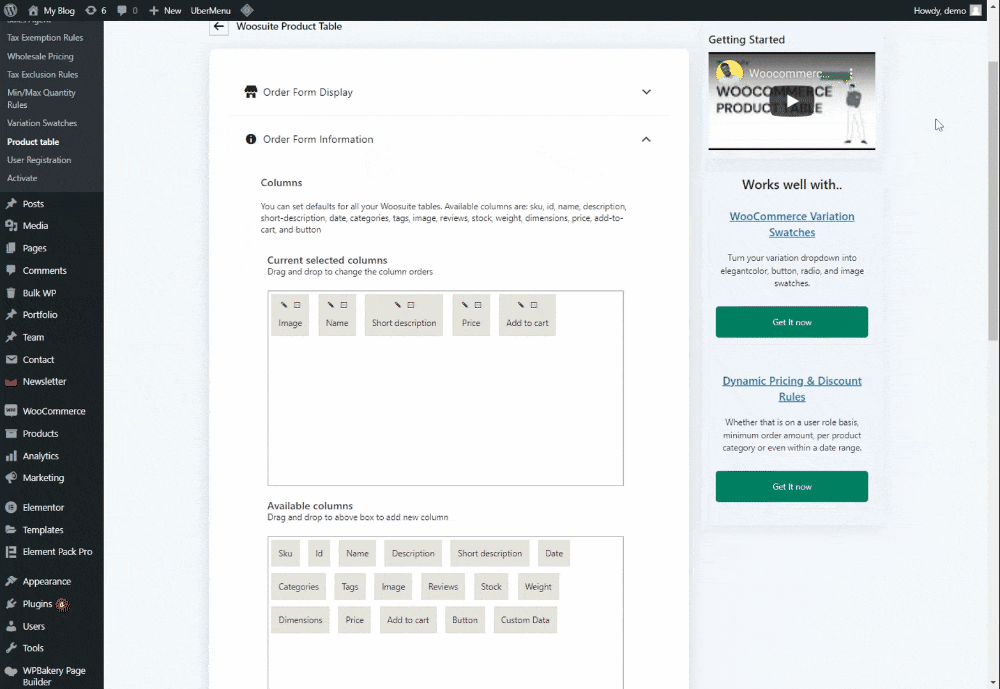
How to Change the Number WooCommerce Products Per Page

WooCommerce is very popular because it allows store owners to personalize the design of their online store. The ability to modify the WooCommerce number of products per page is one of the most intriguing WooCommerce customization features.

If you haven’t been able to find a solution that will allow your customers.d to change the number of products per page.

Worry not! I have a very simple solution that will not only help you to allow the customers to change the number of products per page but it’ll also help you to make your store’s shop page more attractive to the shoppers. 

So In today’s article, I’ll show you how to allow the customers to change the number of products per page with the help of the WooCommerce Product Table plugin. 

Here’s a quick sneak peek of the final results.

But first, let’s see why you might want to change the number of products per page.

Why You Should Change the Number of Products Per Page?

A WooCommerce shop page has 16 products by default, separated into 4 rows and 3 or 4 columns. A prominent product image, product name, price, and an Add to Cart button are usually included with each product.

Although this is a reasonable option for small businesses selling a limited number of items, it is not the best option for every online store.

So following are a few reasons to allow the customers to change the number of products per page in WooCommerce. 

1. Improve the User Experience

Allowing the customers to change the number of products per page can increase the user experience a lot as they’ll be able to easily find what they are looking for and this can increase your sales too. 

2. Improve the Shop Page Layout

If you have a large number of products and several product pages to sell. The default WooCommerce shop page layout makes it tough for customers to find what they want. They’ll have to go through a lot of pages, which will shorten their buying experience and drive them away from your site.

So allowing the customer to change the number of products per change can improve the shop page layout and the users can view all the products from a single page without navigating to other pages. 

So without further ado let’s jump into the tutorial. 

How to Change the Number of Products Per Page in WooCommerce?

Here I’ll show you the step-by-step process to change the number of products per page with the help of WooCommerce Product Table plugin. 

So, follow the following steps.

1. Install and Activate the WooCommerce Product Table Plugin

Note: You can skip this step if you have already installed and activated the WooCommerce Product Table plugin. 

To install the WooCommerce Product Table plugin, you will need to install the Woosuite Core plugin and activate it with the help of a license key. We have created a Quick Start Guide for you to figure out how to install and activate the WooCommerce Product Table plugin.

2. Create a New Customized Table

Once the plugin is installed and activated, Now we’ll change the layout of the shop page and allow the customers to select the number of products per page. 

Follow the given steps to create a customized table layout.

2.1. Add New Table

To create a table, navigate to Woosuite » Product Table from your WordPress dashboard and click on the Add New Table button. 

Once you click it, you’ll see a screen where you can create and control the different table settings. 

2.2. Order Form Display

Give an internal name to the table. This will help to identify and manage the tables if you are working with multiple tables at a time. 

2.3.  Order Form Information

Now expand the Order Form Information by clicking on the (▾) 

Now, specify the columns you want to add to the table. To add a column just drag the column from the Available columns section and drop it in the selected columns sections. 

2.4. Change the Product Image Size

Now below the available columns field, you’ll see the “Image Size” field where you can change the size of the image by adding its length and width. 

I have changed the image size to 246*246. You can adjust it according to your shop page. 

3. Allow Customers to Change the Number of Products Per Page

Now expand the Order Form Control by clicking on the (▾) 

Here you need to scroll down to the “Page Length” field and enable the dropdown from which the customers can select and change the number of products per page. 

By default, the ‘page length’ would be hidden. You can enable it by selecting its position. 

You can select the position as 

  • Above Table
  • Below Table
  • Above & Below  Table
  • Hidden

I have selected “Above & Below Table” so that the ‘Show [x] products’ dropdown list will show above and below the table. 

4. Create Custom Layout for Table

Next, we will create a custom table layout to improve the user experience. 

To create a custom layout, expand the Order Form Design table by clicking on the (▾) 

1. Enable Custom CSS

I’ll be using the custom CSS code to customize the table layout. To enable it, click on the Enable Custom CSS Toggle button. 

I have used the following CSS code You can copy and paste it to get the same layout. 

tr{ 
  cursor: pointer;
  box-shadow: 0 0 15px 0 rgb(0 0 0 / 5%) ;

}

table.dataTable{
    border-collapse: separate;
    border-spacing: 0px 1em !important;
}

/* table.dataTable tbody td{
    vertical-align: middle;
}*/

table.wc-product-table tbody tr td:last-child { 
    border-bottom-right-radius: 10px; 
}


table.dataTable.no-footer {
    border-bottom: 0px solid #111;
}

a.single-product-link {
  font-size: 30px;
  text-decoration: none;
  color: #000000;
  text-transform: uppercase;
}

5. Save Changes

Once done, click on the Save Changes button at the top right corner to save the changes. 

6. Set WooSuite Product Table as the Default Shop Page Layout

To set the Woosuite product table as the default shop page layout, go back to the General Settings of the plugin by clicking on the back arrow at the top. 

Now select the table you just created, from the Shop Pages dropdown and click on the Save Changes button at the top right corner to save the changes.

7. Final Results

Now if you visit the Shop Page of your store, you’ll see all the products are being displayed in a customized table layout and now the users can select the number of products per page from the “Show [x] products” dropdown. 

Conclusion

Now you know the method to allow the customers to change the number of products per page in WooCommerce. 

By following this method you can easily improve the user experience which will ultimately help you to get more sales. This will also boost the visibility of all the products and make the buying experience more enjoyable for clients. Customers will be able to change the number of products per page from the dropdown.

If you have any queries, you can ask them in the comments or contact our customer support. Our dedicated customer support team typically replies within 48 hours.

To get started, download the WoCommerce Product Table plugin today!

Brian
Brian

Welcome to the AovUp blog, where we discuss all things WooCommerce. I hope we can help you achieve something today...

Leave a Reply

Your email address will not be published. Required fields are marked *

We – and our partners – use cookies to deliver our services and to show you ads. By using our website, you agree to the use of cookies as described in our Cookie Policy