Are you looking for a solution to display sold-out products in WooCommerce? If you do, then you have come to the right place. In this tutorial, I will teach you how to display sold-out products in WooCommerce.
WooCommerce does not offer any features to show the out of stock products separately by default. There are times when you might want to display your sold out products Especially if you sell one off pieces. It’s a great way to showcase your previous stock or previous work.
With the help of WooCommerce Product Table plugin, I’ll show you step by step how you can achieve the desired result.
So keep on reading and find out how to display sold out products with the Product Table plugin.
On This Page
What is Product Table in WooCommerce?
A product table plugin shows the list of all products in a responsive, searchable, and filterable table. It is an excellent choice to list all the products with multiple columns and show more information. There are several benefits of adding a product table to your WooCommerce store. One of the major benefits is that it allows your customers to find all products on the same page. It will save a lot of time to search and purchase the products from the store.
Before displaying the out of stock products, we will display the in-stock products in the product table. It helps users to find products that are in stock easily. With the Product Table plugin, you can add a product table on any page on the website.
Here’s a preview of what you will be able to achieve:

How to List Available Products in WooCommerce?
By default, the product table displays all products on your WooCommerce store. You can change this behavior and list only available products from the Product Table settings.
Note: In the first two steps, we will install and activate the required plugins. You can skip those steps if you have already installed and activated the mentioned plugins.
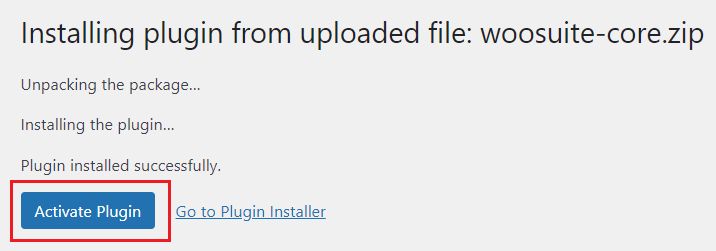
1. Install and Activate Woosuite Core Plugin
First, you have to download the Woosuite core plugin file on your device. After that, you need to upload and install the plugin to your WooCommerce site.
Go to Plugins and click Add New. Then click on the Upload plugin and choose the plugin file. After uploading the plugin, click Install Now.
Plugins > Add New > Upload Plugin > Choose File > Install Now

When the plugin is installed successfully, click on Activate Plugin to activate the plugin.
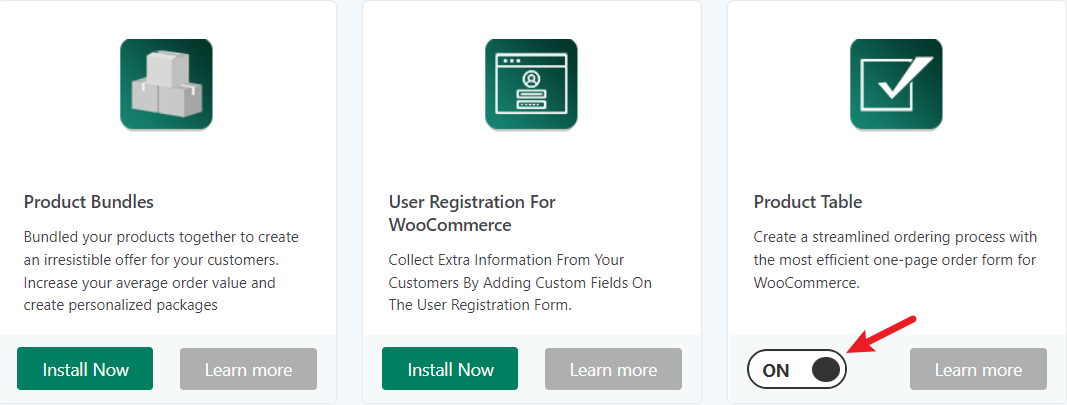
2. Install and Activate Product Table Plugin
After the Woosuite core plugin is activated, a new option, ‘Woosuite’, will be shown in the WordPress dashboard. On the Woosuite’s Addons page, you can manage multiple plugins by installing, activating, and deactivating them.
Click on Woosuite and go to the Addons page. Then find the Product Table plugin and click Install Now to install it.

You have to activate the plugin by turning the button to ‘ON’, as shown below.
3. Quick Order Form Page
After you activate the plugin, by default, it will create a Quick Order Form page to display the product table.

You can select other pages to display the product table from the Product Table setting.
4. Add a New Table
The Product Table plugin allows you to create multiple tables having different settings to display the product table. If you want to display in-stock and out-of-stock products on different tables, you will have to create two tables. First, let’s create a new table for showing the available products.
Go to Woosuite and click Product Table. Then click Add new table to add a new product table.
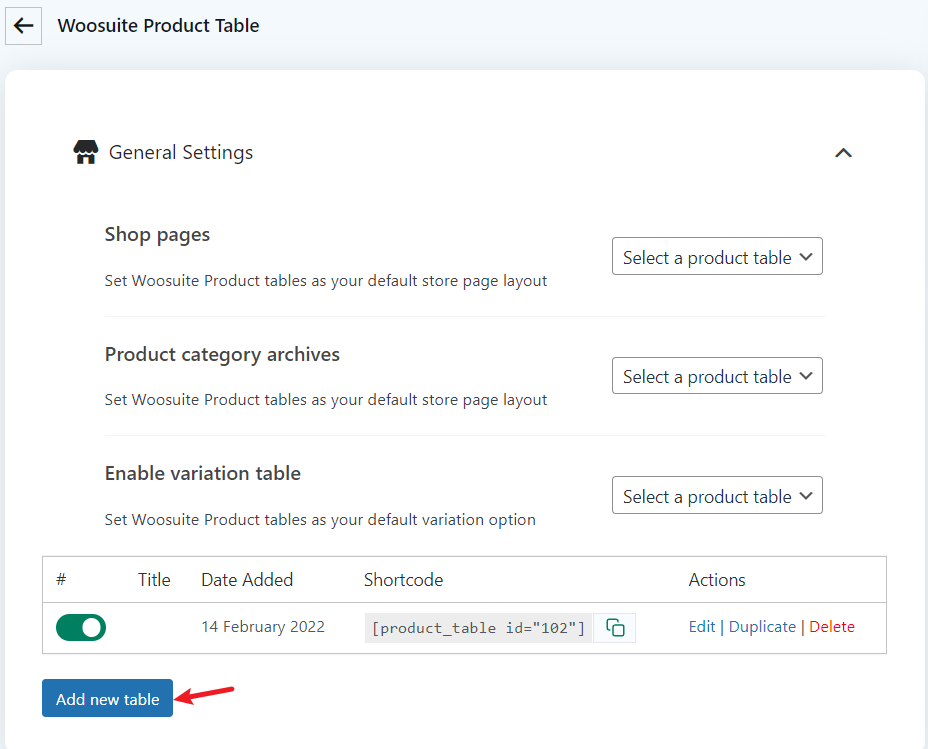
The setting page for the new table will appear.
5. Order Form Display
If you expand the Order Form Display, you will find the following option.
Title: You can provide the title for the product table.
Quick Order Form Page: It allows you to select the existing page on which you want to display this product table. We have selected the option “Select a page” because we will create a new page later to display the product table.

Order Form Information: In this section, you can select multiple columns which you want to display on the table. For example, Name, Image, Description, Categories, Price, Add to Cart, etc.
You will have to drag and drop columns from “Available columns” to the “Current selected columns” to add columns. It also lets you change the column orders.
We have selected the following columns to display on this product table.

6. Add a Rule to Display Instock Products
This is the main part where we will filter the table to display only products that are in stock.
Expand the Order Form Controls section and click Add rule in the Product conditions option.
Then edit the rule as follows:
Type: Stock Status
Value: In Stock

You can add a dropdown to filter the table by category, tag, attribute, or custom taxonomy. This setting is useful as it helps users to find exactly what they want easily.

After configuring all the settings, click Save changes to save the product table. If you again navigate to Product Table from Woosuite, you will find the newly created table. The new product table id will be different so you can use the multiple tables with different settings on your store.

7. Add a Product Table Shortcode
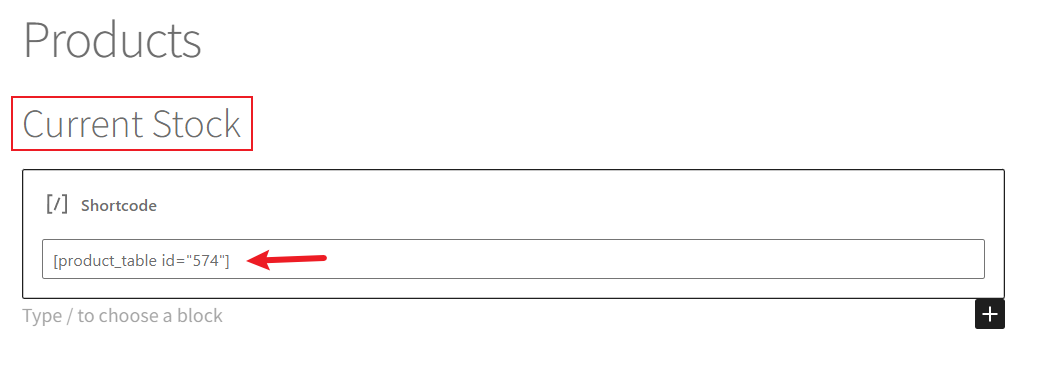
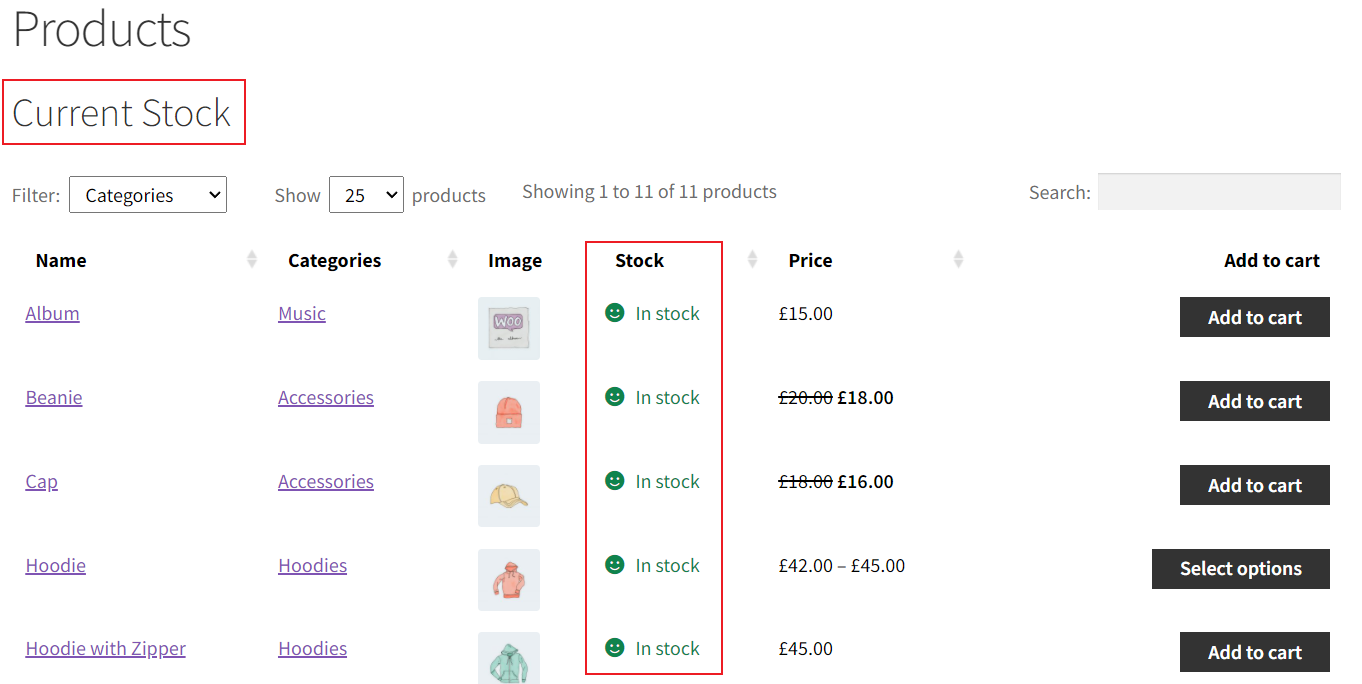
The shortcode of the table can be added to any page to display the product table. For example, our new product table’s shortcode is [product_table id=”574″]. We will use this shortcode and display the in-stock products on the desired page.
Go to Pages and click Add New. Provide the title for the page, for e.g., Products. After that, give the heading as Current Stock. Then add a shortcode block and insert your product table shortcode.
After setting up the page, publish the page and visit the page to view the product table.
How to List Sold Out Products in WooCommerce?
Now, let’s display the out of stock products in the store. We will need the new table to show the sold out products.
1. Add a New Table
Go to Woosuite and click Product Table. Then click Add new table to add a new product table.
Provide the title “Out-of-Stock Products” and use the option “Select a page” on the Quick Order Form Page.

2. Order Form Display
Then choose the columns you want to display on the product table. We have selected the following columns for the sold out products table.

3. Add a Rule to Display Sold Out Products
Now, we will create a rule so that only out of stock products are displayed on the table.
Expand the Order Form Controls section and click Add rule in the Product conditions option.
Edit the rule as follows:
Type: Stock Status
Value: Out of Stock
Then click Save changes to save the table and visit the Product table page. As you can see, a new table is created.

4. Add a Product Table Shortcode
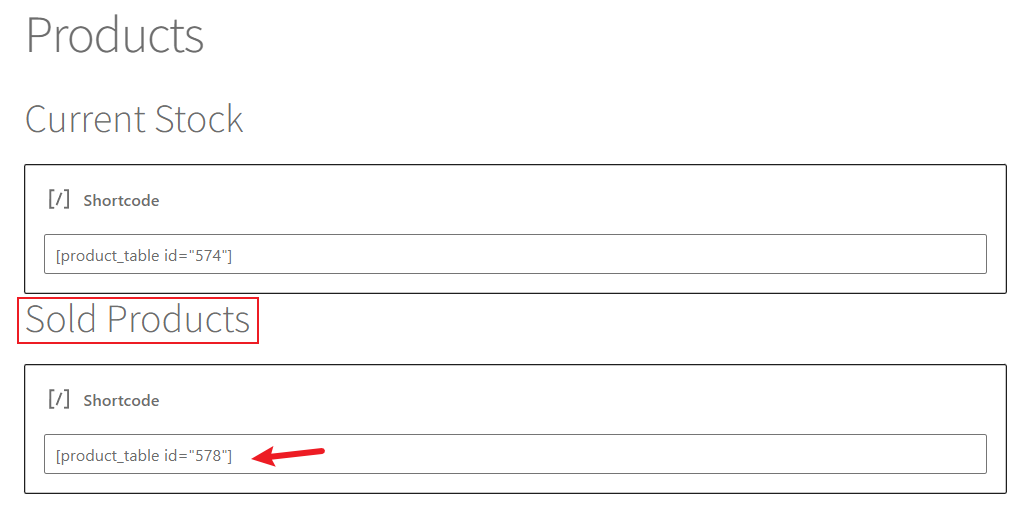
We will use the shortcode of “Out-of-Stock Products” table to display sold out products.
Go to Pages and edit the Products page. Add a new heading “Sold Products” and insert the shortcode in the shortcode block.
Then update and visit the page to check whether the new product table is displaying out of stock products or not.

As you can see, it only shows products that are out of stock. In this way, you can easily show available and sold out products on the product table.
Conclusion
The Product Table plugin makes it super easy to display available and sold out products on the Woocommerce store. It becomes easier to browse products and know their availability. So, it is an excellent way to provide the stock status of products to your customers. We also showed how you can add or remove the columns from the product table.
We hope this article helps you to understand how to list the available and sold out products separately on the product table. If you have any confusion, please contact us for further information.
Ready to display sold out products in Woocommerce? Install the Product Table plugin today.


