WooCommerce one click upsell is a valuable marketing technique that enables online businesses to increase their revenue by optimizing each customer transaction.
This strategy facilitates offering additional products or services to customers during the checkout process, encouraging them to spend more effortlessly.
By leveraging WooCommerce one click upselling technique, businesses can enhance their customers’ experience and increase their profits in a few simple steps.
In this article, we’ll explore the features and advantages of WooCommerce One Click Upsell and how it can assist businesses in boosting their sales to new heights.
Without any further ado, let’s jump into the tutorial.
On This Page
What Do You Need To Implement a Successful WooCommerce One-Click Upsell?
The one-click upsell strategy involves identifying the right products to offer, creating compelling and personalized offers, and presenting them to customers at the right time.
To implement a successful one-click upsell strategy, businesses need to:
1. Identify the right products
One-click upsell works best when the additional products or services are relevant to the customer’s purchase. Businesses need to identify complementary products or services that customers will likely be interested in.
2. Create compelling offers
Upsell offers need to be compelling enough to encourage customers to add them to their cart. Businesses should consider offering discounts or incentives to create exciting upsell offers.
3. Personalize offers
Personalization is key to a successful one-click upsell strategy. Businesses need to use customer data and purchase history to tailor their upsell offers to each customer’s needs and preferences.
4. Present offers at the right time
Timing is crucial in the one-click upsell strategy. Offers should be presented at the right point in the checkout process when customers will most likely be receptive to them.
By implementing the WooCommerce one-click upsell strategy, businesses can increase their revenue and improve their customer experience by providing personalized and relevant offers that enhance the shopping experience.
Now let’s dive in to see how to create compelling WooCommerce one-click upsell offers.
How to Create WooCommerce One-Click Upsells?
To create the WooCommerce one-click upsell offer, I’ll use the AIO Checkout plugin by Woosuite. It will help you create various order bumps in a few simple steps.
Following are the steps to help you create a WooCommerce one-click upsell offer.
1. Install and Activate the AIO Checkout Plugin
First, download the AIO Checkout plugin from the Woosuite store. It is free for now, and you can get it by submitting the form.
Once you have downloaded it, navigate to the Plugins » Add New from your WordPress admin dashboard, and click the Upload button to upload the downloaded file to install and activate the plugin.
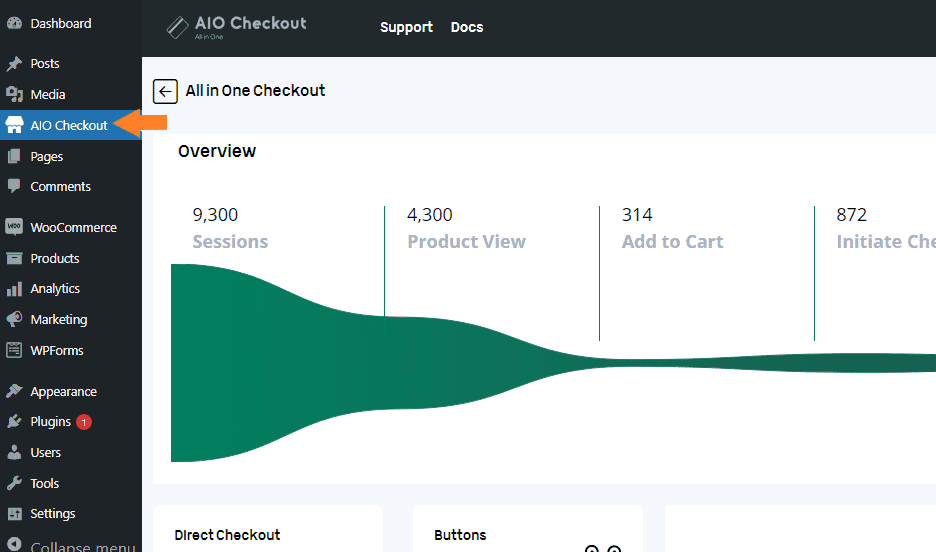
Once you have installed and activated the plugin, navigate to AIO Checkout from your WordPress dashboard.
3. Create a WooCommerce One-Click Upsell Offer
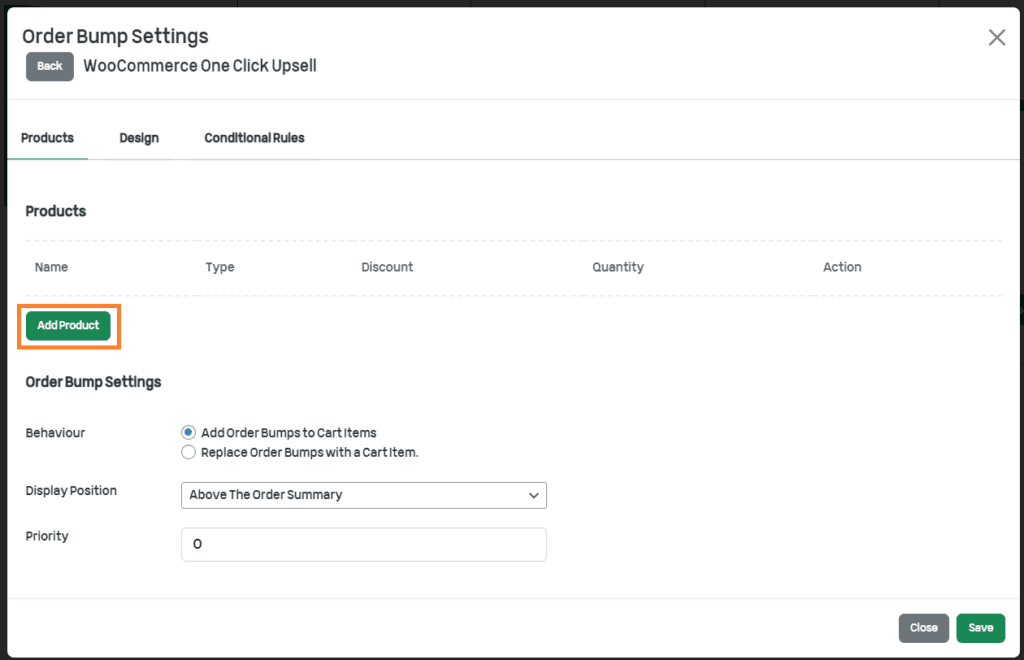
Once on the settings page, we need to create a one-click upselling offer. It will be shown at the cart and the checkout so customers can decide whether or not they want to purchase the upselling offers. The plugin calls it the order bump.
To create an order bump, click the ‘Order Bump’ section.
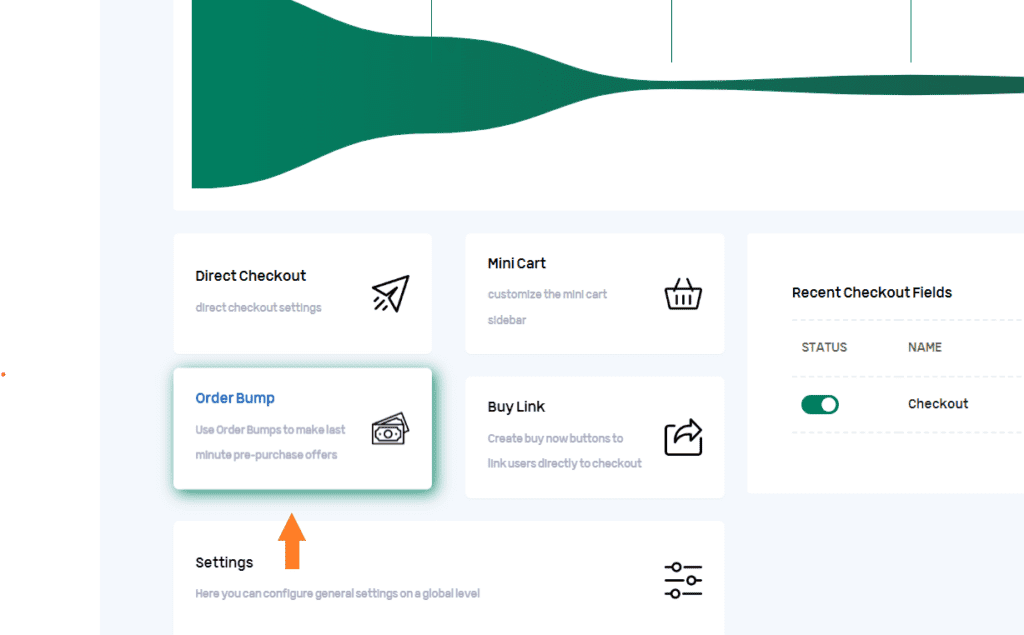
3.1. Add Order Bump
Once you click it, a pop-up will appear from where you can create different order bumps. I have already created a few.
Click the ‘Add Order Bump’ button to create an order bump.

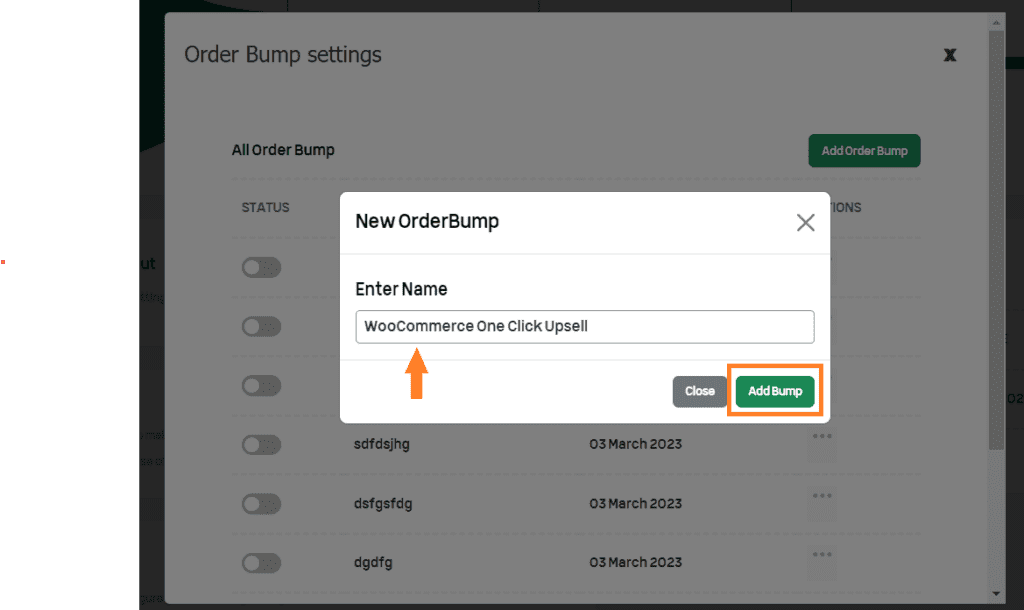
3.2. Name the Order Bump
Once you click the button, a pop-up will appear. Enter the name of the order bump in the field and click the ‘Add Bump’ button.
3.3. Add the Product to the Order Bump
After adding the order bump, we need to configure it to match our expectations. We need to add the insurance product to it.
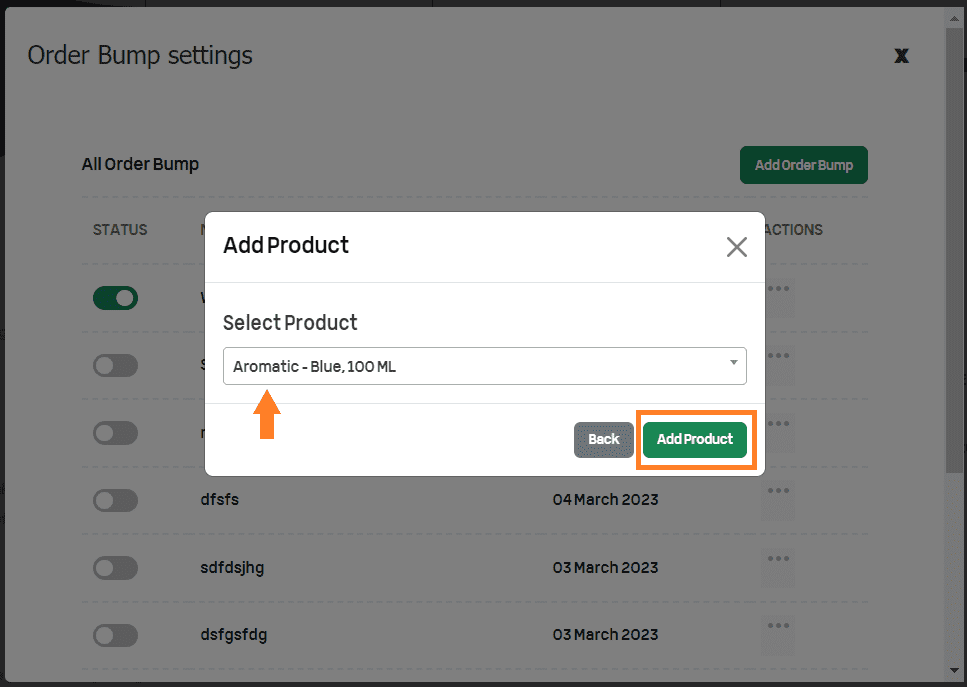
Once you add the order bump, a new pop-up will appear. Click the ‘Add Product’ button to add the product you want to upsell on the cart and checkout pages.
Once you click the button, a pop-up will appear from where you can select the product you want to upsell. Select the product from the pop-up and click the ‘Add Product’ button to add it to the order bump.
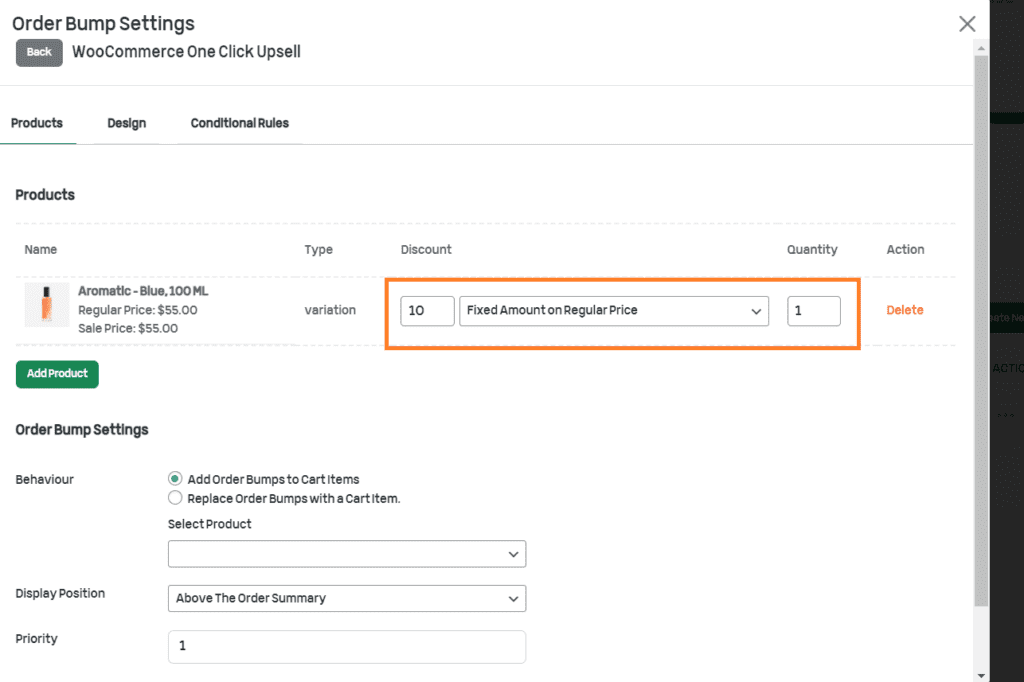
You can also set the discounts. For now, you can add discounts based on four conditions.
- Percentage (%) of Sale Price
- Fixed Amount on Sale Price
- Percentage (%) of Regular Price
- Fixed Amount on Regular Price
In the future, an update will allow you to create discounts based on the total cart. For example, If the cart total is $1000, you can set the discount as ‘10% of the total cart.’
For now, I am selecting ‘Fixed Amount on Regular Price.’ You can also select the number of products you want to offer.
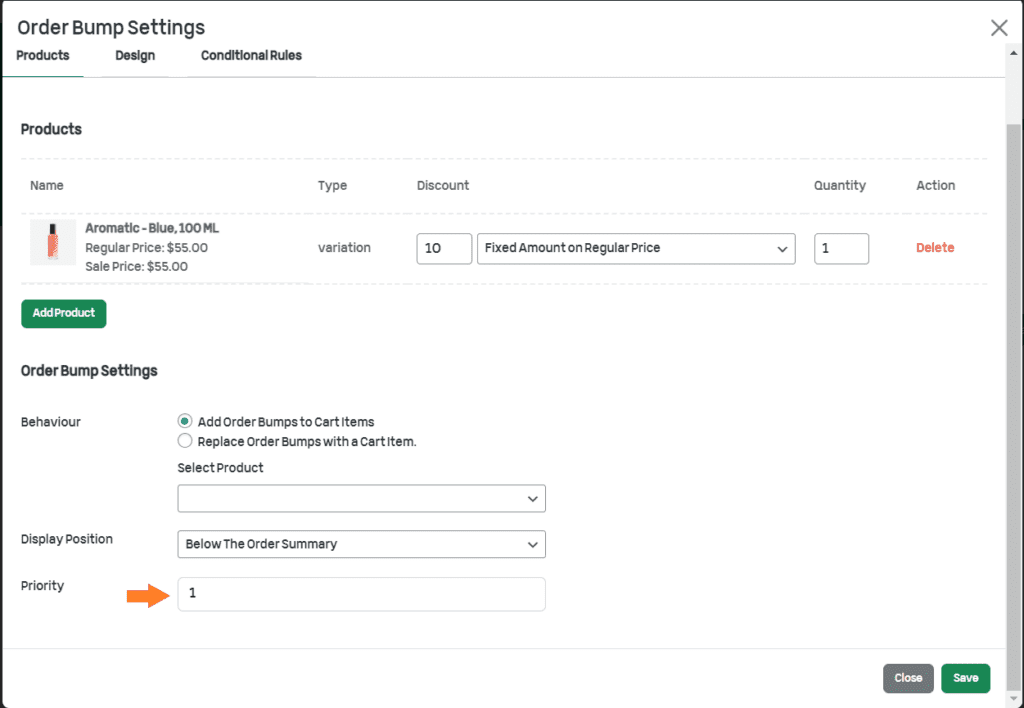
3.4. Select the Position of the Order Bump
We need to select the position where we want to display the order bump from the ‘Display Position’ dropdown. You can display it in five different positions.
- Above the order summary
- Below the order summary
- Above the payment gateways
- Below the payment gateways
- Above checkout form
For this tutorial, I am selecting the ‘Below the order summary’ option to display the one-click upsell offer below the order summary.
Note: You can leave the ‘Behaviour’ to default. But it is up to you to explore it.
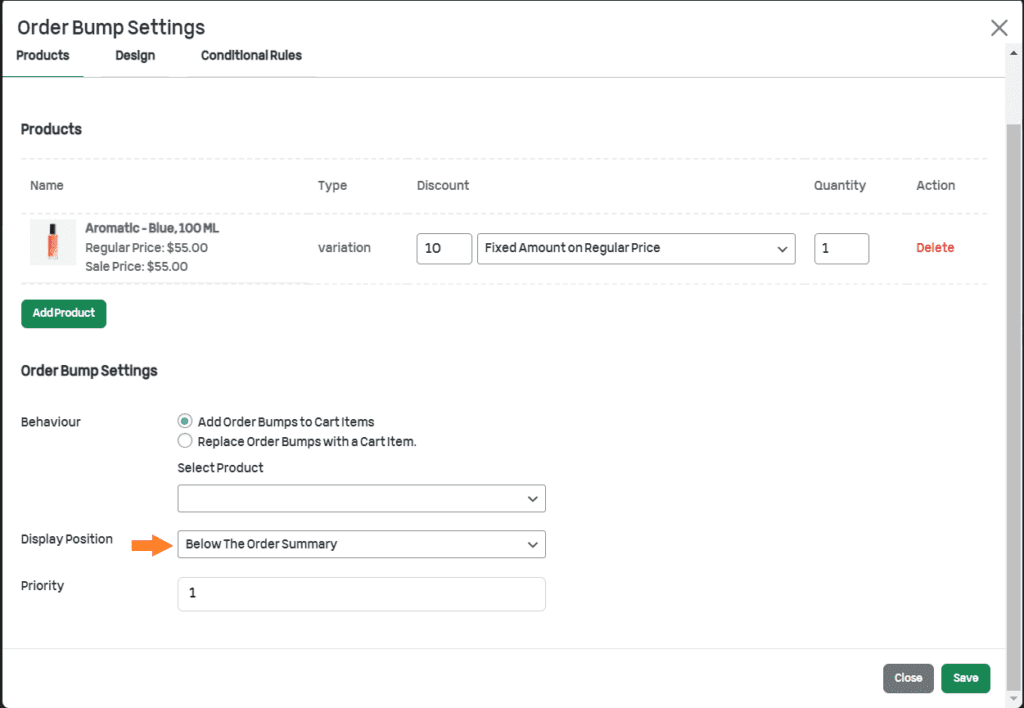
3.5. Set the Priority
Next, we need to set the priority of this order bump in the ‘Priority’ tab. For this order bump, I am putting it to 1.
Please note that if you have created multiple order bumps, the one with the lowest priority will run first.
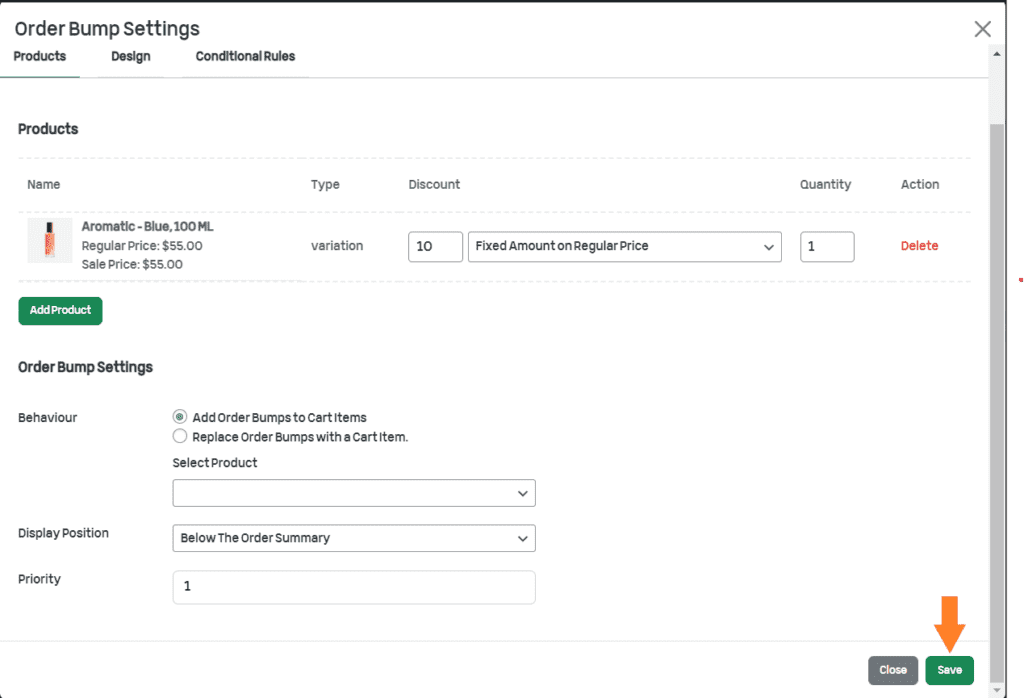
3.6. Save Settings
Finally, click the green ‘Save’ button on the bottom right side of the pop-up to save the order bump settings.
4. Configure the WooCommerce One-Click Upsell CTA
We need to configure the title of the order bump that will encourage the customers to purchase the shipping insurance.
To do so, click the ‘Design’ tab in the pop-up.
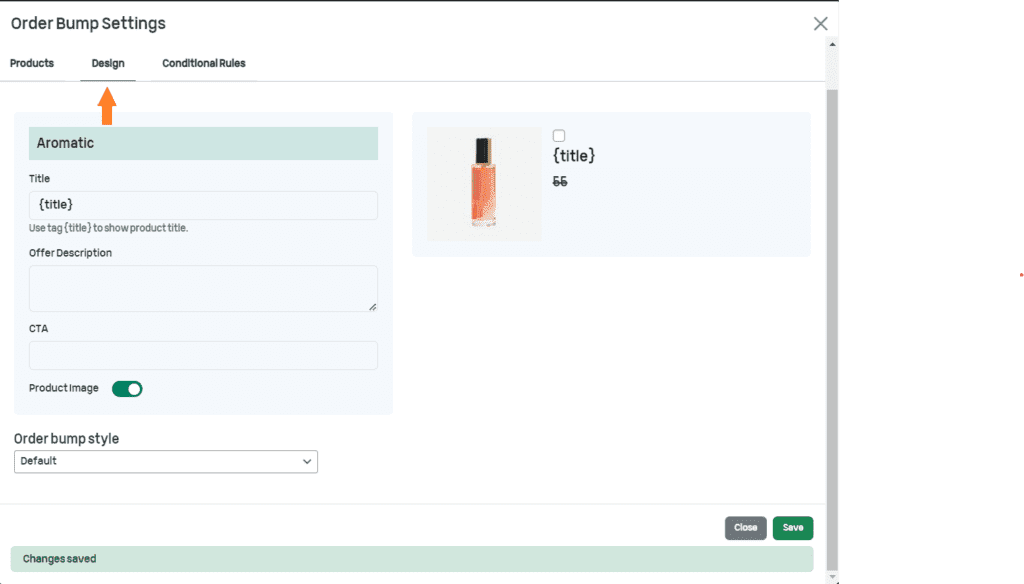
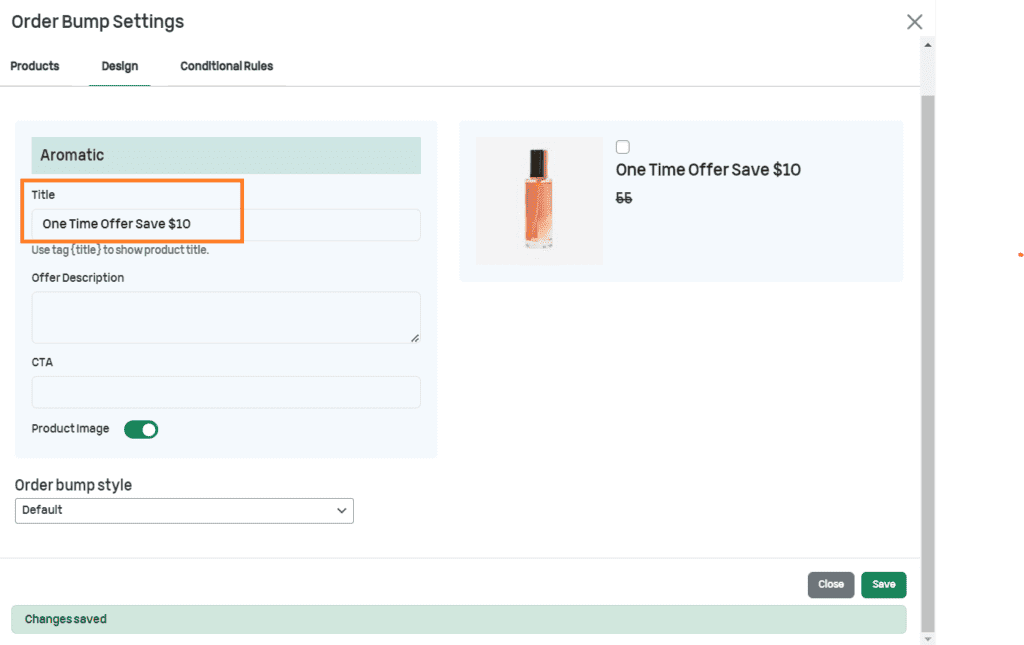
4.1. Add the Title
In the ‘Title’ field, add the title you want to display at the cart and checkout that will encourage customers to purchase the order bump.
4.2. Add Offer Description
In the ‘Offer Description’ field, enter the description to give customers some sort of info, or it depends on how you use it.
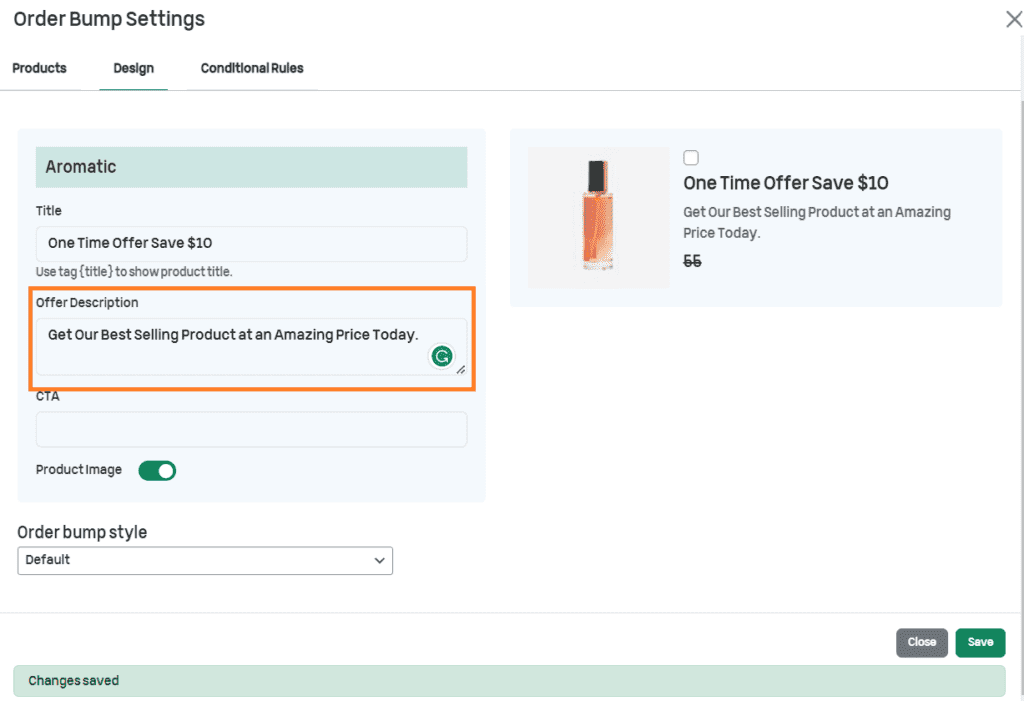
4.3. Add the CTA
In the ‘CTA’ field, enter the call to action. It could be anything that excites the customers, like ‘Grab the Offer’ or ‘Yes, I want this.’
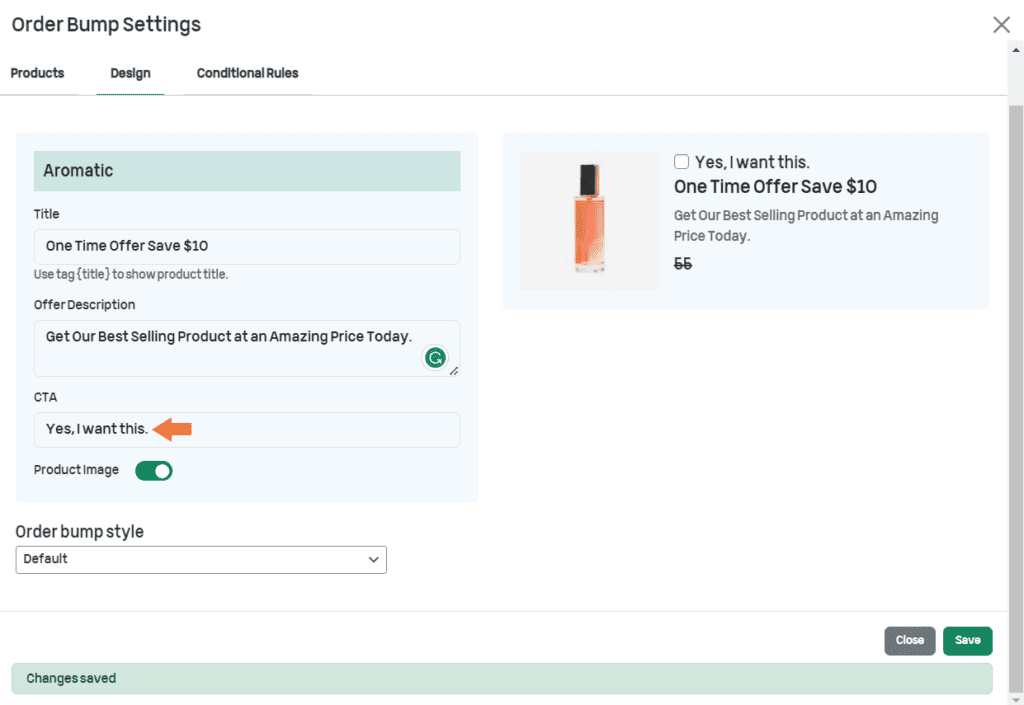
Don’t forget to click the ‘Save’ button to save the settings.
4.4. Add Conditions (Optional)
Next, if you want to add conditions to the order bump, you can do it by going into the ‘Conditional Rules’ tab and selecting the condition you want.
You can select from six different conditions.
- Cart Total
- Cart Total (Subtotal)
- Cart Category(s)
- Cart Item Count
- Shipping Country
- Billing Country
You can add different rules based on the ‘AND’ and ‘OR’ conditions. The rules within the AND condition will be applied if all the rules are correct, while in the case of the OR condition, if one or more rules are correct, the condition will be used.
I am adding a condition that says if the cart total exceeds $100, then this order bump will be displayed. To add this condition, I have selected the ‘Cart Total’ from the dropdown.
Once you select any condition, a new dropdown will appear beside it. From there, you can set a second condition. I am selecting the ‘is greater than’ from the dropdown.
Next, you just need to type the amount you want to display the one-click upsell offer. You can also add multiple rules by clicking the ‘Add Rule Group’ button.
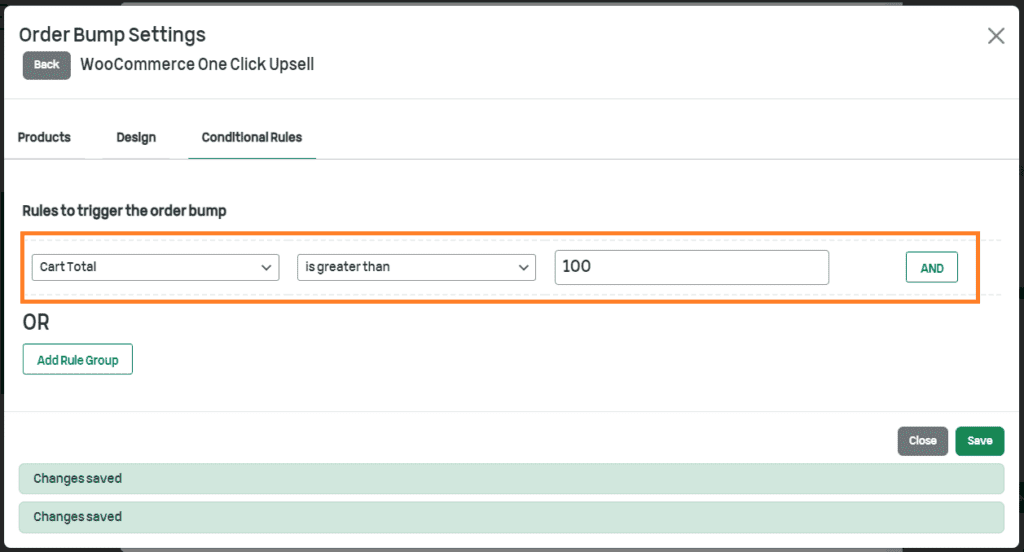
Don’t forget to click the ‘Save’ button at the button right corner of the pop-up.
5. Display the Shipping Insurance Upsell in the Mini Cart (Optional)
This step is optional. If you have created a mini-cart, you can display the one-click upsell offer in the mini-cart as well in just a few clicks.
Fortunately, you won’t have to look for another plugin to create a mini-cart or display the order bumps in the mini-cart. The AIO Checkout plugin is all you need.
I have compiled a guide for you that will not only help you create a mini-cart but also guides you through creating a free shipping amount counter.
Once you have created the mini-cart, you’ll see a new option below it to show the order bump in the mini-cart.
Enable the ‘Show the order bump in the mini-cart’ option and select the order bump position.
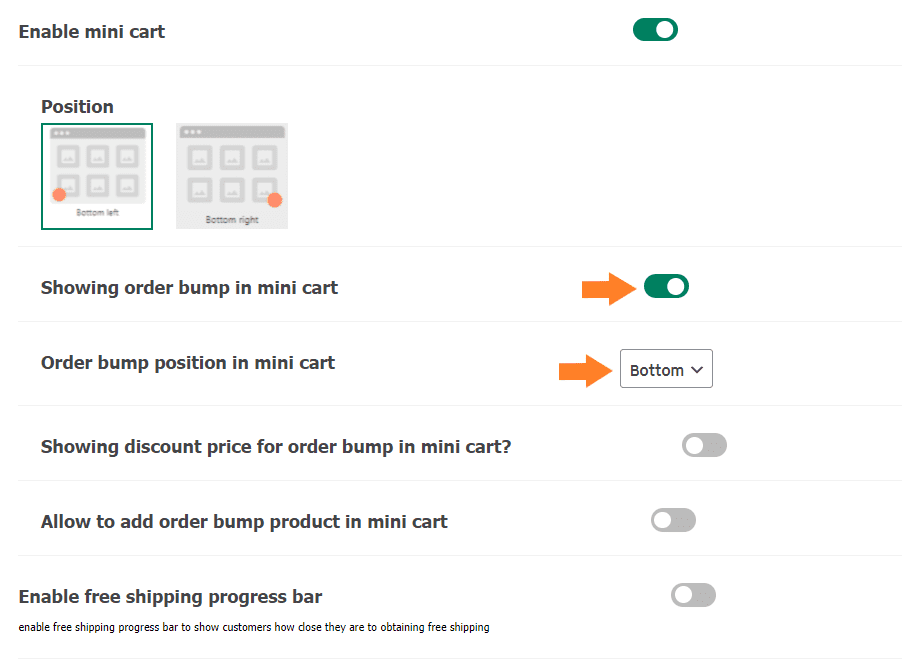
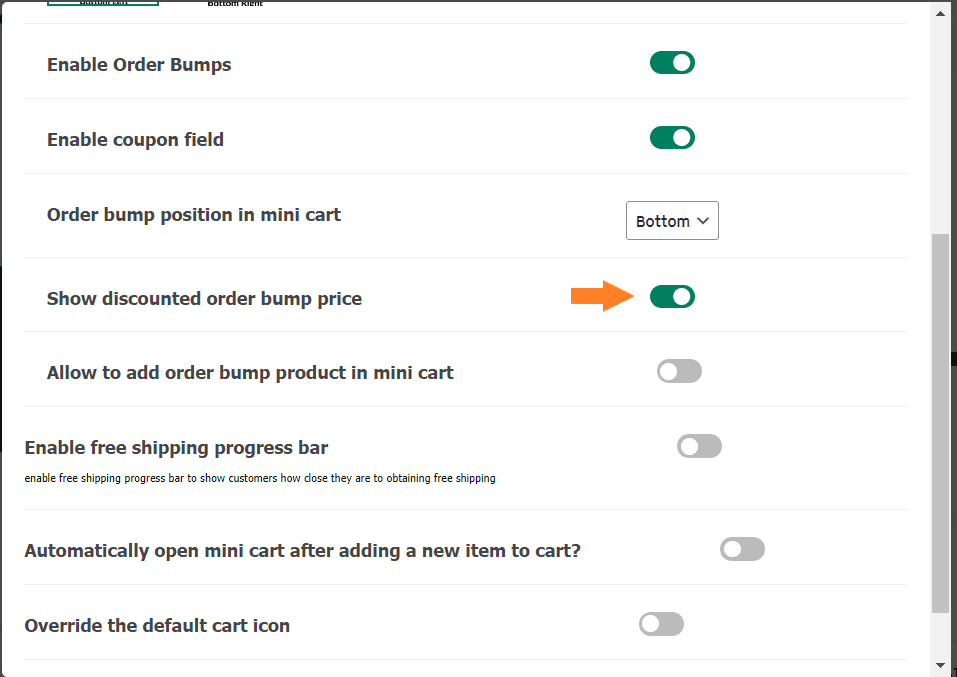
5.1. Enable the Discount Price
Next, you need to enable the ‘Showing discount price for order bump in mini cart’ option to display the discounted price for order bumps.
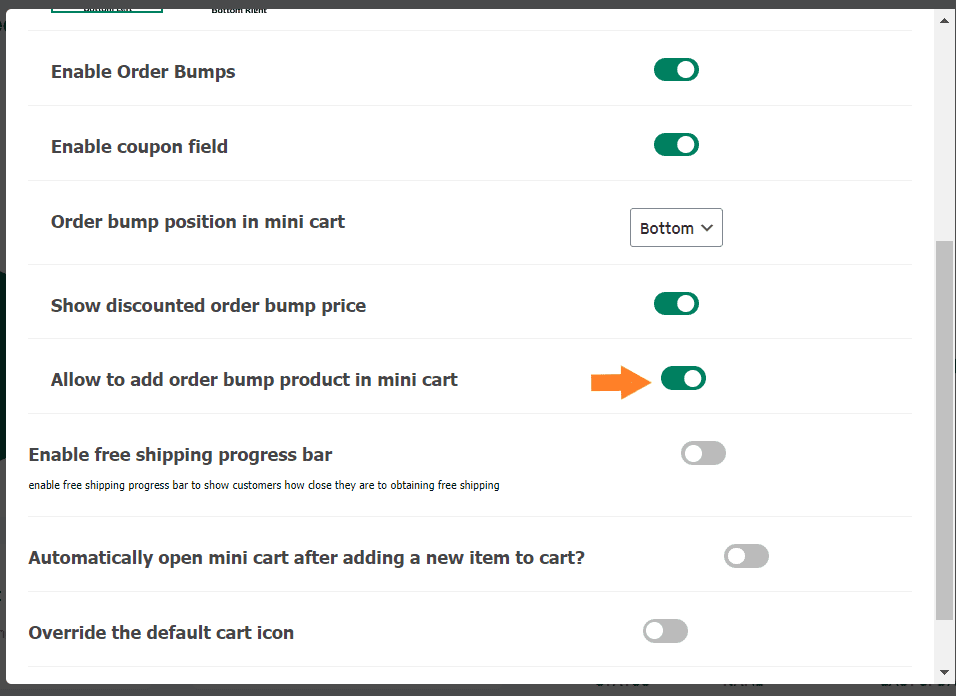
5.2. Allow Customers to Add the Order Bump the Cart
Next, you need to allow the customers to add the order bump product in the mini cart by enabling the ‘Allow to add order bump product in mini cart’ option.
Don’t forget to save the settings.
6. Final Results
Now, let’s test it.
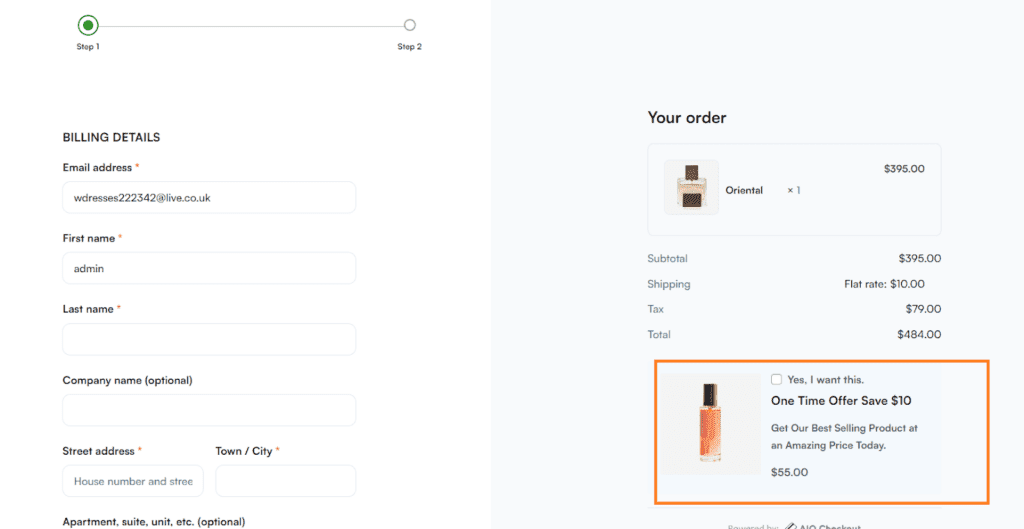
To test it, I visited the shop page and added a few products to my cart to make the cart total greater than $100. When I opened the mini-cart, as you can see in the screenshot below, the order bump had been added to the mini-cart.
Now your customers can easily purchase the one-click upsell offer in a single click from the mini-cart.
When I visited the checkout page, I could see the order bump below the order summary.
Note: I am using the custom checkout created by the AIO Checkout plugin. You can follow the following tutorials to create a custom WooCommerce checkout.
- How To Create a WooCommerce Checkout like Shopify?
- How to Combine WooCommerce Cart and Checkout Page?
- How to Add a WooCommerce One-Click Buy Checkout
- How to Create a WooCommerce 2-step Checkout
- How to Edit the WooCommerce Checkout Page
- How To Enable One Page Checkout Shop In WooCommerce?
Frequently Asked Questions (FAQs)
How Does One-Click Upsell Work?
One-click upsell is a strategy that works by offering customers additional products or services during the checkout process. They can purchase it with just one click.
This presents personalized and relevant upsell offers based on the customer’s purchase history, preferences, and behavior. By making it easy for customers to add more items to their cart with just one click, businesses can increase revenue and improve the overall shopping experience.
What are Upsells and Cross-sells in WooCommerce?
Upsells and cross-sells are product recommendation strategies in WooCommerce. Upsells are higher-value or better-quality products that are similar to the product a customer is currently viewing, while cross-sells are complementary products that enhance the customer’s overall shopping experience. Businesses can increase revenue and improve customer experience by offering upsells and cross-sells.
In WooCommerce, adding upsells and cross-sells is easy and can be done using the AIO Checkout plugin.
How Do I Set up an Upsell in WooCommerce?
To set up and upsell in WooCommerce, you can use Woosuite’s plugins like AIO Checkout. It will allow you to set up an upsell in just a few simple clicks. You can also use the WooCommerce Product Bundles plugin to create upsell.
Conclusion
That’s it for today’s article. I hope this article was helpful to you and you were able to create WooCommerce one-click upsells without any difficulty.
One-click upsells are always beneficial as long as you are upselling the relevant products that can add value to the existing purchase of customers. It is a significant factor that can decide the success of a one-click upsell.
Also, AIO Checkout is the best plugin to create upsell and cross-sell offers in WooCommerce. It also helps you with several other cart and checkout issues. I have a complete comparison that explains how AIO Checkout is better than the others.
I also have a guide that explains the difference between upsell and cross-sell and which strategy you should use.
Ready to create successful WooCommerce one-click upsell offers? Download the AIO Checkout plugin now!


