When customers do not see the add-to-cart message upon adding an item to their cart, it may cause confusion.
As an online store owner, you know how important it is to provide a seamless shopping experience to your customers. Such errors may cause you to lose sales and customer confidence.
But don’t worry. I got you covered here!
In today’s article, I will point out a few quick fixes to this error so you can revive your customer experience and get going with the sales.
At the end of this tutorial, you can fix the ‘WooCommerce add-to-cart message not showing’ error to provide a smooth customer shopping experience.
Before diving into fixing the error, let’s understand a bit about the error and why it occurs.
On This Page
- 1 What is the “WooCommerce Add to Cart Message Not Showing” Error?
- 2 How to Fix the ‘WooCommerce Add to Cart Message Not Showing’ Error?
- 3 How to Improve the WooCommerce Cart and the Checkout Pages?
- 4 Conclusion
What is the “WooCommerce Add to Cart Message Not Showing” Error?
The WooCommerce add-to-cart message not showing means when users add a product to their cart, they don’t see any message confirming whether the product has been added to their cart.
Usually, when a user clicks the add-to-cart button to add the product to the cart, they see a confirmation message saying, ‘The product has been added to your cart successfully.’
But if your site has the ‘WooCommerce add-to-cart message not showing’ error, the message will not be displayed to the customers.
It can be frustrating for the customers and may need clarification on whether the item is added to the cart. It can also cause the store owners to lose sales.
There can be several reasons for this error, but the most common ones include the following:
- Conflicts with other plugins.
- Issues with the theme’s code.
- Problem with WooCommerce settings.
- Server, site, or browser cache.
Fortunately, there are ways to fix this error and provide customers with a smooth shopping experience without losing sales.
Without any further ado, let’s jump straight into fixing the error.
How to Fix the ‘WooCommerce Add to Cart Message Not Showing’ Error?
The following are a few ways to help you fix the ‘WooCommerce add-to-cart message not showing’ error.
1. Check Your Theme’s Code
The add-to-cart message is typically displayed through your theme’s code. If there are any conflicts or issues with the code, the add-to-cart message may not appear.
To determine if the issue is with your theme, there are two methods, and you can use any of them.
1.1. Switch to a Default Theme
Probably, you’ll be using a different WooCommerce theme than WordPress’s default themes that come with the WordPress installation. To check if the error is due to your existing theme, you can try to switch to a default theme like twenty-twenty-three.

Now you can test by adding a product to the cart and checking if the message shows. If the confirmation shows on the default theme, the issue is with your theme’s code. And you need to contact your theme’s developer to help you fix it.
1.2. Check Your Theme’s Code
The second method to check if the error is due to your theme’s code is by checking your theme’s code. It may require you the coding knowledge.
You need to look for any conflicts or issues that may be preventing the message from showing up, such as missing or incorrect WooCommerce hooks.
You can also contact your theme’s developer to help you with it.
2. Check for Plugin Conflicts
The second method to fix the ‘WooCommerce add-to-cart message not showing’ error is to check for plugin conflicts. Plugin conflicts with other plugins can also cause the add-to-cart message not to appear.
To check for any plugin conflict, there are two different methods.
2.1. Troubleshoot Using the Plugin
The first method to check for the plugin conflict is by using a plugin named Health Check & Troubleshooting. This plugin will allow you to enable the troubleshooting mode and disable all the plugins.
After that, you can enable each plugin individually and check if the add-to-cart message appears. It is a free plugin that you can download from the WordPress repository.
2.1.1. Install and Activate the Plugin
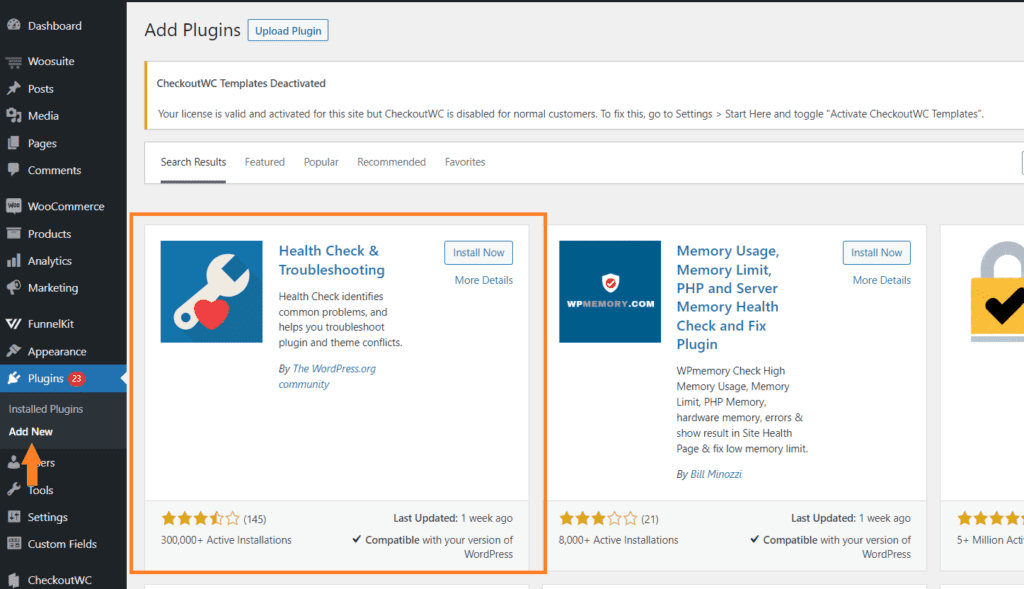
You can also install it from your WordPress dashboard by navigating to Plugins » Add New and searching for the ‘health check’ in the search bar.
Once you have found the plugin, click the ‘Install Now’ button to install it, and once it is installed, click the ‘Activate’ button to activate the plugin.
2.1.2. Go to Troubleshoot Settings
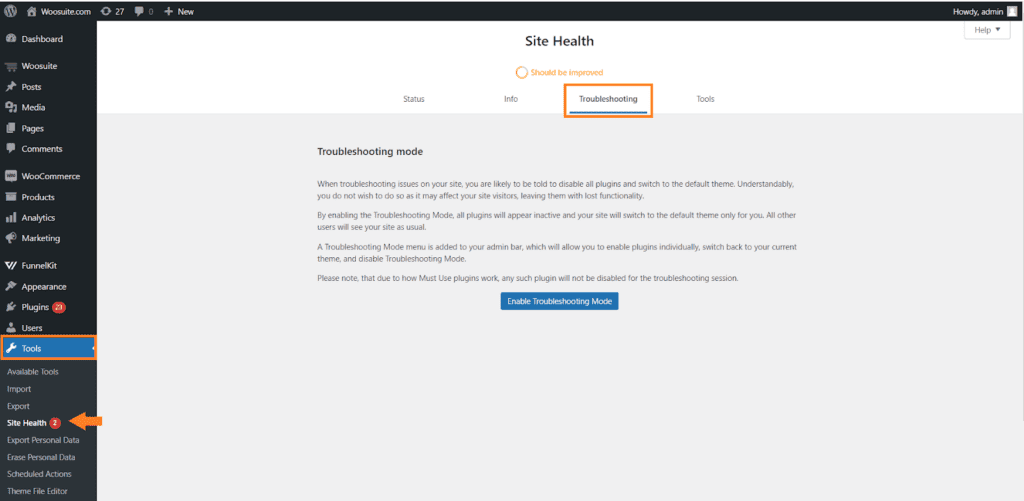
Once the plugin is installed, navigate to Tools » Site Health from your WordPress dashboard and click the Troubleshooting tab to troubleshoot settings.
2.1.3. Enable the Troubleshooting Mode
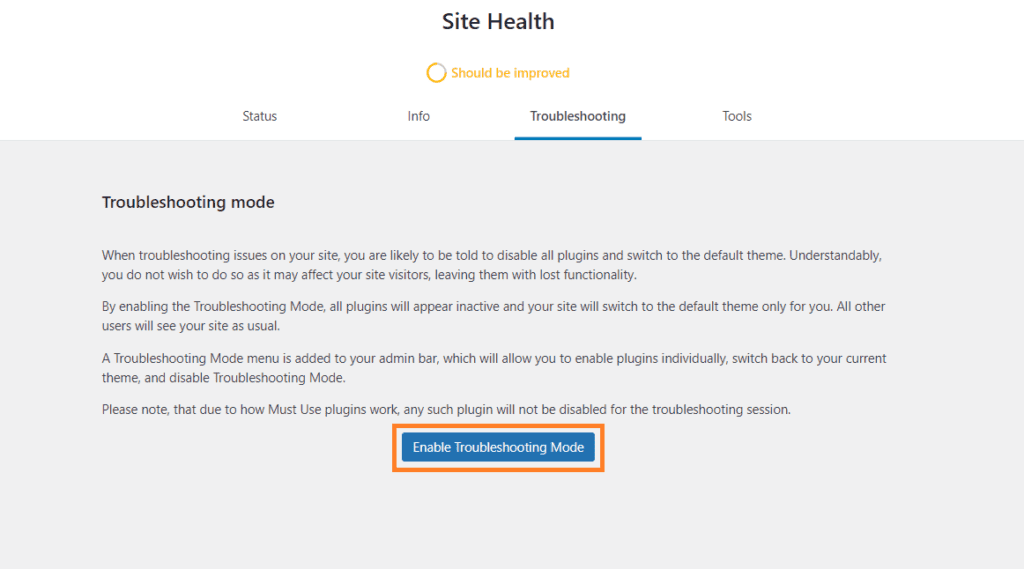
Click the ‘Enable Troubleshooting Mode’ button to enable the troubleshooting mode. In troubleshooting mode, you can easily identify the plugin causing the issue.
It will create a temporary version of your site where you can disable all the plugins and enable them one by one to find the culprit. Your regular customers will see the normal site. It won’t affect your live site and audience.
2.1.4. Find the Plugin Causing the Issue
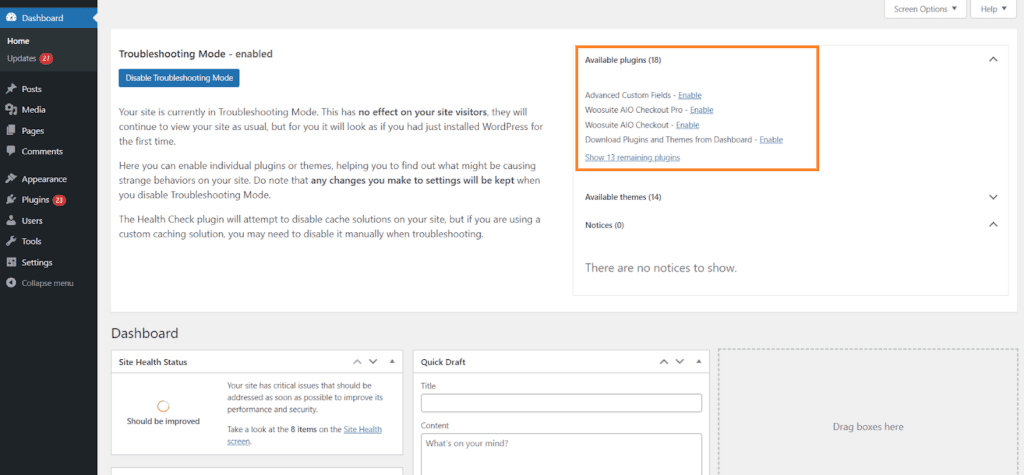
Once you have enabled the troubleshooting mode, all the active plugins will be disabled, and you can enable them one by one and see if the error persists.
You can enable one plugin and test by adding a product to the cart, and if the add-to-cart message appears, it means the plugin wasn’t the culprit. Now you need to do the same thing with plugins and check if the error persists after enabling each plugin.
This will help you find the plugin making the conflict and causing the ‘WooCommerce add-to-cart message not showing’ error.
Note: Remember to enable the WooCommerce plugin because you won’t be able to see the shop page or any product page without it.
2.2. Troubleshoot Without Using the Plugin
If you don’t want to install another plugin to find the plugin conflict, you can do it manually without using any other plugin.
But remember, this will affect your live site until you are finished.
You’ll need to deactivate all the plugins installed and activated on your site to follow this method.
2.2.1. Navigate to Plugins
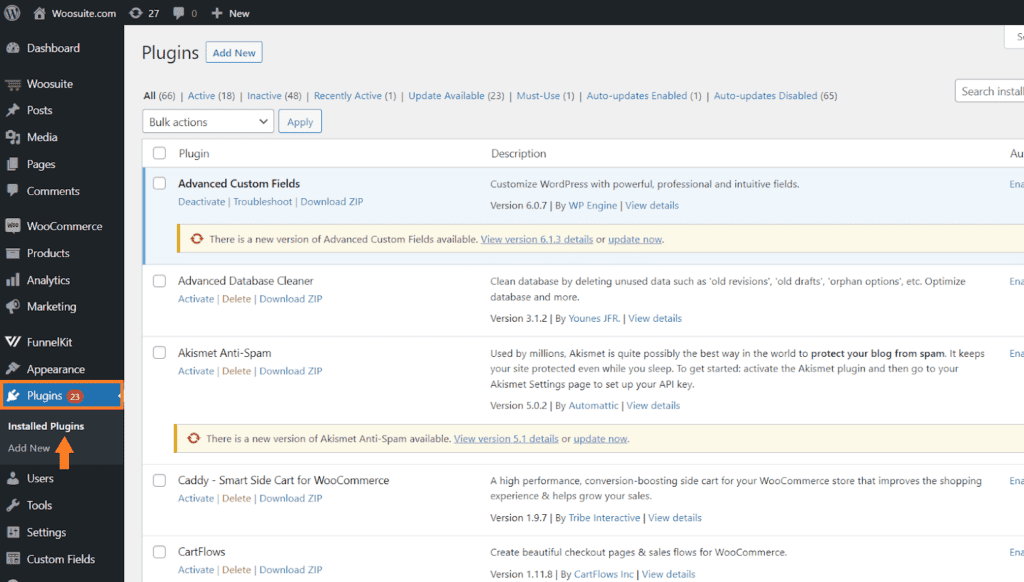
You need to navigate to Plugins » Installed Plugins from your WordPress dashboard to deactivate the installed plugins.
2.2.2. Deactivate all the Plugins
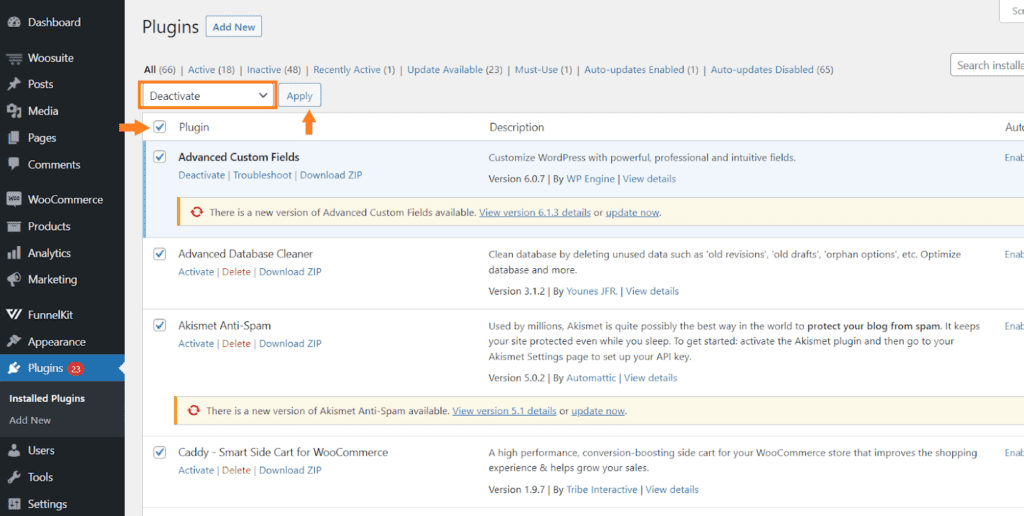
Now, to deactivate all the plugins at once, check the checkbox to select all the plugins at once. After that, from the Actions dropdown, select Deactivate to deactivate all the plugins.
After that, click the ‘Apply’ button to deactivate the plugins.
Note: Remember to enable the WooCommerce plugin because you won’t be able to see the shop page or any product page without it.
You can activate the plugin one by one and check if the add-to-cart message appears. If you find the culprit causing the issue, you can contact the plugin’s developer for further assistance.
But if the error wasn’t due to any plugin, you can continue to read this tutorial to find and fix the error.
3. Disable the AJAX Behavior For Add to Cart Button
Sometimes, enabling the AJAX behavior for the add-to-cart button can also cause the ‘WooCommerce add-to-cart message not showing’ error.
AJAX is a web development technique that allows websites to update content on a page without reloading the entire page. In the context of WooCommerce, AJAX provides a smoother and more seamless shopping experience for customers when they click the ‘add to cart’ button.
Sometimes, it may conflict with the theme’s code and cause an issue. Fortunately, WooCommerce allows you to enable or disable this behavior quickly. You can follow the following steps to do so.
3.1. Navigate to WooCommerce Product Settings
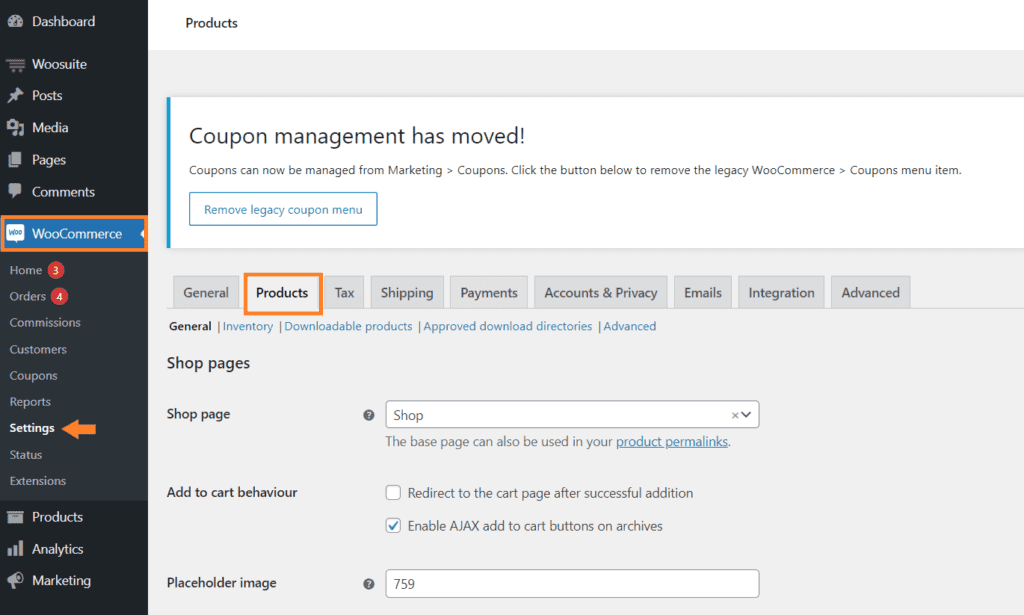
Navigate to WooCommerce Settings Products from your WordPress dashboard to enable or disable the add-to-cart behavior.
3.2. Disable the Add to Cart AJAX Behavior
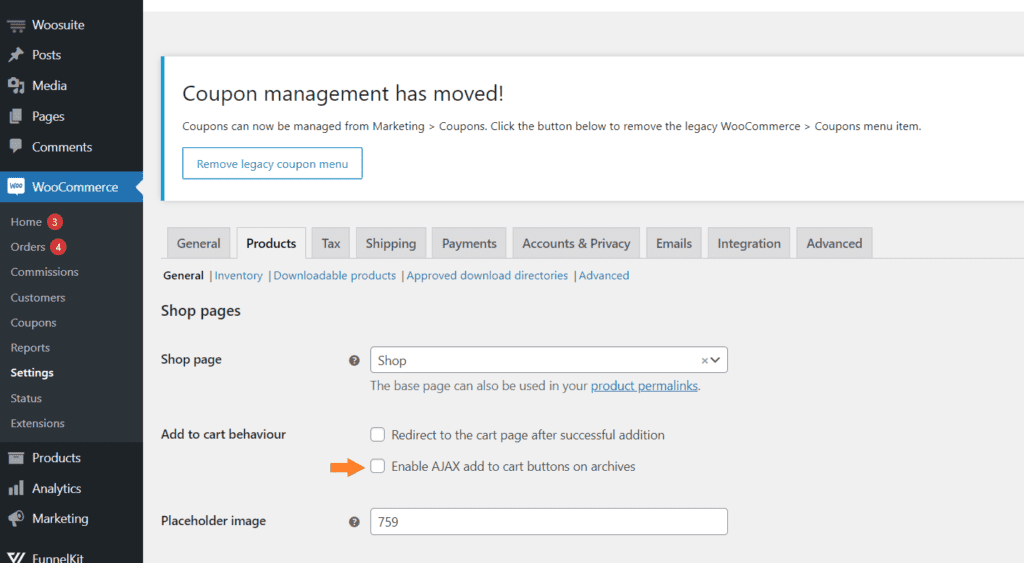
Once you are in the settings, uncheck the ‘Enable AJAX add to cart buttons on archives’ to disable the AJAX behavior.
3.3. Save the Settings
Finally, scroll to the bottom of the page and click the ‘Save Changes’ button to save the settings.
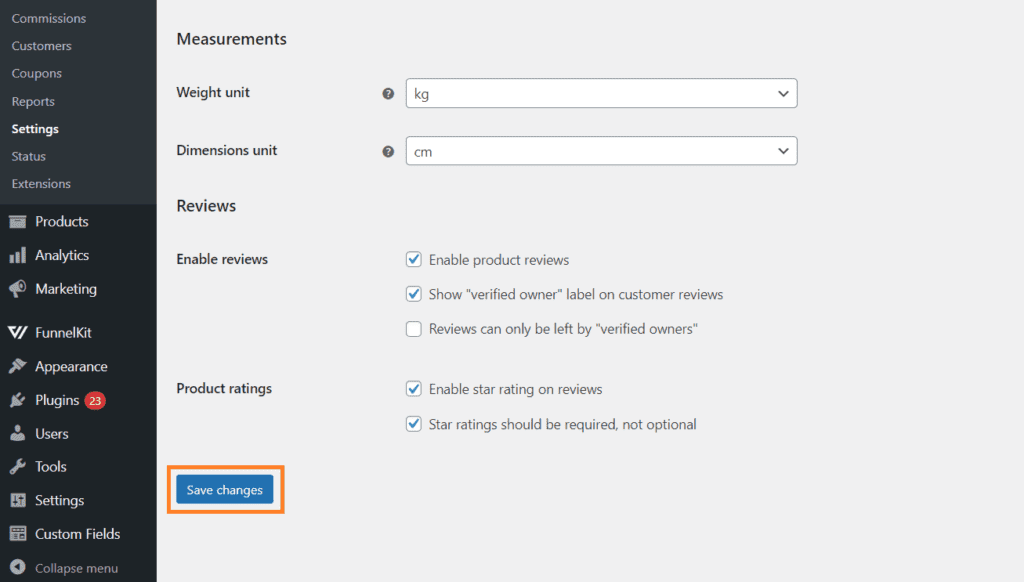
After that, you can try adding a product to your cart and see if the confirmation message appears. It appears AJAX behavior was causing the issue. You can keep it disabled or contact your theme developers to help fix it.
You may also be using a plugin for AJAX behavior. If that’s the case, please disable the plugin as well to see if the add-to-cart confirmation message appears.
Note: If you are using a premium WooCommerce theme that allows you to enable the AJAX behavior for the add-to-cart button, you can also disable the AJAX behavior from your theme settings, which might fix the error.
Disabling it won’t affect your customer experience. You can disable it temporarily, contact your theme developers, and ask them to fix the conflict.
4. Clear Cache
If none of the above methods worked for you, the issue is probably with the browser cache. This means that your browser may display an older page version, which may not include the updated message.
Here’s how to clear your cache to fix the error:
4.1. Clear Your Browser Cache
To clear your browser cache, go to your browser’s settings or options and look for the “clear cache” or “clear browsing data” option.
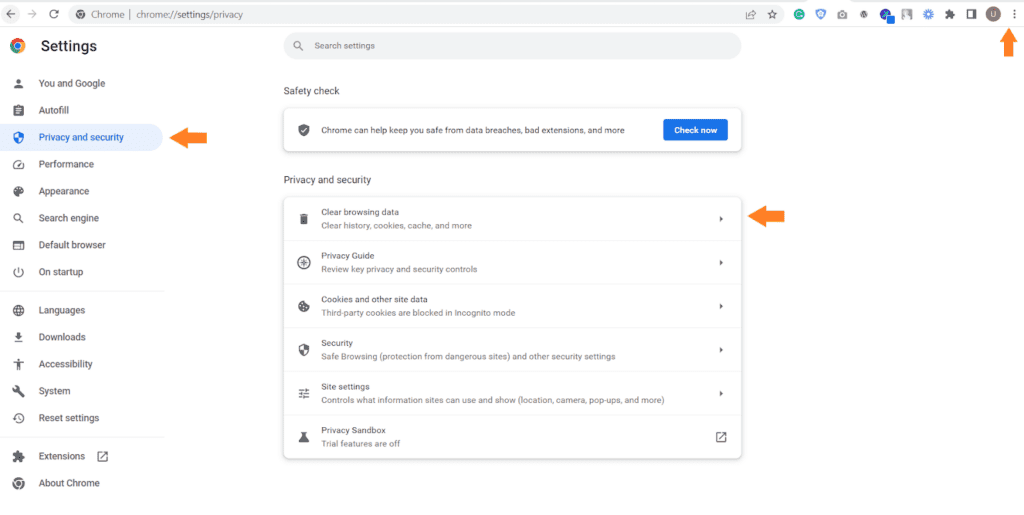
Select the option to clear the cache and cookies. After selection, click the ‘Clear Data’ button to clear the browser cache.
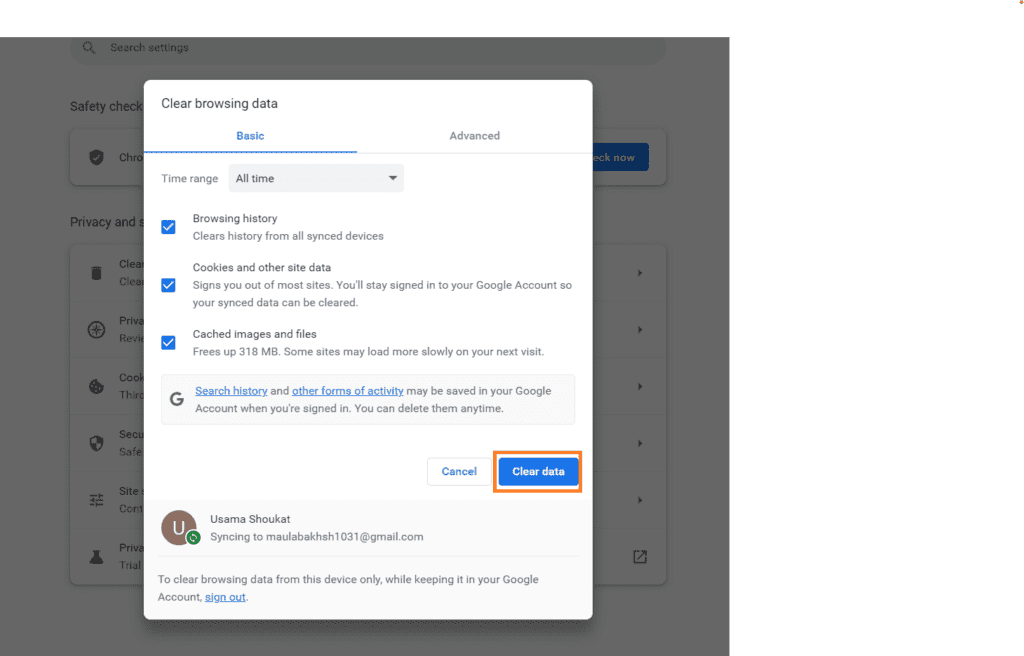
4.2. Reload the Page
Clearing the cache will take some time, depending on the cache size. Once the cache is cleared, return to your site’s product page and try adding it to your cart. The add-to-cart confirmation message should now appear.
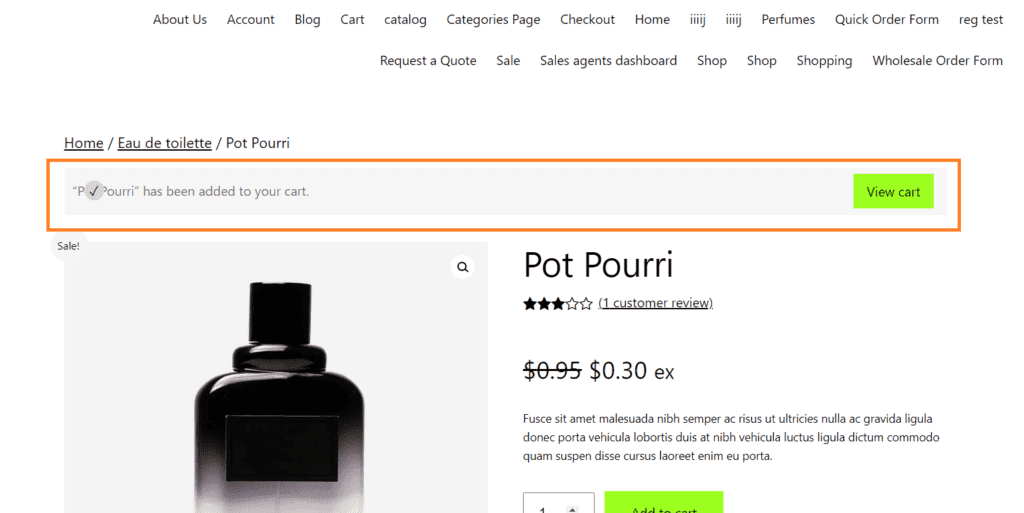
4.3. Disable Caching Plugins
If you’re using a caching plugin on your website, try disabling it temporarily and see if the “add to cart” message appears. If it does, then the caching plugin may be causing the issue, and you may need to configure it correctly or switch to a different caching plugin.
How to Improve the WooCommerce Cart and the Checkout Pages?
Woosuite is a collection of WooCommerce plugins that can help improve the functionality and appearance of your WooCommerce store. It also enables you to improve the cart and checkout pages.
To help you improve the cart and the checkout pages, Woosuite has developed the AIO Checkout plugin, an all-in-one checkout plugin that can help you take your store’s cart and checkout page to the next level.
I have compiled a few guides to help you customize the WooCommerce cart and checkout pages to improve the customer experience and increase sales.
- How To Create a WooCommerce Checkout like Shopify?
- CartFlows vs WooFunnels vs AIO Checkout
- How to Customize the Add to Cart button in WooCommerce
- How to Customize the WooCommerce Product Image Size?
- How to Add a WooCommerce One-Click Buy Checkout
- How to Combine WooCommerce Cart and Checkout Page?
- How to Create a WooCommerce Checkout Countdown?
- How to Edit the WooCommerce Checkout Page
- How to Create a WooCommerce 2-step Checkout
- How to Create a Tripwire Funnel (With Examples 2023)
Conclusion
That’s it for today’s article. I hope this article was helpful to you and you were able to fix the “WooCommerce add to cart message not showing” error and improve the customer’s shopping experience. This error can be frustrating for website owners and customers.
Providing your customers with a smooth and seamless shopping experience is essential, as it can affect your sales.
By implementing the methods explained in this article to fix the ‘WooCommerce add to cart message not showing’ error, you can ensure that customers can easily add items to their cart and complete their purchases without any issues.
To further ensure that your customers are getting an excellent experience, you can use the AIO Checkout and the other Woosuite plugins.


