Do you want to require user registration before the checkout, but you don’t know how? I have you covered right here.
In this tutorial, I’ll show you how to force user registration in WooCommerce with the help of the WooCommerce Request a Quote Plugin. In simple terms, buyers will need first to create an account to buy products from your eCommerce store.
I’ll show you each step in detail, using images to help you understand the process better. So, continue reading to learn how to make user registration mandatory in your WooCommerce store.
Read Also: How to Add Login to Purchase Button In WooCommerce
On This Page
- 1 How to Force User Registration in WooCommerce?
- 2 Method 1: Force Use Registration in WooCommerce Using the AIO Checkout Plugin
- 2.1 1. Navigate to the AIO Checkout
- 2.2 2. Create a New Checkout Form
- 2.3 3. Select the Design of the Checkout Form
- 2.4 4. Select the Thank You Page Design
- 2.5 5. Add Fields to the Checkout Form
- 2.6 6. Force User Registration in WooCommerce
- 2.7 7. Enable the Checkout
- 2.8 8. Save Changes
- 2.9 10. Final Results
- 3 Method 2: Using AovUp Request A Quote Plugin
- 4 Conclusion
How to Force User Registration in WooCommerce?
Follow the steps to make user registration compulsory in WooCommerce.
Enable Account Creation on the ‘My Account’ Page
Follow the mentioned steps to enable account creation on the ‘My Account’ page.
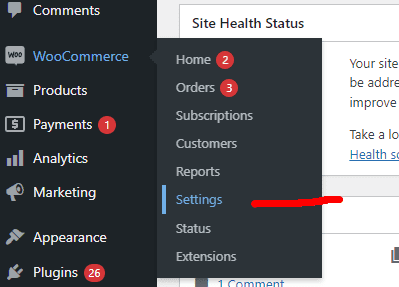
1. Navigate to WooCommerce ‘Settings’
Look for the ‘WooCommerce’ option in the WordPress toolbar. Then, search for the ‘Settings’ option in the WooCommerce submenu.
In the WordPress Admin Dashboard: WooCommerce > Settings > Click on it
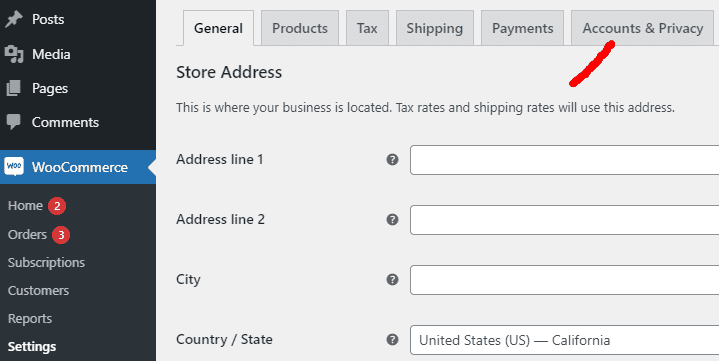
2. Head to Accounts and Privacy Settings
Head over to the ‘Accounts & Privacy’ settings.
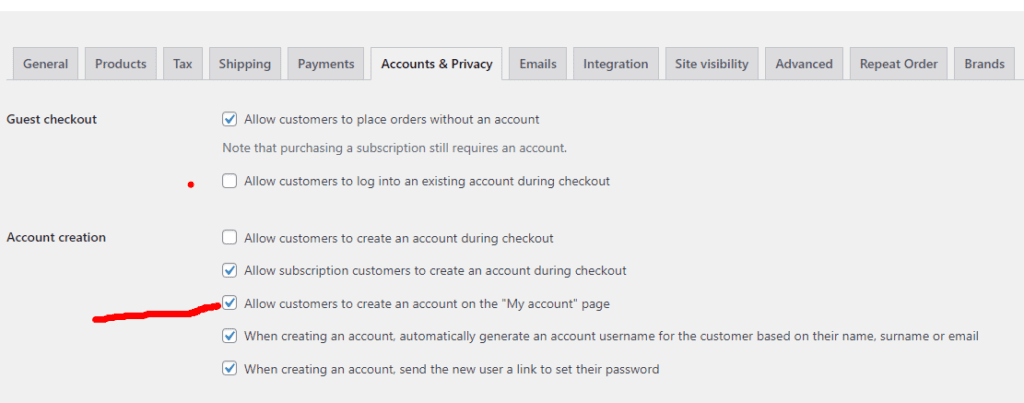
3. Check the ‘Allow Customers to Create an Account on the “My Account” page’
Tick the ‘Allow Customers to Create an Account on the My Account page’ option to let users create an account from the My Account page.
4. Click on the ‘Save Changes’ Button
Scroll down, and click on the ‘Save Changes’ button.
Method 1: Force Use Registration in WooCommerce Using the AIO Checkout Plugin
The following is the step-by-step guide to force user registration in WooCommerce using the AIO Checkout plugin.
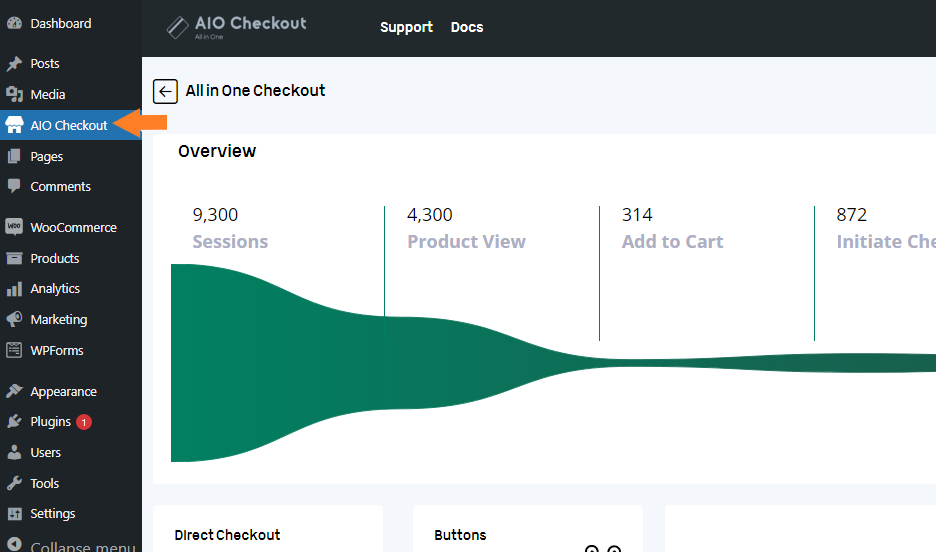
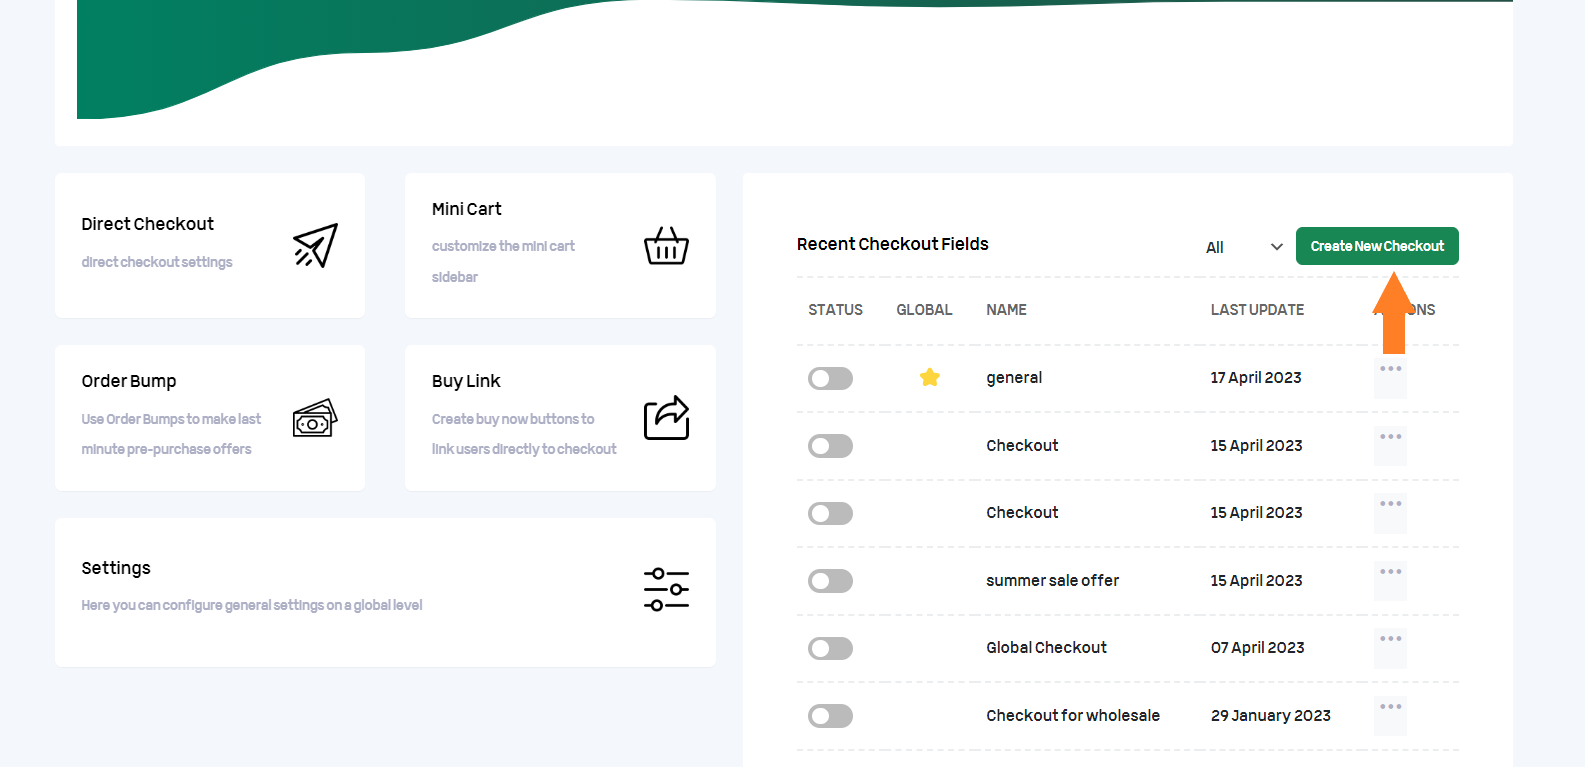
Once you have installed and activated the plugin, navigate to AIO Checkout from your WordPress dashboard.
2. Create a New Checkout Form
Once you are on the general settings page of the plugin, you will see different options. But we want to create a new checkout form, so click the “Create New Checkout” button.
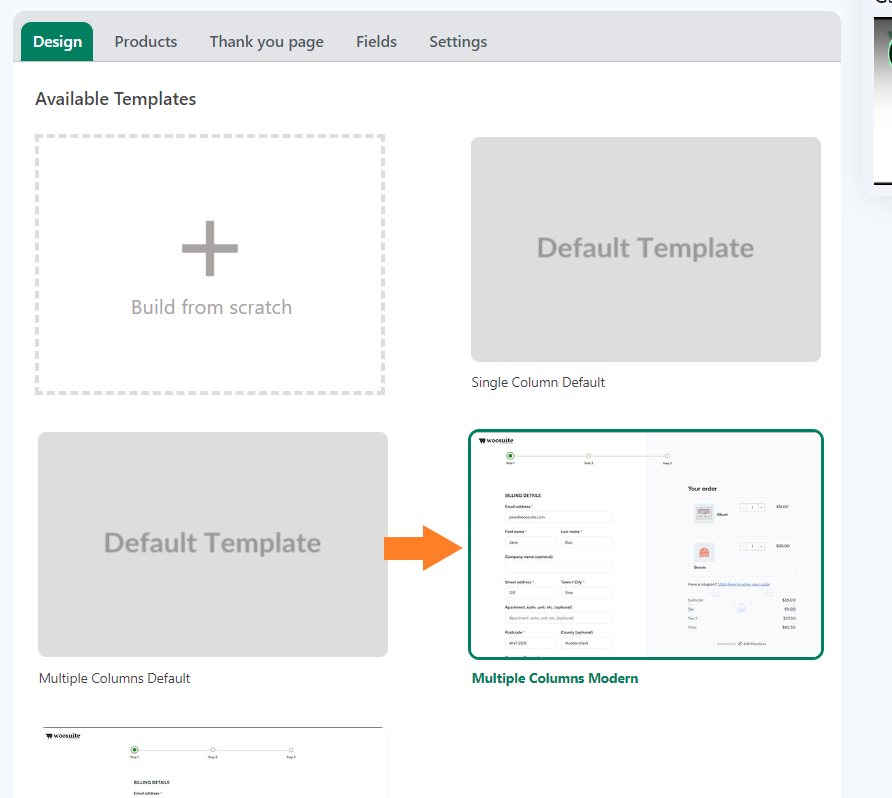
3. Select the Design of the Checkout Form
On the checkout edit page, you must first select the design of the checkout form/page.
Multiple templates are available, and you can choose any template you want. I have selected the ‘Multiple Columns Modern’ template.
You can also create a template from scratch using a page builder like Elementor.
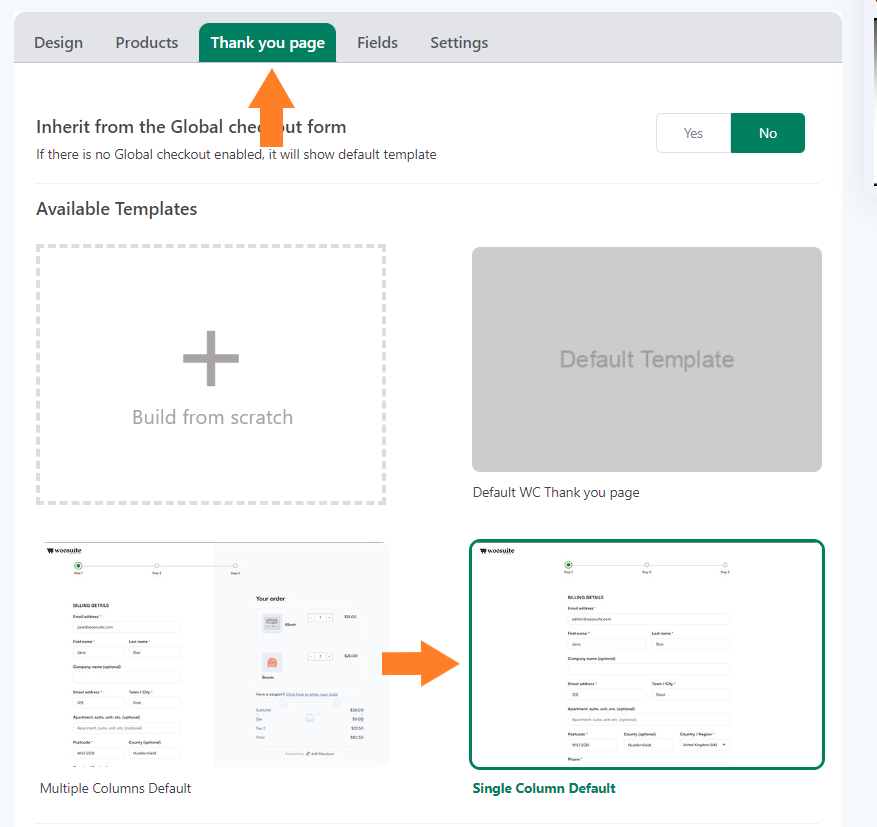
4. Select the Thank You Page Design
Next, click the ‘Thank You Page’ tab at the top, and select the template for the thank you page. If you want, you can also create a custom thank you page.
If you want to inherit the thank you page design from the global checkout, you can leave everything to default. But if you want to customize the thank you page or create one from scratch, ensure to select ‘No’ for the ‘Inherit from the Global checkout form’ option.
Note: You won’t see the thank you page templates if you have set the ‘Inherit from the Global checkout form’ option to ‘Yes.’
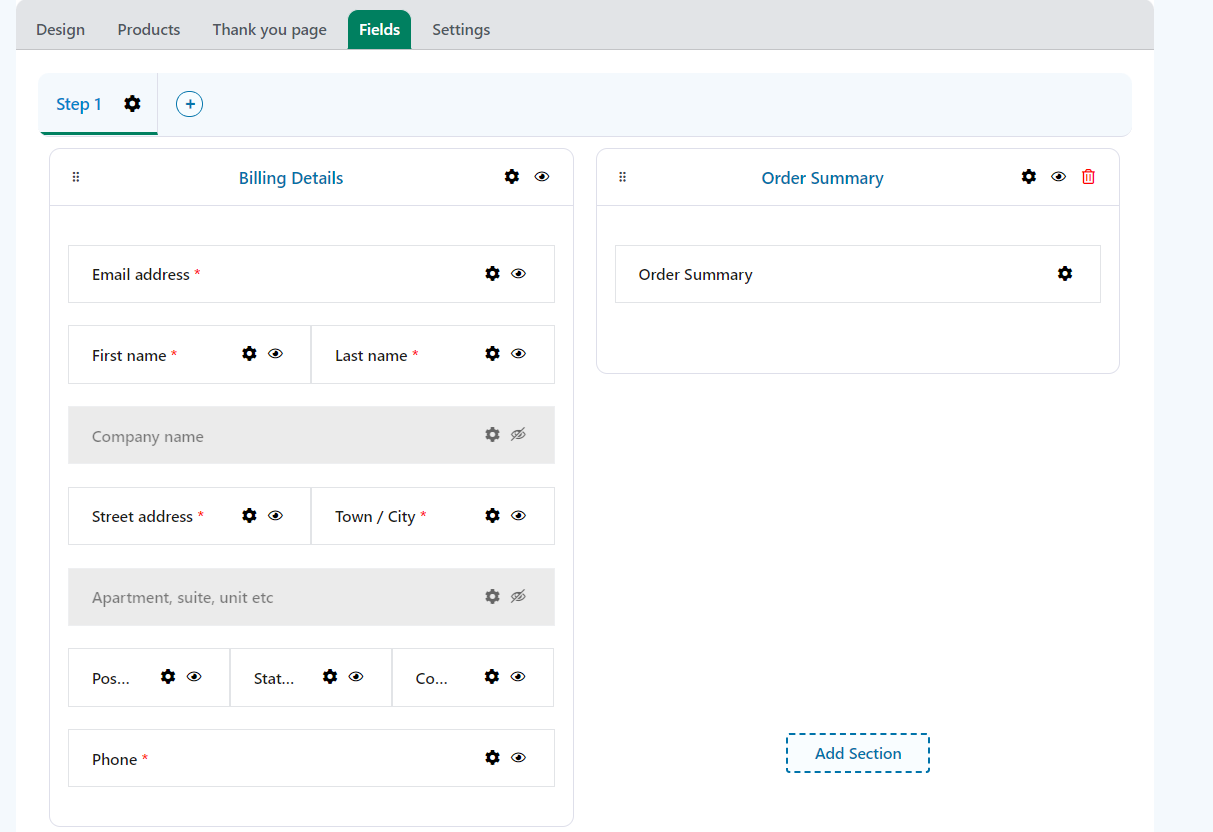
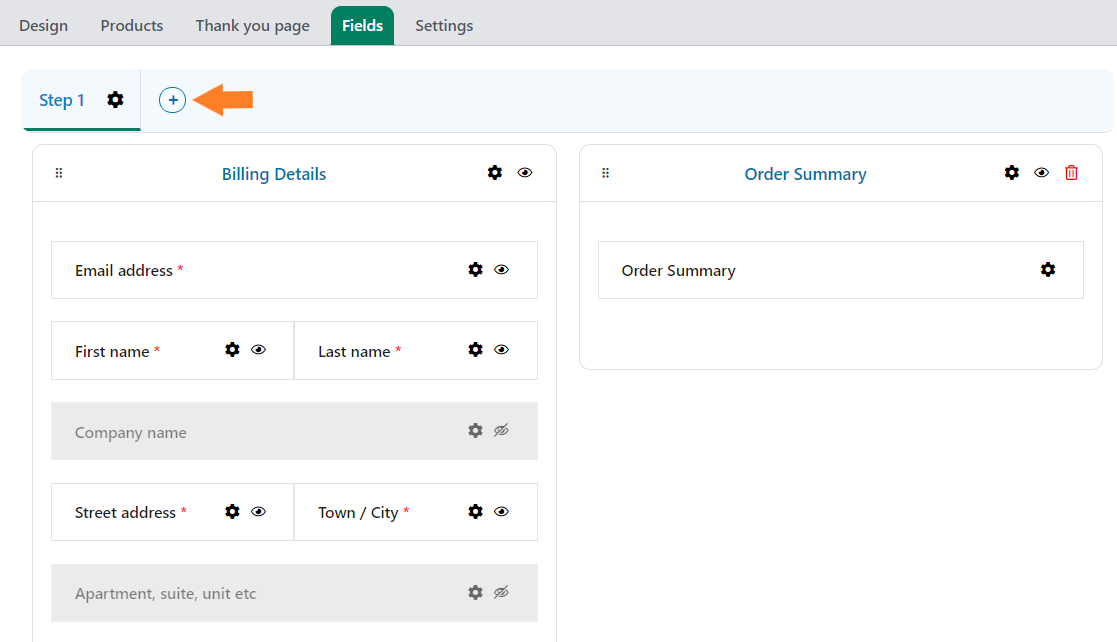
5. Add Fields to the Checkout Form
After selecting the design, click the ‘Fields’ tab to add and edit the checkout fields and force user registration.
You should see the default WooCommerce checkout fields in two columns (the template we selected in step 4). Still, you can customize the form according to your business needs to improve the customer experience. You can also add custom fields like birthday fields, VAT number fields, reCaptcha fields, and more.
I could see the forms in two columns. In your case, the checkout form layout depends on the layout design you selected in the ‘Design’ tab.
5.1. Create a 2-Step Checkout Form
It entirely depends on you whether to create a 2-step form or not. However, I like to keep things more organized and I want customers to log in/register to my site before filling out the checkout details.
That is why I’ll add an email address and a terms and conditions field in the first step of the checkout. Once the guest user agrees to the terms and conditions, their account will be created automatically, and they can complete their purchase.
To create a 2-step checkout, click the ( + ) icon.
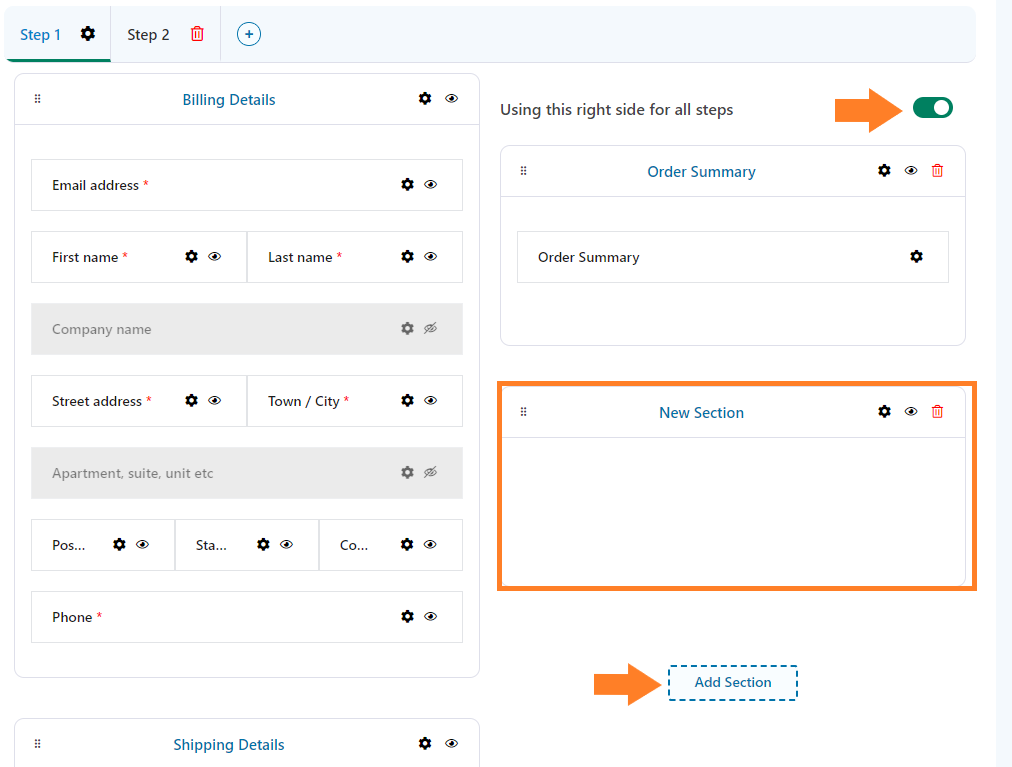
5.2. Add a New Section
Once you have added Step 2, you’ll see a new toggle button under the Step 1 section. Toggle it to use the right side of the screen for order summary.
Next, click the ‘Add Section’ button to add a new section.
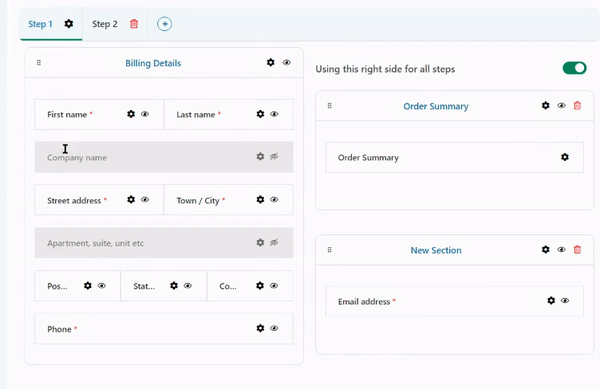
5.3. Move Email Address Field to New Section
We need to add an email address to a new section to force user registration and keep things organized. Don’t worry if things aren’t making sense yet; you’ll get a clear picture later.
Move the email address field from the billing section to the new section you just added.

5.4. Move Sections to Step 2
As we are creating a 2-step checkout with a multiple-column layout, we need to move all the sections, except the new section and the order summary section, to Step 2.
Drag the sections and drop them in Step 2.
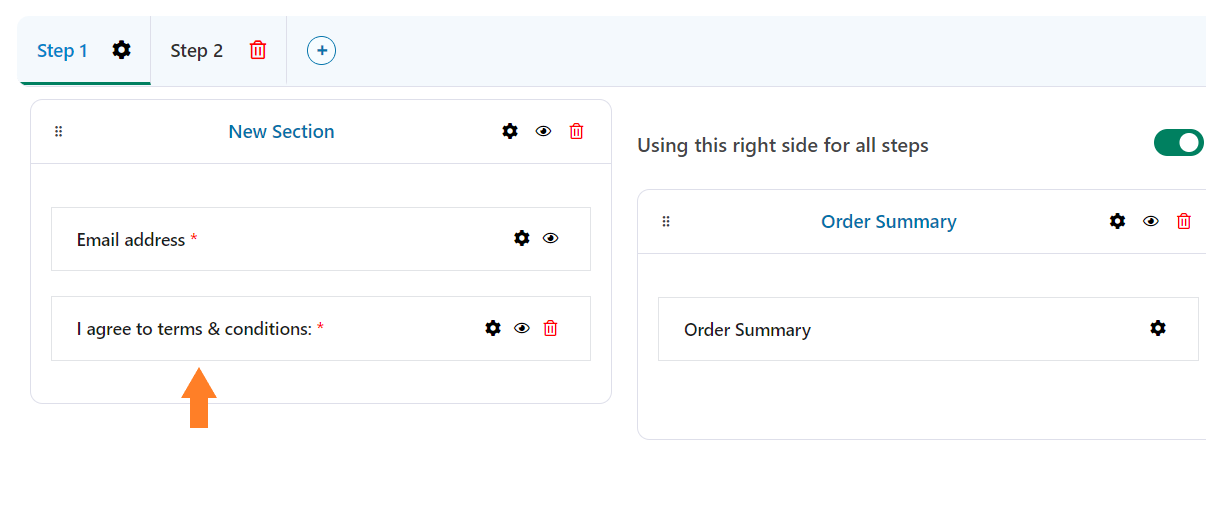
I have also moved the new section to the first column in Step 1.
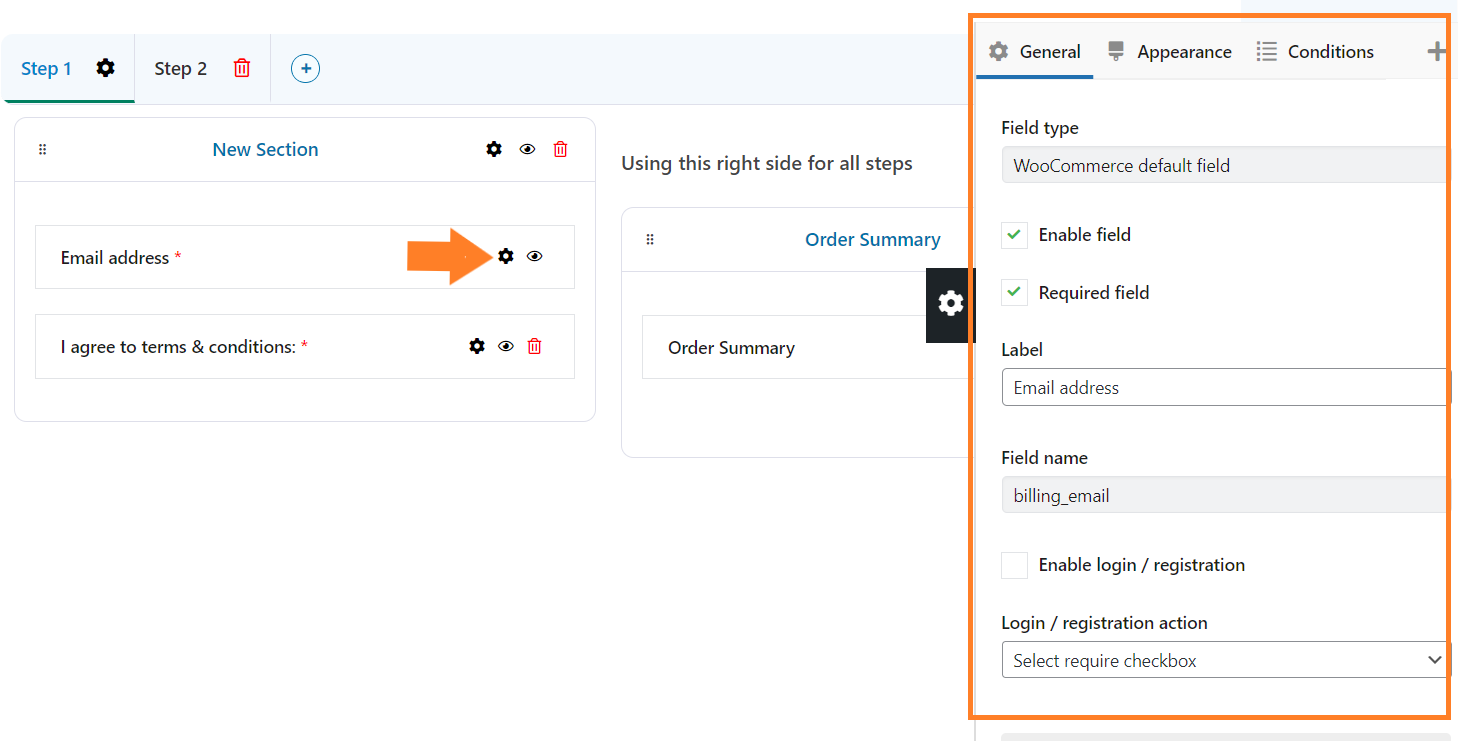
This plugin automatically creates user accounts, so it is important to mention this in your store’s terms and conditions. You also need to make sure to create a terms and conditions checkbox so you don’t get into any legal trouble.
I have added a checkbox field and changed its label to ‘I agree to terms and conditions.’ In the next step, I’ll connect it with the email address field.
6. Force User Registration in WooCommerce
Once the layout is sorted and organized as needed, click the black gear icon on the email address field to force user registration. A new section will slide in from the right side of your screen.
6.1. Enable Login/Registration
Check the ‘Enable Login/Registration’ checkbox to force user registration in WooCommerce.
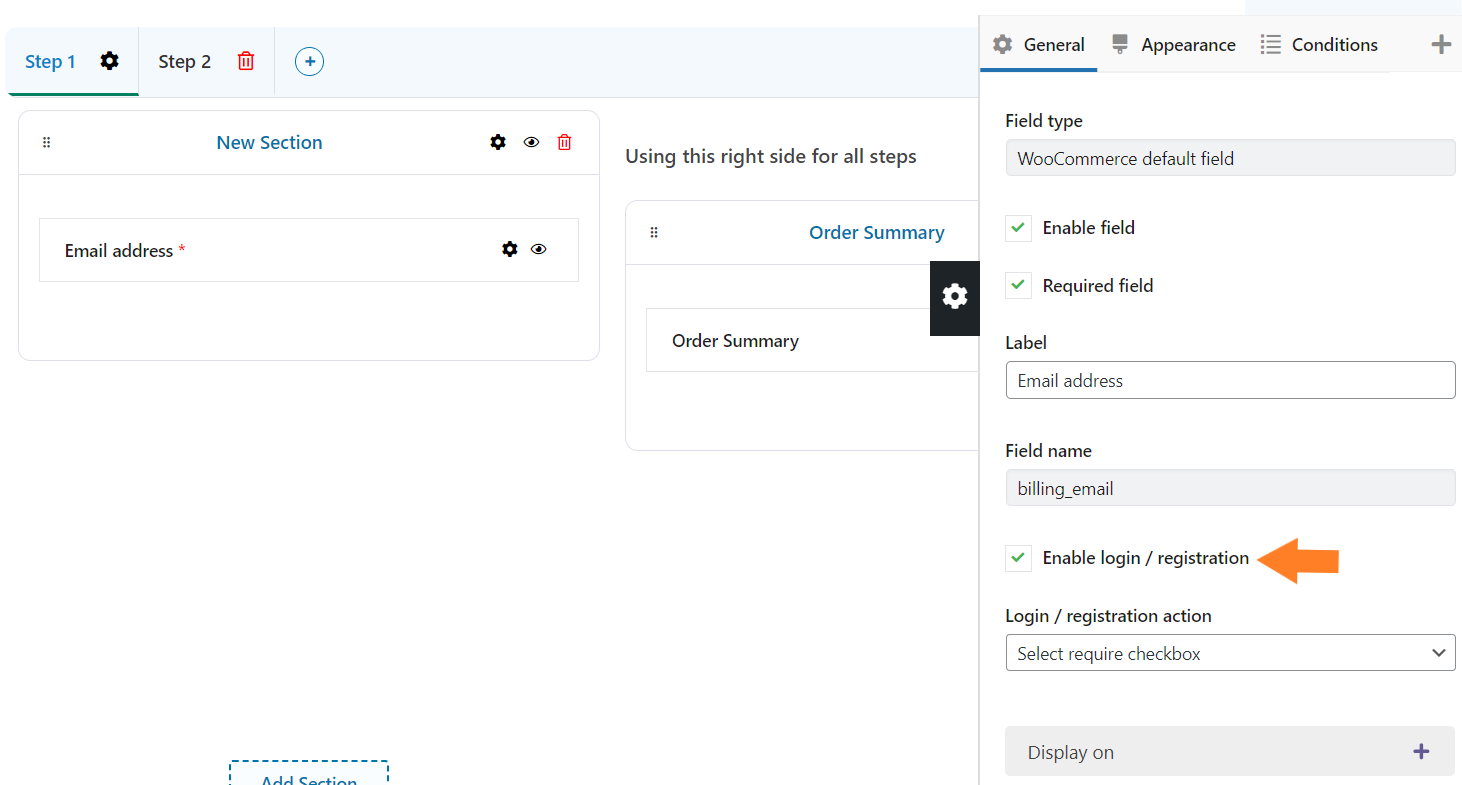
6.2. Select the Login/Registration Action
I want to create user accounts only if they have agreed to the terms & conditions. To do so, select the terms & conditions (checkbox we added above) from the ‘Login/Registration Action’ dropdown.

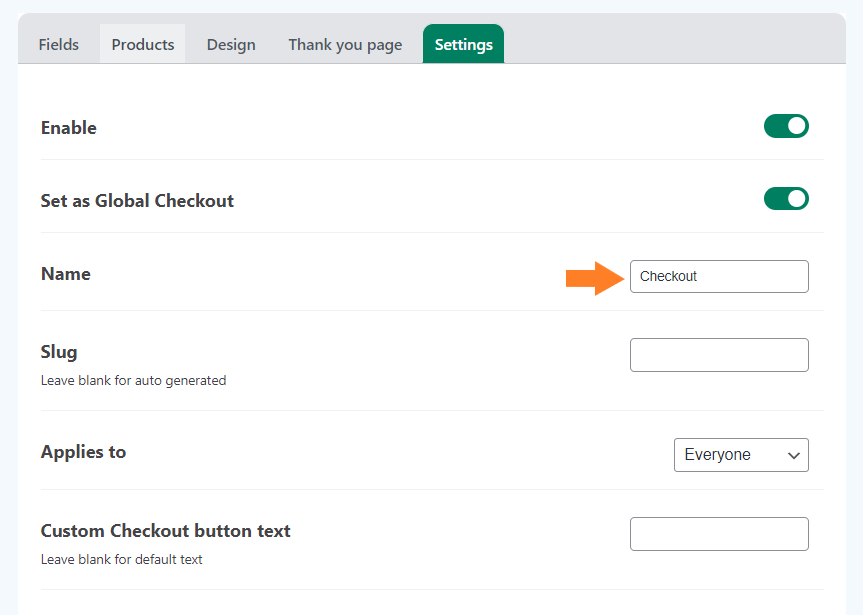
7. Enable the Checkout
Next, we need to enable the checkout, and to do so, click the ‘Settings’ tab.
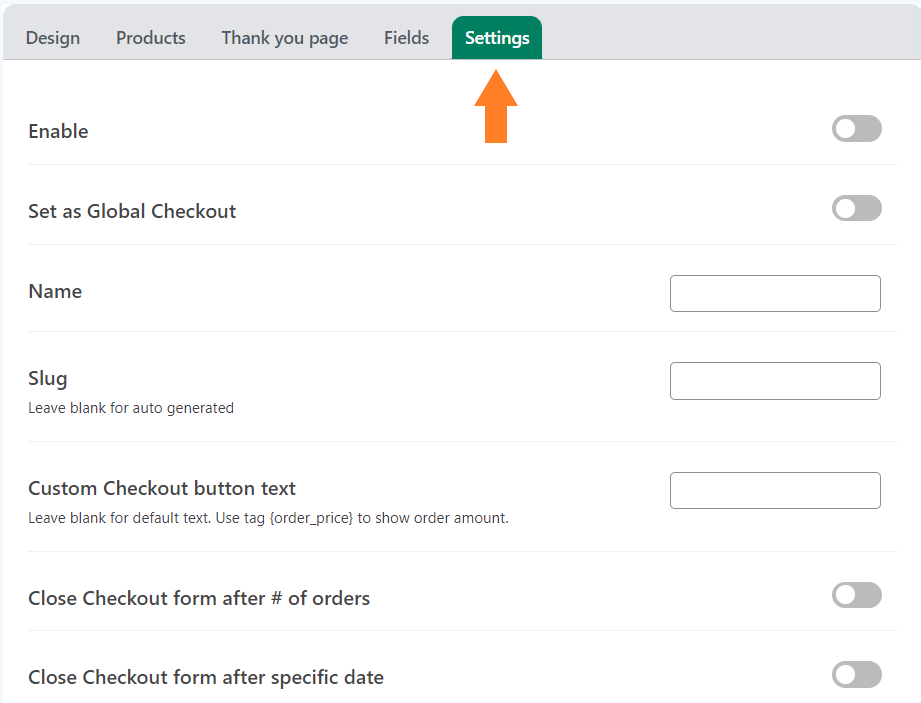
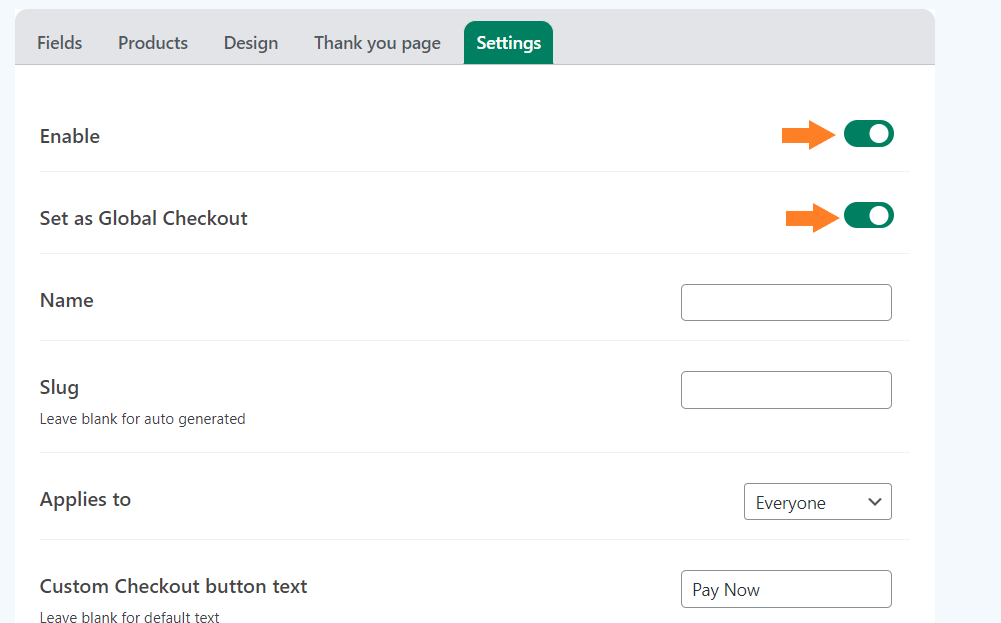
7.1. Enable the Checkout Form
To enable the checkout form, toggle the ‘Enable’ button. Also, ensure you have enabled the ‘Set as Global Checkout’ option to make this form the global checkout.
You can leave it disabled to set this checkout form for specific user roles. I am enabling it as a global checkout as I don’t want to set a user restriction.
7.2. Give a Name to the Form
Now, we need to give this form a name. It will only be displayed to the admin. It is helpful if you have created different checkout layouts for different user roles.
Note: You can also explore the other available settings and set a custom checkout button text, integrate Mailchimp, enable the Google autocomplete address, and more. But I’ll move to the next step to keep this tutorial short and to the point.
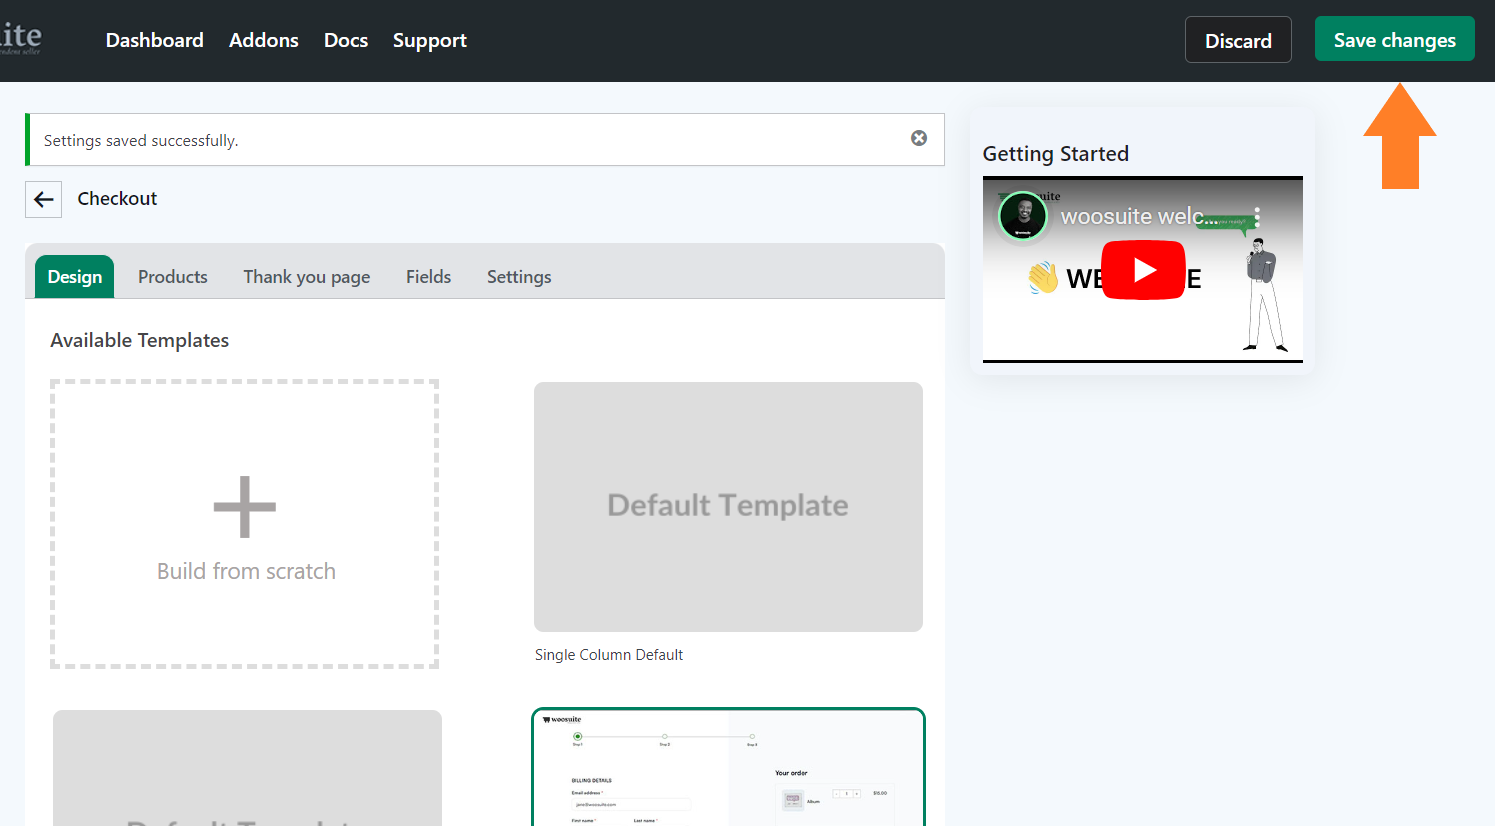
8. Save Changes
Once you have forced the user registrations in WooCommerce and configured the other required settings, click the green ‘Save Changes’ button at the top right corner of your screen to save the settings.
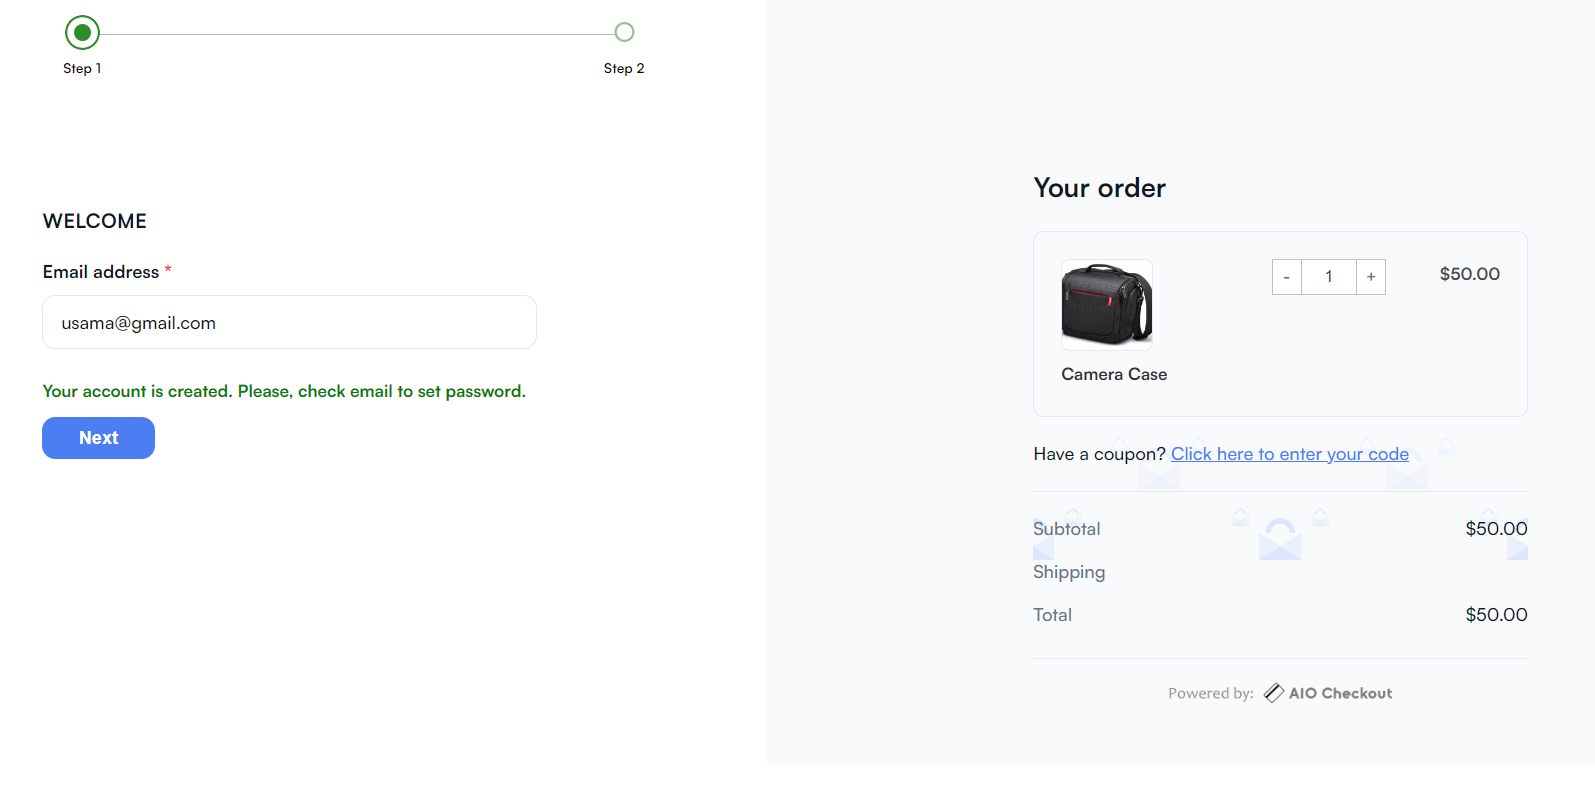
10. Final Results
Now let’s test the final results.
I visited my store, added a product to my cart, and visited the checkout page. As you can see in the screenshot below, the checkout layout was completely changed and divided into two steps.
In the first step, I was asked for my email address. I entered my email address, and upon agreeing to the terms & conditions, my account was automatically created. I could proceed to the next step and complete the checkout.
Note: When a user adds the email address, the plugin will check for existing customers. If a match is found, a password field will automatically be created, enabling customers to log into their existing accounts.
Method 2: Using AovUp Request A Quote Plugin
To achieve the desired results, I’ll replace the ‘Add to Cart’ button with a custom button. We will hyperlink the custom button to my User Registration or Login page.
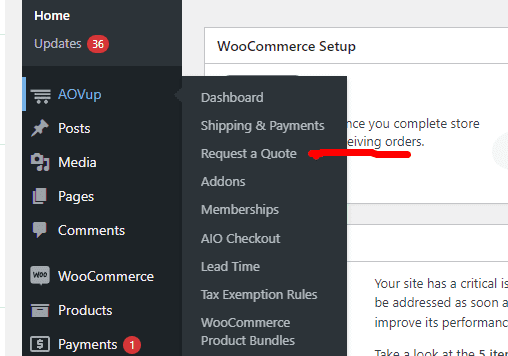
Look for the ‘AovUp’ option on the right side of your WordPress toolbar. Then, click on the ‘Request a Quote’ option.
In the WordPress Admin Dashboard: Navigate to the Woosuite Submenu > Request a Quote > Click on it.
3. Create a New Rule to Force User Registration
Follow the steps to create a new rule to force user registration in WooCommerce.
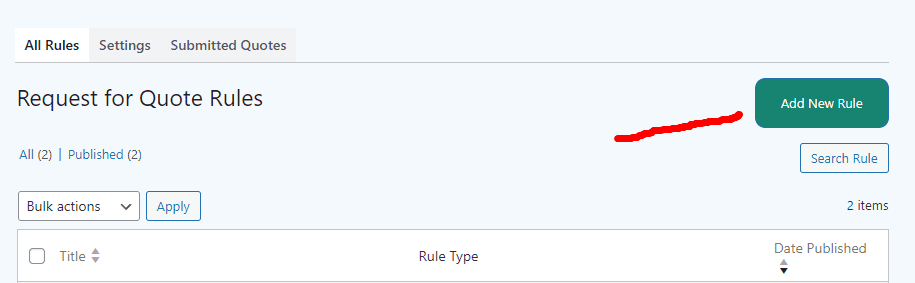
3.1. Click on the ‘Add New Rule’ Button
Click on the ‘Add New Rule’ button to create a new rule.
3.2. Give An Internal Campaign Name

Enter an internal campaign name for your new rule in the ‘Add Title’ field. This is for internal purposes only. This won’t be visible on the front end.
3.3. Select the ‘Rule Type’ to ‘Quote Rule for Guest Users.’
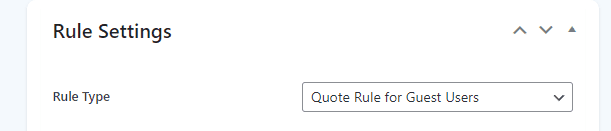
Select the ‘Rule Type’ option to ‘Quote Rule for Guest Users’ from the dropdown. This rule will be applied to Guest Users only.
3.4. Add ‘1’ In the ‘Rule Priority’ Field
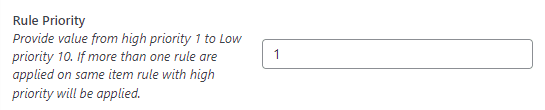
Enter ‘1’ in the Rule Priority field. We are prioritizing this field, so we added ‘1’ in this field. You can add between 1 to 10.
3.5. Tick the ‘Apply To All Products’

Tick the ‘Apply On All Products’ option to apply this rule to all your WooCommerce store products.
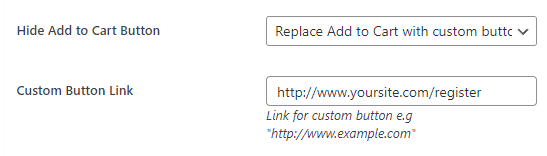
3.6. Select ‘Replace Add to Cart with Custom Button’ With ‘Hide Add to Cart Button’
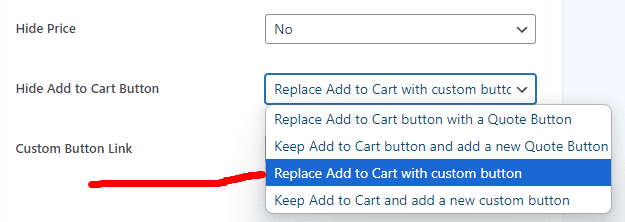
3.7. Add Custom Page Link
In this Custom Button Link box, add the page link to which you want to redirect visitors after clicking the custom button.
3.8. Give a Label to Your Custom Button
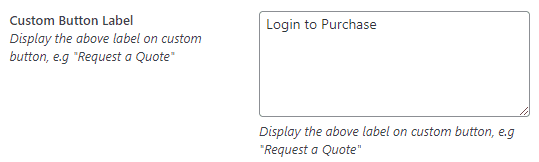
In the ‘Custom Button Label’ field, add the label you want to show on the button. For instance, you display ‘Login to Purchase’ on the button.
3.9. Click on the Publish Button
Click on the ‘Publish’ button to make this rule live. So, click on it.
Final Results
We have now figured out how to force user registration in WooCommerce. We made all the settings correctly. We will now check whether everything is working fine or not.
I’m currently on the Shop Page of my WooCommerce Demo Store, and you can see the ‘Login to Purchase’ button is visible instead of the ‘Add to Cart Button.’ The prices are also visible with the Login to Purchase button. Here are the final results we got with the help of the WooCommerce Request a Quote Plugin.
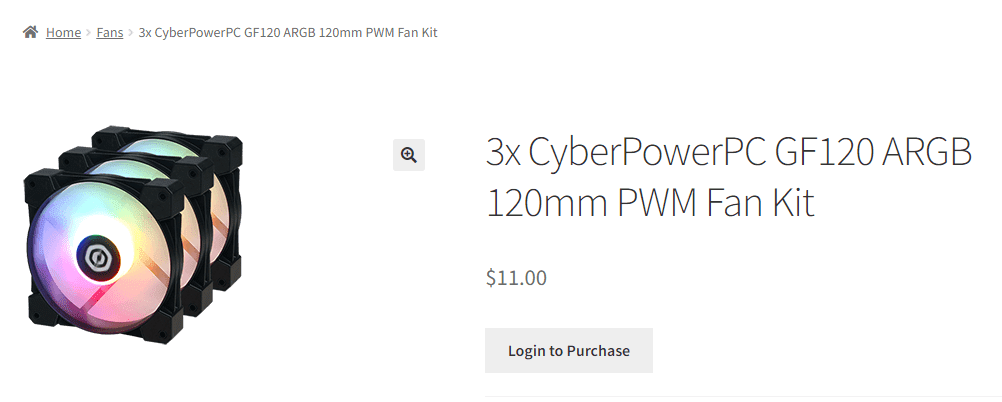
After clicking on the ‘Login to Purchase’ button, I am sent to the User Registration page, where I can log in or create a new account.
Read Also: How to Hide Prices in WooCommerce [Step-By-Step Guide]
Conclusion
We finally checked out how to force user registration in WooCommerce. I hope you understood the steps properly and implemented them on your WooCommerce store. If you face any issues while creating a rule to force users to register before checking out, leave a comment or contact Woosuite customer support. Our dedicated customer support team typically replies within 48 hours.
Ready to Make User Registration Compulsory in WooCommerce?
Install the WooCommerce Request a Quote Plugin today.


