Security is a big concern for any online eCommerce store. Especially if you are using WooCommerce, you may be aware that it is open-source software, and you need to take some extra steps to ensure your store’s security.
Adding an extra security layer to your WooCommerce store to protect it from fake or fraudulent orders is an excellent idea. These spam orders may cause you to lose money and your Google rankings.
CAPTCHAs will help you avoid spam or fraudulent orders and improve your site’s security.
To help you with this, I’ll walk you through the step-by-step process to add a CAPTCHA to WooCommerce checkout in today’s tutorial. It is a very straightforward process to do so. Just follow the steps mentioned in this tutorial.
Before diving into the tutorial, let’s explore the different types of CAPTCHA.
On This Page
- 1 What is CAPTCHA?
- 2 How to Add CAPTCHA to WooCommerce Checkout?
- 2.1 1. Install and Activate the AIO Checkout Plugin
- 2.2 2. Get the Google reCAPTCHA APIs
- 2.3 3. Navigate to the AIO Checkout
- 2.4 4. Click the Settings Section
- 2.5 5. Paste the Google reCAPTCHA API Keys
- 2.6 6. Create a New Checkout Form
- 2.7 7. Add CAPTCHA Field to WooCommerce Checkout
- 2.8 8. Select the Design of the Checkout Form
- 2.9 9. Select the Thank You Page Design
- 2.10 10. Enable the Checkout
- 2.11 11. Save Changes
- 2.12 12. Final Results
- 3 Final Thoughts
What is CAPTCHA?
CAPTCHA stands for ‘Completely Automated Public Turing test to tell Computers and Humans Apart.’ It is a modern technology that tells the difference between human users and automated ones (like spam bots) and ensures the site is secure.
It gives challenges or puzzles that computers find challenging but that humans find simple. For instance, recognizing squished letters or numbers or targeting a specific region to click on.

The CAPTCHA generates and displays simple front-end challenges the user must complete before accessing the site.
The CAPTCHA allows filtering out unwanted traffic and blocking automated programs and bots from accessing your site.
So it is an excellent idea to keep such traffic away from your site.
Types of CAPTCHA
Following are a few types of CAPTCHA.
1. Not a Robot Checkbox CAPTCHA
To complete this CAPTCHA, the user will move the mouse cursor to the checkbox and click it. This action serves as data for the model, which decides whether you are a human. If so, great; otherwise, the user will not be allowed to access the site.

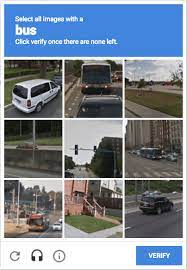
2. Image CAPTCHA
It’s the standard for most CAPTCHA, and the one most people use. To prove they are human, users must select the appropriate image boxes from a series presented.
Visitors can bypass the CAPTCHA and request a new one if the image or instructions are unclear.
3. Text CAPTCHA
To complete the text CAPTCHA, visitors must enter the text that is displayed in the image into the submit box to access a particular page or complete a task such as submitting a form.
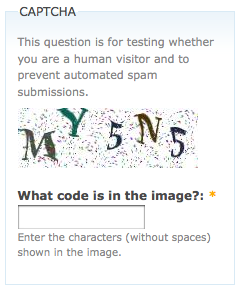
They will be taken to the subsequent page automatically if the user enters the text correctly. On the other hand, if the text is inaccurate, the system will automatically generate another text CAPTCHA that users will need to enter.
Now that we are familiar with a few most used types of CAPTCHA, let’s dive in to add CAPTCHA to WooCommerce Checkout.
How to Add CAPTCHA to WooCommerce Checkout?
Please follow the steps to add a CAPTCHA to WooCommerce checkout and avoid fraudulent orders.
1. Install and Activate the AIO Checkout Plugin
First, we need to install and activate the AIO Checkout plugin to improve the customer’s shopping experience.
Download the AIO Checkout plugin from the AovUp store. It also has a free version, but to follow along with this tutorial, you’ll need to purchase its Pro version.

Once you have downloaded it, navigate to the Plugins » Add New from your WordPress admin dashboard, and click the Upload button to upload the downloaded file to install and activate the plugin.
2. Get the Google reCAPTCHA APIs
To add a captcha at checkout and make it work smoothly, you’ll need to get the Google reCAPTCHA site and secret keys. To get the APIs, head to the Google reCAPTCHA admin dashboard and make sure you are logged in using your Google account.
You’ll see a dashboard similar to the following.

2.1. Add the Label
In the ‘Label’ field, you can add the name of the captcha or simply add your website name. For example, mywebsitename.com
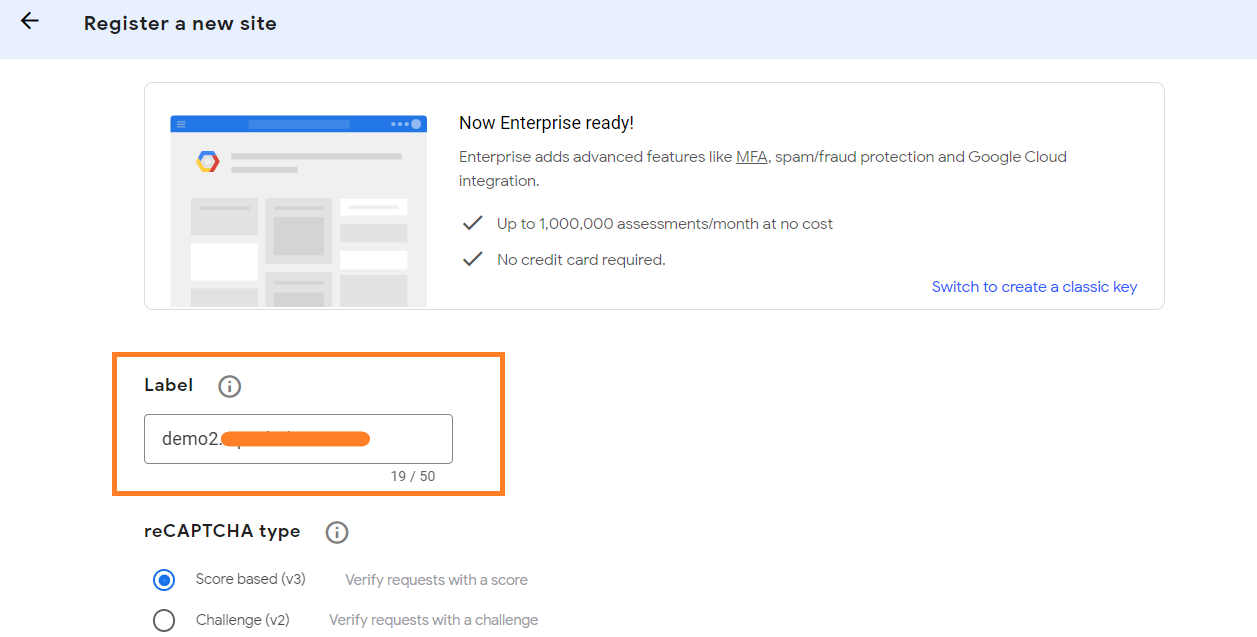
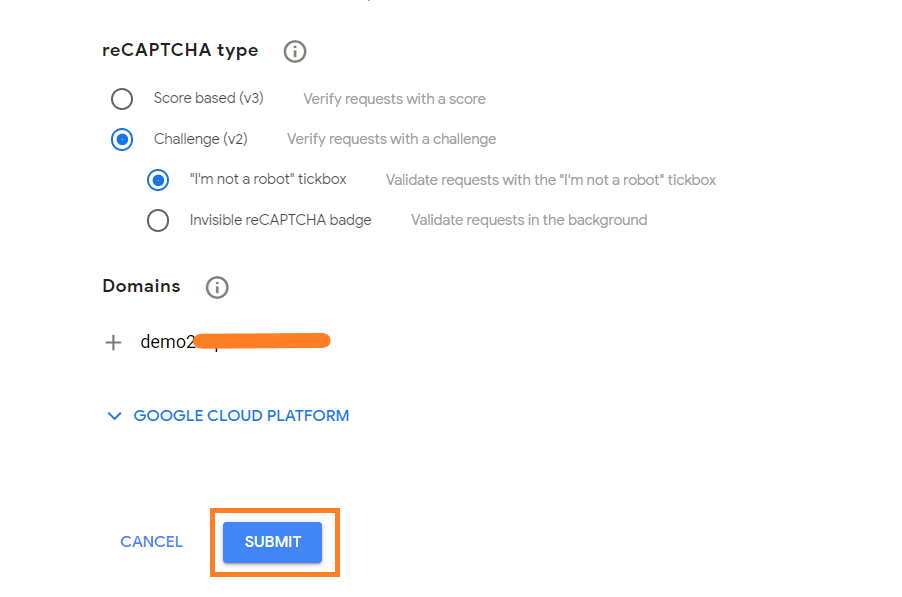
2.2. Select the reCAPTCHA Type
The next thing you need to do is to select the reCAPTCHA type. You will get two types of reCAPTCHA.
- Score-based (v3): This type verifies the requests with a score.
- Challenge(v2): This type of reCAPTCHA verifies the request with a challenge.
You can select the one that you want to add to your store. For this tutorial, I am selecting the ‘Challenge(v2)’ type.
Once you select it, you’ll see two new sub-options below it. These will be:
- “I’m not a robot” tickbox
- Invisible reCAPTCHA badge
Again, the choice is yours but I am going to select the ‘I am not a robot’ option to add a reCAPTCHA tickbox to my demo store.

2.3. Add Your Domain Name
After selecting the type of reCAPTCHA, you need to add the domain name to which you want to display the CAPTCHA. You can also add multiple domain names.
To add a domain name, simply add the domain name of your site in the ‘Add a domain’ textbox in the ‘Domains’ section.
Make sure to add the domain name without HTTPS protocol or backslashes. For example:
- https://mywebsitename.com (Wrong Format)
- mywebsitename.com (Correct Format)
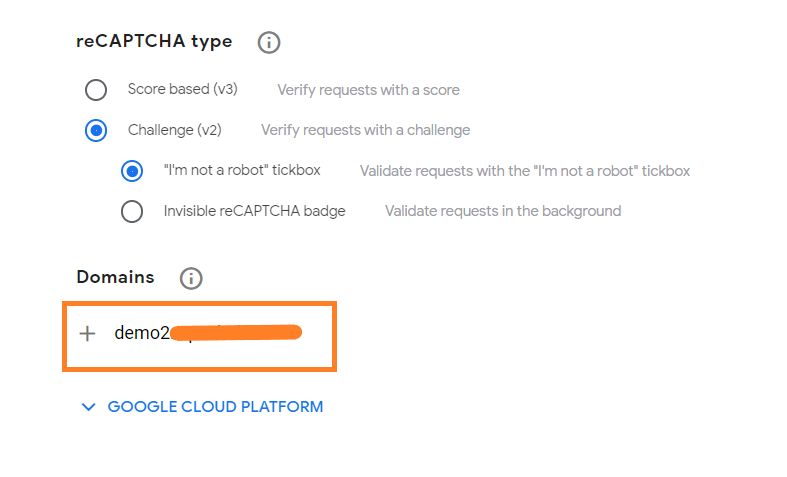
If you want to add more domains, you can do that by clicking the ‘Plus’ icon.
2.4. Click the Submit Button
Finally, click the ‘Submit’ button at the bottom of the page to submit the form to get the APIs.
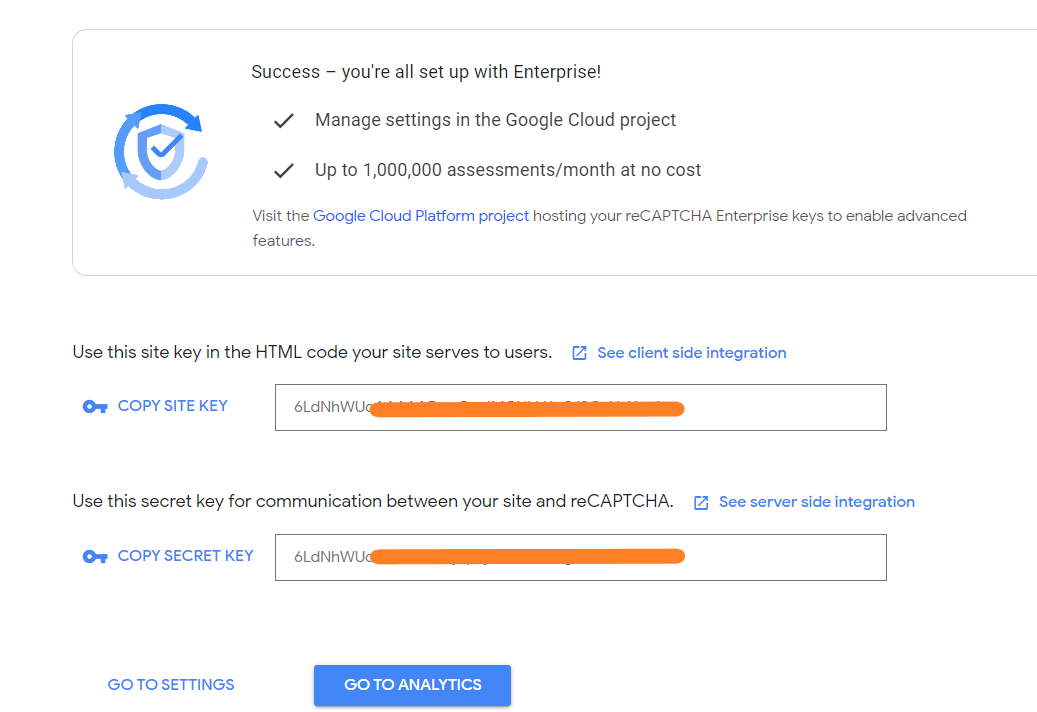
After clicking the button, you’ll get the site and secret keys. Make sure to open this tab as we’ll need to copy the APIs in the next steps.
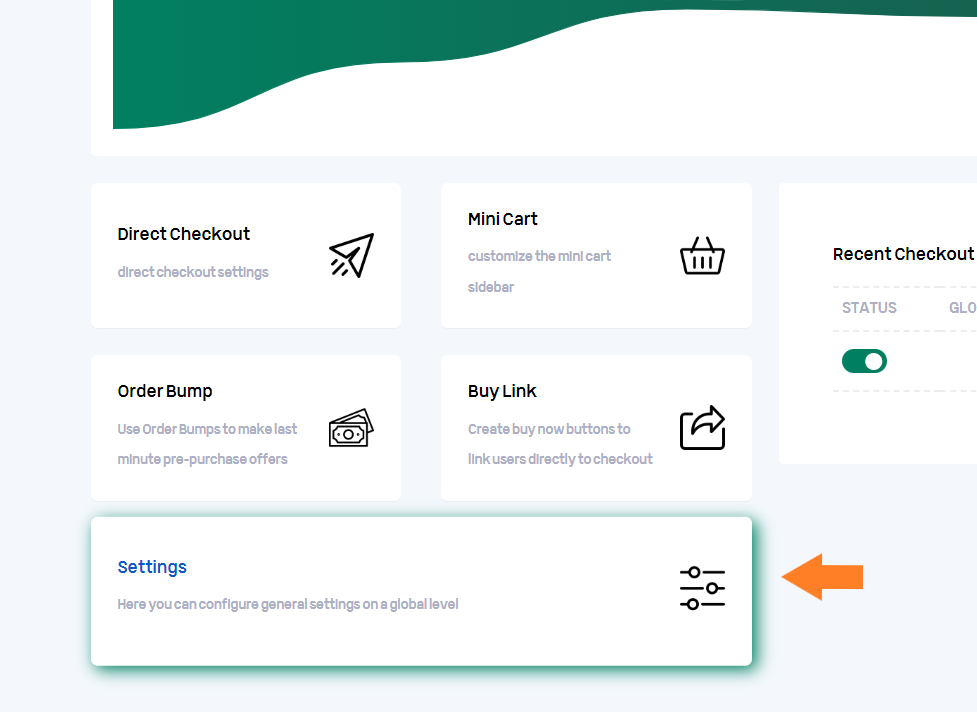
After getting the API keys, open your WordPress dashboard in a new tab and navigate to AIO Checkout from your WordPress dashboard.

4. Click the Settings Section
Once you are in the plugin’s general settings, now, to add a reCAPTCHA to WooCommerce checkout, we need to add the reCAPTCHA API keys to the AIO Checkout plugin so that the reCAPTCHAs can work properly.
To add the API keys, hover your mouse to the “Settings” section and click it.
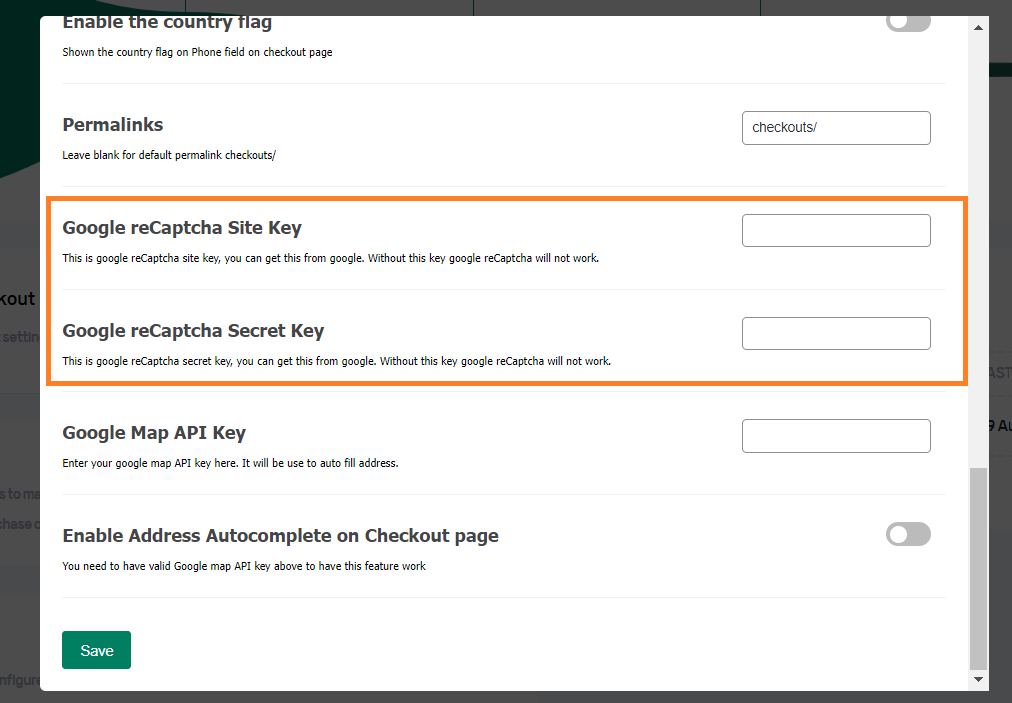
5. Paste the Google reCAPTCHA API Keys
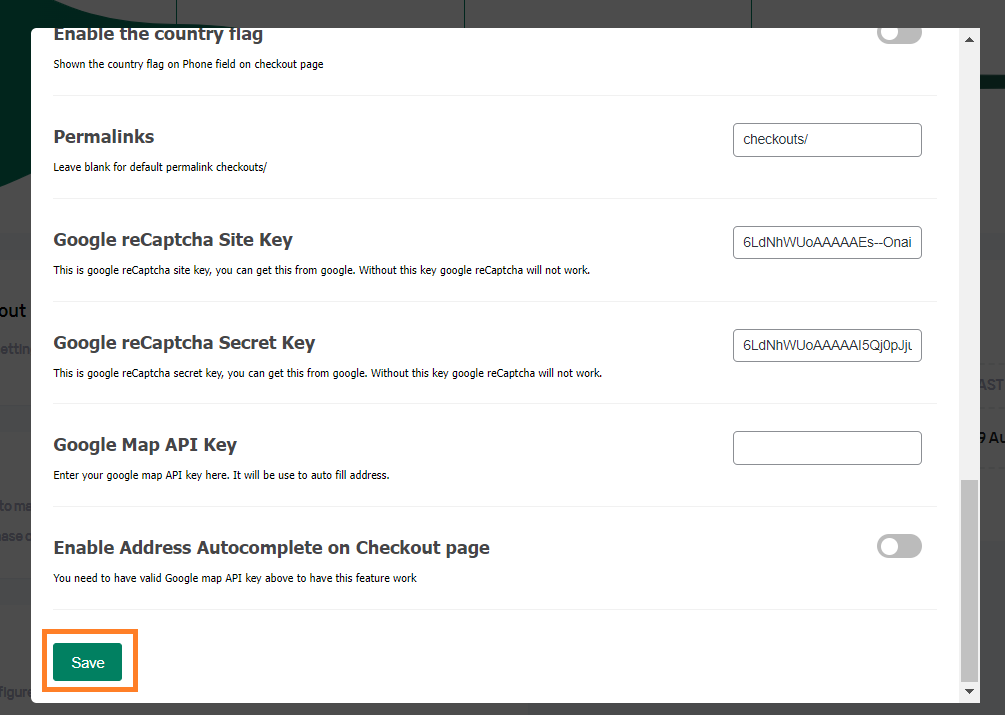
Once you click it, a pop-up will appear from where you can configure the general settings globally. Within the pop-up scroll down a bit and you’ll see the ‘Google reCaptcha Site Key’ and the ‘Google reCaptcha Secret Key’ fields where you can paste the required API keys.
5.1. Copy the API Keys
To get the API keys, head back to the Google reCAPTCHA tab that we left open in the previous step. Click the ‘Copy Site Key’ button to copy it.
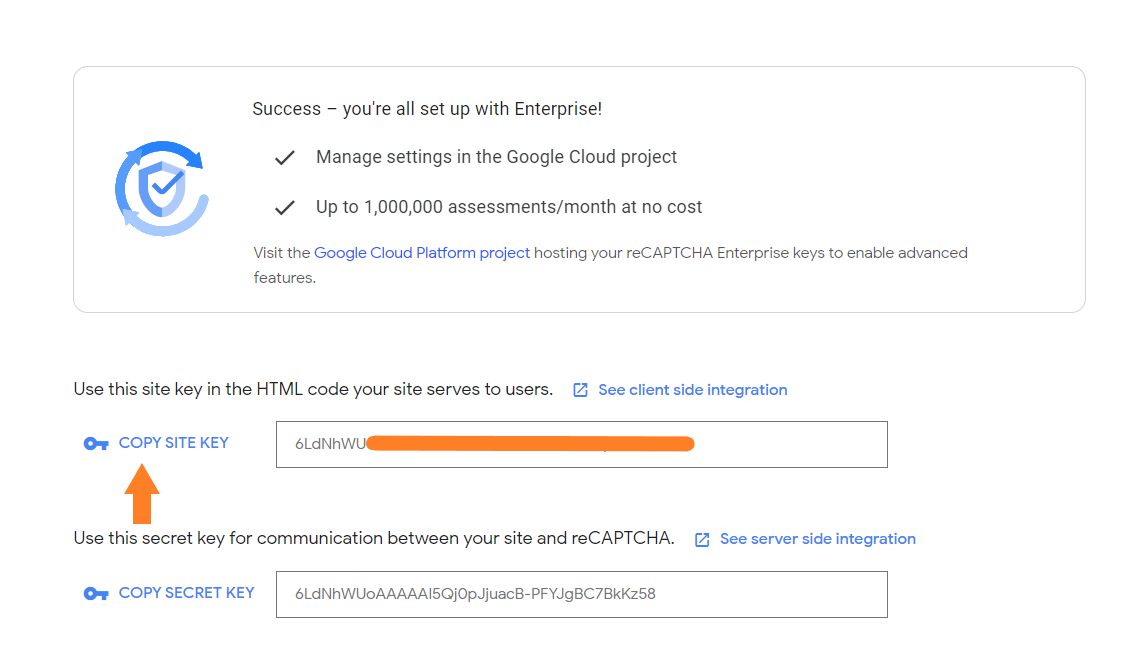
5.2. Paste the Site Key
Once you have copied the key, head back to your WordPress dashboard tab and paste the key in the ‘Google reCaptcha Site Key’ field.
Make sure, you have copied the site key first and added it in the correct field. Remember if you do not add the keys correctly, the reCAPTCHAs won’t work on your site.

5.3. Paste the Secret Key
After that, you also need to paste the secret key. First, go back to the tab and copy the secret key, and then come back to the WordPress tab and paste the secret key in the ‘Google reCAPTCHA Secret Key’ field.

5.4. Save Settings
Once you have added the API keys correctly, make sure to click the green ‘Save’ button to save the settings.
6. Create a New Checkout Form
After that, you need to create a new checkout form and add the ‘reCAPTCHA’ field to it so customers can see it and verify their identity. I have already created a few checkout forms, but I’ll make a new one for this tutorial to show you the complete process of adding the CAPTCHA to your store’s checkout.
Click the “Create New Checkout” button to create a new checkout form.
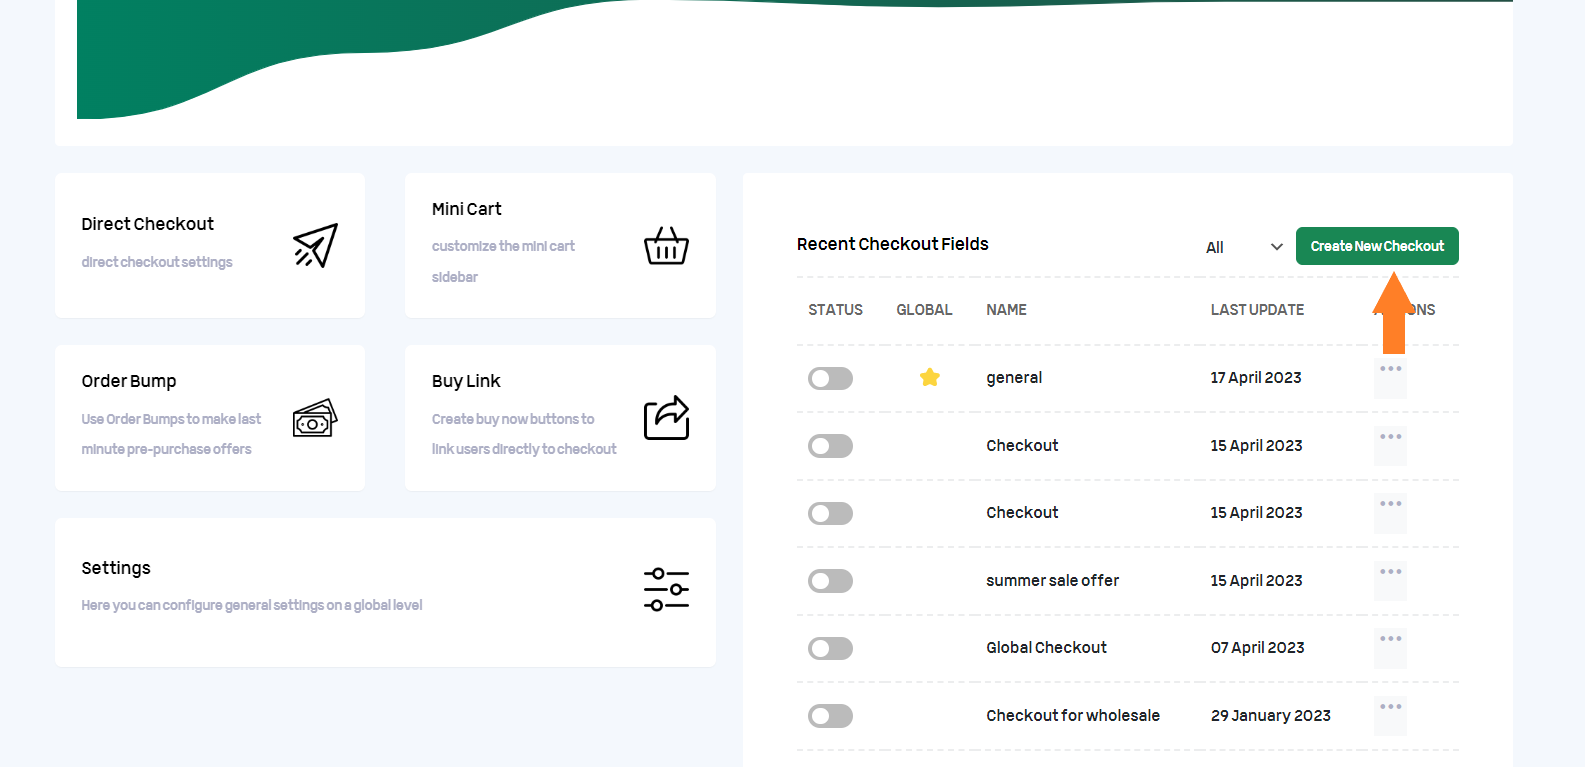
Once you click the button, a new checkout form will be created. It’ll be the default WooCommerce checkout field, but you can customize it according to your business needs to improve the customer experience.
You can also add custom fields like birthday fields, VAT number fields, etc.

7. Add CAPTCHA Field to WooCommerce Checkout
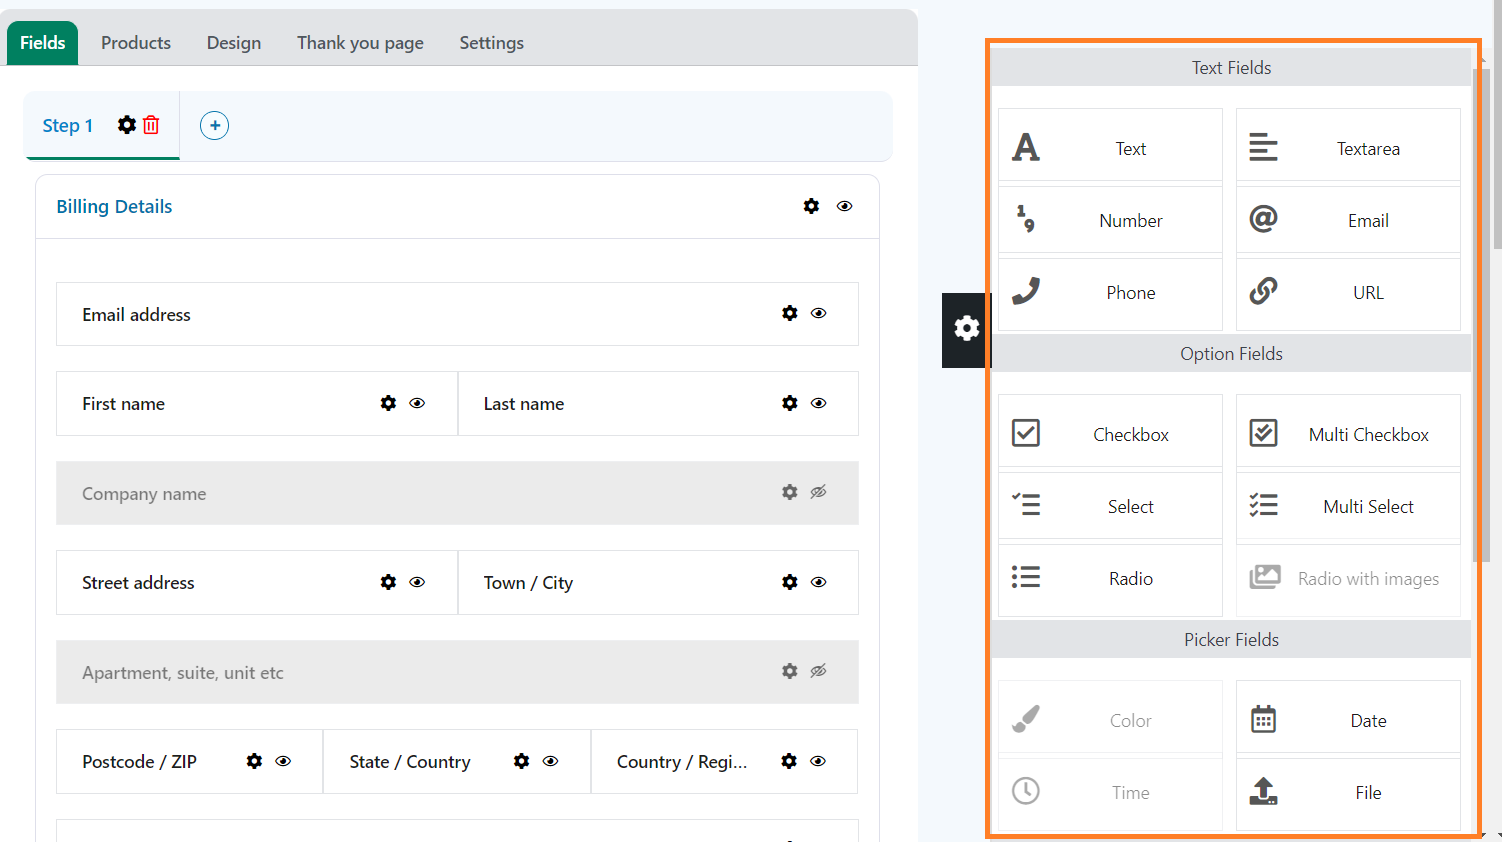
Once the checkout form is created, click the black floating gear icon on your screen’s right side to open the fields panel.
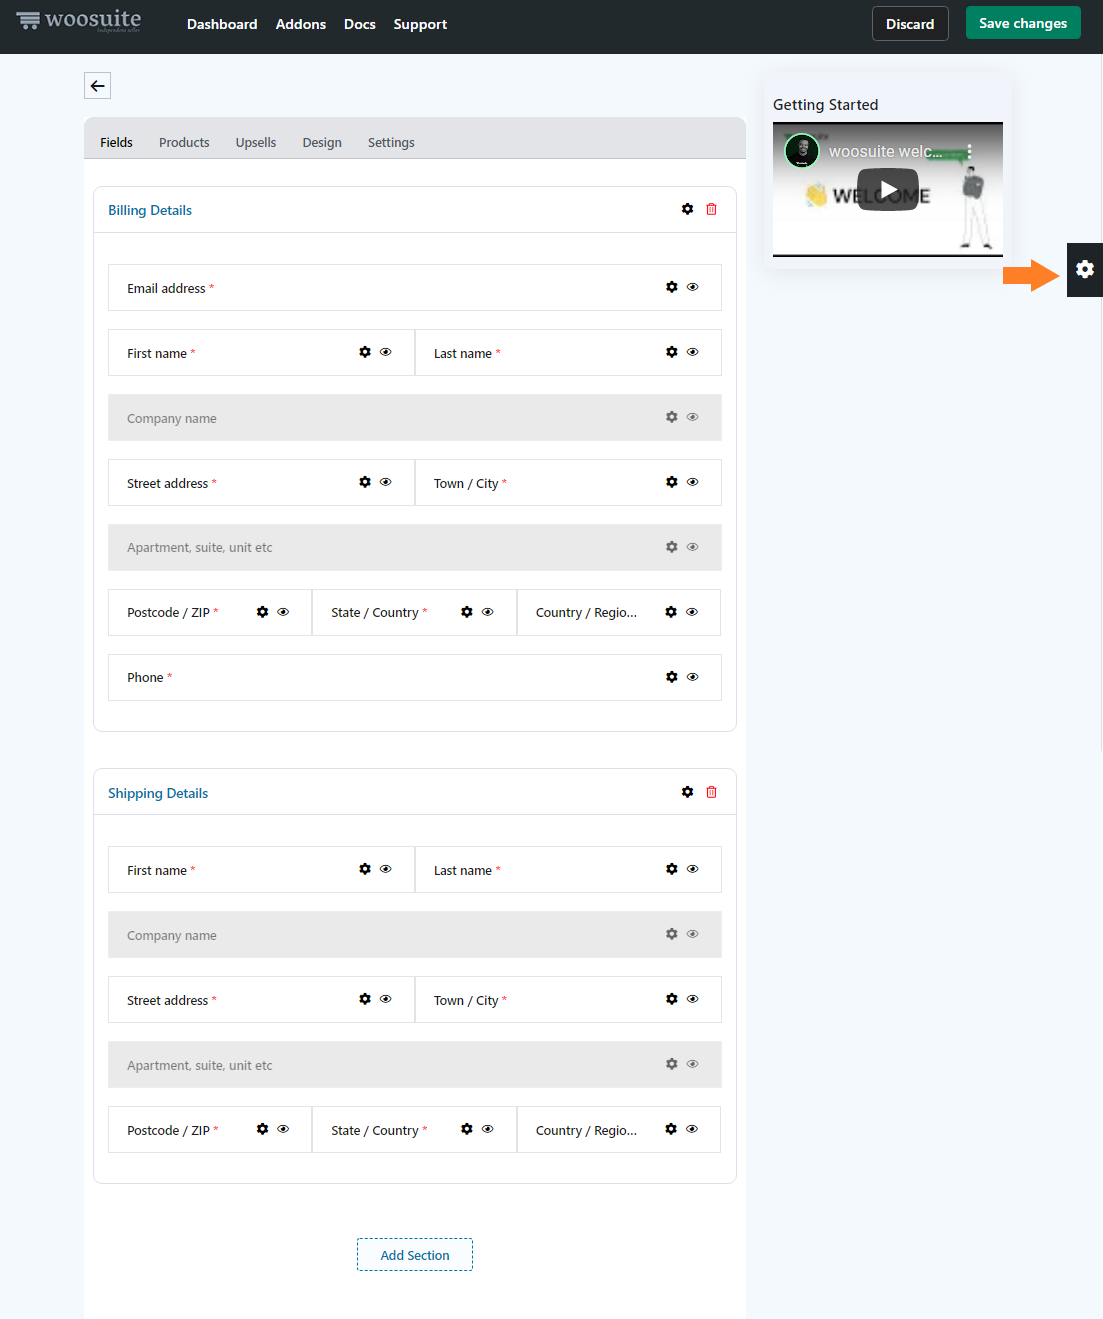
Once you click on the Gear icon, a pop-up will appear on the right side of your screen. You’ll see different fields that you can add to the checkout form or create a new form with the fields you want.
4.1. Add a New Section to Checkout
It is an optional step to keep things organized on the checkout page. I’ll create a new section and name it ‘Complete the CAPTCHA.’ After that, I’ll add the field to it.
To create a new section, scroll to the bottom of the page and click the ‘Add New Section’ button. It will create a new section above the ‘Payment’ section.
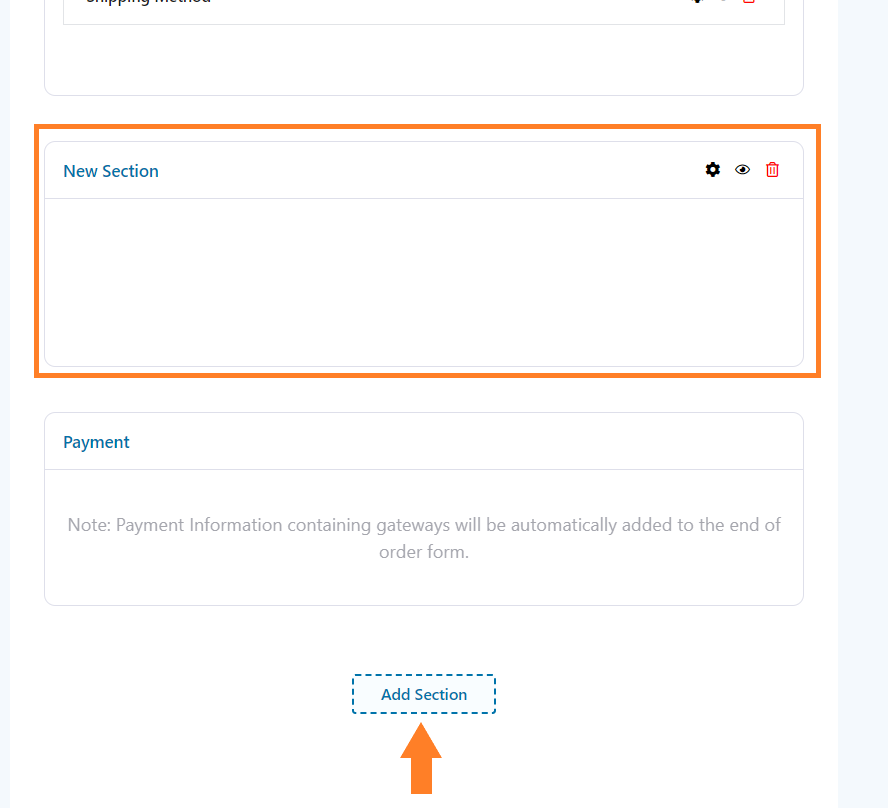
You can drag and drop the section anywhere you want in the checkout form. I have added it below the ‘Shipping Details’ section.
You need to change its name to let customers know what this section is about.
To do so, click the gear icon on the section, and a popup will slide in from the right side of the screen. You can replace the existing label with the one you want in the ‘Section Label’ field.

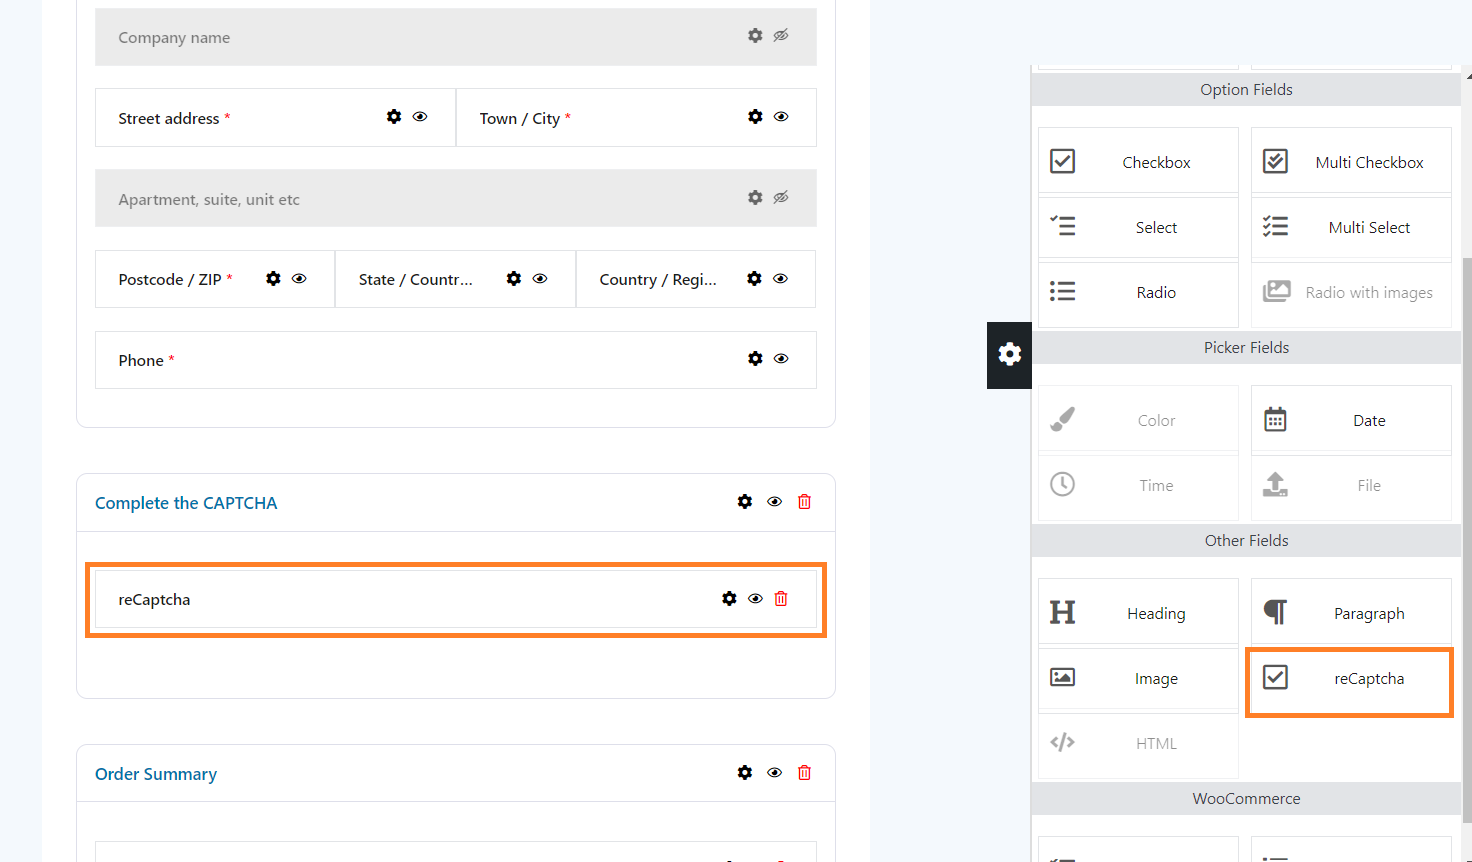
4.2. Add the CAPTCHA Field
Next, you need to add a reCAPTCHA field to your checkout page to allow customers to verify their identity.
To do so, simply drag the ‘reCAPTCHA’ field from the fields panel to the new section that we created above. You can drag and drop the field to adjust its order.
If you have not added the above section, you can add the reCAPTCHA field anywhere inside the checkout form.
8. Select the Design of the Checkout Form
Once you have added the reCAPTCHA field to the checkout form, the next thing you need to do is select the design of the checkout form/page.
Click the ‘Design’ tab at the top.
There are multiple templates available, you can choose any template you want. I have selected the ‘Multiple Columns Modern’ template.
You can also create a template from scratch.

9. Select the Thank You Page Design
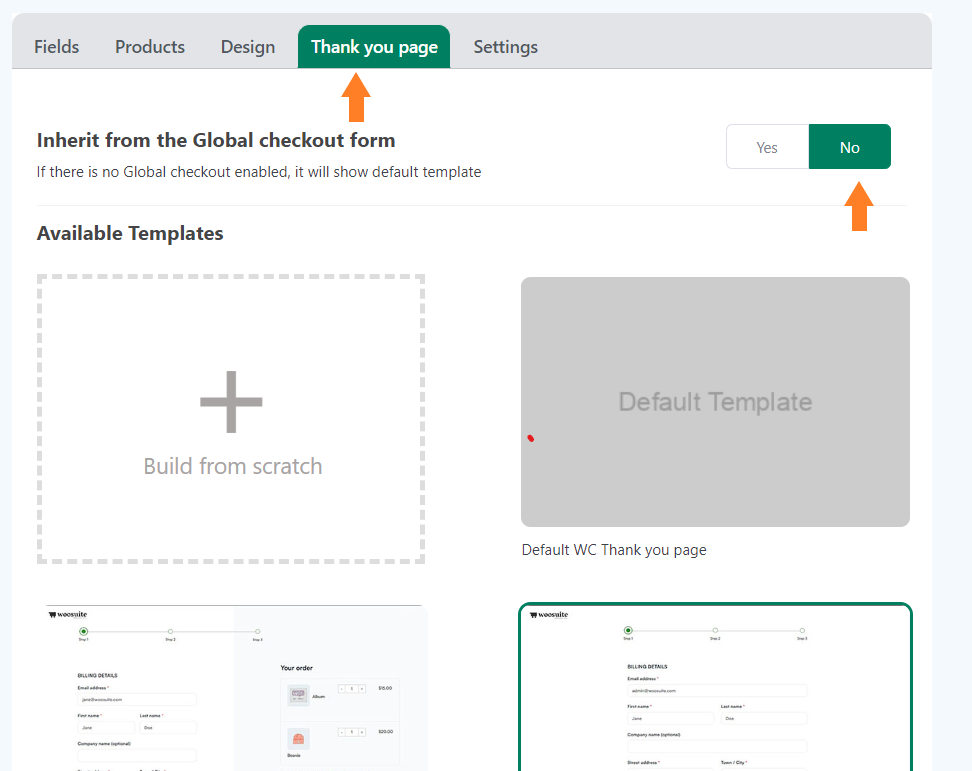
Next, click the ‘Thank You Page’ tab at the top, and select the template for the thank you page. If you want, you can also create a custom thank you page.
If you want to inherit the thank you page design from the global checkout, you can leave everything to default. But if you want to customize the thank you page or create one from scratch, ensure to select ‘No’ for the ‘Inherit from the Global checkout form’ option.
Note: You won’t see the thank you page templates if you have set the ‘Inherit from the Global checkout form’ option to ‘Yes.’
10. Enable the Checkout
After selecting the thank you page design, we need to enable this checkout form. Click the ‘Settings’ tab.
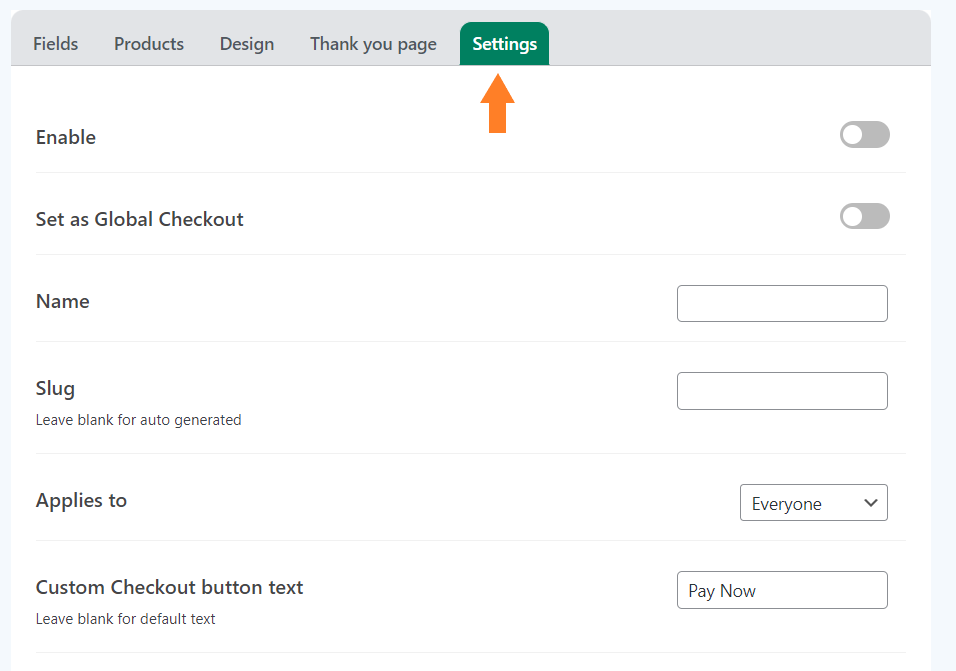
10.1. Enable the Checkout Form
To enable the checkout form, toggle the ‘Enable’ button. Also, ensure you have enabled the ‘Set as Global Checkout’ option to make this form the global checkout.
You can leave it disabled if you want to set this checkout form for specific user roles. I am enabling it as a global checkout as I don’t want to set a user restriction.

10.2. Give a Name to the Form
Now, we need to give a name to this form. It will only be displayed to the admin. It is helpful if you have created different checkout layouts for different user roles.
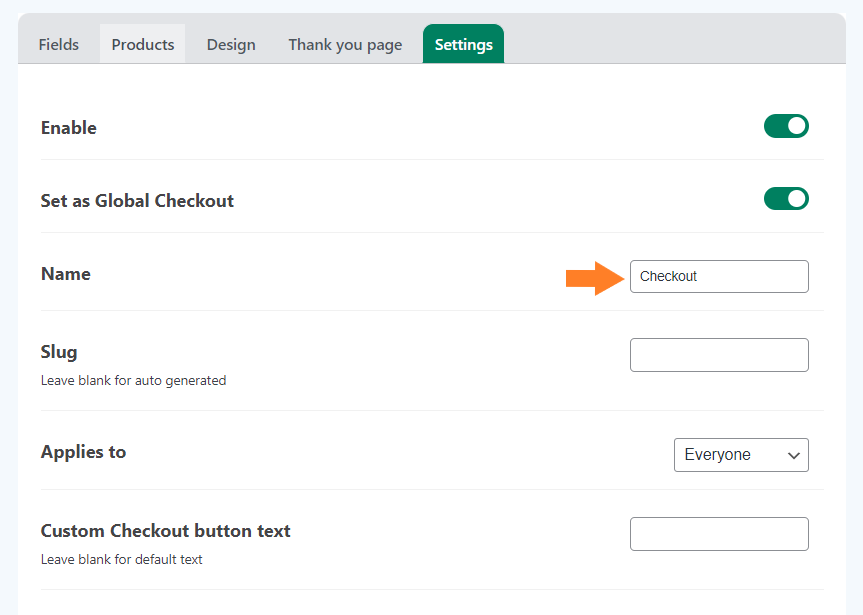
Note: You can also explore the other available settings and set a custom checkout button text. But I’ll move to the next step to keep this tutorial short and to the point.
11. Save Changes
Once you have added the reCAPTCHA field and made the required adjustments to the checkout form and enabled it, click the green ‘Save Changes’ button at the top right corner of your screen to save the settings.

12. Final Results
Now let’s the final results.
To test it, I added a product to my cart and visited the checkout page. As you can in the screenshot below the reCAPTCHA has been added to my demo store’s checkout and I can complete it to verify my human identity.

Final Thoughts
I hope this article was helpful to you and you were able to add CAPTCHA to WooCommerce checkout easily.
However, if you want to improve the WooCommerce checkout page, you can follow the following guides.


