Creating a free plus shipping funnel can get you insane results in terms of increasing the average order value and revenues. Many eCommerce stores are using this modern era techniques to increase their sales and customer’s trust.
This approach provides immense value to potential customers by offering a product for free, only requiring them to cover the shipping and handling fees.
In today’s article, I’ll walk you through the step-by-step process to create a free plus shipping funnel in your WooCommerce online store. I’ll also dive into a little bit of explanation to give you a clear idea of what exactly the free plus shipping funnel means.
So, without any further ado, let’s jump into it.
On This Page
- 1 What is a Free Plus Shipping Funnel?
- 2 How to Create a Free Plus Shipping Funnel in WooCommerce?
- 3 Conclusion
What is a Free Plus Shipping Funnel?
A “Free Plus Shipping” funnel is a strategic e-commerce marketing approach designed to attract customers by offering a product for free, where the customer only pays for the shipping and handling charges.
This method can effectively lower the entry barrier for potential customers, making them more likely to engage with a brand.
Once these customers are engaged, they’re often introduced to upsells or additional products, enhancing the potential for increased revenue.
This tactic not only serves as an enticing introduction for new customers but also creates an opportunity for businesses to showcase other products, ultimately aiming to boost overall average order value, sales, and customer loyalty.
How Free Plus Shipping Funnel Works?
The funnel typically works as follows:
- Lead Magnet: The funnel usually begins with an advertisement or promotion, where a product (often something of relatively low cost to the seller) is offered for free. This entices potential customers and captures their attention.
- Sales/Landing Page: Once interested, the customer is directed to a landing page that provides details about the free product and emphasizes the value they’re getting. This page will have a call to action button or you can also add the order form to this page to allow customers to purchase it from a single page.
- Upsells and Cross-sells: After the customer has decided to claim the free product and is in the checkout process, they are often presented with additional offers. These can be higher-priced items, bundles, or related products that complement the free item. This is where businesses can substantially increase their average order value.
- Order Confirmation and Delivery or Thank You Page: After the customer has navigated through the funnel, they are redirected to a thank you page where they receive an order confirmation and the product shipping details. On the thank you page, you’ll also have the opportunity to upsell and cross-sell more products.
- Follow-up: Once the product is delivered, businesses have an opportunity to engage with customers through follow-up emails, asking for reviews, offering discount codes for future purchases, or promoting other products.
This is just a basic idea of how it works, but you can break it down into more individual steps like, the sales page > Order Form Page > Upsells > Thank you page.
As I’m creating the upsell offer on the order form page, I have combined them as one step in the user’s purchasing journey. It is up to you how you want to shape your free plus shipping funnel.
Now that, we are aware of this marketing technique, let’s jump into the process of creating it.
How to Create a Free Plus Shipping Funnel in WooCommerce?
To create a free plus shipping funnel in WooCommerce, you’ll need a third-party plugin. I’ll use AovUp’s AIO Checkout plugin to create the funnel.
The reason, I like this plugin is it allows you to do all the things using this single plugin. While if you are using some other plugins, you may need to use several plugins to get to the final results.
For example, you may need to use a separate plugin for creating upsell offers, a separate plugin for creating an order landing page, and a separate plugin for creating a checkout and the custom thank you page.
But with the help of the AIO Checkout plugin, you can do all this and more in just a few clicks. So without any further ado, let’s straight jump into it and see how to create the free plus shipping funnel in WooCommerce.
The following are the steps to create this amazing funnel and boost your revenue.
1. Install and Activate the AIO Checkout Plugin
First, we need to install and activate the AIO Checkout plugin to improve the customer’s shopping experience.
Download the AIO Checkout plugin from the AovUp store. It also has a free version, but to follow along with this tutorial, you’ll need to purchase its Pro version.

Once you have downloaded it, navigate to the Plugins » Add New from your WordPress admin dashboard, and click the Upload button to upload the downloaded file to install and activate the plugin.
2. Create your Free Product
First, we need to create a public product that we’ll be selling for free and then we also need to create a private product that will only be available if the user purchases the first product.
The private product will be shown as an upsell on the checkout page. To create a new product, navigate to Products > Add New from your WordPress dashboard.
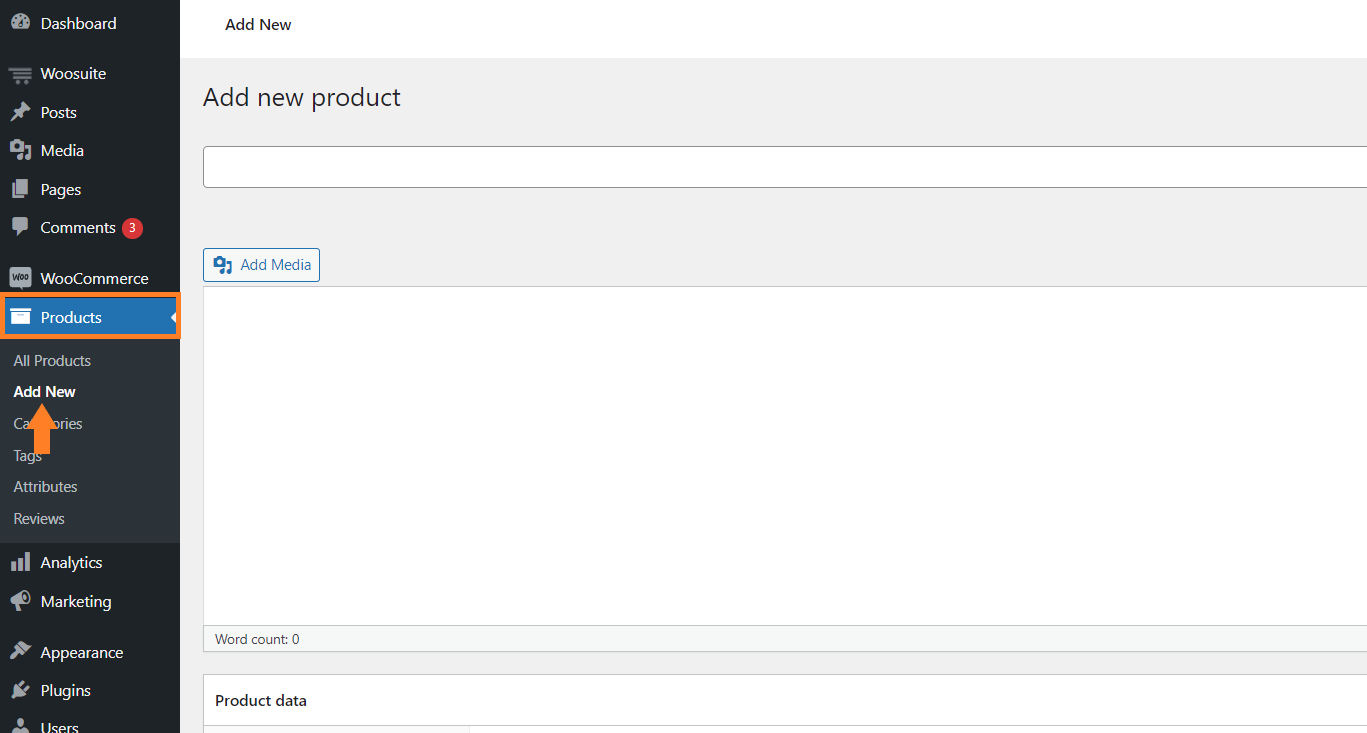
2.1. Configure the Product
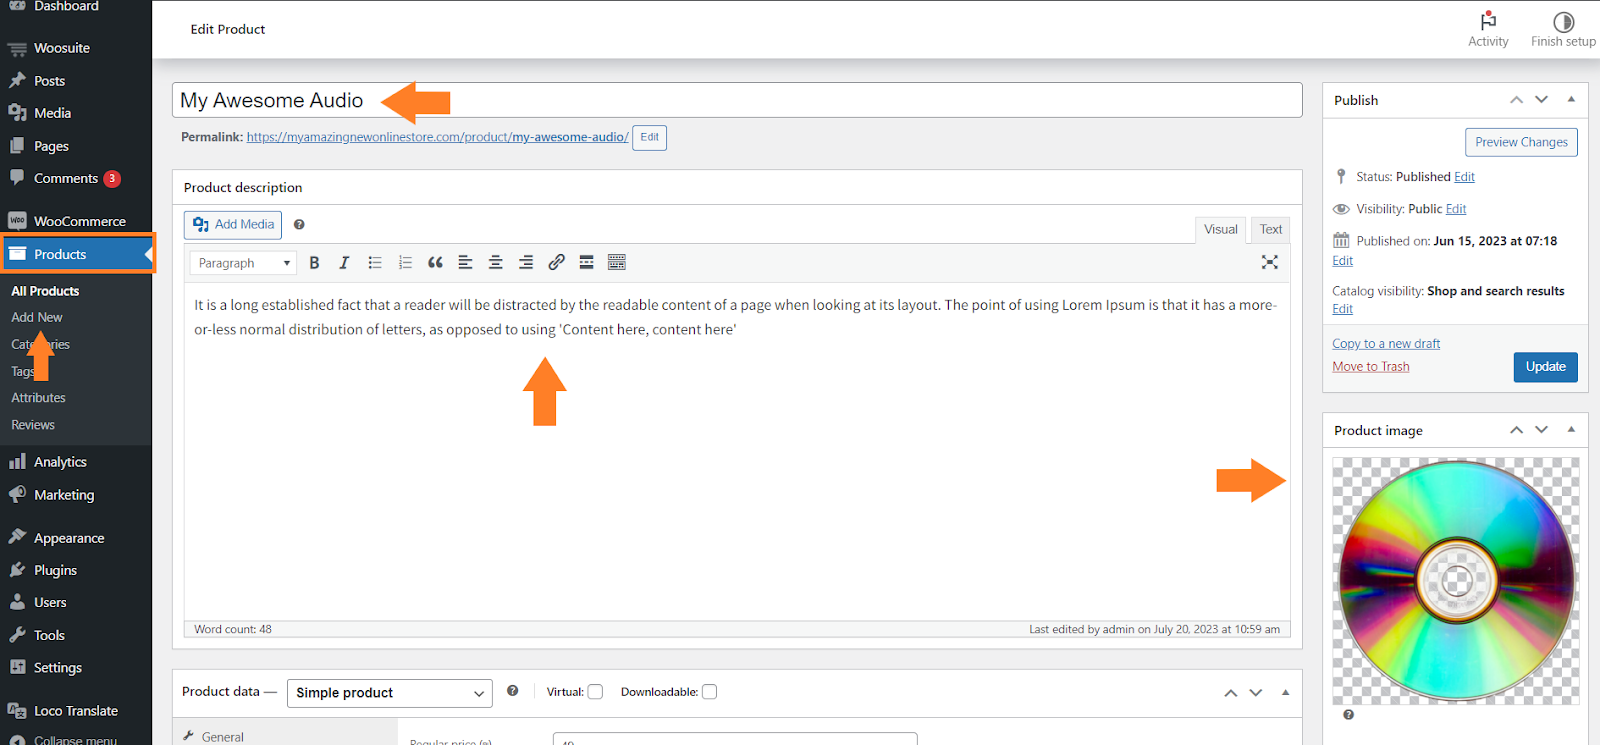
Once you are on the product edit page, you need to configure and add product details like title, description, image, and pricing. I have already added the product details.

Just make sure to add ‘0’ in the Regular price under the Product Data section as we’ll be providing this product for free.

3. Create a Private Product to Upsell
It depends on your choice if you want to create a private product that will specifically be sold as an upselling offer. But you can create a public product as well so customers can directly purchase it from the shop page.
If that’s the case, you will need to be a little more careful because on the order form page, if the user sees the same product as an upsell product or additional offer, it might annoy them and leave the cart.
For this tutorial, I’ll create a private product that will specifically be sold in the upsell offer. To create a private product you need to do the same as we did in the previous step.
Simply navigate to Product > Add New from your WordPress dashboard and add the product details on the product page.
I have already added the product details.
3.1. Create a Private Product
Once you have added the product details, to create it as a private product so users can’t see it on the shop and search pages, we need to change its visibility.
Click the ‘Edit’ button right beside the ‘Visibility’ in the ‘Publish’ section.
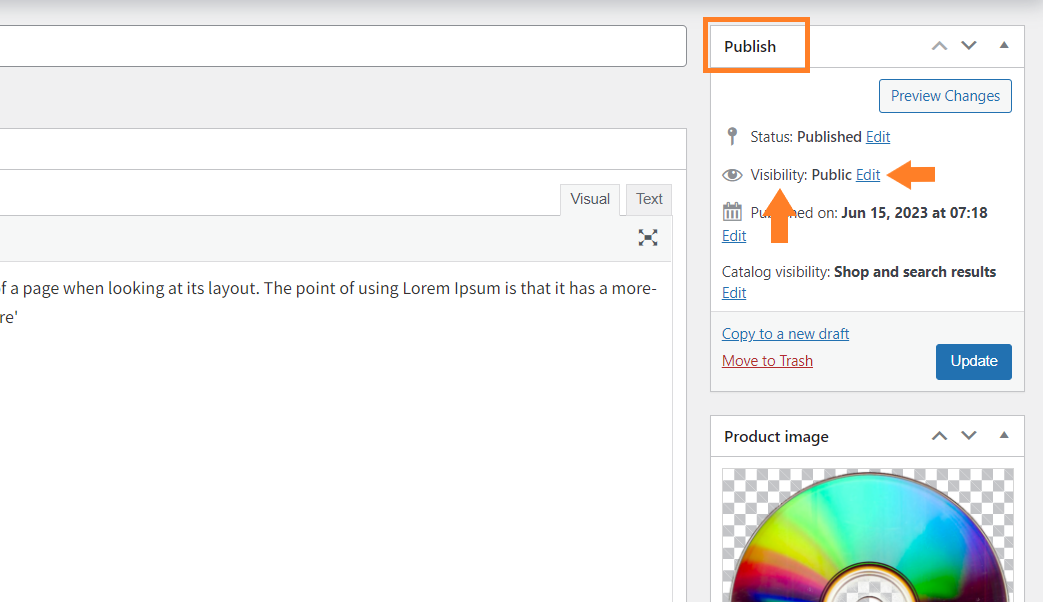
After clicking the edit button, three radio options will slide down.
- Public
- Password Protected
- Private
Make sure to check the ‘Private’ button and click ‘OK’ to save it.

3.2. Publish or Update the Product
Once the product visibility is set to ‘Private’ click the blue ‘Publish/Update’ button to publish the product. Remember that, this product will not be displayed on the store’s shop page.

5. Create the Order Form Page
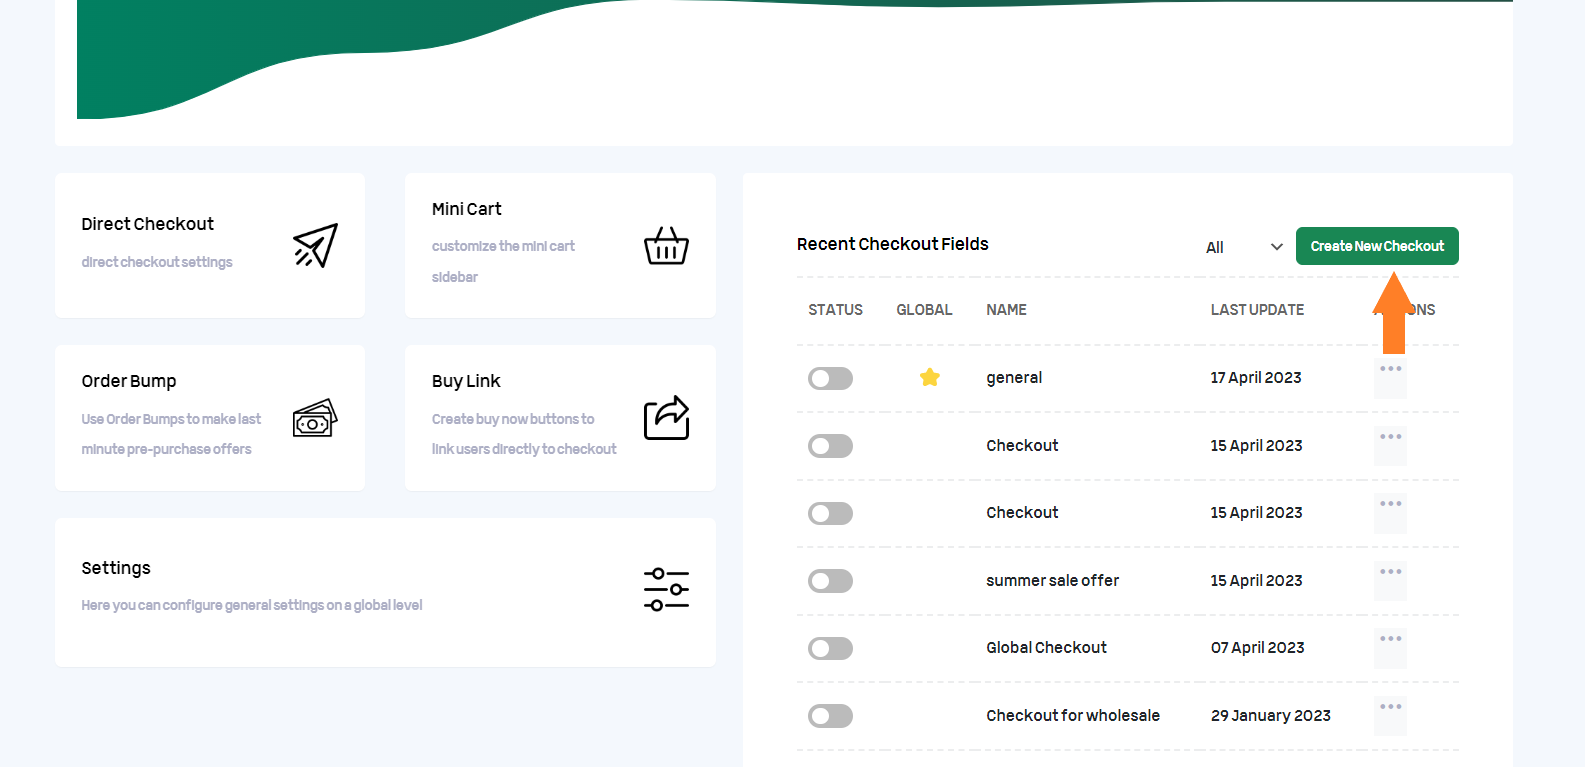
Once you have created the products and installed and activated the plugin, navigate to AIO Checkout from your WordPress dashboard.

I have already created a few order forms, but I’ll make a new one for this tutorial to show you the complete process of customizing it, to allow customers to maximize the customer experience.
Click the “Create New Checkout” button to create a new checkout or order form.
Once you click the button, a new checkout form will be created. It’ll be the default WooCommerce checkout field, but you can customize it according to your business needs to improve the customer experience.
You can also add custom fields like birthday fields, VAT number fields, etc.
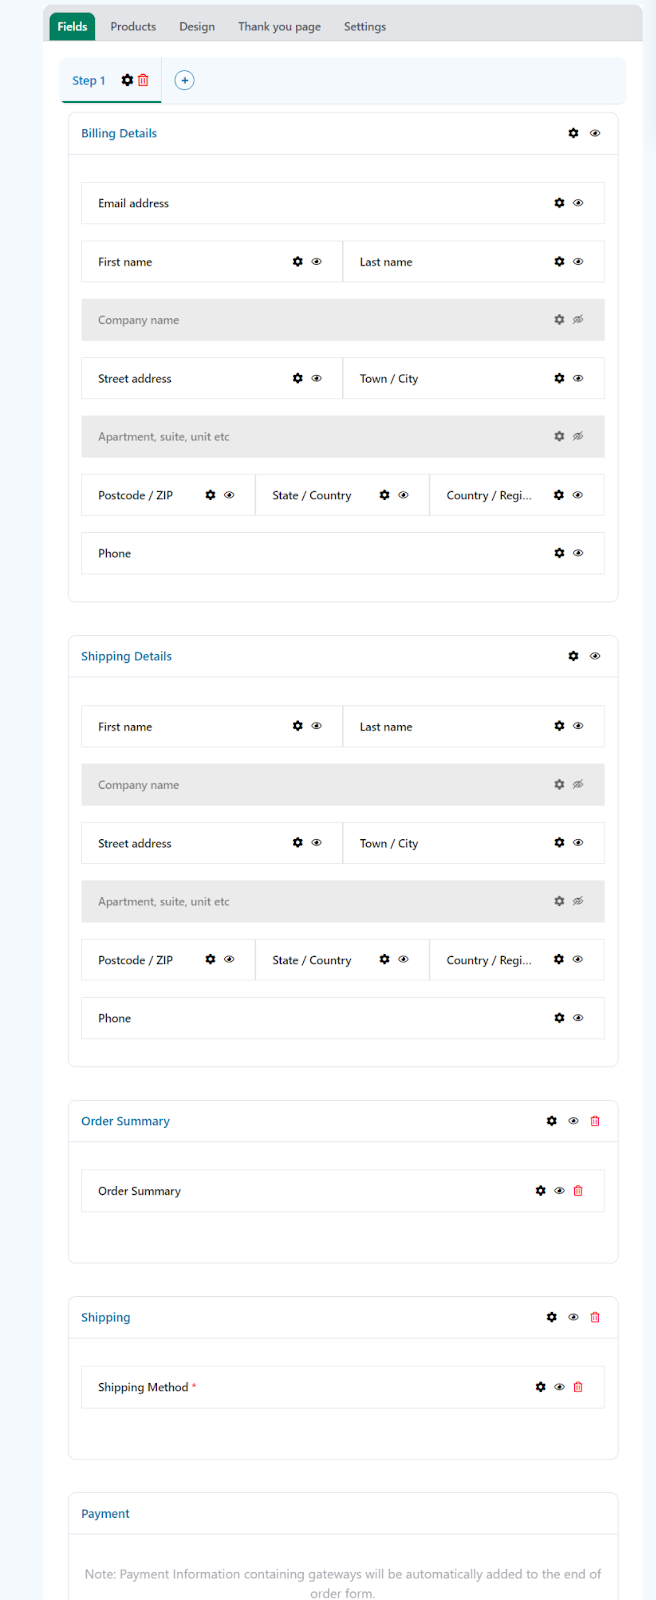
You can customize the order form as you want. You can add fields, create new sections, or even create different steps for the checkout. I have created a 2-step checkout/order form.
- In the first step, customers can add their details, select the shipping method, and add the upsell offer to their order.
- In the second step, they can complete the purchase by paying for the shipping only and if they have purchased the upsell offer as well, they’ll pay for the shipping and the upsell offer. They’ll get the product for free that they added to their product at first.
I have set this up. This tutorial will become quite long if I go into the details of creating this setup. I have already compiled a guide for you to create a 2-step checkout or order form.
Here’s the tutorial that will help you with this.

5.1. Make Order Form Specific for a Product
Once you have adjusted the order form page as per your requirements, now, if you are planning to create a landing page for the product then this feature will help you a lot by creating product-specific checkout.
It means that this checkout/order form will only be used for this product.
To do so, click the ‘Product’ and you’ll be redirected to the page from where you can select products for which you want to create this order form.

5.1.1. Add/Select the Product
To make it a product-specific order form, click the ‘Add Product’ button and a rule will be added above the button from where you can select the product for which you want to make this order form.

You can also add discounts for the selected product but as we are creating the free plus shipping funnel we’ll be providing this product for free, so we don’t need to set the discounts.
5.2. Select the Design of the Checkout Form
Once you have selected the product for this order form, you need to select the design of the checkout form/order form page.
Click the ‘Design’ tab at the top.
There are multiple templates available, you can choose any template you want. I have selected the ‘Multiple Columns Modern’ templates.
You can also create a template from scratch.

5.3. Select the Thank You Page Design
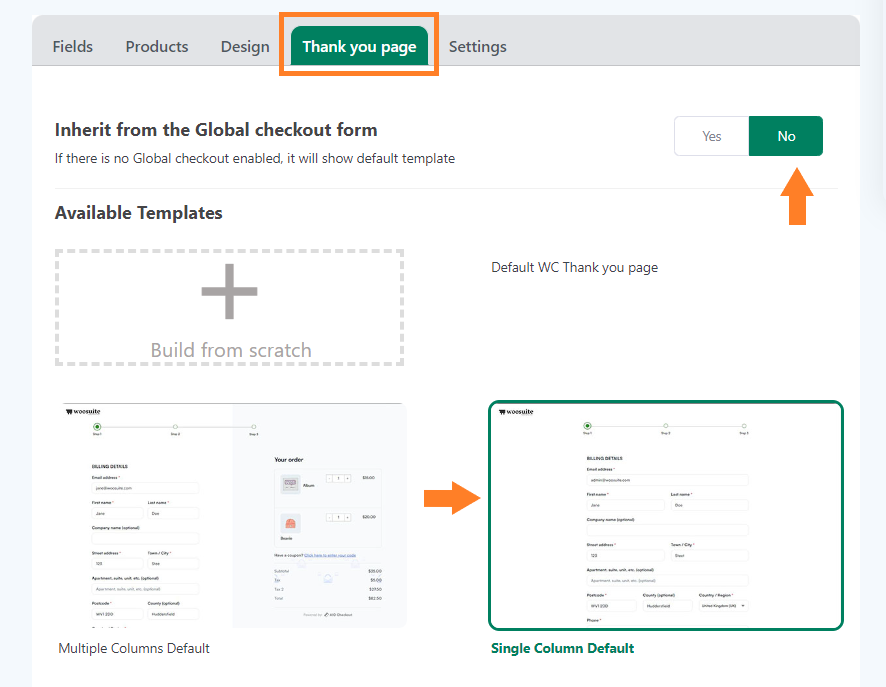
Next, click the ‘Thank You Page’ tab at the top, and select the template for the thank you page. If you want, you can also create a custom thank you page.
If you want to inherit the thank you page design from the global checkout, you can leave everything to default. But if you want to customize the thank you page or create one from scratch, ensure to select ‘No’ for the ‘Inherit from the Global checkout form’ option.
I have selected the ‘Single Column Default’ template for the thank you page design. You can choose from the available ones or create a custom page.
5.4. Enable the Checkout
After selecting the thank you page design, we need to enable this checkout form. Click the ‘Settings’ tab.

5.4.1. Enable the Checkout Form
To enable the checkout form, toggle the ‘Enable’ button. Do not enable it as a global checkout as we want this order form for a specific product.
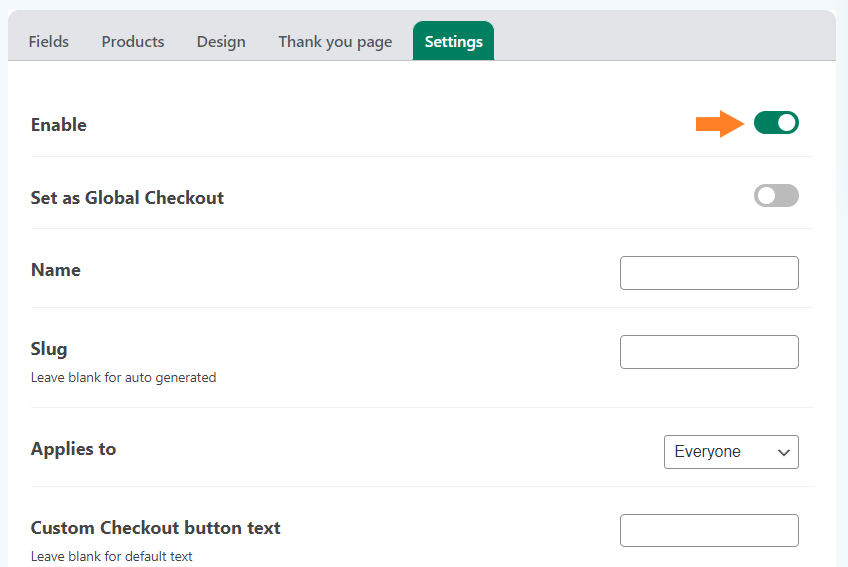
5.4.2. Give a Name to the Form
Now, we need to give a name to this form. It will only be displayed to the admin. It is helpful if you have created different checkout layouts for different user roles or different products.

Note: You can also explore the other available settings and set a custom checkout button text. But I’ll move to the next step to keep this tutorial short and to the point.
5.5. Save Changes
Once you have created the order form page and enabled it, click the green ‘Save Changes’ button at the top right corner of your screen to save the settings.
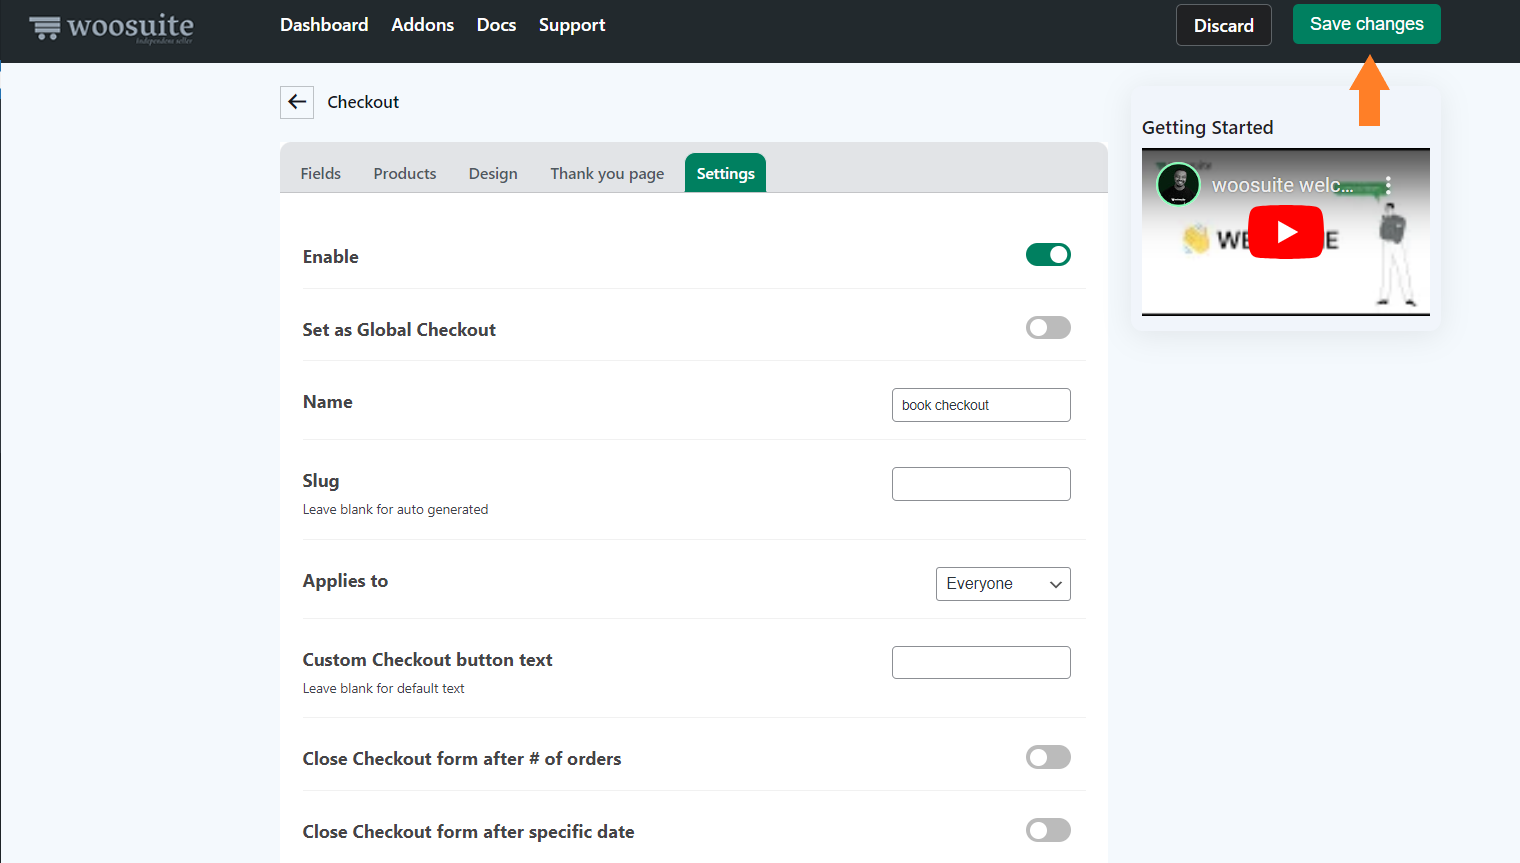
Note: You can add a custom slug in the ‘Slug’ field or after saving, it will be created automatically. You can use this slug to link the call to action(CTA) button to this order form page.
I am not doing this, as I’ll not go into the details of creating a landing or sales page, in this tutorial. I’ll use the default product page as the sales page.
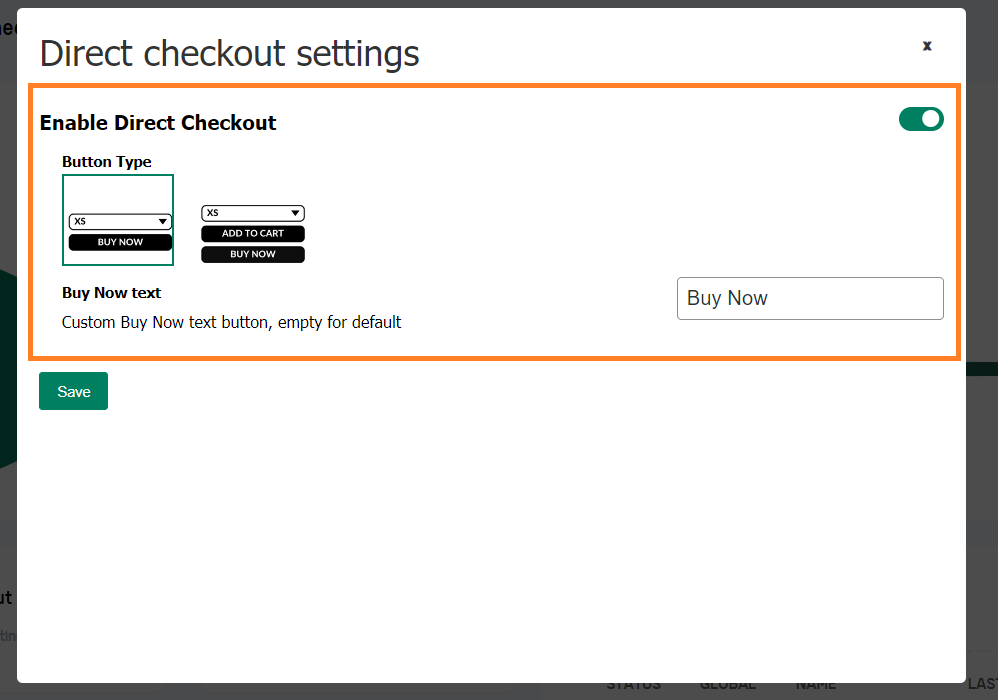
6. Enable Direct Checkout
If you are using the custom landing page or sales page for your product, you can skip this step and move to the next one.
But if you using the product page as the landing page or sales page, then you need to enable the direct checkout to take customers directly to the checkout.
Once you have created the order form page, next, we need to enable the direct checkout so users are directly redirected to the order form page by clicking the ‘Buy Now’ button.
To enable the direct checkout, you need to go back to the plugin’s general settings. I have also created a guide to help you enable direct checkout to your store.
7. Create Upsell Offer
The next step is to create the upselling offer that will be shown to the customers on the order form page. We’ll use the private product that we created above in this tutorial.
To create a WooCommerce upsell offer, you can follow this guide. Just make sure to select the private product from the upsell settings.
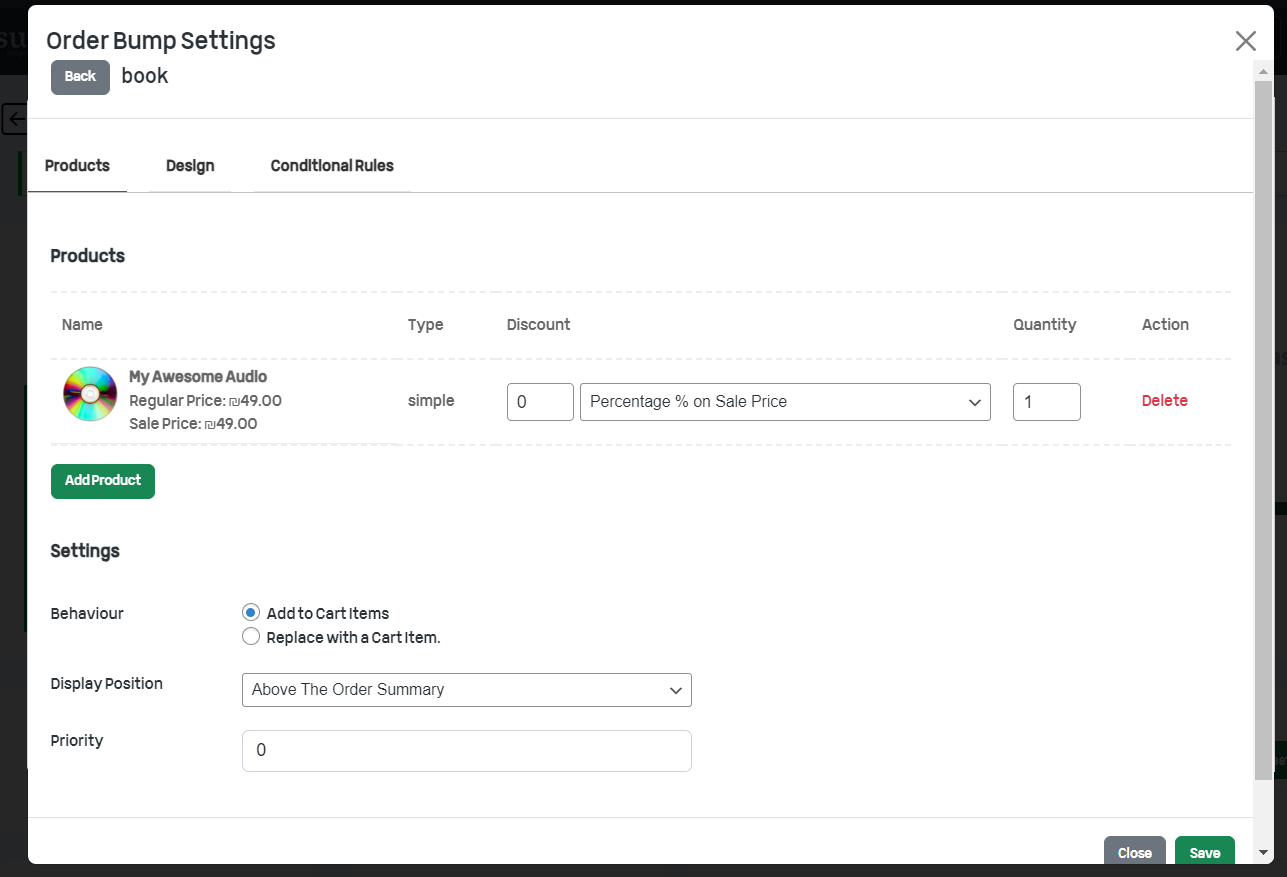
Also, while adding the condition to show this upsell or order bump, you need to select the category in which you added the private product.
If you didn’t give any category to the private product, while creating it, you can select ‘Uncategorized’ from the category conditions section.
I have selected the ‘book’ category as I gave the same category to the private product that I created earlier.
The condition that I created means that this upselling offer will only be shown to the customers if they are purchasing the product from the ‘book’ category.

8. Add Shipping Method
The final step is to set up the shipping method. As we are offering the product for free but charging for shipping the product, we need to add a shipping method to our store.
If you already have created the shipping method, you can follow the following tutorial to make a shipping method specific to a product. It will ensure that this method will only be applied to the order form page if the user is purchasing a specific product. In my case, that specific product is a book.
If you haven’t set up the shipping methods, you’ll first need to add the shipping zone and the shipping methods. I have also created a guide for this to help you set up the WooCommerce shipping.
Here’s the guide:
I have just added a flat-rate shipping method. You can add different shipping methods but make sure not to add free shipping as it will ruin the whole purpose of the free plus shipping funnel.

You can also add weight-based shipping to allow customers to pay according to the weight of their order/cart.
9. Create a Landing or Sales Page
You might want to create a custom landing page for the product. The funnels are usually created when you run ads. This way, you can redirect the ad’s audience to the landing page and then the order form page.
Note: You can also redirect the audience to the product page as I am doing in this tutorial but I am adding this step only If you want to create a sales landing page for the product.
I have compiled a guide to help you create a sales landing page for your product. You can simply follow the following guide to create a sales landing page. The design opportunities are unlimited and it entirely depends on your product type and your choice.
The following guide will help you create the sales landing page.
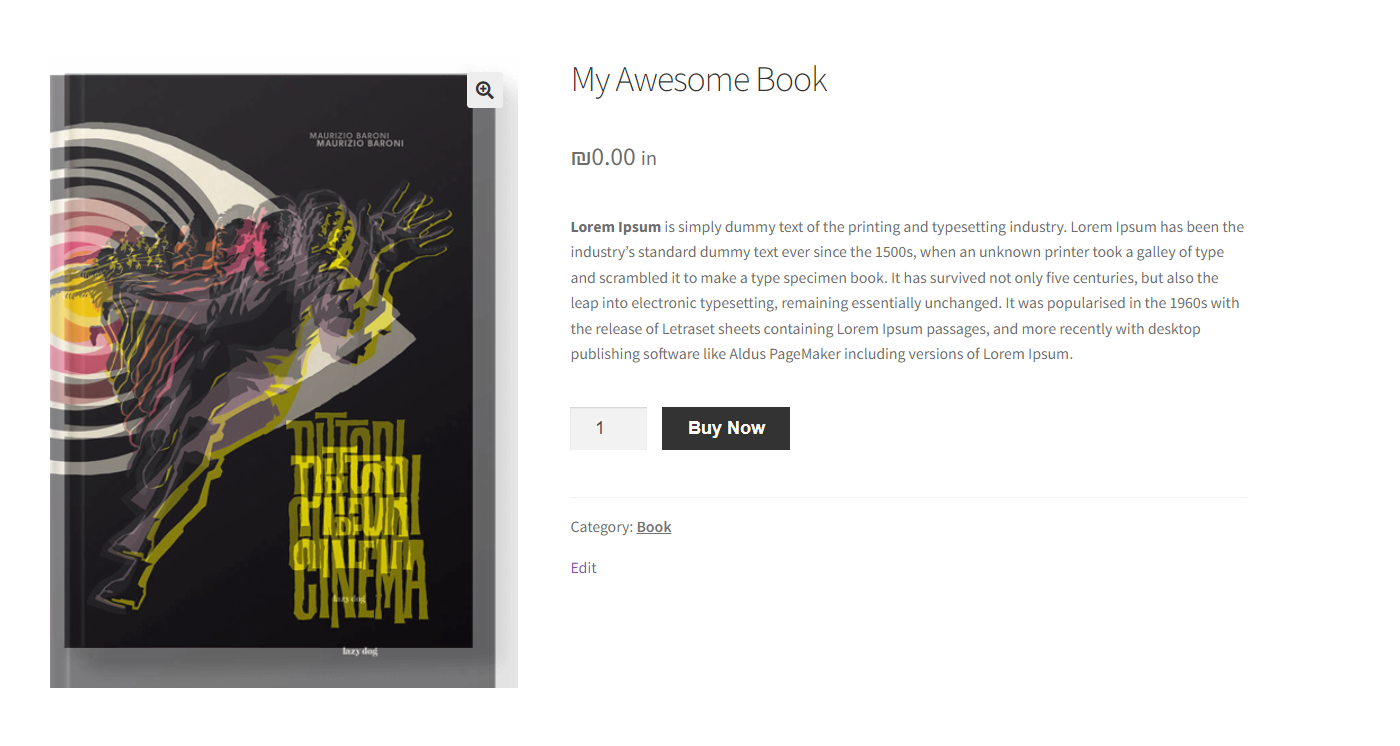
10. Final Results
Once you have made all the necessary changes and created the free plus shipping funnel successfully, now is the time to test the funnel.
To test the funnel, I first visited my product page. I had enabled the direct checkout, so I could see the ‘Buy Now’ button instead of the cart button.
I clicked the button to directly go to the order form page to purchase this product.
Once, I clicked the buy now button, I was redirected to the order form page where I could add the billing and shipping details. I could also see the upselling offer that we created in this tutorial.
Also, the product was free and I only needed to pay for the shipping. This is how you can make excellent free plus shipping funnels.

Conclusion
That’s it for today’s article.
I hope it was helpful to you and you were able to create free plus shipping funnels and increase your revenue and average order value.
The “Free Plus Shipping” idea is a smart way for businesses to get more people interested. By giving something for free, you can get customers excited and looking at other things you offer.
Ready to get started?
Download the AIO Checkout plugin now!


